教程:使用 Azure Functions 和 Python 处理存储的文档
可以使用文档智能作为通过 Azure Functions 生成的自动化数据处理管道的一部分。 本指南将介绍如何使用 Azure Functions 来处理已上传到 Azure Blob 存储容器的文档。 此工作流使用文档智能布局模型从存储的文档中提取表数据,然后将表数据以 .csv 文件形式保存到 Azure 中。 然后,你可以使用 Microsoft Power BI(本指南未介绍)来显示数据。

本教程介绍如何执行下列操作:
- 创建 Azure 存储帐户。
- 创建 Azure Functions 项目。
- 从上传的表单中提取布局数据。
- 将提取的布局数据上传到 Azure 存储。
先决条件
Azure 订阅 - 创建试用版订阅
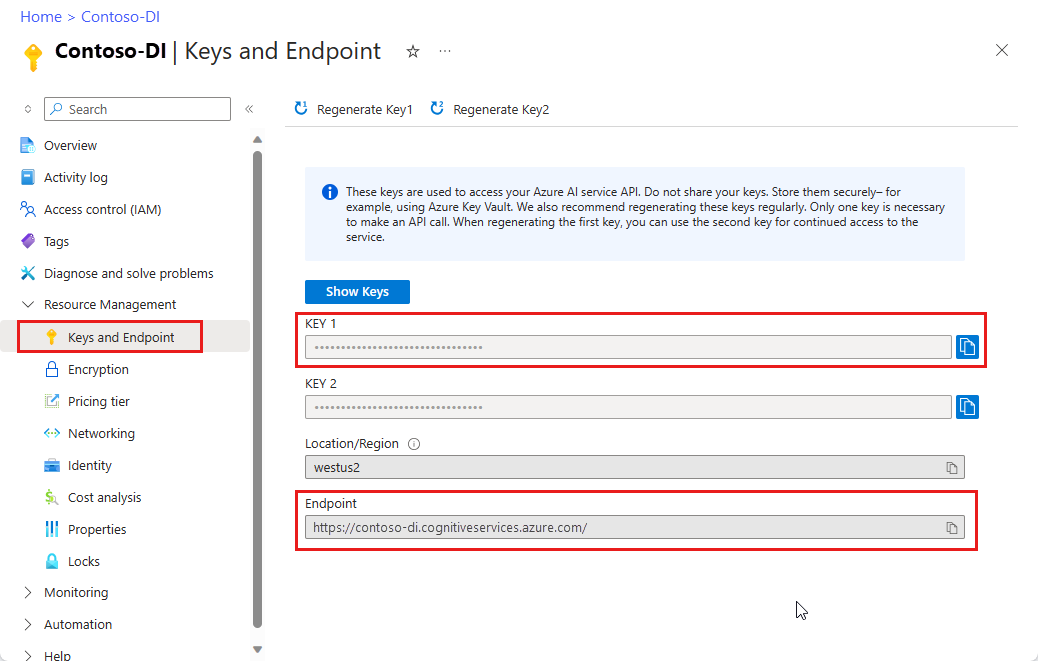
文档智能资源。 拥有 Azure 订阅后,请在 Azure 门户中创建文档智能资源,以获取密钥和终结点。 可以使用免费定价层 (
F0) 试用该服务,然后再升级到付费层进行生产。部署资源后,选择“转到资源”。 需要从创建的资源获取密钥和终结点,以便将应用程序连接到文档智能 API。 稍后在本教程中需将密钥和终结点粘贴到以下代码内:
Python 3.6.x、3.7.x、3.8.x 或 3.9.x(此项目不支持 Python 3.10.x)。
最新版本的 Visual Studio Code (VS Code),其中安装了以下扩展:
Azure Functions 扩展。 安装后,应会在左侧导航窗格中看到 Azure 徽标。
Azure Functions Core Tools 3.x 版(此项目不支持 4.x 版)。
适用于 Visual Studio Code 的 Python 扩展。 有关详细信息,请参阅VS Code 中的 Python 入门
Azure 存储资源管理器已安装。
要分析的本地 PDF 文档。 可以将示例 pdf 文档用于此项目。
创建 Azure 存储帐户
在 Azure 门户中创建常规用途 v2 Azure 存储帐户。 如果不知道如何使用存储容器创建 Azure 存储帐户,请按照以下快速入门操作:
在左侧窗格中选择“资源共享(CORS)”选项卡,并删除现有的 CORS 策略(如果有)。
部署存储帐户后,创建名为 input 和 output 的两个空 Blob 存储容器。
创建 Azure Functions 项目
创建名为 functions-app 的新文件夹以包含项目,然后选择“选择”。
打开 Visual Studio Code,然后打开命令面板 (Ctrl+Shift+P)。 搜索并选择“Python: 选择解释器” → 选择版本为 3.6.x、3.7.x、3.8.x 或 3.9.x 的已安装 Python 解释器。 此选择将你所选的 Python 解释器路径添加到项目。
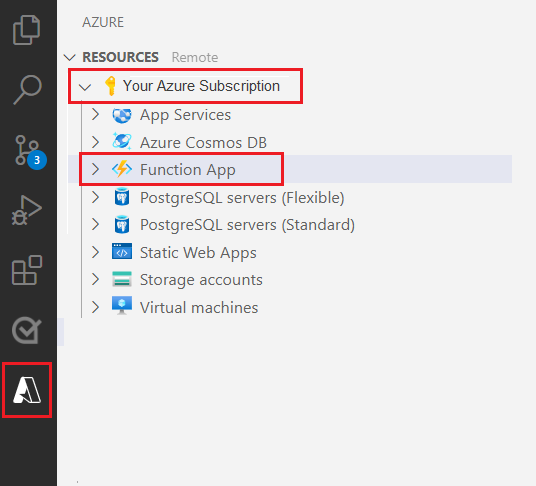
从左侧导航窗格中选择 Azure 徽标。
你将在“资源”视图中看到现有的 Azure 资源。
选择要用于此项目的 Azure 订阅,然后在下面会看到 Azure 函数应用。
选择位于列出的资源下的“工作区(本地)”部分。 选择加号,然后选择“创建函数”按钮。
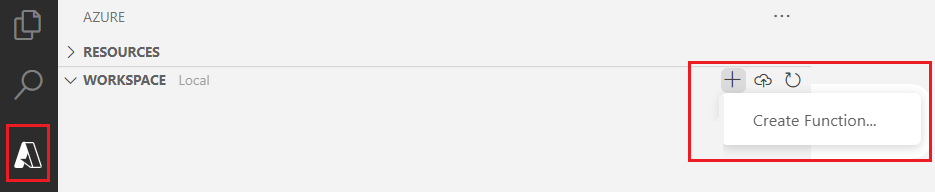
出现提示时,选择“新建项目”并导航到 Function-app 目录。 选择“选择” 。
系统将提示你配置一些设置:
选择语言 → 选择 Python。
选择 Python 解释器来创建虚拟环境 → 选择前面设置为默认值的解释器。
选择模板 → 选择“Azure Blob 存储触发器”,并为触发器指定名称或接受默认名称。 按 Enter 以确认。
选择设置 → 从下拉菜单中选择“➕创建新的本地应用设置”。
选择订阅 → 选择包含你创建的存储帐户的 Azure 订阅 → 选择存储帐户 → 然后选择存储输入容器的名称(在本例中为
input/{name})。 按 Enter 以确认。选择要用于打开项目的方式 → 从下拉菜单中选择“在当前窗口中打开项目”。
完成这些步骤后,VS Code 将使用一个 __init__.py Python 脚本添加新的 Azure 函数项目。 将文件上传到 input 存储容器时将触发此脚本:
import logging

import azure.functions as func


def main(myblob: func.InputStream):
    logging.info(f"Python blob trigger function processed blob \n"
                 f"Name: {myblob.name}\n"
                 f"Blob Size: {myblob.length} bytes")
测试函数
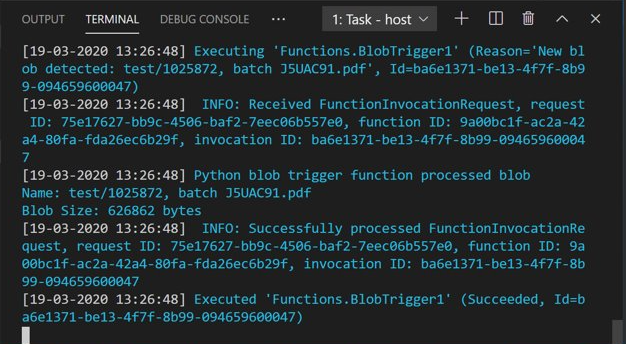
按 F5 运行基本函数。 VS Code 将提示你选择要对接到的存储帐户。
选择创建的存储帐户,然后继续操作。
打开 Azure 存储资源管理器并将示例 PDF 文档上传到 input 容器。 然后查看 VS Code 终端。 该脚本应会记录它已由 PDF 上传操作触发。
在继续操作之前停止脚本。
添加文档处理代码
接下来,将你自己的代码添加到 Python 脚本,以调用文档智能服务,并使用文档智能布局模型分析上传的文档。
在 VS Code 中导航到函数的 requirements.txt 文件。 此文件定义脚本的依赖项。 将以下 Python 包添加到该文件:
cryptography
azure-functions
azure-storage-blob
azure-identity
requests
pandas
numpy
然后打开 __init__.py 脚本。 添加以下
import语句:import logging from azure.storage.blob import BlobServiceClient import azure.functions as func import json import time from requests import get, post import os import requests from collections import OrderedDict import numpy as np import pandas as pd可将生成的
main函数保留原样。 稍后你要将自己的自定义代码添加到此函数中。# This part is automatically generated def main(myblob: func.InputStream): logging.info(f"Python blob trigger function processed blob \n" f"Name: {myblob.name}\n" f"Blob Size: {myblob.length} bytes")以下代码块针对上传的文档调用文档智能分析布局 API。 填写终结点和密钥值。
# This is the call to the Document Intelligence endpoint
    endpoint = r"Your Document Intelligence Endpoint"
    apim_key = "Your Document Intelligence Key"
    post_url = endpoint + "/formrecognizer/v2.1/layout/analyze"
    source = myblob.read()

    headers = {
    # Request headers
    'Content-Type': 'application/pdf',
    'Ocp-Apim-Subscription-Key': apim_key,
        }

    text1=os.path.basename(myblob.name)
重要
完成后,请记住将密钥从代码中删除,并且永远不要公开发布该密钥。 对于生产来说,请使用安全的方式存储和访问凭据,例如 Azure Key Vault。 有关详细信息,请参阅 Azure AI 服务安全性。
接下来,添加代码以查询服务并获取返回的数据。
resp = requests.post(url=post_url, data=source, headers=headers)

if resp.status_code != 202:
    print("POST analyze failed:\n%s" % resp.text)
    quit()
print("POST analyze succeeded:\n%s" % resp.headers)
get_url = resp.headers["operation-location"]

wait_sec = 25

time.sleep(wait_sec)
# The layout API is async therefore the wait statement

resp = requests.get(url=get_url, headers={"Ocp-Apim-Subscription-Key": apim_key})

resp_json = json.loads(resp.text)

status = resp_json["status"]

if status == "succeeded":
    print("POST Layout Analysis succeeded:\n%s")
    results = resp_json
else:
    print("GET Layout results failed:\n%s")
    quit()

results = resp_json
添加以下代码以连接到 Azure 存储的 output 容器。 填写你自己的存储帐户名称和密钥值。 可以在 Azure 门户中你的存储资源的“访问密钥”选项卡上获得该密钥。
# This is the connection to the blob storage, with the Azure Python SDK
    blob_service_client = BlobServiceClient.from_connection_string("DefaultEndpointsProtocol=https;AccountName="Storage Account Name";AccountKey="storage account key";EndpointSuffix=core.chinacloudapi.cn")
    container_client=blob_service_client.get_container_client("output")
以下代码分析返回的文档智能响应,构造一个 .csv 文件,然后将其上传到 output 容器。
重要
你可能需要编辑此代码,使之与你自己的文档结构相符。
    # The code below extracts the json format into tabular data.
    # Please note that you need to adjust the code below to your form structure.
    # It probably won't work out-of-the-box for your specific form.
    pages = results["analyzeResult"]["pageResults"]

    def make_page(p):
        res=[]
        res_table=[]
        y=0
        page = pages[p]
        for tab in page["tables"]:
            for cell in tab["cells"]:
                res.append(cell)
                res_table.append(y)
            y=y+1

        res_table=pd.DataFrame(res_table)
        res=pd.DataFrame(res)
        res["table_num"]=res_table[0]
        h=res.drop(columns=["boundingBox","elements"])
        h.loc[:,"rownum"]=range(0,len(h))
        num_table=max(h["table_num"])
        return h, num_table, p

    h, num_table, p= make_page(0)

    for k in range(num_table+1):
        new_table=h[h.table_num==k]
        new_table.loc[:,"rownum"]=range(0,len(new_table))
        row_table=pages[p]["tables"][k]["rows"]
        col_table=pages[p]["tables"][k]["columns"]
        b=np.zeros((row_table,col_table))
        b=pd.DataFrame(b)
        s=0
        for i,j in zip(new_table["rowIndex"],new_table["columnIndex"]):
            b.loc[i,j]=new_table.loc[new_table.loc[s,"rownum"],"text"]
            s=s+1
最后,最后一个代码块将提取的表和文本数据上传到 Blob 存储元素。
    # Here is the upload to the blob storage
    tab1_csv=b.to_csv(header=False,index=False,mode='w')
    name1=(os.path.splitext(text1)[0]) +'.csv'
    container_client.upload_blob(name=name1,data=tab1_csv)
运行函数
再次按 F5 运行函数。
使用 Azure 存储资源管理器将一个示例 PDF 表单上传到 input 存储容器。 此操作应会触发脚本的运行,然后 output 容器中应会显示生成的 .csv 文件(以表的形式显示)。
可将此容器连接到 Power BI,以便为其包含的数据创建丰富的可视化效果。
后续步骤
在本教程中,你已学习如何使用一个以 Python 编写的 Azure 函数来自动处理上传的 PDF 文档,并以一种更易于阅读数据的格式输出其内容。 接下来,请学习如何使用 Power BI 显示数据。