如何:使用 Azure Static Web Apps 部署 Fluid 应用程序
本文演示如何使用 Azure Static Web Apps 部署 Fluid 应用。 FluidHelloWorld 存储库包含名为 DiceRoller 的 Fluid 应用程序,该应用程序允许所有连接的客户端摇一次骰子并查看结果。 在本操作指南中,将使用 Visual Studio Code 扩展将 DiceRoller 应用程序部署到 Azure Static Web Apps。
如果没有 Azure 订阅,请创建一个试用帐户。
先决条件
为存储库创建分支和克隆
导航到 https://github.com/microsoft/FluidHelloWorld 并单击“创建分支”按钮以创建你自己拥有的 FluidHelloWorld 存储库分支。
然后使用以下命令将分支克隆到本地计算机。
git clone -b main-azure https://github.com/<YOUR_GITHUB_ACCOUNT_NAME>/FluidHelloWorld.git
确保将 <YOUR_GITHUB_ACCOUNT_NAME> 替换为你的 GitHub 用户名。
接下来,打开 Visual Studio Code 并转到“文件”>“打开文件夹”以在编辑器中打开已克隆的存储库。
连接到 Azure Fluid Relay
可以通过提供在创建 Azure 资源时为你唯一生成的租户 ID 和密钥,连接到 Azure Fluid Relay。 可以生成自己的令牌提供程序实现,也可以使用由 Fluid Framework 提供 AzureFunctionTokenProvider 的两个令牌提供程序实现。
若要详细了解如何使用 InsecureTokenProvider 进行本地开发,请参阅连接到服务和应用中的身份验证和授权。
使用 AzureFunctionTokenProvider
AzureFunctionTokenProvider 是一个令牌提供程序,它不会在客户端代码中公开密钥,并且可用于生产方案。 此令牌提供程序实现可用于从 HTTPS 终结点提取令牌,该终结点负责使用租户密钥对访问令牌进行签名。 这样就可以安全地生成令牌,并传递回客户端应用。
import { AzureClient, AzureFunctionTokenProvider } from "@fluidframework/azure-client";

const config = {
    tenantId: "myTenantId",
    tokenProvider: new AzureFunctionTokenProvider("https://myAzureAppUrl"+"/api/GetAzureToken", { userId: "test-user",userName: "Test User" }),
    endpoint: "https://myServiceEndpointUrl",
    type: "remote",
};

const clientProps = {
    connection: config,
};

const client = new AzureClient(clientProps);
若要使用此令牌提供程序,需要部署一个 HTTPS 终结点,对令牌进行签名,并将 URL 传递到 AzureFunctionTokenProvider。
使用 Azure Static Web Apps 部署 Azure Function
通过 Azure Static Web Apps,可以开发全堆栈网站,而无需处理整个 Web 托管环境的服务器端配置。 可以将 Azure Functions 与静态网站一起部署。 使用此功能,可以部署 HTTP 触发的 Azure Function,用于对令牌进行签名。
注意
可以使用实现 Azure Function 对令牌进行签名中的示例 Azure Function 代码,以实现函数。
部署 Azure Function 后,必须更新传递给 AzureFunctionTokenProvider 的 URL。
import { AzureClient } from "@fluidframework/azure-client";

const config = {
    tenantId: "myTenantId",
    tokenProvider: new AzureFunctionTokenProvider("https://myStaticWebAppUrl/api/GetAzureToken", { userId: "test-user",userName: "Test User" }),
    endpoint: "https://myServiceEndpointUrl",
    type: "remote",
};

const clientProps = {
    connection: config,
};

const client = new AzureClient(config);
从根目录运行 npm run build 命令以重新生成应用。 这会生成 dist 文件夹,该文件夹包含应部署到静态 Web 应用的应用程序代码。
登录 Azure
如果你已使用 Azure 服务扩展,则应该已经登录,可以跳过此步骤。
在 Visual Studio Code 中安装 Azure 扩展后,需要登录到 Azure 帐户。
在 Visual Studio Code 中,选择 Azure 资源管理器图标,然后选择“登录到 Azure”,并按照提示进行操作。
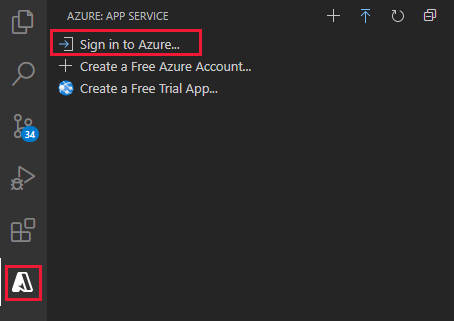
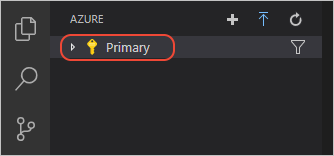
登录后,验证 Azure 帐户的电子邮件地址是否显示在“状态栏”中,以及订阅是否显示在 Azure 资源管理器中:
创建静态 Web 应用
在 Visual Studio Code 中,选择活动栏中的 Azure 徽标以打开 Azure 扩展窗口。

注意
必须在 Visual Studio Code 中登录到 Azure 和 GitHub,才能继续操作。 如果你还没有进行身份验证,在创建过程中,扩展将提示你登录到这两个服务。
选择 F1,打开 Visual Studio Code 命令面板。
在命令框中输入“创建静态 Web 应用”。
选择“Azure Static Web Apps: 创建静态 Web 应用...”,然后选择 Enter。
输入与框架预设选项匹配的设置值。
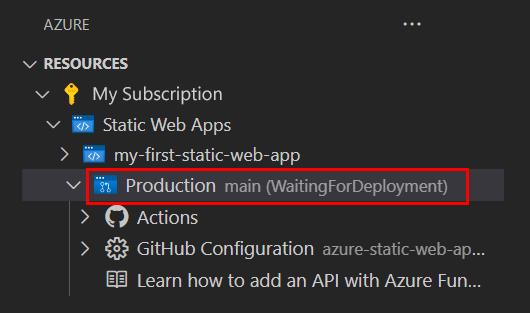
创建应用后,将在 Visual Studio Code 中显示确认通知。
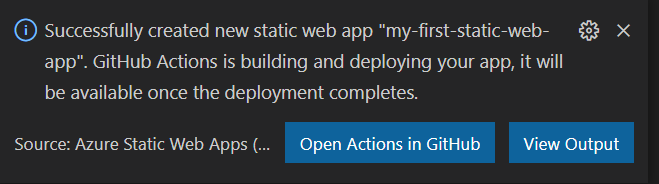
在部署过程中,Visual Studio Code 扩展会向你报告生成状态。
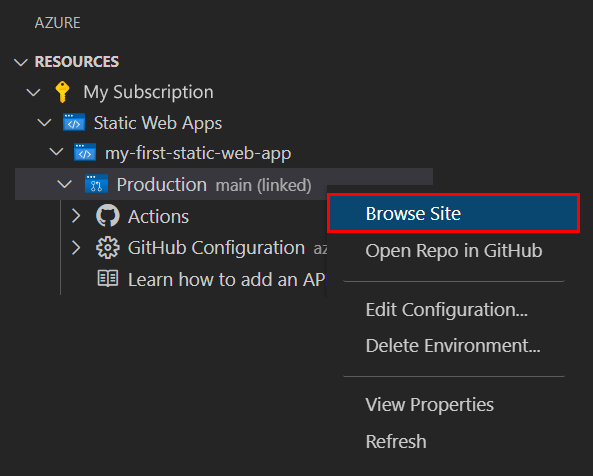
部署完成后,可以直接导航到网页。
若要在浏览器中查看网站,请在 Static Web Apps 扩展中右键单击该项目,然后选择“浏览网站”。
应用程序代码、Azure Function 和生成输出的位置是位于
/.github/workflows目录中的azure-static-web-apps-xxx-xxx-xxx.yml工作流文件的一部分。 创建静态 Web 应用时,会自动创建此文件。 它定义了一个 GitHub Actions,用于生成和部署静态 Web 应用。
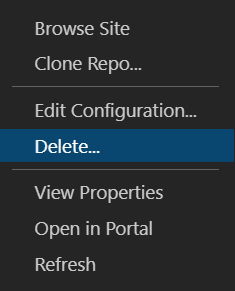
清理资源
如果不打算继续使用此应用程序,可通过该扩展删除 Azure Static Web Apps 实例。
在 Visual Studio Code 资源浏览器窗口中,返回到“Static Web Apps”部分,右键单击“my-first-static-web-app”,然后选择“删除”。