Note
Access to this page requires authorization. You can try signing in or changing directories.
Access to this page requires authorization. You can try changing directories.
This tutorial describes how to configure an Azure Database for MySQL Flexible Server instance to use Private Link for secure connectivity.
Sign in to Azure
Sign in to the Azure portal.
Create the virtual network
In this section, you create a Virtual Network and the subnet to host the VM used to access your Private Link resource.
On the upper-left side of the screen, select Create a resource > Networking > Virtual network.
In Create virtual network, then select this information:
Setting Value Name Enter MyVirtualNetwork. Address space Enter 10.1.0.0/16. Subscription Select your subscription. Resource group Select Create new, enter myResourceGroup, then select OK. Location Select China North 3. Subnet - Name Enter mySubnet. Subnet - Address range Enter 10.1.0.0/24. Leave the rest as default and select Create.
Create a Virtual Machine
On the upper-left side of the screen in the Azure portal, select Create a resource > Compute > Virtual Machine.
In Create a virtual machine - Basics, then select this information:
Setting Value PROJECT DETAILS Subscription Select your subscription. Resource group Select the created resource group myResourceGroup.INSTANCE DETAILS Virtual machine name Enter myVm. Region Select China North 3. Availability options Leave the default No infrastructure redundancy required. Image Select Windows Server 2019 Datacenter. Size Leave the default Standard DS1 v2. ADMINISTRATOR ACCOUNT Username Enter a username of your choosing. Password Enter a password of your choosing. The password must be at least 12 characters long and meet the defined complexity requirements. Confirm Password Reenter password. INBOUND PORT RULES Public inbound ports Leave the default None. SAVE MONEY Already have a Windows license? Leave the default No. Select Next: Disks.
In Create a virtual machine - Disks, leave the defaults and select Next: Networking.
In Create a virtual machine - Networking, select this information:
Setting Value Virtual network Leave the default MyVirtualNetwork. Address space Leave the default 10.1.0.0/24. Subnet Leave the default mySubnet (10.1.0.0/24). Public IP Leave the default (new) myVm-ip. Public inbound ports Select Allow selected ports. Select inbound ports Select HTTP and RDP. Select Review + create. You're taken to the Review + create page, where Azure validates your configuration.
When you see the Validation passed message, select Create.
Create an Azure Database for MySQL Flexible Server instance with a Private endpoint
Create an Quickstart: Create an instance of Azure Database for MySQL with the Azure portal with Public access (allowed IP addresses) and Private endpoint as the connectivity method.
Select Add Private endpoint to create private endpoint:
Setting Value Project details Subscription Select your subscription. Resource group Select myResourceGroup. You created this in the previous section. Instance Details Name Enter myPrivateEndpoint. If this name is taken, create a unique name. Location Select China North 3. Virtual network Select MyVirtualNetwork. Subnet Select mySubnet. PRIVATE DNS INTEGRATION Integrate with private DNS zone Select Yes. Private DNS Zone Select (New)privatelink.mysql.database.chinacloudapi.cn Select OK to save the Private endpoint configuration.
After entering the remaining information in the other tabs, select Review + create to deploy the Azure Database for MySQL Flexible Server instance.
Note
In some cases, the Azure Database for MySQL Flexible Server instance and the virtual network subnet are in different subscriptions. In these cases, you must ensure the following configurations:
- Make sure that both subscriptions have the Microsoft.DBforMySQL/flexibleServer resource provider registered. For more information, see resource-manager-registration.
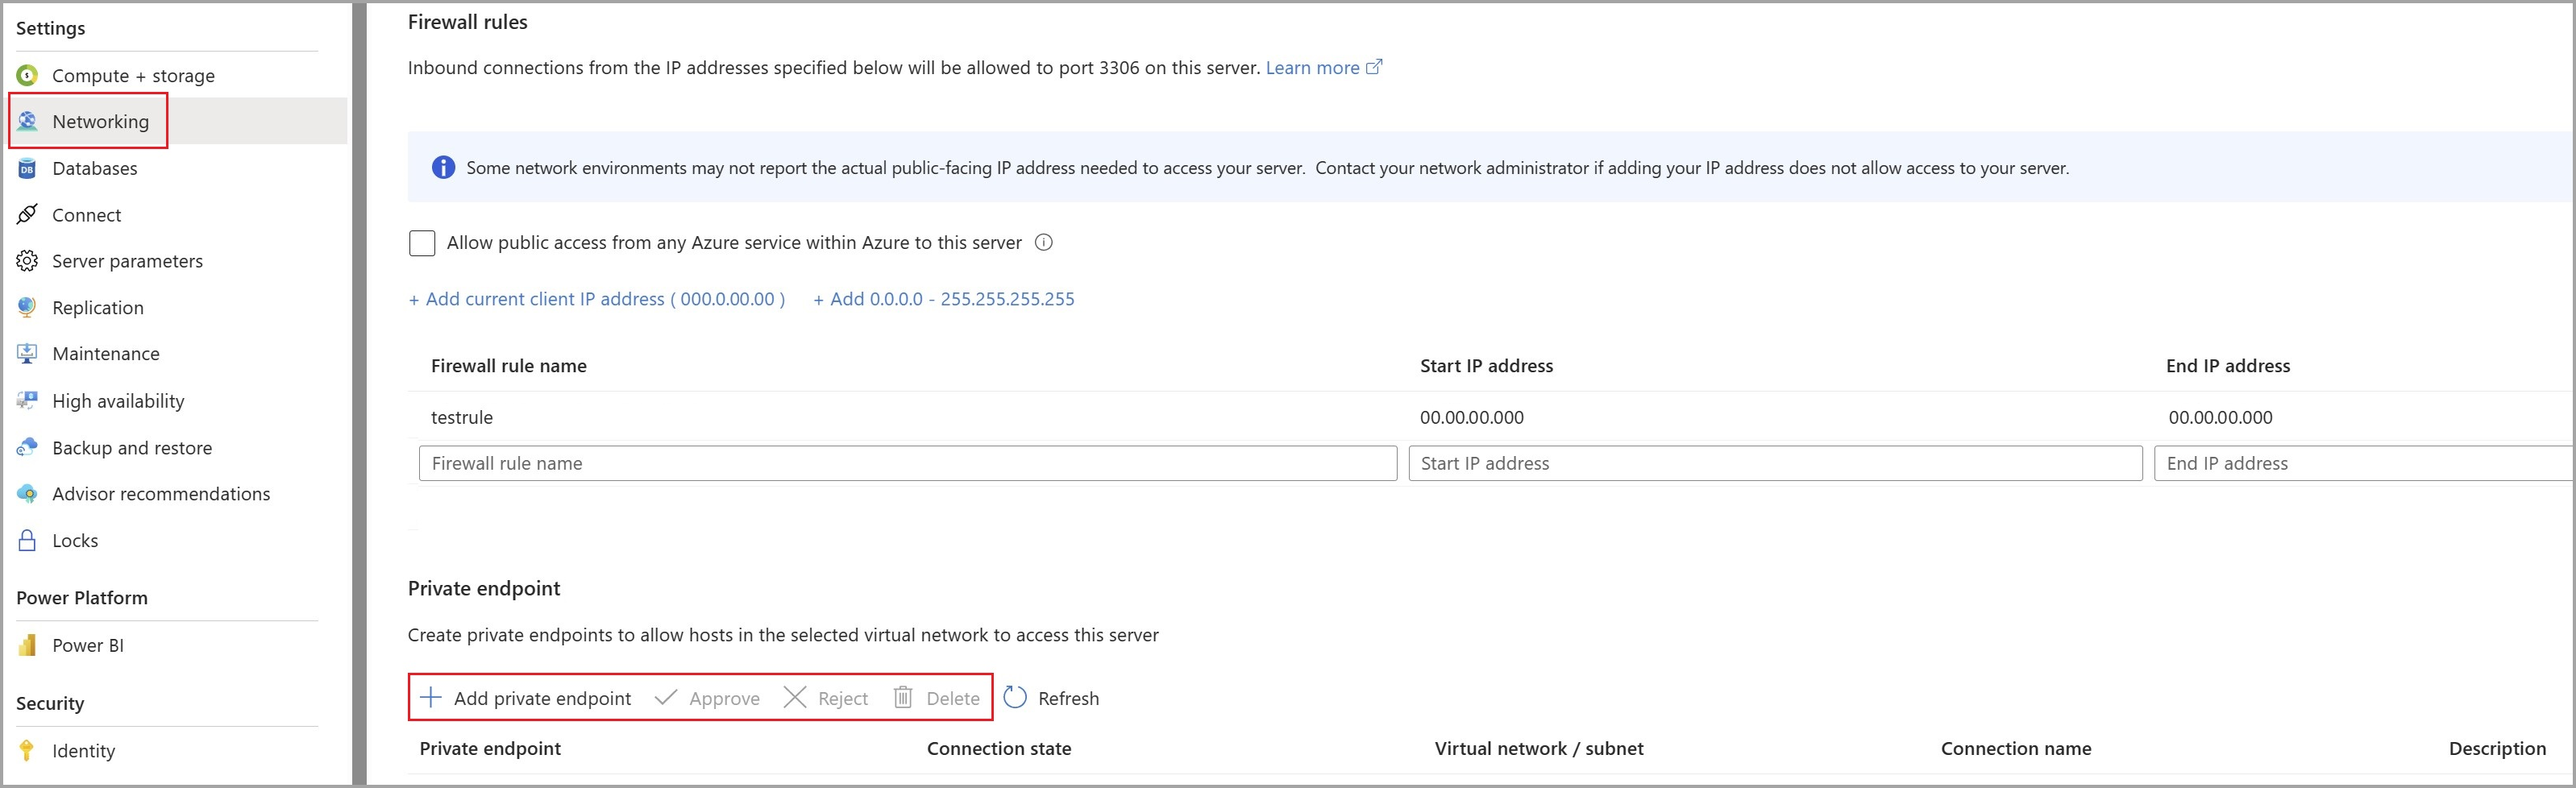
Manage private endpoints on Azure Database for MySQL Flexible Server via the Networking tab
Navigate to your Azure Database for MySQL Flexible Server resource in the Azure portal.
Go to the Networking section under Settings.
In the Private endpoint section, you can manage your private endpoints (Add, Approve, Reject, or Delete).

Connect to a VM using Remote Desktop (RDP)
Connect to the created VM from the internet:
In the portal's search bar, enter myVm.
Select the Connect button. After selecting the Connect button, Connect to virtual machine opens.
Select Download RDP File. Azure creates a Remote Desktop Protocol (.rdp) file and downloads it to your computer.
Open the downloaded.rdp file.
If prompted, select Connect.
Enter the username and password you specified when creating the VM.
Note
You might need to select More choices > Use a different account to specify the credentials you entered when you created the VM.
Select OK.
You might receive a certificate warning during the sign-in process. Select Yes or Continue if you receive a certificate warning.
Once the VM desktop appears, minimize it to go back to your local desktop.
Access the Azure Database for MySQL Flexible Server instance privately from the VM
In the Remote Desktop of myVM, open PowerShell.
Enter
nslookup myServer.privatelink.mysql.database.chinacloudapi.cn.Server: UnKnown Address: 168.63.129.16 Non-authoritative answer: Name: myServer.privatelink.mysql.database.chinacloudapi.cn Address: 10.x.x.xNote
Regardless of the firewall settings or public access being disabled, the ping and telnet tests verify network connectivity.
Test the private link connection for the Azure Database for MySQL Flexible Server instance using any available client. The following example uses MySQL Workbench to do the operation.
In New connection, then select this information:
Select Connect.
Browse databases from the left menu.
(Optionally) Create or query information from the Azure Database for MySQL Flexible Server instance.
Close the remote desktop connection to myVm.
Clean up resources
When you're done using the private endpoint, Azure Database for MySQL Flexible Server instance, and the VM, delete the resource group and all of the resources it contains:
- Enter myResourceGroup in the Search box at the top of the portal and select myResourceGroup from the search results.
- Select Delete resource group.
- Enter myResourceGroup for TYPE THE RESOURCE GROUP NAME and select Delete.
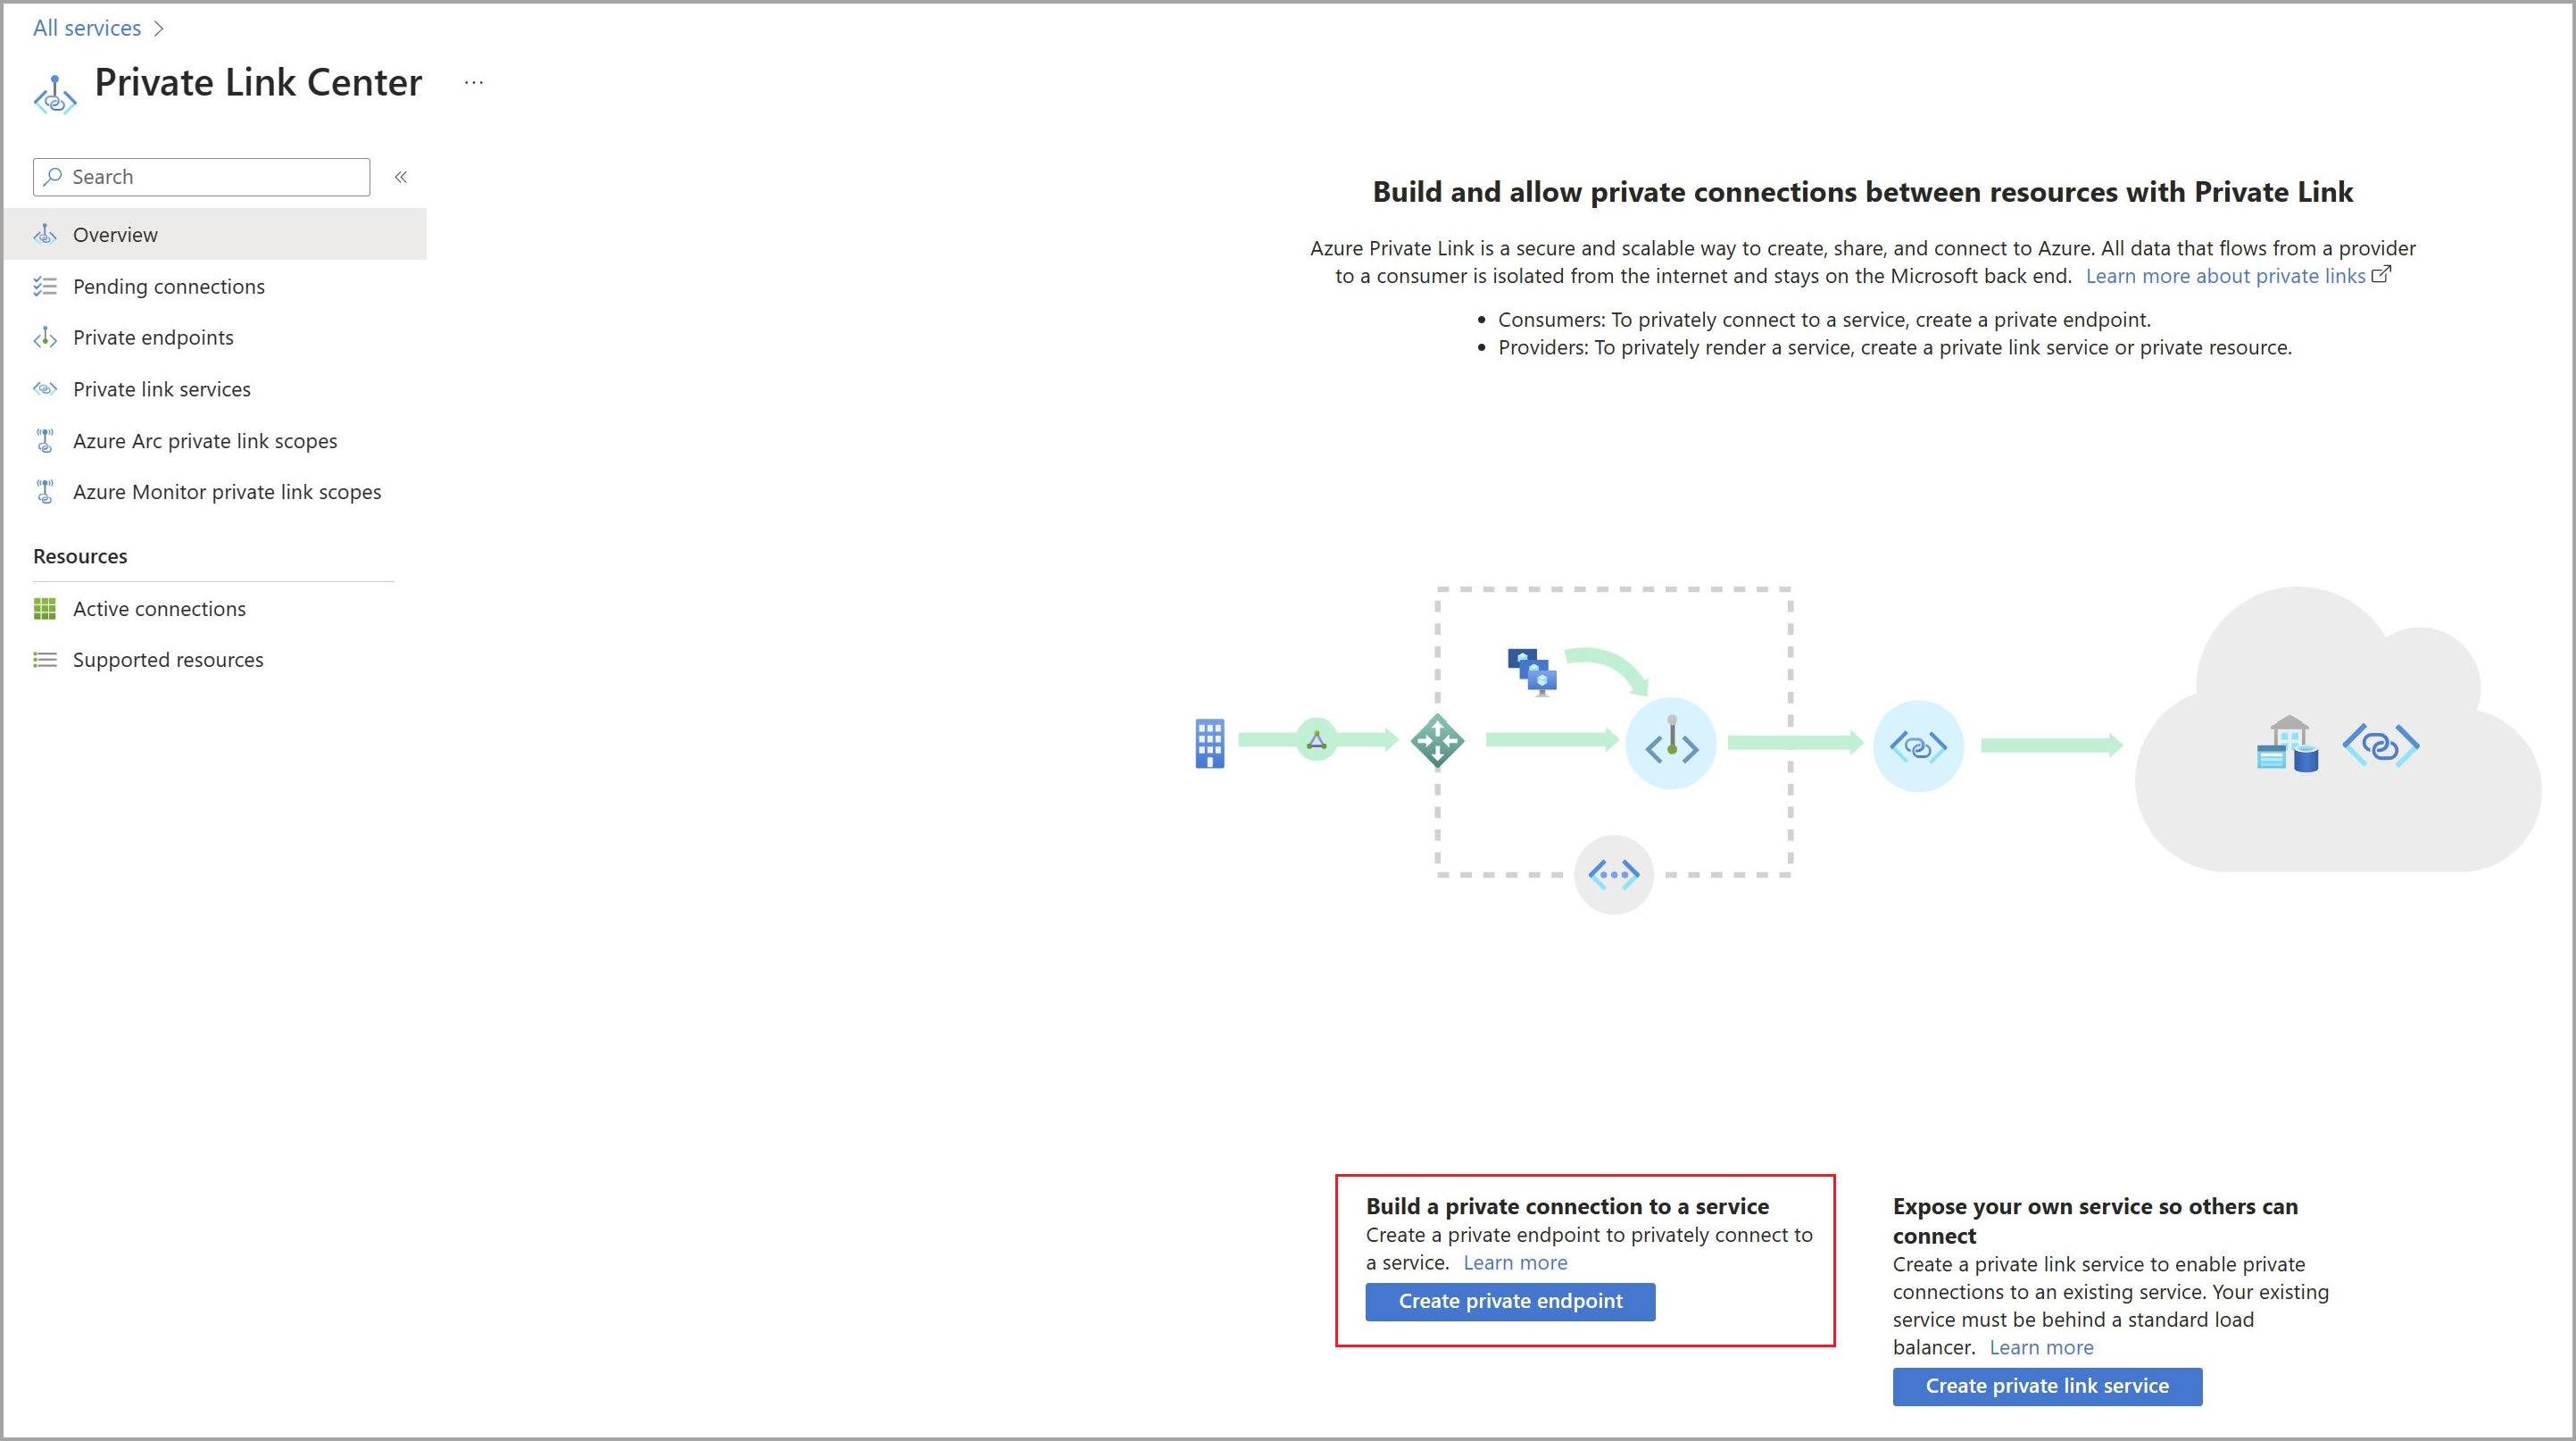
Create a private endpoint via Private Link Center
In this section, you learn how to add a private endpoint to the Azure Database for MySQL Flexible Server instance.
In the Azure portal, select Create a resource > Networking > Private Link.
In Private Link Center - Overview, select the option to Create private endpoint.
In Create a private endpoint - Basics, then select the Project details information:
Select Next: Resource, then select this information:
Select Next: Virtual Network, then select the Networking information:
Select Next: DNS, then select the PRIVATE DNS INTEGRATION information:
Select Review + create. You're taken to the Review + create page, where Azure validates your configuration.
When you see the Validation passed message, select Create.

Note
The FQDN in the customer's DNS setting doesn't resolve the private IP configured. You must set up a DNS zone for the configured FQDN.