Note
Access to this page requires authorization. You can try signing in or changing directories.
Access to this page requires authorization. You can try changing directories.
This guide shows you how to call the v3.2 GA Read API to extract text from images. You'll learn the different ways you can configure the behavior of this API to meet your needs.
The following steps assume that you've already created a Computer Vision resource and obtained a key and endpoint URL. If you haven't, see the quickstart to get started.
Determine how to process the data (optional)
Specify the OCR model
By default, the service uses the latest generally available (GA) model to extract text. Starting with Read v3.2, a model-version parameter allows choosing between the GA and preview models for a given API version. The model you specify is used to extract text with the Read operation.
When using the Read operation, use the following values for the optional model-version parameter.
| Value | Model used |
|---|---|
| Not provided | Latest GA model |
| Latest | Latest GA model |
| 2022-04-30 | Latest GA model. 164 languages for print text and 9 languages for handwritten text along with several enhancements on quality and performance |
| 2022-01-30 | Adds print text support for Hindi, Arabic, and related languages. For handwritten text, adds support for Japanese and Korean. |
| 2021-09-30 | Adds print text support for Russian and other Cyrillic languages. For handwritten text, adds support for Chinese Simplified, French, German, Italian, Portuguese, and Spanish. |
| 2021-04-12 | 2021 GA model |
Input language
By default, the service extracts all text from your images or documents including mixed languages. The Read operation has an optional request parameter for language. Only provide a language code if you want to force the document to be processed as that specific language. Otherwise, the service might return incomplete and incorrect text.
Natural reading order output (Latin languages only)
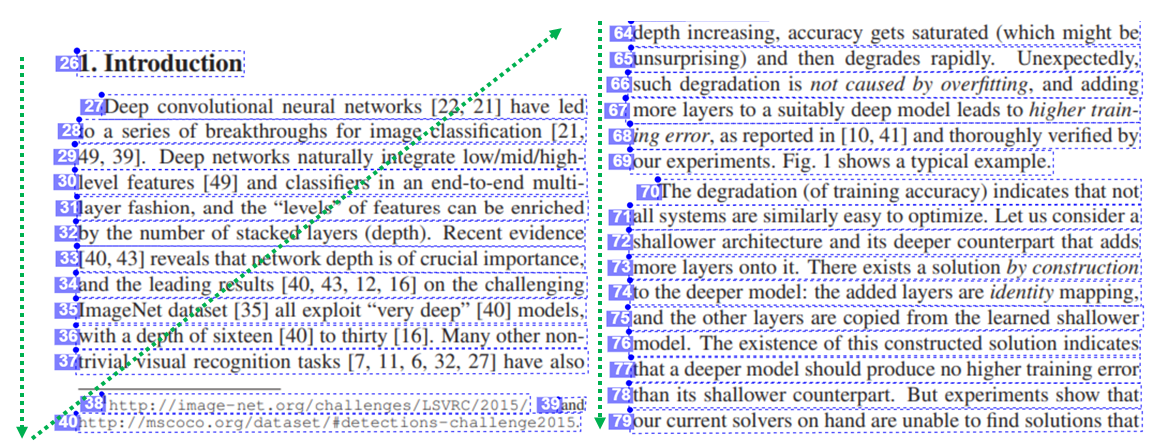
By default, the service outputs the text lines in left-to-right order. Optionally, with the readingOrder request parameter, use natural for a more human-friendly reading order output as shown in the following example. This feature is only supported for Latin languages.

Select pages or page ranges for text extraction
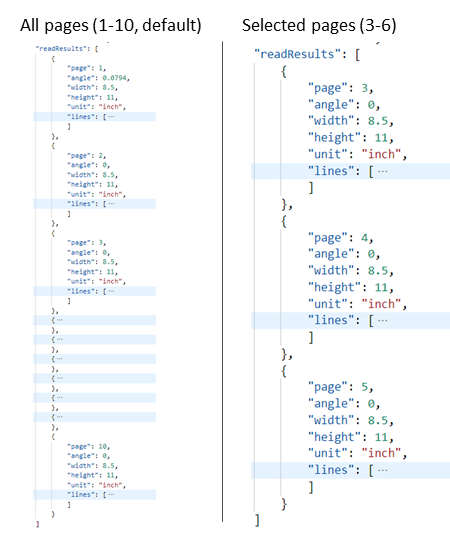
By default, the service extracts text from all pages in the documents. Optionally, use the pages request parameter to specify page numbers or page ranges to extract text from only those pages. The following example shows a document with 10 pages, with text extracted for both cases: All pages (1-10) and Selected pages (3-6).

Submit data to the service
You submit either a local image or a remote image to the Read API. For local, you put the binary image data in the HTTP request body. For remote, you specify the image's URL by formatting the request body like the following example.
{"url":"http://example.com/images/test.jpg"}
The Read API's Read call takes an image or PDF document as the input and extracts text asynchronously.
https://{endpoint}/vision/v3.2/read/analyze[?language][&pages][&readingOrder]
The call returns with a response header field called Operation-Location. The Operation-Location value is a URL that contains the operation ID to be used in the next step.
| Response header | Example value |
|---|---|
| Operation-Location | https://cognitiveservice/vision/v3.2/read/analyzeResults/d3d3d3d3-eeee-ffff-aaaa-b4b4b4b4b4b4 |
Note
Billing
The Azure AI Vision pricing page includes the pricing tier for Read operations. Each analyzed image or page is one transaction. If you call the operation with a PDF or TIFF document containing 100 pages, the Read operation will count it as 100 transactions and you will be billed for 100 transactions. If you made 50 calls to the operation and each call submitted a document with 100 pages, you will be billed for 50 X 100 = 5000 transactions.
Get results from the service
The second step is to call the Get Read Result operation. This operation takes as input the operation ID that was created by the Read operation.
https://{endpoint}/vision/v3.2/read/analyzeResults/{operationId}
It returns a JSON response that contains a status field with the following possible values.
| Value | Meaning |
|---|---|
notStarted |
The operation has not started. |
running |
The operation is being processed. |
failed |
The operation failed. |
succeeded |
The operation succeeded. |
You call this operation iteratively until it returns with the succeeded value. Use an interval of 1-to-2 seconds to avoid exceeding the requests per second (RPS) rate.
Note
The free tier limits the request rate to 20 calls per minute. The paid tier allows 30 RPS that can be increased upon request. Note your Azure resource identifier and region, and open an Azure support ticket or contact your account team to request a higher RPS rate.
When the status field has the succeeded value, the JSON response contains the extracted text content from your image or document. The JSON response maintains the original line groupings of recognized words. It includes the extracted text lines and their bounding box coordinates. Each text line includes all extracted words with their coordinates and confidence scores.
Note
The data submitted to the Read operation are temporarily encrypted and stored at rest for a short duration, and then deleted. This lets your applications retrieve the extracted text as part of the service response.
Sample JSON output
See the following example of a successful JSON response:
{
  "status": "succeeded",
  "createdDateTime": "2021-02-04T06:32:08.2752706+00:00",
  "lastUpdatedDateTime": "2021-02-04T06:32:08.7706172+00:00",
  "analyzeResult": {
    "version": "3.2",
    "readResults": [
      {
        "page": 1,
        "angle": 2.1243,
        "width": 502,
        "height": 252,
        "unit": "pixel",
        "lines": [
          {
            "boundingBox": [
              58,
              42,
              314,
              59,
              311,
              123,
              56,
              121
            ],
            "text": "Tabs vs",
            "appearance": {
              "style": {
                "name": "handwriting",
                "confidence": 0.96
              }
            },
            "words": [
              {
                "boundingBox": [
                  68,
                  44,
                  225,
                  59,
                  224,
                  122,
                  66,
                  123
                ],
                "text": "Tabs",
                "confidence": 0.933
              },
              {
                "boundingBox": [
                  241,
                  61,
                  314,
                  72,
                  314,
                  123,
                  239,
                  122
                ],
                "text": "vs",
                "confidence": 0.977
              }
            ]
          }
        ]
      }
    ]
  }
}
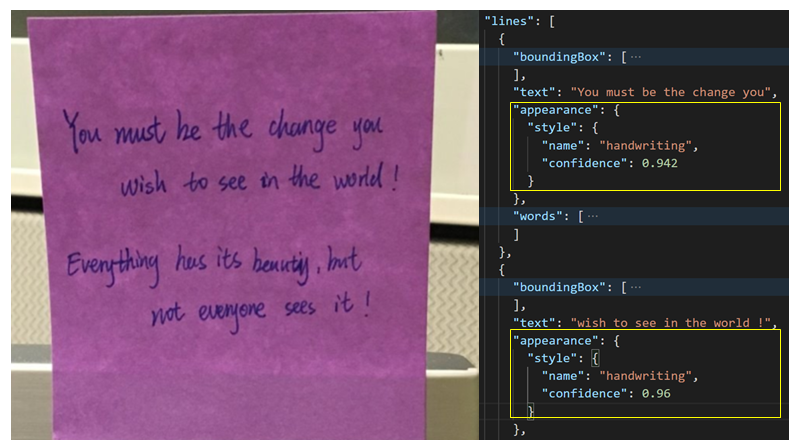
Handwritten classification for text lines (Latin languages only)
The response includes a classification of whether each line of text is in handwritten style or not, along with a confidence score. This feature is only available for Latin languages. The following example shows the handwritten classification for the text in the image.
