Note
Access to this page requires authorization. You can try signing in or changing directories.
Access to this page requires authorization. You can try changing directories.
Important
Language Understanding Intelligent Service (LUIS) will be fully retired on March 31, 2026. LUIS resource creation isn't available. Beginning on October 31, 2025, the LUIS portal will no longer be available. We recommend migrating your LUIS applications to conversational language understanding to benefit from continued product support and multilingual capabilities.
In this quickstart, create a LUIS app using the prebuilt home automation domain for turning lights and appliances on and off. This prebuilt domain provides intents, entities, and example utterances for you. Next, try customizing your app by adding more intents and entities. When you're finished, you'll have a LUIS endpoint running in the cloud.
Sign in to LUIS portal
A new user to LUIS needs to follow this procedure:
- Sign in to the LUIS portal, select your country/region and agree to the terms of use. If you see My Apps instead, a LUIS resource already exists and you should skip ahead to create an app. If not, start by using an Azure resource, this allows you to link your LUIS account with a new or existing Azure Authoring resource.
In the Choose an authoring window that appears, find your Azure subscription, and LUIS authoring resource. If you don't have a resource, you can create a new one.
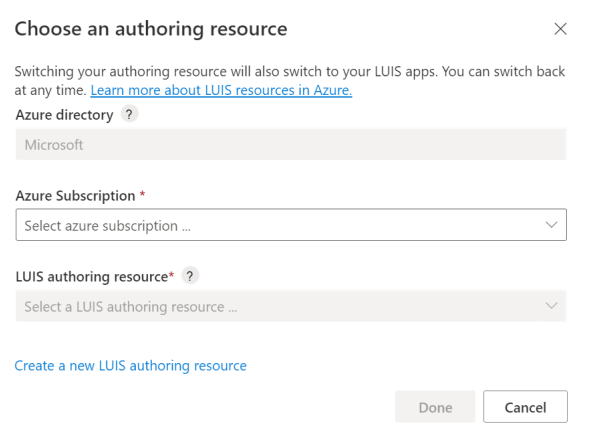
When you create a new authoring resource, provide the following information:
- Tenant name - the tenant your Azure subscription is associated with.
- Azure subscription name - the subscription that will be billed for the resource.
- Azure resource group name - a custom resource group name you choose or create. Resource groups allow you to group Azure resources for access and management.
- Azure resource name - a custom name you choose, used as part of the URL for your authoring and prediction endpoint queries.
- Pricing tier - the pricing tier determines the maximum transaction per second and month.
Select subscription and authoring resource
When you select a specific subscription and authoring resource, you will see a list of apps associated with it.
Create a new app
You can create and manage your applications on My Apps.
Create an application
To create an application, click + New app.
In the window that appears, enter the following information:
| Name | Description |
|---|---|
| Name | A name for your app. For example, "home automation". |
| Culture | The language that your app understands and speaks. |
| Description | A description for your app. |
| Prediction resource | The prediction resource that will receive queries. |
Select Done.
Note
The culture cannot be changed once the application is created.
Add prebuilt domain
LUIS offers a set of prebuilt domains that can help you get started with your application. A prebuilt domain app is already populated with intents, entities and utterances.
In the left navigation, select Prebuilt domains.
Search for HomeAutomation.
Select Add domain on the HomeAutomation card.
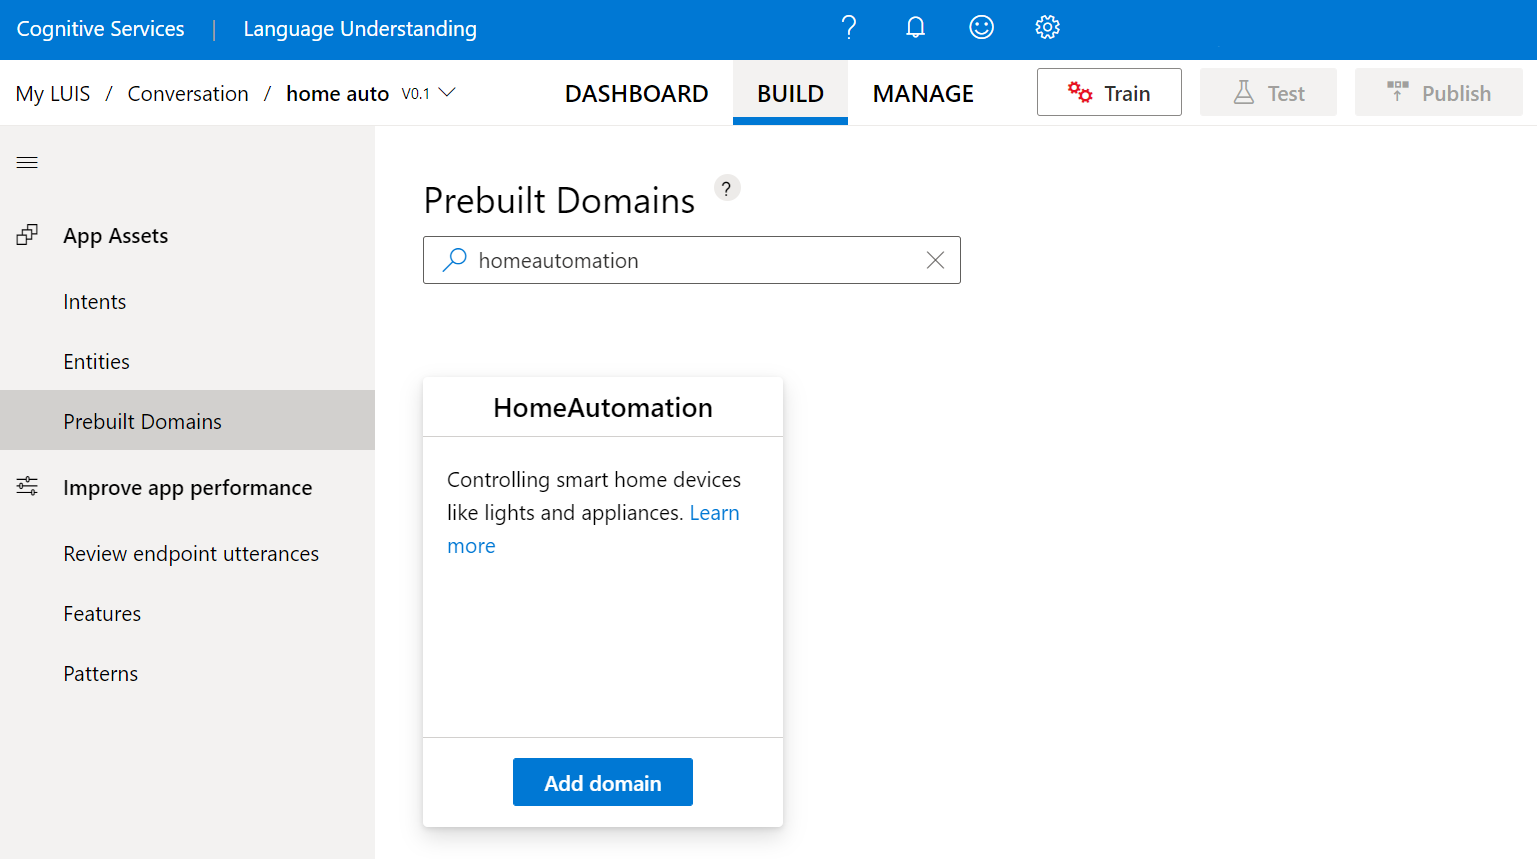
When the domain is successfully added, the prebuilt domain box displays a Remove domain button.
Check out intents and entities
Select Intents in the left pane to see the HomeAutomation domain intents. It has example utterances, such as
HomeAutomation.QueryStateandHomeAutomation.SetDevice.Note
None is an intent provided by all LUIS apps. You use it to handle utterances that don't correspond to functionality your app provides.
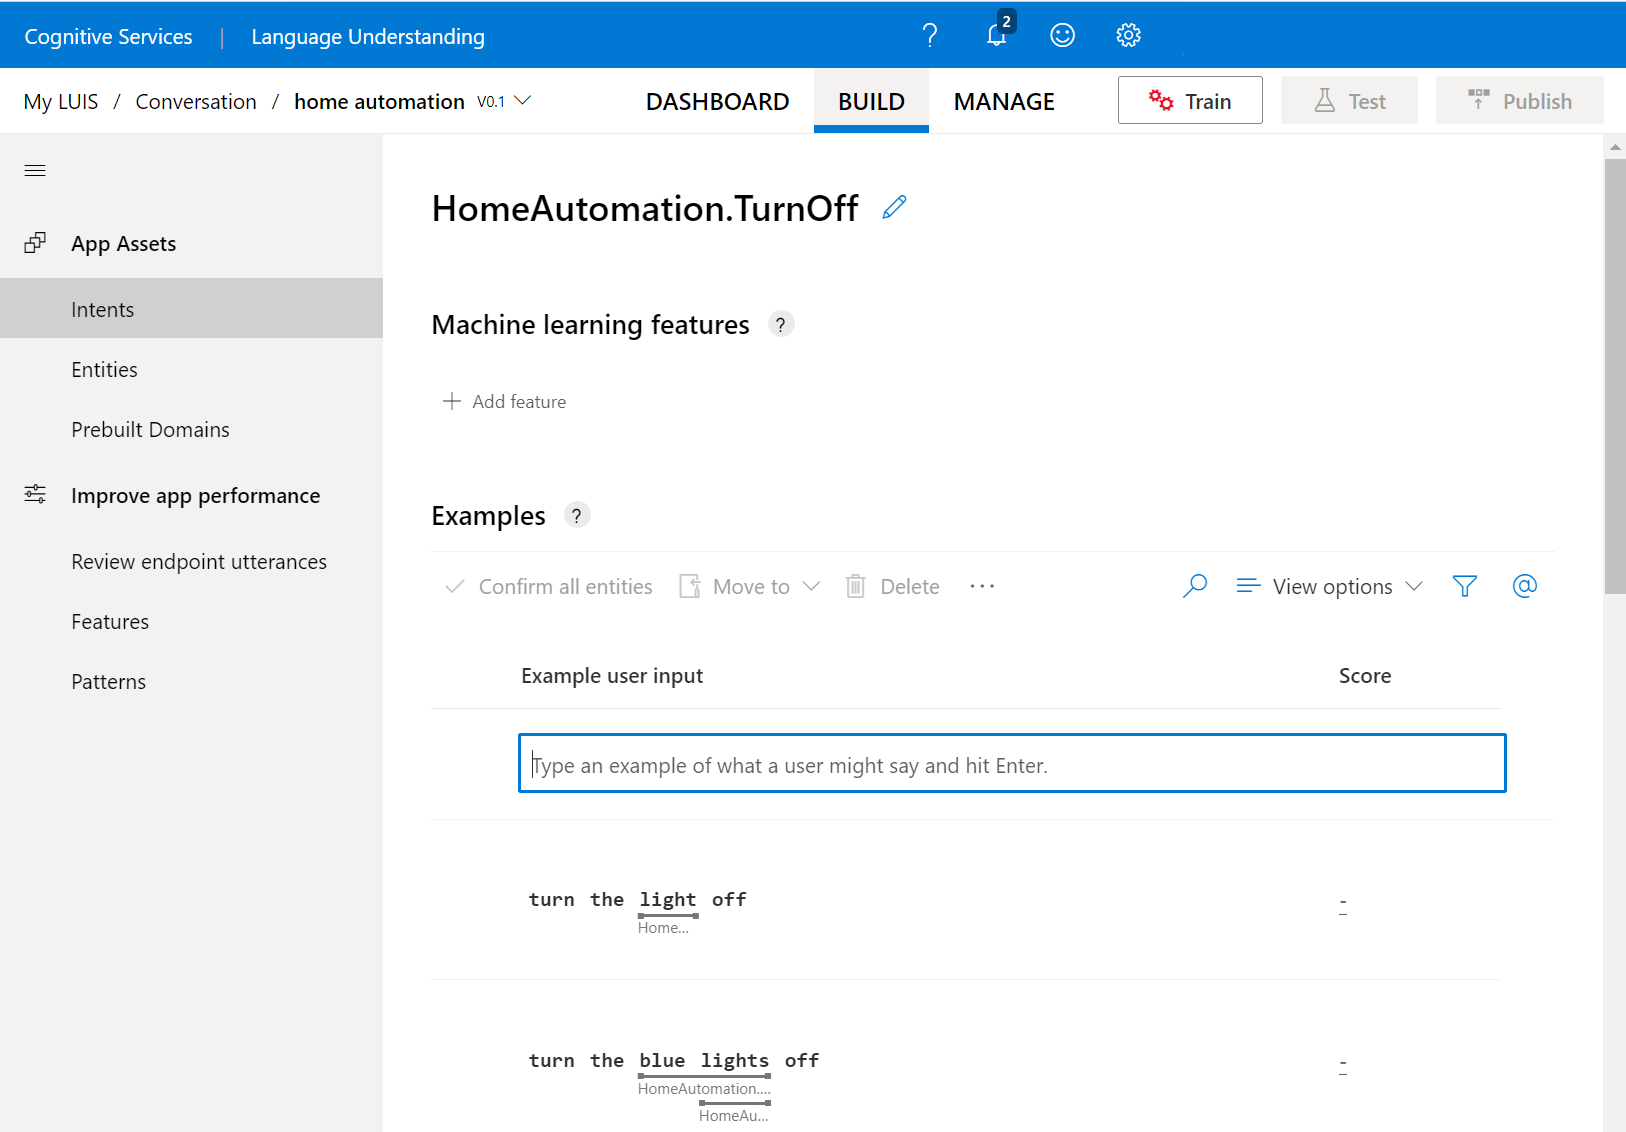
Select the HomeAutomation.TurnOff intent. The intent contains a list of example utterances that are labeled with entities.
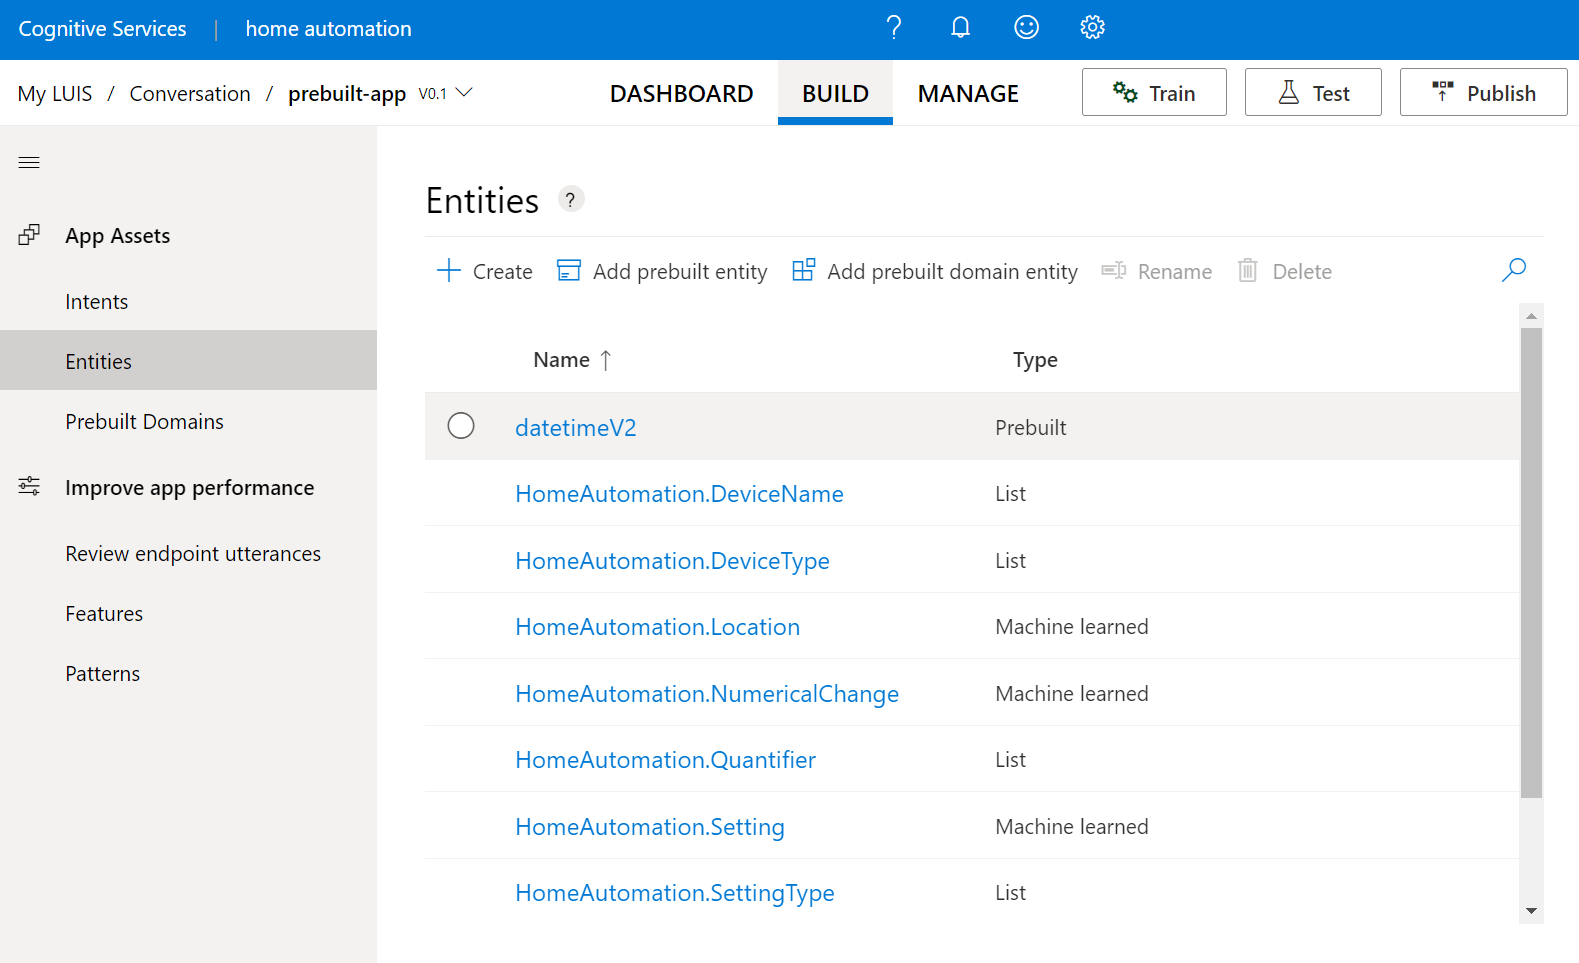
If you want to view the entities for the app, select Entities. If you select one of the entities, such as HomeAutomation.DeviceName you will see a list of values associated with it.
Train the LUIS app
After your application is populated with intents, entities, and utterances, you need to train the application so that the changes you made can be reflected.
In the top-right side of the LUIS website, select the Train button.

Training is complete when the Train button is disabled.
Test your app
Once you've trained your app, you can test it.
Select Test from the top-right navigation.
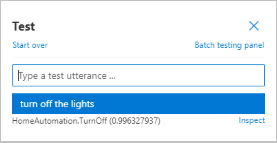
Type a test utterance into the interactive test pane, and press Enter. For example, Turn off the lights.
In this example, Turn off the lights is correctly identified as the top scoring intent of HomeAutomation.TurnOff.
Select Inspect to view more information about the prediction.
Close the test pane.
Customize your application
Besides the prebuilt domains LUIS allows you to create your own custom applications or to customize on top of prebuilt ones.
Create Intents
To add more intents to your app
- Select Intents in the left pane.
- Select Create
- Enter the intent name,
HomeAutomation.AddDeviceAlias, and then select Done.
Create Entities
To add more entities to your app
- Select Entities in the left pane.
- Select Create
- Enter the entity name,
HomeAutomation.DeviceAlias, select machine learned from type and then select Create.
Add example utterances
Example utterances are text that a user enters in a chat bot or other client applications. They map the intention of the user's text to a LUIS intent.
On the Intents page for HomeAutomation.AddDeviceAlias, add the following example utterances under Example Utterance,
| # | Example utterances |
|---|---|
| 1 | Add alias to my fan to be wind machine |
| 2 | Alias lights to illumination |
| 3 | nickname living room speakers to our speakers a new fan |
| 4 | rename living room tv to main tv |
For best results make sure that example utterances vary in the following ways:
- Utterance length
- punctuation
- Word choice
- Verb tense (is, was, will be)
- Word order
Label example utterances
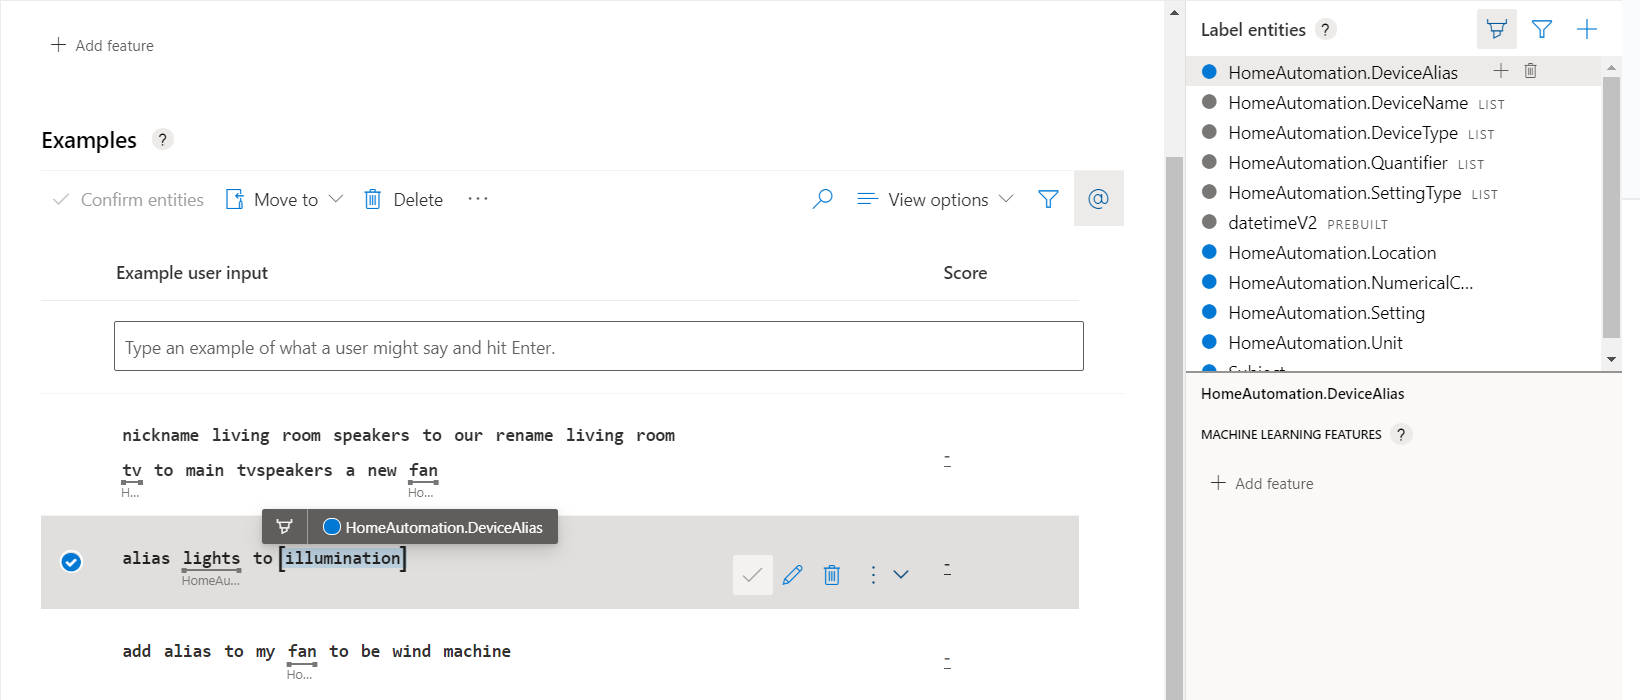
Labeling your utterances is needed because you added an ML entity. Labeling is used by your application to learn how to extract the ML entities you created.
To label your utterances, you have two options: Entity palette labeling and inline labeling.
Entity palette labeling
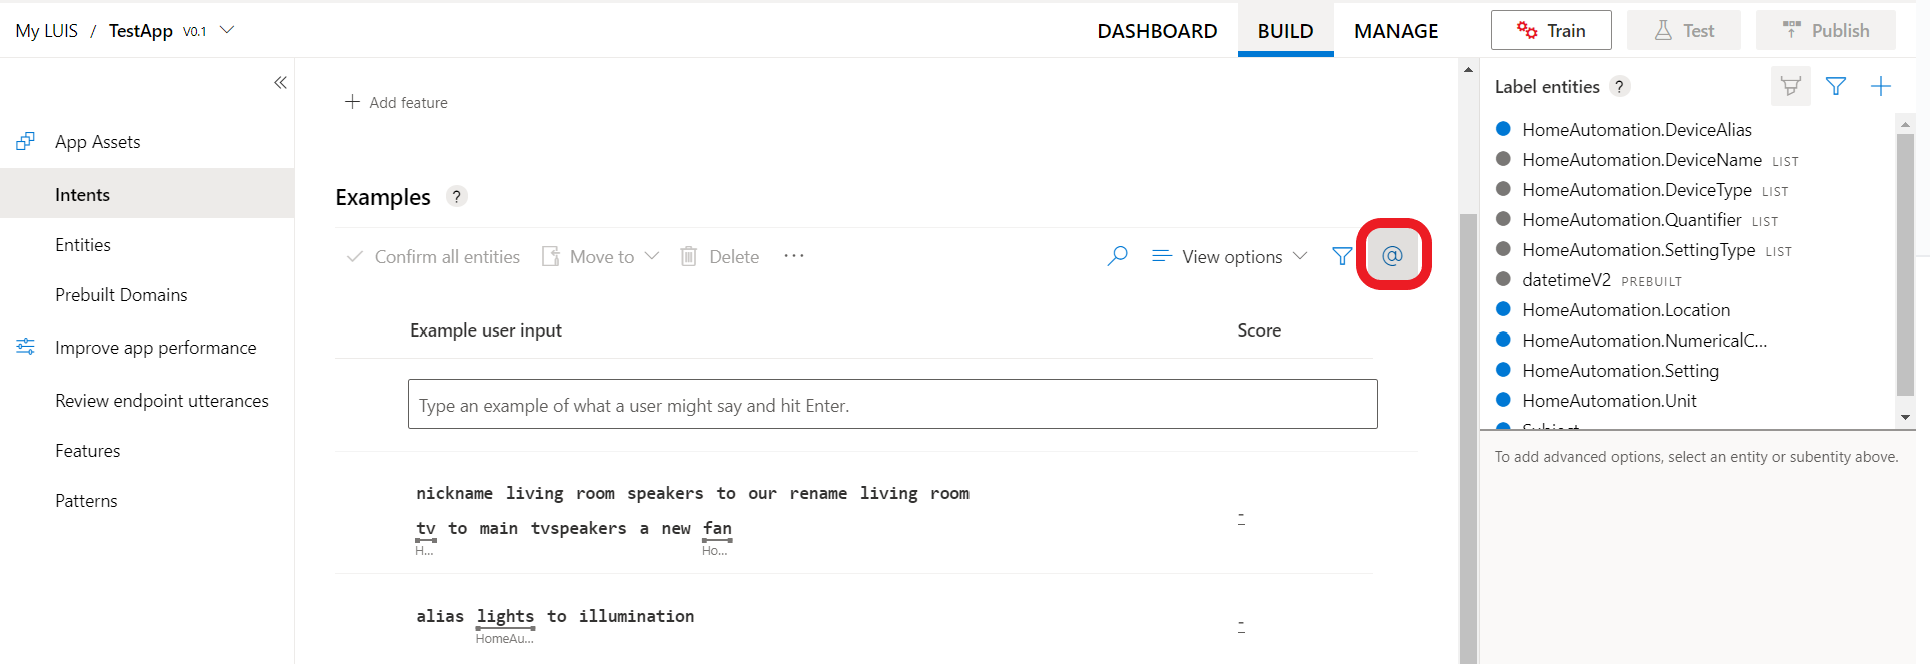
When you select the @ icon on top right, the entity palette opens in the right side of the page.
Select the entity you want to start labeling.
Highlight the text you want to label with this entity.
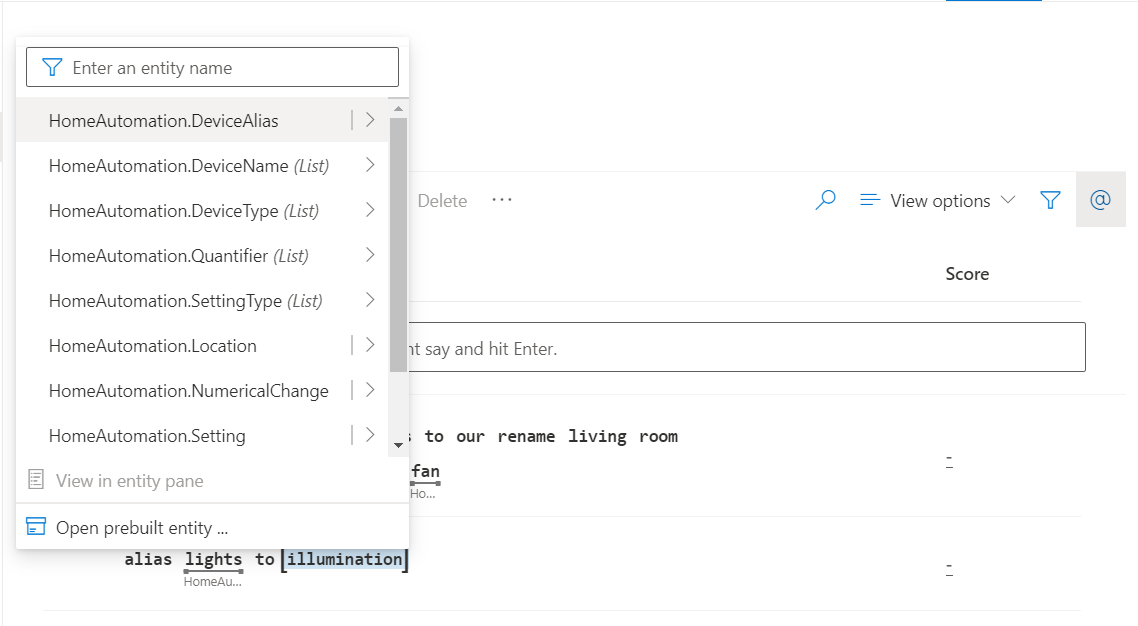
Inline labeling
Highlight the text you want to label.
Select the entity you want to label the text with from the menu that pops up.
Create Prediction resource
At this point, you have completed authoring your application. You need to create a prediction resource to publish your application in order to receive predictions in a chat bot or other client applications through the prediction endpoint
To create a Prediction resource from the LUIS portal
Go to the Manage tab in your application.
In the left navigation, select Azure Resources.
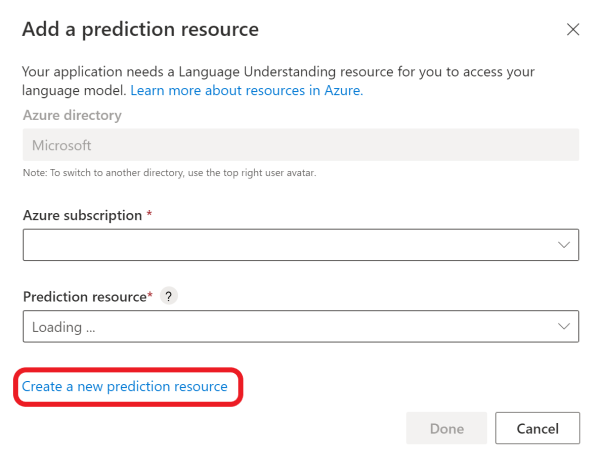
select Add Prediction resource button.
If you already have a prediction resource, add it. Otherwise, select Create a new prediction resource.
Publish the app to get the endpoint URL
In order to receive a LUIS prediction in a chat bot or other client applications, you need to publish the app to the prediction endpoint.
Select Publish in the top-right navigation.

Select the Production slot, then select Done.
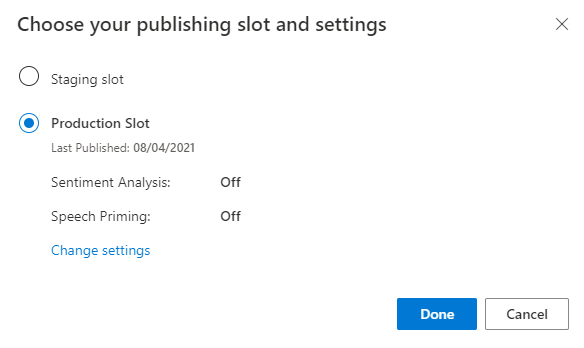
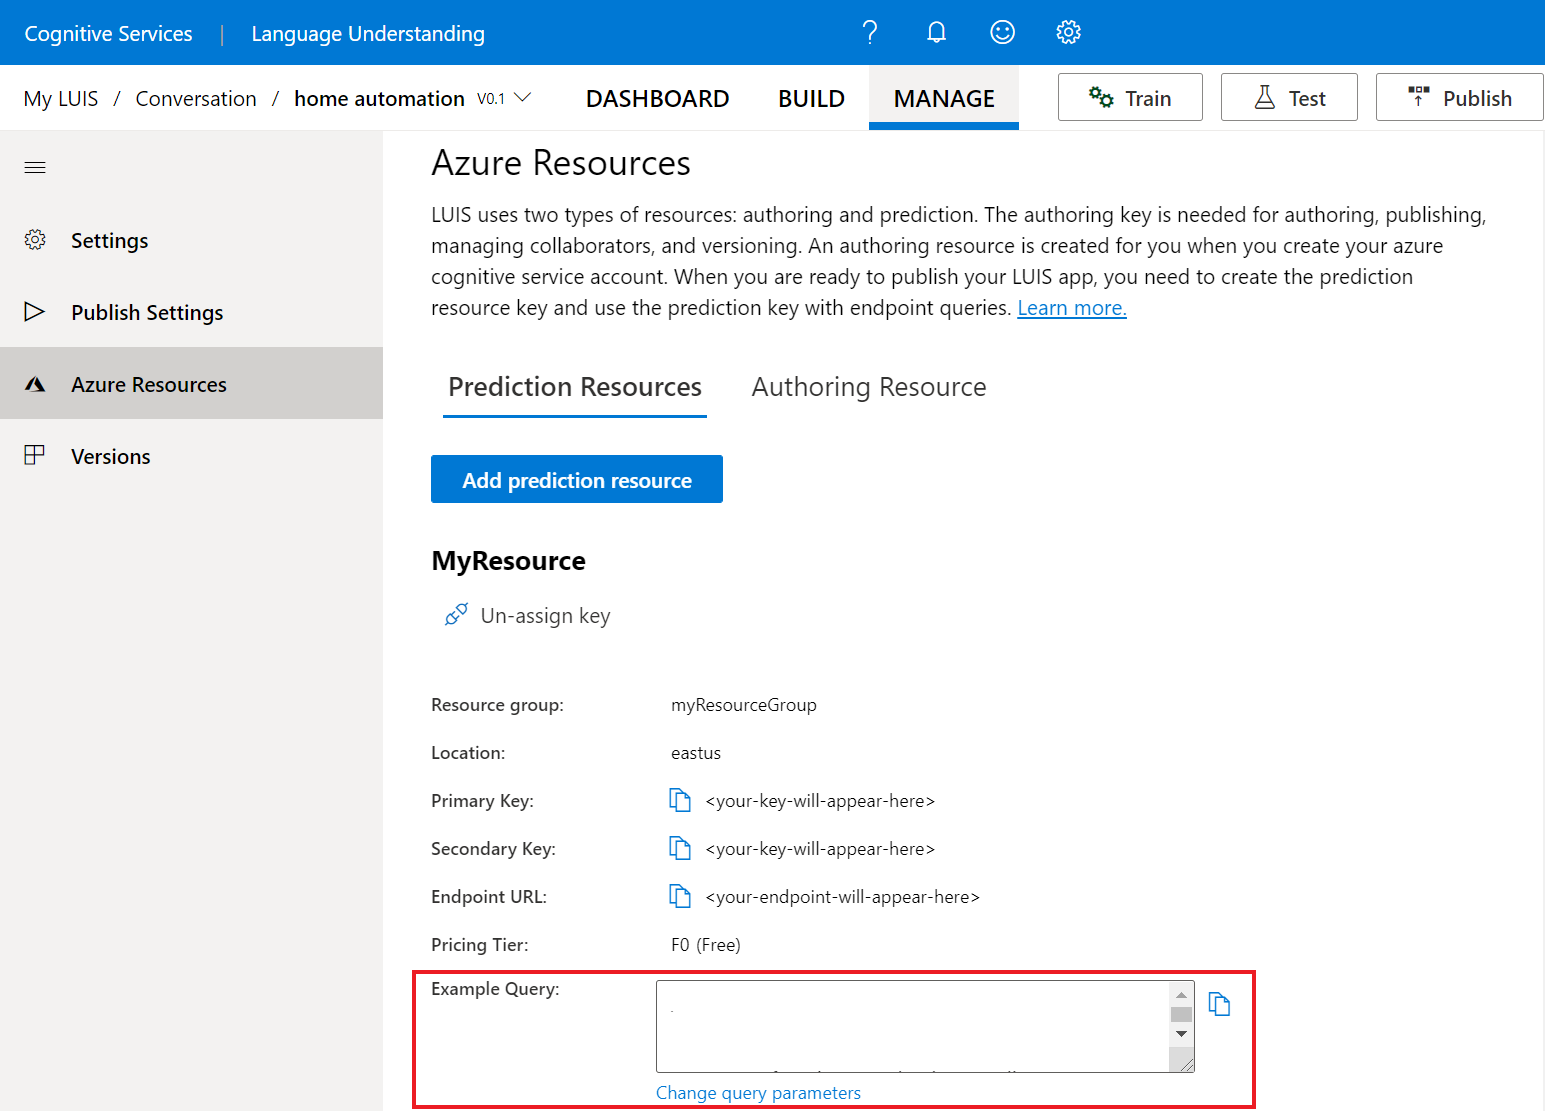
Select Access your endpoint URLs in the notification to go to the Azure Resources page. You will only be able to see the URLs if you have a prediction resource associated with the app. You can also find the Azure Resources page by clicking Manage.

Query the V3 API prediction endpoint
In the LUIS portal, in the Manage section (top-right menu), on the Azure Resources page (left menu), on the Prediction Resources tab, copy the Example Query at the bottom of the page. The URL has your app ID, key, and slot name. The V3 prediction endpoint URL has the form of:
https://YOUR-RESOURCE-NAME.api.cognitive.azure.cn/luis/prediction/v3.0/apps/APP-ID/slots/SLOT-NAME/predict?subscription-key=YOUR-PREDICTION-KEY&<optional-name-value-pairs>&query=YOUR_QUERY_HEREPaste the URL into a new browser tab. If you don't see the URL, you don't have a prediction resource and will need to create one.
In the browser address bar, for the query string, make sure the following values are in the URL. If they are not in the query string, add them:
verbose=trueshow-all-intents=true
In the browser address bar, go to the end of the URL and enter turn off the living room light for the query string, then press Enter.
{
    "query": "turn off the living room light",
    "prediction": {
        "topIntent": "HomeAutomation.TurnOff",
        "intents": {
            "HomeAutomation.TurnOff": {
                "score": 0.969448864
            },
            "HomeAutomation.QueryState": {
                "score": 0.0122336326
            },
            "HomeAutomation.TurnUp": {
                "score": 0.006547436
            },
            "HomeAutomation.TurnDown": {
                "score": 0.0050634006
            },
            "HomeAutomation.SetDevice": {
                "score": 0.004951761
            },
            "HomeAutomation.TurnOn": {
                "score": 0.00312553928
            },
            "None": {
                "score": 0.000552945654
            }
        },
        "entities": {
            "HomeAutomation.Location": [
                "living room"
            ],
            "HomeAutomation.DeviceName": [
                [
                    "living room light"
                ]
            ],
            "HomeAutomation.DeviceType": [
                [
                    "light"
                ]
            ],
            "$instance": {
                "HomeAutomation.Location": [
                    {
                        "type": "HomeAutomation.Location",
                        "text": "living room",
                        "startIndex": 13,
                        "length": 11,
                        "score": 0.902181149,
                        "modelTypeId": 1,
                        "modelType": "Entity Extractor",
                        "recognitionSources": [
                            "model"
                        ]
                    }
                ],
                "HomeAutomation.DeviceName": [
                    {
                        "type": "HomeAutomation.DeviceName",
                        "text": "living room light",
                        "startIndex": 13,
                        "length": 17,
                        "modelTypeId": 5,
                        "modelType": "List Entity Extractor",
                        "recognitionSources": [
                            "model"
                        ]
                    }
                ],
                "HomeAutomation.DeviceType": [
                    {
                        "type": "HomeAutomation.DeviceType",
                        "text": "light",
                        "startIndex": 25,
                        "length": 5,
                        "modelTypeId": 5,
                        "modelType": "List Entity Extractor",
                        "recognitionSources": [
                            "model"
                        ]
                    }
                ]
            }
        }
    }
}
Clean up resources
When no longer needed, delete the LUIS app. To do so, select My apps from the top left menu. Select the ellipsis (...) to the right of the app name in the app list, select Delete. On the pop-up dialog Delete app?, select Ok.

