Note
Access to this page requires authorization. You can try signing in or changing directories.
Access to this page requires authorization. You can try changing directories.
This article shows you how to use the outbound network and fully qualified domain name (FQDN) rules for AKS clusters to control egress traffic using Azure Firewall. To simplify this configuration, Azure Firewall provides an Azure Kubernetes Service (AzureKubernetesService) FQDN tag that restricts outbound traffic from the AKS cluster.
Prerequisites
- An Azure account with an active subscription. If you don't have one, create a Trial before you begin.
- Install and configure Terraform.
- Azure CLI installed and signed in with
az login, used to verify the deployment. Install Azure CLI if you don't already have it. kubectlinstalled to connect to the cluster. To install it locally, use theaz aks install-clicommand.
Firewall frontend IP requirements
- Production starting point: Plan for at least 20 frontend IPs on Azure Firewall, and size the configuration for your workload to avoid source network address translation (SNAT) port exhaustion.
- High-traffic clusters: If your cluster creates many outbound connections to the same destinations, you might need more frontend IPs or Azure Firewall integration with NAT Gateway to increase SNAT capacity.
- API server protection: Add the firewall's public frontend IP to API server authorized IP ranges for enhanced security
- Developer access: When using authorized IP ranges, either use a jumpbox in the firewall's virtual network (VNet) or add developer endpoint IPs to the authorized range
This guidance applies throughout the configuration process described in this article.
Note
The FQDN tag contains all the FQDNs listed in outbound network and FQDN rules for AKS clusters and is automatically updated.
Architecture overview
The following diagram illustrates the architecture of an AKS cluster with restricted egress traffic using Azure Firewall:
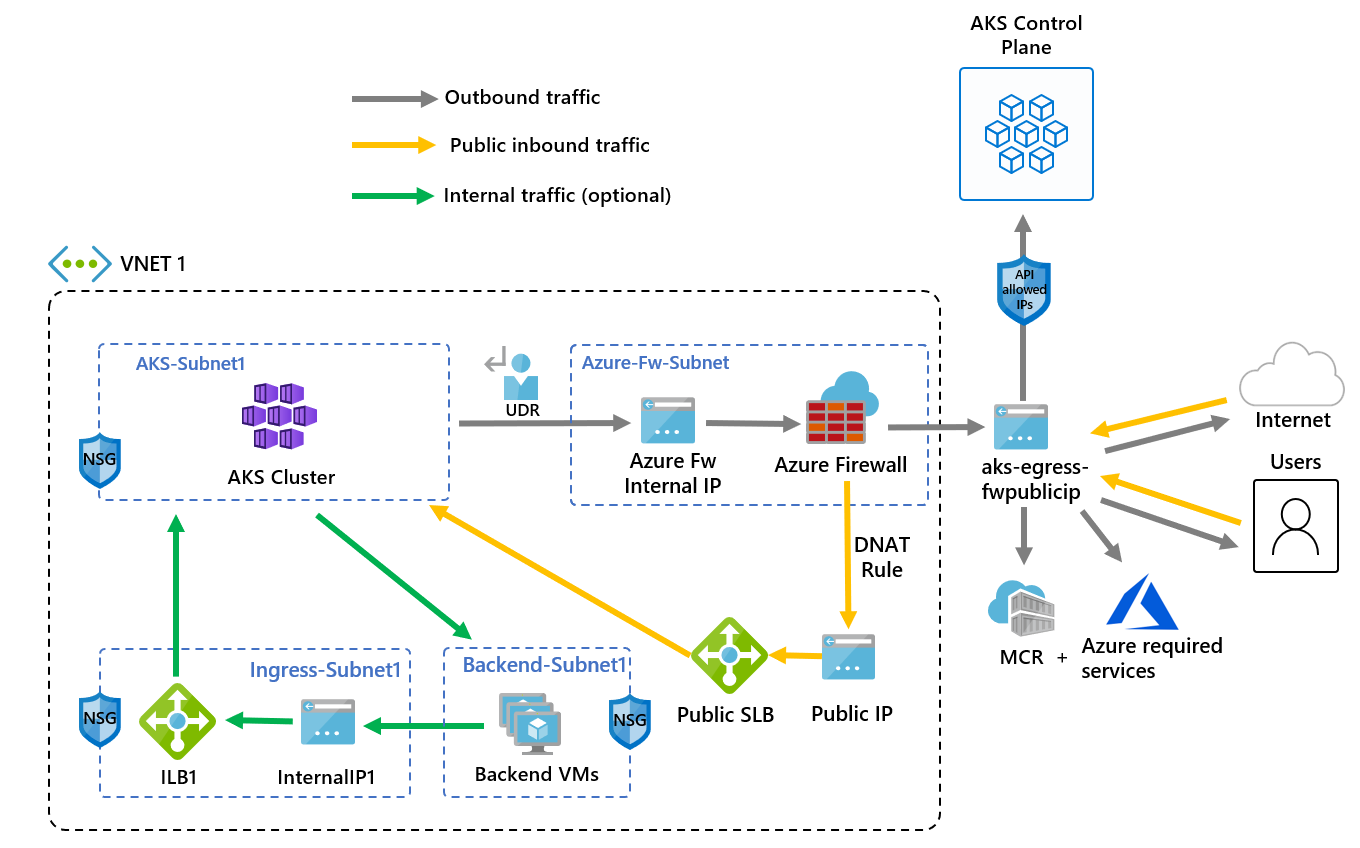
The diagram shows AKS agent nodes in a dedicated subnet routing outbound traffic through Azure Firewall by using a UDR. For inbound traffic, a DNAT rule translates the firewall public IP address to the public load balancer frontend IP address.
Key components of this architecture include:
- Public ingress is forced to flow through firewall filters:
- AKS agent nodes are isolated in a dedicated subnet.
- Azure Firewall is deployed in its own subnet.
- A DNAT rule translates the firewall public IP into the load balancer frontend IP.
- Outbound requests start from agent nodes to the Azure Firewall private IP using a user-defined route (UDR):
- Requests from AKS agent nodes follow a UDR that has been placed on the subnet the AKS cluster was deployed into.
- Azure Firewall egresses out of the VNet from a public IP frontend.
- Access to the public internet or other Azure services flows to and from the firewall frontend IP address.
- You can protect access to the AKS control plane using API server authorized IP ranges, including the firewall public frontend IP address.
- Internal traffic:
- You can use an internal load balancer for internal traffic, which you could isolate on its own subnet, instead of or alongside a public load balancer.
Configure environment variables
The following table lists the environment variables used in this article. Set these variables in your shell before proceeding, or modify the commands to use your own values.
| Variable | Description | Example value |
|---|---|---|
RESOURCE_GROUP |
Name of the resource group | aks-egress-rg |
LOCATION |
Azure region for resources | eastus |
CLUSTER_NAME |
Name of the AKS cluster | aks-egress |
VNET_NAME |
Name of the virtual network | aks-egress-vnet |
AKS_SUBNET_NAME |
Name of the subnet for AKS | aks-subnet |
FW_SUBNET_NAME |
Name of the subnet for Azure Firewall | AzureFirewallSubnet |
FW_NAME |
Name of the Azure Firewall | aks-egress-fw |
FW_PUBLICIP_NAME |
Name of the public IP for Azure Firewall | aks-egress-fwpublicip |
FW_IPCONFIG_NAME |
Name of the IP configuration for Azure Firewall | aks-egress-fwconfig |
FW_ROUTE_TABLE_NAME |
Name of the route table for Azure Firewall | aks-egress-fwrt |
FW_ROUTE_NAME_1 |
Name of the route for Azure Firewall | aks-egress-fwrn |
FW_ROUTE_NAME_2 |
Name of the internet route for Azure Firewall | aks-egress-fwrn-internet |
Create a resource group
Create a resource group using the
az group createcommand.az group create --name $RESOURCE_GROUP --location $LOCATION
Create a virtual network with multiple subnets
Provision a VNet with two separate subnets: one for the cluster and one for the firewall. Optionally, you can create one for internal service ingress. The following diagram illustrates the empty network topology before deploying any resources:
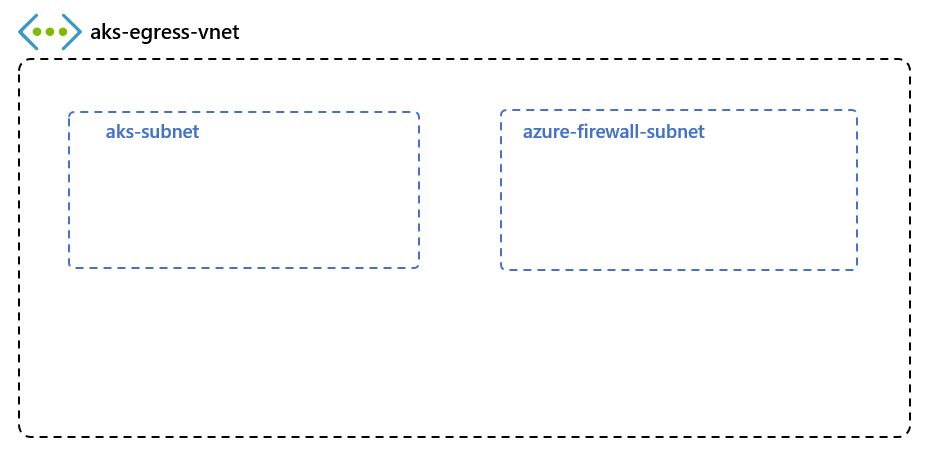
The diagram shows the VNet with separate subnets for AKS and Azure Firewall before resources are deployed.
Create a VNet using the
az network vnet createcommand.az network vnet create \ --resource-group $RESOURCE_GROUP \ --name $VNET_NAME \ --location $LOCATION \ --address-prefixes 10.42.0.0/16 \ --subnet-name $AKS_SUBNET_NAME \ --subnet-prefix 10.42.1.0/24Create a subnet for Azure Firewall using the
az network vnet subnet createcommand.# Dedicated subnet for Azure Firewall (subnet must be named "AzureFirewallSubnet") az network vnet subnet create \ --resource-group $RESOURCE_GROUP \ --vnet-name $VNET_NAME \ --name $FW_SUBNET_NAME \ --address-prefix 10.42.2.0/24
Create a public IP for Azure Firewall
Create a standard SKU public IP resource using the
az network public-ip createcommand. Use this resource as the frontend IP address for the Azure Firewall. The single-IP configuration in this article is intended for testing. For production, use the firewall frontend IP requirements to plan SNAT capacity for your workload.az network public-ip create --resource-group $RESOURCE_GROUP --name $FW_PUBLICIP_NAME --location $LOCATION --sku "Standard"
Install the Azure Firewall CLI extension
Register the Azure Firewall CLI extension to create an Azure Firewall using the
az extension addcommand.az extension add --name azure-firewall
Create an Azure Firewall and enable DNS proxy
Note
For high-traffic scenarios, see the firewall frontend IP requirements section.
For more information on how to create an Azure Firewall with multiple IPs, see Create an Azure Firewall with multiple public IP addresses using Bicep.
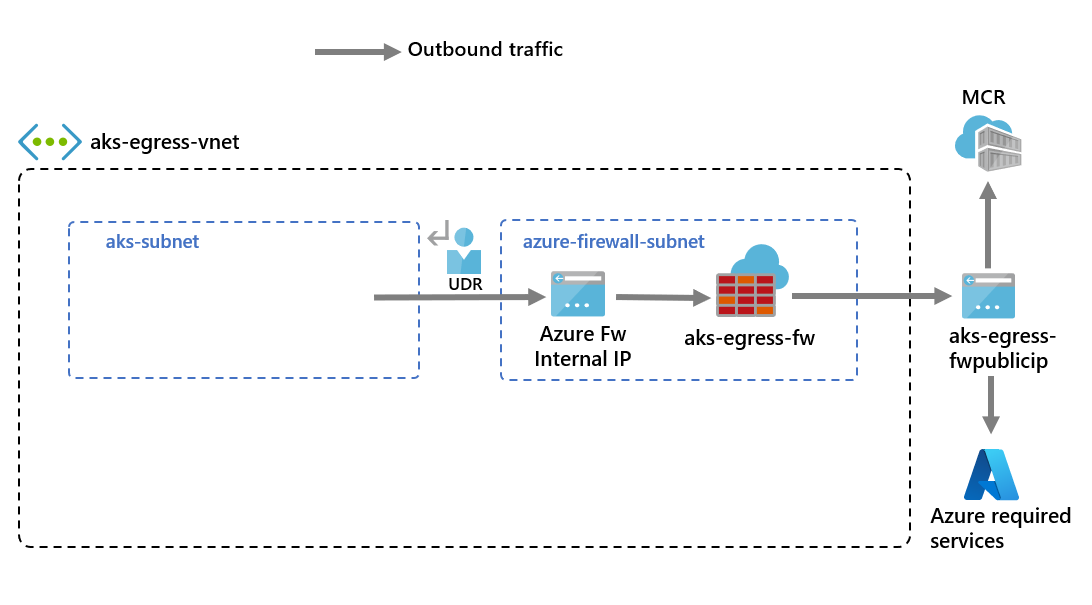
The diagram shows Azure Firewall deployed in its subnet, with a UDR directing traffic from the AKS subnet to the firewall private IP address.
Create an Azure Firewall and enable DNS proxy using the
az network firewall createcommand with--enable-dns-proxyset totrue.az network firewall create --resource-group $RESOURCE_GROUP --name $FW_NAME --location $LOCATION --enable-dns-proxy trueSetting up the public IP address to the Azure Firewall might take a few minutes. Once it's ready, you can assign the IP address to the firewall front end.
Note
To use FQDN on network rules, you need DNS proxy enabled. When DNS proxy is enabled, the firewall listens on port 53 and forwards DNS requests to the DNS server you specify. This setting allows the firewall to automatically translate the FQDN.
Create an IP configuration for Azure Firewall
Create an Azure Firewall IP configuration using the
az network firewall ip-config createcommand.az network firewall ip-config create --resource-group $RESOURCE_GROUP --firewall-name $FW_NAME --name $FW_IPCONFIG_NAME --public-ip-address $FW_PUBLICIP_NAME --vnet-name $VNET_NAME
Get the Azure Firewall IP addresses
Save the public and private firewall frontend IP addresses for configuration later using the following commands:
export FW_PUBLIC_IP=$(az network public-ip show --resource-group $RESOURCE_GROUP --name $FW_PUBLICIP_NAME --query "ipAddress" -o tsv)
export FW_PRIVATE_IP=$(az network firewall show --resource-group $RESOURCE_GROUP --name $FW_NAME --query "ipConfigurations[0].privateIPAddress" -o tsv)
Note
For API server security, see the firewall frontend IP requirements section.
Configure the virtual network to use Azure Firewall as its DNS server
Configure the virtual network to use the Azure Firewall private IP address as its DNS server by using the
az network vnet updatecommand. This configuration ensures that the AKS nodes and Azure Firewall resolve the destination FQDNs in the network rules consistently.az network vnet update \ --resource-group $RESOURCE_GROUP \ --name $VNET_NAME \ --dns-servers $FW_PRIVATE_IP
UDR requirements for AKS egress through Azure Firewall
Azure automatically routes traffic between Azure subnets, VNets, and on-premises networks. To modify default routing, create a route table with the following requirements:
| Category | Requirement | Value or description |
|---|---|---|
| Route parameter | Destination | 0.0.0.0/0 (all traffic) |
| Route parameter | Next hop type | Network virtual appliance (NVA) |
| Route parameter | Next hop IP | Azure Firewall private IP address |
| Route parameter | Association | One route table per subnet (zero or one allowed) |
| UDR constraint | Default internet route | 0.0.0.0/0 already exists but requires a public IP address for SNAT. |
| UDR constraint | Next hop | The route must point to a gateway or NVA, not directly to the internet. |
| UDR constraint | AKS validation | AKS validates the route configuration and prevents direct internet routes. |
| UDR constraint | Route table limit | Each subnet supports a maximum of one associated route table. |
| Outbound type impact | UDR (userDefinedRouting) |
No load balancer public IP address is created for outbound requests. |
| Outbound type impact | Load balancer public IP address | Created only for inbound requests that use a LoadBalancer service. |
| Outbound type impact | SNAT configuration | Requires a properly configured public IP address for outbound connectivity. |
For more information, see Outbound rules for Azure Load Balancer.
Create a route with a hop to Azure Firewall
Create an empty route table using the
az network route-table createcommand. The route table defines the Azure Firewall as the next hop. Each subnet can have zero or one route table associated to it.az network route-table create --resource-group $RESOURCE_GROUP --location $LOCATION --name $FW_ROUTE_TABLE_NAMECreate routes in the route table for the subnets using the
az network route-table route createcommand.az network route-table route create --resource-group $RESOURCE_GROUP --name $FW_ROUTE_NAME_1 --route-table-name $FW_ROUTE_TABLE_NAME --address-prefix 0.0.0.0/0 --next-hop-type VirtualAppliance --next-hop-ip-address $FW_PRIVATE_IP az network route-table route create --resource-group $RESOURCE_GROUP --name $FW_ROUTE_NAME_2 --route-table-name $FW_ROUTE_TABLE_NAME --address-prefix $FW_PUBLIC_IP/32 --next-hop-type Internet
For information on how to override Azure's default system routes or add more routes to a subnet's route table, see the Virtual network route table documentation.
Required outbound rules for AKS egress through Azure Firewall
Note
For applications outside of the kube-system or gatekeeper-system namespaces that need to talk to the API server, an extra network rule to allow TCP communication to port 443 for the API server IP in addition to adding application rule for fqdn-tag of AzureKubernetesService is required.
The following network rules allow the egress traffic used in this article:
- The first and second network rules allow access to pull containers from GitHub Container Registry (
ghcr.io) and Docker Hub (docker.io).
AKS clusters that use the konnectivity agent, including the cluster created in this article, don't require outbound access on TCP port 9000 or UDP port 1194. Nodes provisioned after March 2021 also don't require outbound NTP access on UDP port 123. For the rules required by other cluster configurations and Azure clouds, see outbound network and FQDN rules for AKS clusters.
Create network rules on Azure Firewall
Create the network rules using the following
az network firewall network-rule createcommands.az network firewall network-rule create --resource-group $RESOURCE_GROUP --firewall-name $FW_NAME --collection-name 'aksfwnr' --name 'ghcr' --protocols 'TCP' --source-addresses '*' --destination-fqdns ghcr.io pkg-containers.githubusercontent.com --destination-ports '443' --action allow --priority 100 az network firewall network-rule create --resource-group $RESOURCE_GROUP --firewall-name $FW_NAME --collection-name 'aksfwnr' --name 'docker' --protocols 'TCP' --source-addresses '*' --destination-fqdns docker.io registry-1.docker.io production.cloudflare.docker.com --destination-ports '443'
Create application rules on Azure Firewall
Create the application rule using the
az network firewall application-rule createcommand.az network firewall application-rule create --resource-group $RESOURCE_GROUP --firewall-name $FW_NAME --collection-name 'aksfwar' --name 'fqdn' --source-addresses '*' --protocols 'http=80' 'https=443' --fqdn-tags "AzureKubernetesService" --action allow --priority 100
To learn more about Azure Firewall, see the Azure Firewall documentation.
Associate the route table to AKS
To associate the cluster with the firewall, the dedicated subnet for the cluster's subnet must reference the route table.
Associate the route table to AKS using the
az network vnet subnet updatecommand.az network vnet subnet update --resource-group $RESOURCE_GROUP --vnet-name $VNET_NAME --name $AKS_SUBNET_NAME --route-table $FW_ROUTE_TABLE_NAME
Deploy an AKS cluster that follows your outbound rules
You can now deploy an AKS cluster into the existing VNet. You use the userDefinedRouting outbound type, which ensures that any outbound traffic is forced through the firewall and no other egress paths exist. You can also use the loadBalancer outbound type.
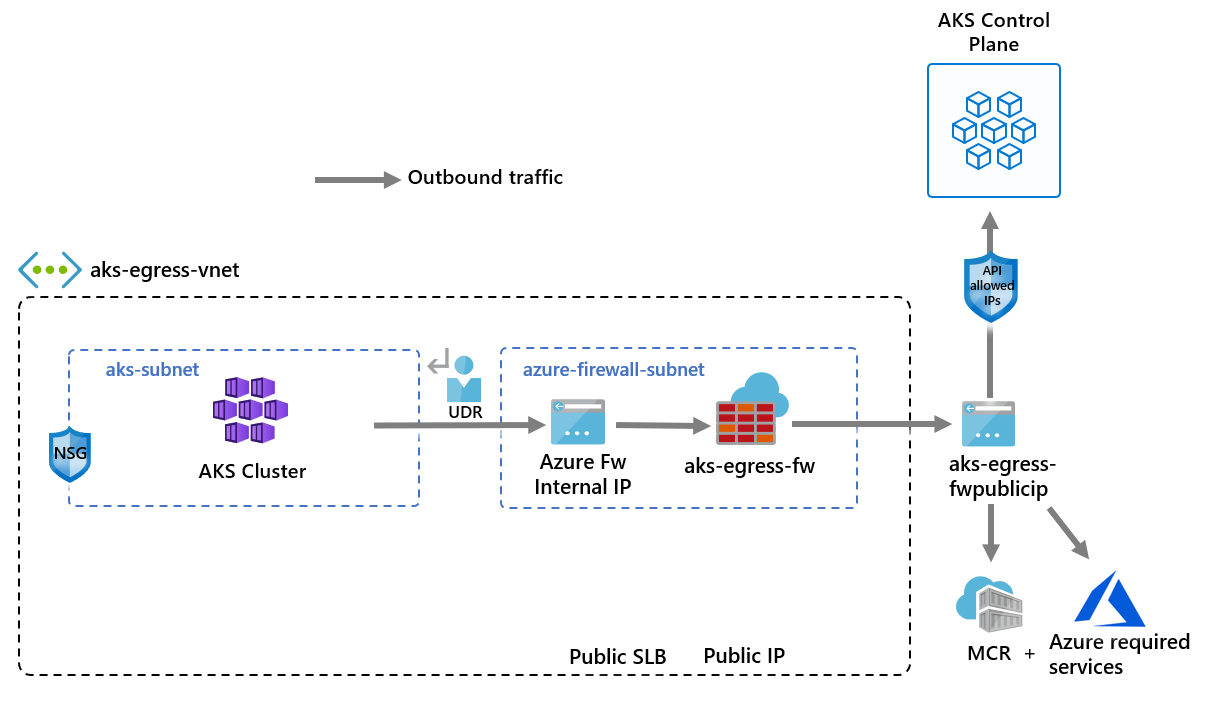
The diagram shows the AKS cluster deployed in the existing VNet, with outbound traffic routed through Azure Firewall by using the UDR.
Set an environment variable for the subnet ID of the target subnet using the following command:
SUBNET_ID=$(az network vnet subnet show --resource-group $RESOURCE_GROUP --vnet-name $VNET_NAME --name $AKS_SUBNET_NAME --query id -o tsv)
You define the outbound type to use the UDR that already exists on the subnet. This configuration enables AKS to skip the setup and IP provisioning for the load balancer.
Tip
You can add extra features to the cluster deployment, such as private clusters.
For API server authorized IP ranges setup and developer access considerations, see the firewall frontend IP requirements section.
Create an AKS cluster with a system-assigned control plane identity
Note
This cluster uses a system-assigned control plane identity. AKS creates a user-assigned kubelet identity in the node resource group if you don't specify your own kubelet managed identity.
For user-defined routing, system-assigned identity only supports the CNI network plugin.
Create an AKS cluster using a system-assigned managed identity with the CNI network plugin using the
az aks createcommand.az aks create --resource-group $RESOURCE_GROUP --name $CLUSTER_NAME --location $LOCATION \ --node-count 3 \ --network-plugin azure \ --outbound-type userDefinedRouting \ --vnet-subnet-id $SUBNET_ID \ --api-server-authorized-ip-ranges $FW_PUBLIC_IP \ --generate-ssh-keys
Create user-assigned managed identities
If you don't have user-assigned identities, follow the steps in this section. If you already have user-assigned identities, skip to Create an AKS cluster with user-assigned identities.
Create a managed identity using the
az identity createcommand.az identity create --name myIdentity --resource-group $RESOURCE_GROUPThe output should resemble the following example output:
 {
   ...
   "id": "/subscriptions/<subscriptionid>/resourcegroups/aks-egress-rg/providers/Microsoft.ManagedIdentity/userAssignedIdentities/myIdentity",
   "location": "eastus",
   "name": "myIdentity",
   ...
   "type": "Microsoft.ManagedIdentity/userAssignedIdentities"
 }
Create a kubelet managed identity using the
az identity createcommand.az identity create --name myKubeletIdentity --resource-group $RESOURCE_GROUPThe output should resemble the following example output:
{
  ...
  "id": "/subscriptions/<subscriptionid>/resourcegroups/aks-egress-rg/providers/Microsoft.ManagedIdentity/userAssignedIdentities/myKubeletIdentity",
  "location": "chinaeast2",
  "name": "myKubeletIdentity",
  ...
  "resourceGroup": "aks-egress-rg",
  ...
  "type": "Microsoft.ManagedIdentity/userAssignedIdentities"
}
Note
If you create your own VNet and route table where the resources are outside of the worker node resource group, the CLI automatically adds the role assignment. If you're using an ARM template or other method, you need to use the principal ID of the cluster managed identity to perform a role assignment.
Create an AKS cluster with user-assigned identities
Create an AKS cluster with your existing user-assigned managed identities in the subnet using the
az aks createcommand. Provide the resource ID of the managed identity for the control plane and the resource ID of the kubelet identity.az aks create \ --resource-group $RESOURCE_GROUP \ --name $CLUSTER_NAME \ --location $LOCATION \ --node-count 3 \ --network-plugin azure \ --network-plugin-mode overlay \ --outbound-type userDefinedRouting \ --vnet-subnet-id $SUBNET_ID \ --api-server-authorized-ip-ranges $FW_PUBLIC_IP \ --assign-identity <identity-resource-id> \ --assign-kubelet-identity <kubelet-identity-resource-id> \ --generate-ssh-keys
Review the Terraform code
Note
The sample code for this article is in the Azure Terraform GitHub repository. You can view the test results log for current and previous versions of Terraform.
See more articles and sample code showing how to use Terraform to manage Azure resources.
The Terraform sample deploys the following resources:
- An Azure virtual network with two subnets: one for the AKS cluster nodes, and a dedicated
AzureFirewallSubnetfor Azure Firewall. - A standard SKU public IP address and an Azure Firewall (
AZFW_VNetSKU,Standardtier) that uses an Azure Firewall Policy with DNS proxy enabled. - A firewall policy rule collection group that contains the network and application rules required for AKS egress: network rules for the API server ports (TCP/9000, UDP/1194), NTP (
ntp.ubuntu.comon UDP/123), GitHub Container Registry, and Docker Hub, plus an application rule that uses theAzureKubernetesServiceFQDN tag on ports 80 and 443. - A route table with a default route (
0.0.0.0/0) that points to the firewall's private IP address as a virtual appliance next hop, and a route that sends the firewall's own public IP address directly to the internet to avoid asymmetric routing. The route table is associated with the AKS subnet only. - An AKS cluster that uses a system-assigned managed identity, the
azurenetwork plugin, theuserDefinedRoutingoutbound type, andapi_server_access_profile.authorized_ip_rangesrestricted to the firewall's public IP address. - A role assignment that grants the AKS cluster's managed identity the
Network Contributorrole on the resource group, so the cluster can manage the networking resources it depends on.
The sample doesn't create a demo workload, a DNAT rule, or a load balancer service. After you verify the cluster, use kubectl to deploy your own application, and then follow the guidance earlier in this article to add a DNAT rule on Azure Firewall if you need inbound connectivity.
- Create a directory to test the sample Terraform code, and make it the current directory.
- Create a file named
main.tfand insert the following code:
terraform {
  required_version = ">= 1.5.0"

  required_providers {
    azurerm = {
      source  = "hashicorp/azurerm"
      version = "~> 4.0"
    }
  }
}

provider "azurerm" {
  features {}
}

variable "prefix" {
  type    = string
  default = "aks-egress"
}

variable "location" {
  type    = string
  default = "eastus"
}

variable "node_count" {
  type    = number
  default = 3
}

variable "vnet_cidr" {
  type    = string
  default = "10.42.0.0/16"
}

variable "aks_subnet_cidr" {
  type    = string
  default = "10.42.1.0/24"
}

variable "firewall_subnet_cidr" {
  type    = string
  default = "10.42.2.0/24"
}

locals {
  resource_group_name    = "${var.prefix}-rg"
  vnet_name              = "${var.prefix}-vnet"
  aks_subnet_name        = "aks-subnet"
  firewall_subnet_name   = "AzureFirewallSubnet"
  firewall_name          = "${var.prefix}-fw"
  firewall_public_ip     = "${var.prefix}-fwpublicip"
  firewall_policy_name   = "${var.prefix}-fwpolicy"
  firewall_ipconfig_name = "${var.prefix}-fwconfig"
  route_table_name       = "${var.prefix}-fwrt"
  default_route_name     = "${var.prefix}-fwrn"
  firewall_public_route  = "${var.prefix}-fwrn-internet"
  aks_name               = var.prefix
}

resource "azurerm_resource_group" "this" {
  name     = local.resource_group_name
  location = var.location
}

resource "azurerm_virtual_network" "this" {
  name                = local.vnet_name
  location            = azurerm_resource_group.this.location
  resource_group_name = azurerm_resource_group.this.name
  address_space       = [var.vnet_cidr]
}

resource "azurerm_subnet" "aks" {
  name                 = local.aks_subnet_name
  resource_group_name  = azurerm_resource_group.this.name
  virtual_network_name = azurerm_virtual_network.this.name
  address_prefixes     = [var.aks_subnet_cidr]
}

resource "azurerm_subnet" "firewall" {
  name                 = local.firewall_subnet_name
  resource_group_name  = azurerm_resource_group.this.name
  virtual_network_name = azurerm_virtual_network.this.name
  address_prefixes     = [var.firewall_subnet_cidr]
}

resource "azurerm_public_ip" "firewall" {
  name                = local.firewall_public_ip
  location            = azurerm_resource_group.this.location
  resource_group_name = azurerm_resource_group.this.name
  allocation_method   = "Static"
  sku                 = "Standard"
}

resource "azurerm_firewall_policy" "this" {
  name                = local.firewall_policy_name
  location            = azurerm_resource_group.this.location
  resource_group_name = azurerm_resource_group.this.name

  dns {
    proxy_enabled = true
  }
}

resource "azurerm_firewall" "this" {
  name                = local.firewall_name
  location            = azurerm_resource_group.this.location
  resource_group_name = azurerm_resource_group.this.name
  sku_name            = "AZFW_VNet"
  sku_tier            = "Standard"
  firewall_policy_id  = azurerm_firewall_policy.this.id

  ip_configuration {
    name                 = local.firewall_ipconfig_name
    subnet_id            = azurerm_subnet.firewall.id
    public_ip_address_id = azurerm_public_ip.firewall.id
  }
}

resource "azurerm_firewall_policy_rule_collection_group" "aks_rules" {
  name               = "aks-egress-rules"
  firewall_policy_id = azurerm_firewall_policy.this.id
  priority           = 100

  network_rule_collection {
    name     = "aks-network-rules"
    priority = 100
    action   = "Allow"

    rule {
      name                  = "apitcp"
      protocols             = ["TCP"]
      source_addresses      = ["*"]
      destination_addresses = ["AzureChinaCloud.${var.location}"]
      destination_ports     = ["9000"]
    }

    rule {
      name                  = "apiudp"
      protocols             = ["UDP"]
      source_addresses      = ["*"]
      destination_addresses = ["AzureChinaCloud.${var.location}"]
      destination_ports     = ["1194"]
    }

    rule {
      name              = "time"
      protocols         = ["UDP"]
      source_addresses  = ["*"]
      destination_fqdns = ["ntp.ubuntu.com"]
      destination_ports = ["123"]
    }

    rule {
      name             = "ghcr"
      protocols        = ["TCP"]
      source_addresses = ["*"]
      destination_fqdns = [
        "ghcr.io",
        "pkg-containers.githubusercontent.com"
      ]
      destination_ports = ["443"]
    }

    rule {
      name             = "docker"
      protocols        = ["TCP"]
      source_addresses = ["*"]
      destination_fqdns = [
        "docker.io",
        "registry-1.docker.io",
        "production.cloudflare.docker.com"
      ]
      destination_ports = ["443"]
    }
  }

  application_rule_collection {
    name     = "aks-application-rules"
    priority = 200
    action   = "Allow"

    rule {
      name                  = "fqdn"
      source_addresses      = ["*"]
      destination_fqdn_tags = ["AzureKubernetesService"]

      protocols {
        type = "Http"
        port = 80
      }

      protocols {
        type = "Https"
        port = 443
      }
    }
  }
}

resource "azurerm_route_table" "this" {
  name                = local.route_table_name
  location            = azurerm_resource_group.this.location
  resource_group_name = azurerm_resource_group.this.name
}

resource "azurerm_route" "default_to_firewall" {
  name                   = local.default_route_name
  resource_group_name    = azurerm_resource_group.this.name
  route_table_name       = azurerm_route_table.this.name
  address_prefix         = "0.0.0.0/0"
  next_hop_type          = "VirtualAppliance"
  next_hop_in_ip_address = azurerm_firewall.this.ip_configuration[0].private_ip_address
}

resource "azurerm_route" "firewall_public_ip_to_internet" {
  name                = local.firewall_public_route
  resource_group_name = azurerm_resource_group.this.name
  route_table_name    = azurerm_route_table.this.name
  address_prefix      = "${azurerm_public_ip.firewall.ip_address}/32"
  next_hop_type       = "Internet"
}

resource "azurerm_subnet_route_table_association" "aks" {
  subnet_id      = azurerm_subnet.aks.id
  route_table_id = azurerm_route_table.this.id
}

resource "azurerm_kubernetes_cluster" "this" {
  name                = local.aks_name
  location            = azurerm_resource_group.this.location
  resource_group_name = azurerm_resource_group.this.name
  dns_prefix          = "${var.prefix}-dns"

  default_node_pool {
    name           = "system"
    vm_size        = "Standard_D2s_v3"
    node_count     = var.node_count
    vnet_subnet_id = azurerm_subnet.aks.id

    upgrade_settings {
      max_surge                     = "10%"
      drain_timeout_in_minutes      = 0
      node_soak_duration_in_minutes = 0
    }
  }

  identity {
    type = "SystemAssigned"
  }

  network_profile {
    network_plugin = "azure"
    outbound_type  = "userDefinedRouting"
  }

  api_server_access_profile {
    authorized_ip_ranges = [
      "${azurerm_public_ip.firewall.ip_address}/32"
    ]
  }

  depends_on = [
    azurerm_route.default_to_firewall,
    azurerm_subnet_route_table_association.aks,
    azurerm_firewall_policy_rule_collection_group.aks_rules
  ]
}

resource "azurerm_role_assignment" "network_contributor" {
  scope                = azurerm_resource_group.this.id
  role_definition_name = "Network Contributor"
  principal_id         = azurerm_kubernetes_cluster.this.identity[0].principal_id
}

output "resource_group_name" {
  value = azurerm_resource_group.this.name
}

output "aks_cluster_name" {
  value = azurerm_kubernetes_cluster.this.name
}

output "firewall_public_ip" {
  value = azurerm_public_ip.firewall.ip_address
}

output "firewall_private_ip" {
  value = azurerm_firewall.this.ip_configuration[0].private_ip_address
}
Initialize Terraform
Run terraform init to initialize the Terraform deployment. This command downloads the azurerm provider required to manage your Azure resources.
terraform init -upgrade
Format and validate the configuration
Run terraform fmt to format the configuration file, and terraform validate to confirm the configuration is syntactically valid.
terraform fmt
terraform validate
Create a Terraform execution plan
Run terraform plan to create an execution plan.
terraform plan -out main.tfplan
Apply a Terraform execution plan
Run terraform apply to apply the execution plan to your Azure subscription.
terraform apply main.tfplan
Creating the virtual network, Azure Firewall, and AKS cluster takes several minutes to complete.
Verify egress, firewall, and route configuration
Get the resource group name, cluster name, and firewall public IP address from the Terraform outputs.
RESOURCE_GROUP=$(terraform output -raw resource_group_name)
CLUSTER_NAME=$(terraform output -raw aks_cluster_name)
FW_PUBLIC_IP=$(terraform output -raw firewall_public_ip)
Confirm the cluster uses the
userDefinedRoutingoutbound type and is restricted to the firewall's public IP address by using theaz aks showcommand.az aks show --resource-group $RESOURCE_GROUP --name $CLUSTER_NAME --query "{outboundType:networkProfile.outboundType, authorizedIpRanges:apiServerAccessProfile.authorizedIpRanges}"Confirm the AKS subnet's route table sends default traffic to the firewall's private IP address. Get the route table name by using the
az network route-table listcommand, and then list its routes by using theaz network route-table route listcommand.ROUTE_TABLE_NAME=$(az network route-table list --resource-group $RESOURCE_GROUP --query "[0].name" -o tsv) az network route-table route list --resource-group $RESOURCE_GROUP --route-table-name $ROUTE_TABLE_NAME --output tableConfirm the network and application rules are in place. Get the firewall policy name by using the
az network firewall policy listcommand, and then show the rule collection group by using theaz network firewall policy rule-collection-group showcommand.FW_POLICY_NAME=$(az network firewall policy list --resource-group $RESOURCE_GROUP --query "[0].name" -o tsv) az network firewall policy rule-collection-group show --resource-group $RESOURCE_GROUP --policy-name $FW_POLICY_NAME --name aks-egress-rules --query "ruleCollections[].name" -o tsv
Connect to the cluster
Configure kubectl to connect to your cluster by using the az aks get-credentials command, and then verify the connection by using the kubectl get nodes command.
az aks get-credentials --resource-group $RESOURCE_GROUP --name $CLUSTER_NAME
kubectl get nodes
Outbound traffic from the cluster now routes through Azure Firewall. The firewall policy allows the required AKS endpoints and blocks all other outbound connections by default.
Enable developer access to the API server
If you used authorized IP ranges for your cluster in the previous step, you need to add your developer tooling IP addresses to the AKS cluster list of approved IP ranges so you access the API server from there. You can also configure a jumpbox with the needed tooling inside a separate subnet in the firewall's VNet.
Retrieve your IP address using the following command:
CURRENT_IP=$(dig @resolver1.opendns.com ANY myip.opendns.com +short)Add the IP address to the approved ranges by using the
az aks updatecommand. The--api-server-authorized-ip-rangesoption replaces the current list, so include the firewall public IP address when you add the developer IP address.az aks update --resource-group $RESOURCE_GROUP --name $CLUSTER_NAME --api-server-authorized-ip-ranges $FW_PUBLIC_IP,$CURRENT_IP/32
Connect to the AKS cluster
Configure
kubectlto connect to your AKS cluster using theaz aks get-credentialscommand.az aks get-credentials --resource-group $RESOURCE_GROUP --name $CLUSTER_NAME
Deploy a public service on AKS
You can now start exposing services and deploying applications to this cluster. This example exposes a public service, but you also might want to expose an internal service using an internal load balancer.
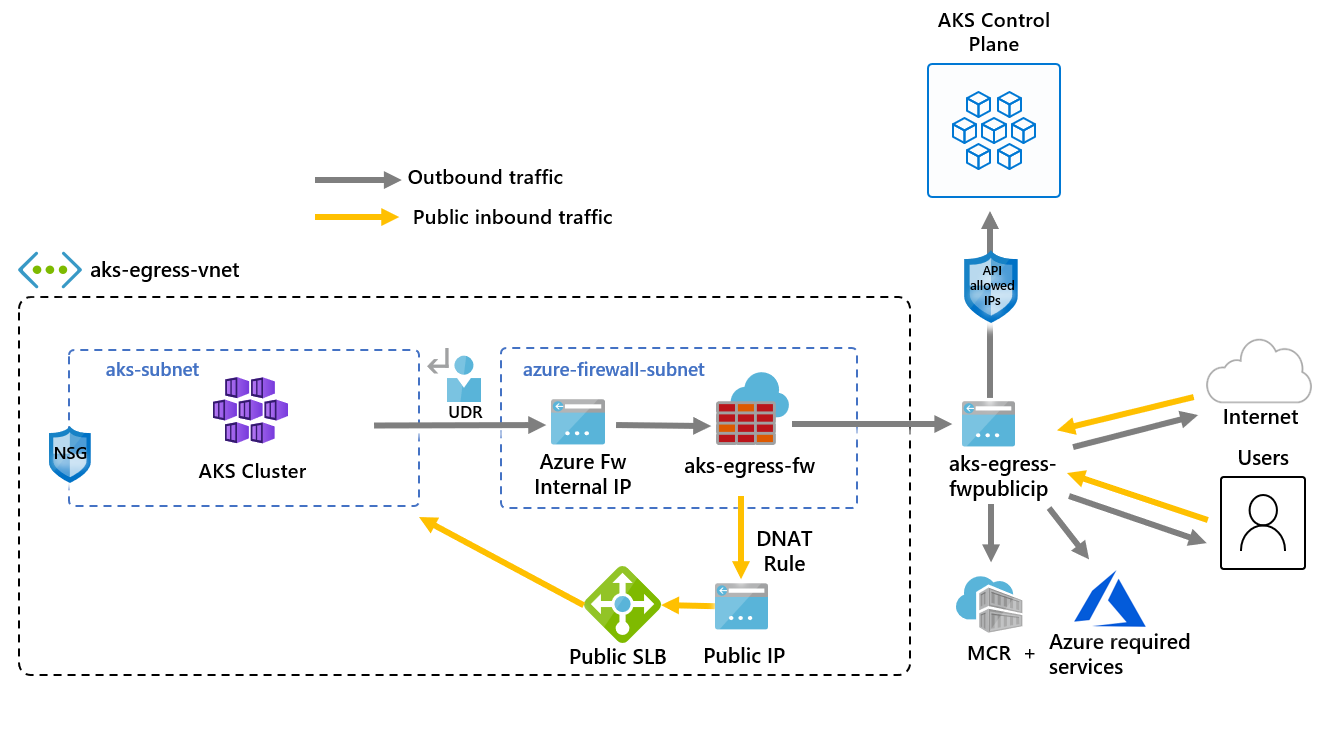
The diagram shows inbound public traffic arriving at the firewall public IP address, being translated by the DNAT rule, and being forwarded to the public load balancer frontend IP address for the AKS service.
Review the AKS Store Demo quickstart manifest to understand the deployed components.
Deploy the service by using the
kubectl applycommand.kubectl apply -f https://raw.githubusercontent.com/Azure-Samples/aks-store-demo/main/aks-store-quickstart.yaml
Get the load balancer public frontend IP
Get the public frontend IP address assigned to the load balancer by using the
kubectl get servicescommand.kubectl get servicesThe IP address should be listed in the
EXTERNAL-IPcolumn, as shown in the following example output:NAME TYPE CLUSTER-IP EXTERNAL-IP PORT(S) AGE kubernetes ClusterIP 10.0.0.1 <none> 443/TCP 9m10s order-service ClusterIP 10.0.104.144 <none> 3000/TCP 11s product-service ClusterIP 10.0.237.60 <none> 3002/TCP 10s rabbitmq ClusterIP 10.0.161.128 <none> 5672/TCP,15672/TCP 11s store-front LoadBalancer 10.0.89.139 20.39.18.6 80:32271/TCP 10sSave the public load balancer frontend IP address by using the
kubectl get svc store-frontcommand.SERVICE_IP=$(kubectl get svc store-front -o jsonpath='{.status.loadBalancer.ingress[*].ip}')
Create a DNAT rule on Azure Firewall
Important
When you use Azure Firewall to restrict egress traffic and create a UDR to force all egress traffic, ensure you create an appropriate DNAT rule in Azure Firewall to correctly allow ingress traffic. Using Azure Firewall with a UDR breaks the ingress setup due to asymmetric routing. The issue occurs if the AKS subnet has a default route that goes to the firewall's private IP address, but you're using a public load balancer - ingress or Kubernetes service of type loadBalancer. In this case, the incoming load balancer traffic is received via its public IP address, but the return path goes through the firewall's private IP address. Because Azure Firewall is stateful, it drops the returning packet because Azure Firewall isn't aware of an established session. To learn how to integrate Azure Firewall with your ingress or service load balancer, see Integrate Azure Firewall with Azure Standard Load Balancer.
To configure inbound connectivity, create a DNAT rule on Azure Firewall. To test connectivity to your cluster, the rule translates the firewall frontend public IP address to the public load balancer frontend IP address saved in $SERVICE_IP. You can customize the destination address. The translated port must be the exposed port for your Kubernetes service. For a topology that uses a private frontend IP address instead, configure an internal load balancer and use its private IP address as the translated address.
Add the NAT rule using the
az network firewall nat-rule createcommand.az network firewall nat-rule create --collection-name exampleset --destination-addresses $FW_PUBLIC_IP --destination-ports 80 --firewall-name $FW_NAME --name inboundrule --protocols Any --resource-group $RESOURCE_GROUP --source-addresses '*' --translated-port 80 --action Dnat --priority 100 --translated-address $SERVICE_IP
Validate connectivity
Navigate to the Azure Firewall frontend IP address in a browser to validate connectivity. You should see the AKS store app. In this example, the firewall public IP was
52.253.228.132: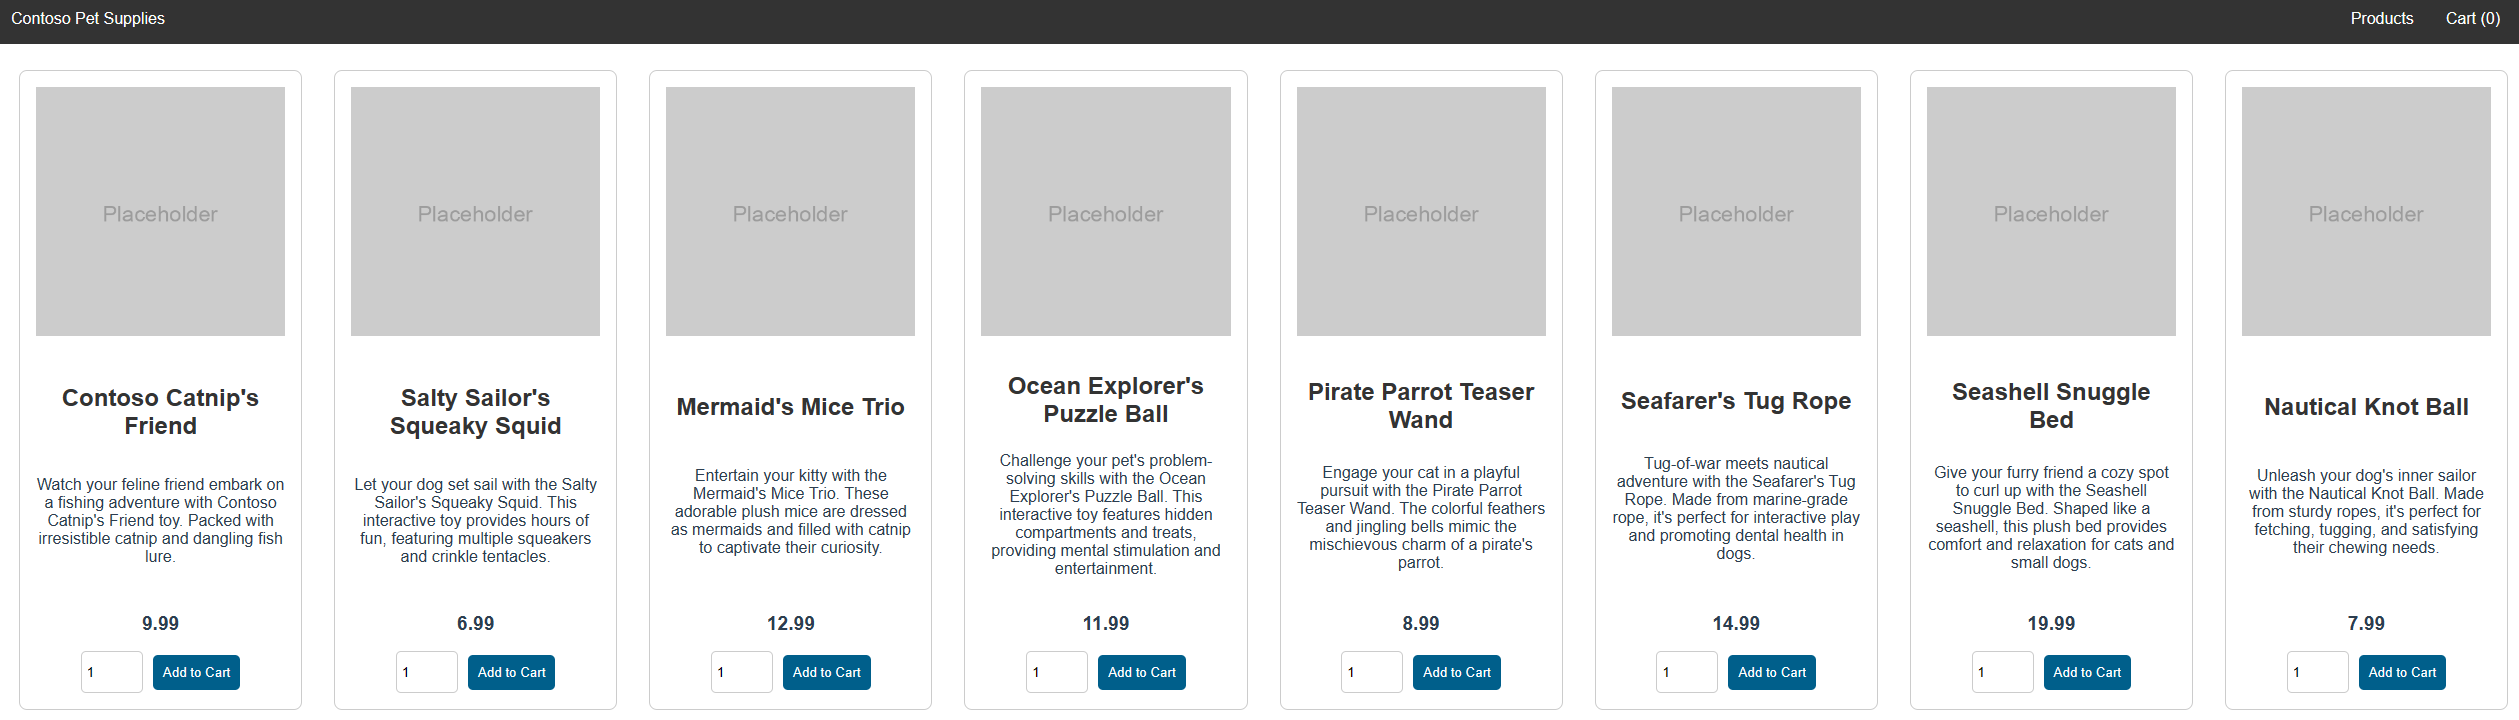
On this page, you can view products, add them to your cart, and then place an order.
Clean up resources
If you no longer need the resources created in this article, you can delete them to avoid incurring future costs.
Delete the AKS resource group using the
az group deletecommand.az group delete --name $RESOURCE_GROUP
Azure Firewall bills hourly whether or not it's actively processing traffic, in addition to data processing charges. Don't leave the firewall (or the rest of this sample) running longer than you need.
Warning
If you're working with existing or production resources in the same working directory, review the execution plan carefully before you destroy. Running terraform destroy removes every resource tracked in the Terraform state file for this configuration, including the virtual network, subnets, Azure Firewall, firewall policy and rules, route table, AKS cluster, and the role assignment. Avoid running it against shared infrastructure unless you're certain it's safe to remove.
Run terraform plan with the -destroy flag to review what Terraform removes.
terraform plan -destroy -out main.destroy.tfplan
Run terraform apply to apply the destroy plan and remove all resources created by this sample, including Azure Firewall.
terraform apply main.destroy.tfplan