Note
Access to this page requires authorization. You can try signing in or changing directories.
Access to this page requires authorization. You can try changing directories.
Consul is an open-source service mesh that provides a key set of functionality across the microservices in a Kubernetes cluster. These features include service discovery, health checking, service segmentation, and observability. For more information about Consul, see the official What is Consul? documentation.
This article shows you how to install Consul. The Consul components are installed into a Kubernetes cluster on AKS.
Note
These instructions reference Consul version 1.6.0, and use at least Helm version 2.14.2.
The Consul 1.6.x releases can be run against Kubernetes versions 1.13+. You can find additional Consul versions at GitHub - Consul Releases and information about each of the releases at Consul- Release Notes.
In this article, you learn how to:
- Install the Consul components on AKS
- Validate the Consul installation
- Uninstall Consul from AKS
Before you begin
The steps detailed in this article assume that you've created an AKS cluster (Kubernetes 1.13 and above, with Kubernetes RBAC enabled) and have established a kubectl connection with the cluster. If you need help with any of these items, then see the AKS quickstart. Ensure that your cluster has at least 3 nodes in the Linux node pool.
You'll need Helm to follow these instructions and install Consul. It's recommended that you have the latest stable version correctly installed and configured in your cluster. If you need help with installing Helm, then see the AKS Helm installation guidance. All Consul pods must also be scheduled to run on Linux nodes.
This article separates the Consul installation guidance into several discrete steps. The end result is the same in structure as the official Consul installation guidance.
Install the Consul components on AKS
We'll start by downloading version v0.10.0 of the Consul Helm chart. This version of the chart includes Consul version 1.6.0.
In a bash-based shell on Linux, Windows Subsystem for Linux or MacOS, use curl to download the Consul Helm chart release as follows:
# Specify the Consul Helm chart version that will be leveraged throughout these instructions
CONSUL_HELM_VERSION=0.10.0

curl -sL "https://github.com/hashicorp/consul-helm/archive/v$CONSUL_HELM_VERSION.tar.gz" | tar xz
mv consul-helm-$CONSUL_HELM_VERSION consul-helm
In a PowerShell-based shell on Windows, use Invoke-WebRequest to download the Consul Helm chart release and then extract with Expand-Archive as follows:
# Specify the Consul Helm chart version that will be leveraged throughout these instructions
$CONSUL_HELM_VERSION="0.10.0"

# Enforce TLS 1.2
[Net.ServicePointManager]::SecurityProtocol = "tls12"
$ProgressPreference = 'SilentlyContinue'; Invoke-WebRequest -URI "https://github.com/hashicorp/consul-helm/archive/v$CONSUL_HELM_VERSION.zip" -OutFile "consul-helm-$CONSUL_HELM_VERSION.zip"
Expand-Archive -Path "consul-helm-$CONSUL_HELM_VERSION.zip" -DestinationPath .
Move-Item -Path consul-helm-$CONSUL_HELM_VERSION -Destination consul-helm
Use Helm and the downloaded consul-helm chart to install the Consul components into the consul namespace in your AKS cluster.
Note
Installation options
We are using the following options as part of our installation:
connectInject.enabled=true- enable proxies to be injected into podsclient.enabled=true- enable Consul clients to run on every nodeclient.grpc=true- enable gRPC listener for connectInjectsyncCatalog.enabled=true- sync Kubernetes and Consul services
Node selectors
Consul currently must be scheduled to run on Linux nodes. If you have Windows Server nodes in your cluster, you must ensure that the Consul pods are only scheduled to run on Linux nodes. We'll use node selectors to make sure pods are scheduled to the correct nodes.
helm install -f consul-helm/values.yaml --name consul --namespace consul ./consul-helm \
  --set connectInject.enabled=true --set connectInject.nodeSelector="beta.kubernetes.io/os: linux" \
  --set client.enabled=true --set client.grpc=true --set client.nodeSelector="beta.kubernetes.io/os: linux" \
  --set server.nodeSelector="beta.kubernetes.io/os: linux" \
  --set syncCatalog.enabled=true --set syncCatalog.nodeSelector="beta.kubernetes.io/os: linux"
helm install -f consul-helm/values.yaml --name consul --namespace consul ./consul-helm `
  --set connectInject.enabled=true --set connectInject.nodeSelector="beta.kubernetes.io/os: linux" `
  --set client.enabled=true --set client.grpc=true --set client.nodeSelector="beta.kubernetes.io/os: linux" `
  --set server.nodeSelector="beta.kubernetes.io/os: linux" `
  --set syncCatalog.enabled=true --set syncCatalog.nodeSelector="beta.kubernetes.io/os: linux"
The Consul Helm chart deploys a number of objects. You can see the list from the output of your helm install command above. The deployment of the Consul components can take around 3 minutes to complete, depending on your cluster environment.
At this point, you've deployed Consul to your AKS cluster. To ensure that we have a successful deployment of Consul, let's move on to the next section to validate the Consul installation.
Validate the Consul installation
Confirm that the resources have been successfully created. Use the kubectl get svc and kubectl get pod commands to query the consul namespace, where the Consul components were installed by the helm install command:
kubectl get svc --namespace consul --output wide
kubectl get pod --namespace consul --output wide
The following example output shows the services and pods (scheduled on Linux nodes) that should now be running:
NAME                                 TYPE           CLUSTER-IP    EXTERNAL-IP             PORT(S)                                                                   AGE     SELECTOR
consul                               ExternalName   <none>        consul.service.consul   <none>                                                                    38s     <none>
consul-consul-connect-injector-svc   ClusterIP      10.0.98.102   <none>                  443/TCP                                                                   3m26s   app=consul,component=connect-injector,release=consul
consul-consul-dns                    ClusterIP      10.0.46.194   <none>                  53/TCP,53/UDP                                                             3m26s   app=consul,hasDNS=true,release=consul
consul-consul-server                 ClusterIP      None          <none>                  8500/TCP,8301/TCP,8301/UDP,8302/TCP,8302/UDP,8300/TCP,8600/TCP,8600/UDP   3m26s   app=consul,component=server,release=consul
consul-consul-ui                     ClusterIP      10.0.50.188   <none>                  80/TCP                                                                    3m26s   app=consul,component=server,release=consul

NAME                                                              READY   STATUS    RESTARTS   AGE    IP            NODE                            NOMINATED NODE   READINESS GATES
consul-consul-connect-injector-webhook-deployment-99f74fdbcr5zj   1/1     Running   0          3m9s   10.240.0.68   aks-linux-92468653-vmss000002   <none>           <none>
consul-consul-jbksc                                               1/1     Running   0          3m9s   10.240.0.44   aks-linux-92468653-vmss000001   <none>           <none>
consul-consul-jkwtq                                               1/1     Running   0          3m9s   10.240.0.70   aks-linux-92468653-vmss000002   <none>           <none>
consul-consul-server-0                                            1/1     Running   0          3m9s   10.240.0.91   aks-linux-92468653-vmss000002   <none>           <none>
consul-consul-server-1                                            1/1     Running   0          3m9s   10.240.0.38   aks-linux-92468653-vmss000001   <none>           <none>
consul-consul-server-2                                            1/1     Running   0          3m9s   10.240.0.10   aks-linux-92468653-vmss000000   <none>           <none>
consul-consul-sync-catalog-d846b79c-8ssr8                         1/1     Running   2          3m9s   10.240.0.94   aks-linux-92468653-vmss000002   <none>           <none>
consul-consul-tz2t5                                               1/1     Running   0          3m9s   10.240.0.12   aks-linux-92468653-vmss000000   <none>           <none>
All of the pods should show a status of Running. If your pods don't have these statuses, wait a minute or two until they do. If any pods report an issue, use the kubectl describe pod command to review their output and status.
Accessing the Consul UI
The Consul UI was installed in our setup above and provides UI based configuration for Consul. The UI for Consul is not exposed publicly via an external ip address. To access the Consul user interface, use the kubectl port-forward command. This command creates a secure connection between your client machine and the relevant pod in your AKS cluster.
kubectl port-forward -n consul svc/consul-consul-ui 8080:80
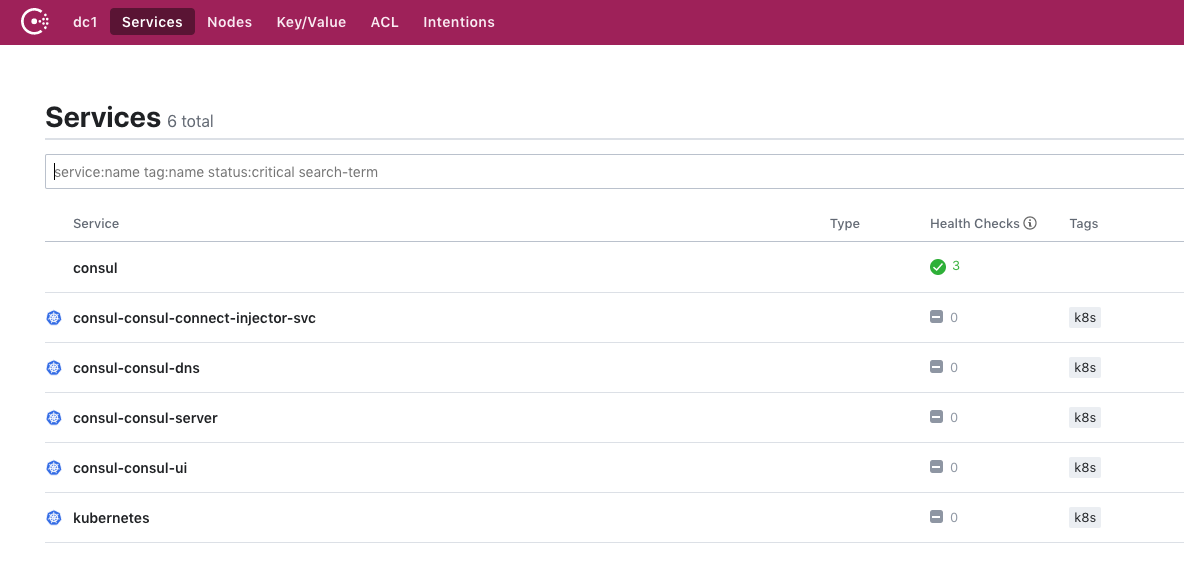
You can now open a browser and point it to http://localhost:8080/ui to open the Consul UI. You should see the following when you open the UI:
Uninstall Consul from AKS
Warning
Deleting Consul from a running system may result in traffic related issues between your services. Ensure that you have made provisions for your system to still operate correctly without Consul before proceeding.
Remove Consul components and namespace
To remove Consul from your AKS cluster, use the following commands. The helm delete commands will remove the consul chart, and the kubectl delete namespace command will remove the consul namespace.
helm delete --purge consul
kubectl delete namespace consul
Next steps
To explore more installation and configuration options for Consul, see the following official Consul articles:
You can also follow additional scenarios using: