Note
Access to this page requires authorization. You can try signing in or changing directories.
Access to this page requires authorization. You can try changing directories.
Application scenarios that require very high scale can exceed the compute resource capacity available to a single deployment of an app. Voting applications, sporting events, and televised entertainment events are all examples of scenarios that require extremely high scale. High scale requirements can be met by horizontally scaling out apps. To handle extreme load requirements, many app deployments can be made within a single region and across regions.
Overview
App Service Environments are an ideal platform for horizontal scale-out. After selecting an App Service Environment configuration that can support a known request rate, developers can deploy additional App Service Environments in "cookie cutter" fashion to attain a desired peak load capacity.
Note
If you want to get started with Azure App Service before signing up for an Azure account, go to Try App Service, where you can immediately create a short-lived starter web app in App Service. No credit cards required; no commitments.
For example, suppose an app running on an App Service Environment configuration has been tested to handle 20 K requests per second (RPS). If the desired peak load capacity is 100 K RPS, five (5) App Service Environments can be created and configured to ensure the application can handle the maximum projected load.
Since customers typically access apps using a custom (or vanity) domain, developers need a way to distribute app requests across all of the App Service Environment instances. A great way to accomplish this goal is to resolve the custom domain using an Azure Traffic Manager profile. The Traffic Manager profile can be configured to point at all of the individual App Service Environments. Traffic Manager will automatically handle distributing customers across all of the App Service Environments, based on the load-balancing settings in the Traffic Manager profile. This approach works regardless of whether all of the App Service Environments are deployed in a single Azure region, or deployed worldwide across multiple Azure regions.
Furthermore, since customers access apps through the vanity domain, customers are unaware of the number of App Service Environments running an app. As a result developers can quickly and easily add, and remove, App Service Environments based on observed traffic load.
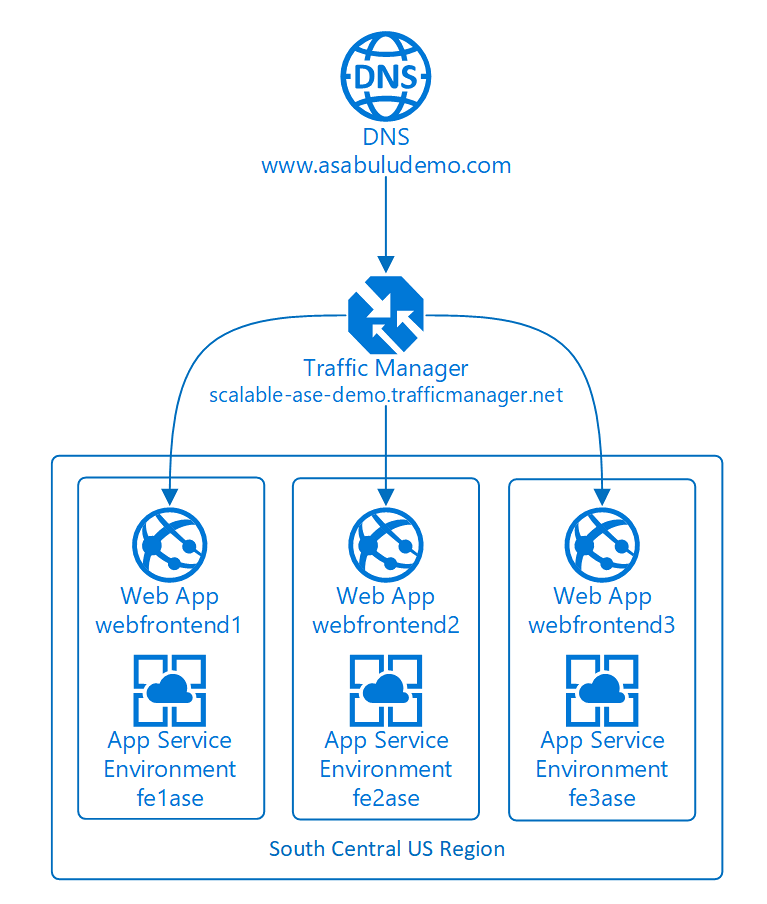
The conceptual diagram below depicts an app horizontally scaled out across three App Service Environments within a single region.

The remainder of this article walks through the steps involved with setting up a distributed topology for the sample app using multiple App Service Environments.
Planning the topology
Before you build out a distributed app footprint, it helps to have a few pieces information ahead of time.
- Custom domain for the app: What is the custom domain name that customers will use to access the app? For the sample app, the custom domain name is
www.asabuludemo.com. - Traffic Manager domain: Choose a domain name when creating an Azure Traffic Manager profile. This name will be combined with the trafficmanager.cn suffix to register a domain entry that is managed by Traffic Manager. For the sample app, the name chosen is scalable-ase-demo. As a result the full domain name that is managed by Traffic Manager is scalable-ase-demo.trafficmanager.cn.
- Strategy for scaling the app footprint: Will the application footprint be distributed across multiple App Service Environments in a single region? Multiple regions? A mix-and-match of both approaches? Base the decision on expectations of where customer traffic will originate, and how well the rest of an app's supporting back-end infrastructure can scale. For example, with a 100% stateless application, an app can be massively scaled using a combination of many App Service Environments in each Azure region, multiplied by App Service Environments deployed across many Azure regions. With 15+ global Azure regions available to choose from, customers can truly build a world-wide hyper-scale application footprint. For the sample app that's used for this article, three App Service Environments were created in a single Azure region (China East).
- Naming convention for the App Service Environments: Each App Service Environment requires a unique name. Beyond one or two App Service Environments, it's helpful to have a naming convention to help identify each App Service Environment. For the sample app, a simple naming convention was used. The names of the three App Service Environments are fe1ase, fe2ase, and fe3ase.
- Naming convention for the apps: Since multiple instances of the app will be deployed, a name is needed for each instance of the deployed app. One little-known but convenient feature of App Service Environments is that the same app name can be used across multiple App Service Environments. Since each App Service Environment has a unique domain suffix, developers can choose to reuse the exact same app name in each environment. For example, a developer could have apps named as follows: myapp.foo1.p.chinacloudsites.cn, myapp.foo2.p.chinacloudsites.cn, myapp.foo3.p.chinacloudsites.cn, etc. For the sample app, however, each app instance also has a unique name. The app instance names used are webfrontend1, webfrontend2, and webfrontend3.
Setting up the Traffic Manager profile
Once multiple instances of an app are deployed on multiple App Service Environments, the individual app instances can be registered with Traffic Manager. For the sample app, a Traffic Manager profile is needed for scalable-ase-demo.trafficmanager.cn that can route customers to any of the following deployed app instances:
- webfrontend1.fe1ase.p.chinacloudsites.cn: An instance of the sample app deployed on the first App Service Environment.
- webfrontend2.fe2ase.p.chinacloudsites.cn: An instance of the sample app deployed on the second App Service Environment.
- webfrontend3.fe3ase.p.chinacloudsites.cn: An instance of the sample app deployed on the third App Service Environment.
The easiest way to register multiple Azure App Service endpoints, all running in the same Azure region, is with the PowerShell Azure Resource Manager Traffic Manager support.
The first step is to create an Azure Traffic Manager profile. The code below shows how the profile was created for the sample app:
$profile = New-AzTrafficManagerProfile –Name scalableasedemo -ResourceGroupName yourRGNameHere -TrafficRoutingMethod Weighted -RelativeDnsName scalable-ase-demo -Ttl 30 -MonitorProtocol HTTP -MonitorPort 80 -MonitorPath "/"
Notice how the RelativeDnsName parameter was set to scalable-ase-demo. This parameter causes the domain name scalable-ase-demo.trafficmanager.cn to be created and associated with a Traffic Manager profile.
The TrafficRoutingMethod parameter defines the load-balancing policy Traffic Manager will use to determine how to spread customer load across all of the available endpoints. In this example, the Weighted method was chosen. Because of this choice, customer requests will be spread across all registered application endpoints based on the relative weights that are associated with each endpoint.
With the profile created, each app instance is added to the profile as a native Azure endpoint. The following code fetches a reference to each front-end web app. It then adds each app as a Traffic Manager endpoint through the TargetResourceId parameter.
$webapp1 = Get-AzWebApp -Name webfrontend1
Add-AzTrafficManagerEndpointConfig –EndpointName webfrontend1 –TrafficManagerProfile $profile –Type AzureEndpoints -TargetResourceId $webapp1.Id –EndpointStatus Enabled –Weight 10

$webapp2 = Get-AzWebApp -Name webfrontend2
Add-AzTrafficManagerEndpointConfig –EndpointName webfrontend2 –TrafficManagerProfile $profile –Type AzureEndpoints -TargetResourceId $webapp2.Id –EndpointStatus Enabled –Weight 10

$webapp3 = Get-AzWebApp -Name webfrontend3
Add-AzTrafficManagerEndpointConfig –EndpointName webfrontend3 –TrafficManagerProfile $profile –Type AzureEndpoints -TargetResourceId $webapp3.Id –EndpointStatus Enabled –Weight 10

Set-AzTrafficManagerProfile –TrafficManagerProfile $profile
Notice how there is one call to Add-AzureTrafficManagerEndpointConfig for each individual app instance. The TargetResourceId parameter in each PowerShell command references one of the three deployed app instances. The Traffic Manager profile will spread load across all three endpoints registered in the profile.
All of the three endpoints use the same value (10) for the Weight parameter. This situation results in Traffic Manager spreading customer requests across all three app instances relatively evenly.
Pointing the app's custom domain at the Traffic Manager domain
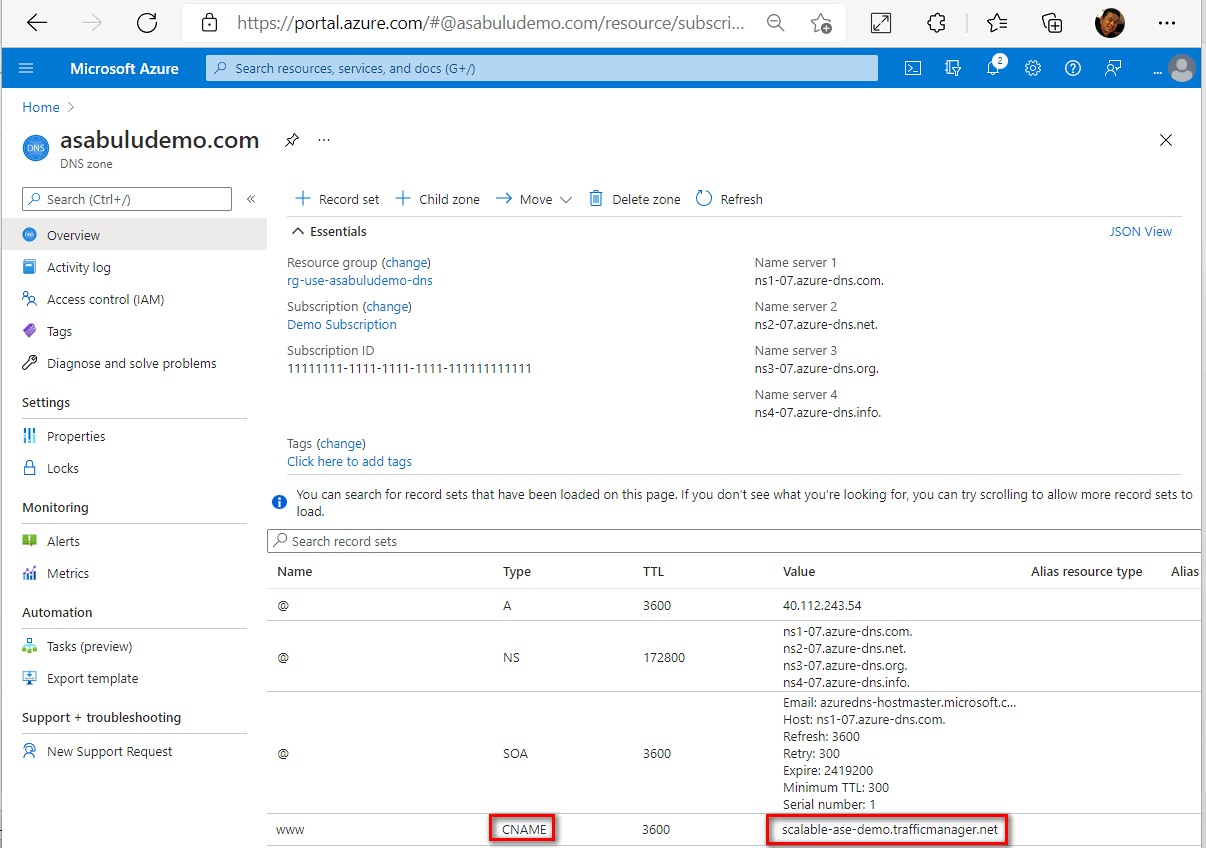
The final step necessary is to point the custom domain of the app at the Traffic Manager domain. For the sample app, point www.asabuludemo.com at scalable-ase-demo.trafficmanager.cn. Complete this step with the domain registrar that manages the custom domain.
By using your registrar's domain management tools, create a CNAME record that points the custom domain at the Traffic Manager domain. The picture below shows an example of what this CNAME configuration looks like:

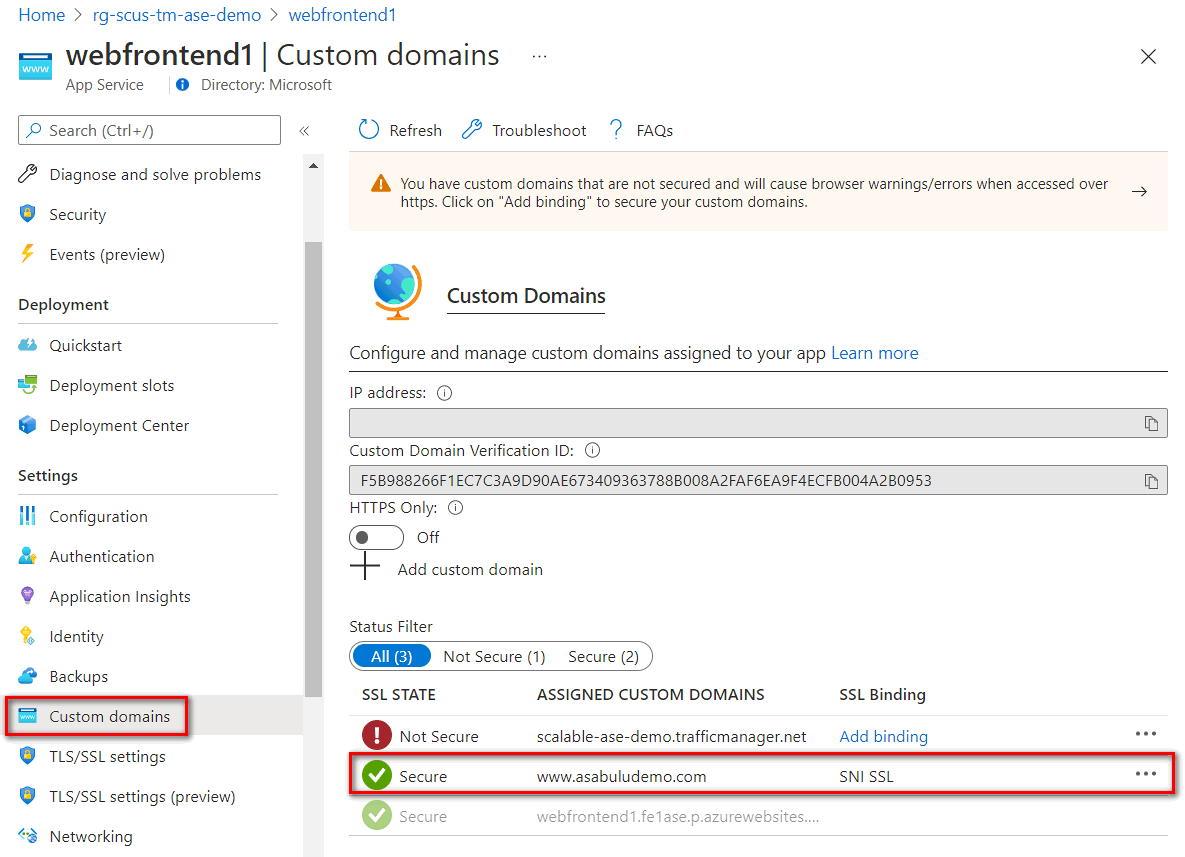
Although not covered in this topic, remember that each individual app instance needs to have the custom domain registered with it as well. Otherwise, if a request makes it to an app instance, and the application hasn't registered the custom domain with the app, the request will fail.
In this example, the custom domain is www.asabuludemo.com, and each application instance has the custom domain associated with it.

For a recap of registering a custom domain with Azure App Service apps, see registering custom domains.
Trying out the distributed topology
The end result of the Traffic Manager and DNS configuration is that requests for www.asabuludemo.com will flow through the following sequence:
- A browser or device will make a DNS lookup for
www.asabuludemo.com - The CNAME entry at the domain registrar causes the DNS lookup to be redirected to Azure Traffic Manager.
- A DNS lookup is made for scalable-ase-demo.trafficmanager.cn against one of the Azure Traffic Manager DNS servers.
- Based on the load-balancing policy specified earlier in the TrafficRoutingMethod parameter, Traffic Manager selects one of the configured endpoints. It then returns the FQDN of that endpoint to the browser or device.
- Since the FQDN of the endpoint is the Url of an app instance that runs on an App Service Environment, the browser or device will ask a Azure DNS server to resolve the FQDN to an IP address.
- The browser or device will send the HTTP/S request to the IP address.
- The request will arrive at one of the app instances running on one of the App Service Environments.
The console picture below shows a DNS lookup for the sample app's custom domain. It successfully resolves to an app instance that runs on one of the three sample App Service Environments (in this case, the second of the three App Service Environments):
