Note
Access to this page requires authorization. You can try signing in or changing directories.
Access to this page requires authorization. You can try changing directories.
This article shows you how to lock down the outbound traffic from your Azure App Service app to back-end Azure resources or other network resources by using Azure Firewall. This configuration helps to prevent data exfiltration and protect your app from malicious program implantation.
By default, an App Service app can make outbound requests to the public internet, for example when installing required Node.js packages from NPM.org. If your app is integrated with an Azure virtual network, you can use network security groups to control the target IP addresses, ports, and protocols of outbound traffic.
Azure Firewall can control outbound traffic at a more granular level and lets you filter traffic based on real-time threat intelligence from Microsoft cybersecurity. You can centrally create, enforce, and log application and network connectivity policies across subscriptions and virtual networks. For more information, see Azure Firewall features.
Work through the following procedures to set up, deploy, and use Azure Firewall to control outbound traffic from your App Service app. For more information about App Service network concepts and security enhancements, see Networking features and Zero to Hero with App Service, Part 6: Securing your web app.
Prerequisites
Have an App Service app that uses regional virtual network integration. For more information, see Enable virtual network integration in Azure App Service.
- In the virtual network integration setup, verify that route all is enabled, which is the default.
- In your app, disable any routing through service endpoints, because all outbound traffic is going to route through the firewall.
1. Create the required firewall subnets
To deploy a firewall into the integrated virtual network, the virtual network must have a subnet called AzureFirewallSubnet. Also, forced tunneling is required by default, so the network must also have a subnet called AzureFirewallManagementSubnet. For more information, see Azure Firewall forced tunneling.
In the Azure portal, navigate to the virtual network integrated with your app.
On the page for your app's integrated virtual network, select Subnets from the left navigation menu.
On the Subnets page, select + Subnet.
On the Add a subnet page, for Subnet purpose, select Azure Firewall.
The name AzureFirewallSubnet and other settings are automatically assigned. Under IPv4, make sure the specified range is at least /26 in size.
Select Add.
Repeat the same procedure to add the AzureFirewallManagementSubnet, this time selecting Firewall Management (forced tunneling) as the Subnet purpose.
2. Deploy the firewall and get its IP address
From the virtual network Overview page, select Firewall from the left navigation menu.
Select Click here to add a new firewall.
On the Create a Firewall page, make sure the Subscription, Resource group, and Region are the same as for the virtual network.
For Name, provide a name for the firewall.
For Firewall policy, select Add new and provide a name for the policy.
For Choose a virtual network, select Use existing and then select your integrated virtual network.
For Public IP address, select an existing address or create one by selecting Add new.
Under Firewall Management NIC, select an existing address for Management public IP address, or create one by selecting Add new.
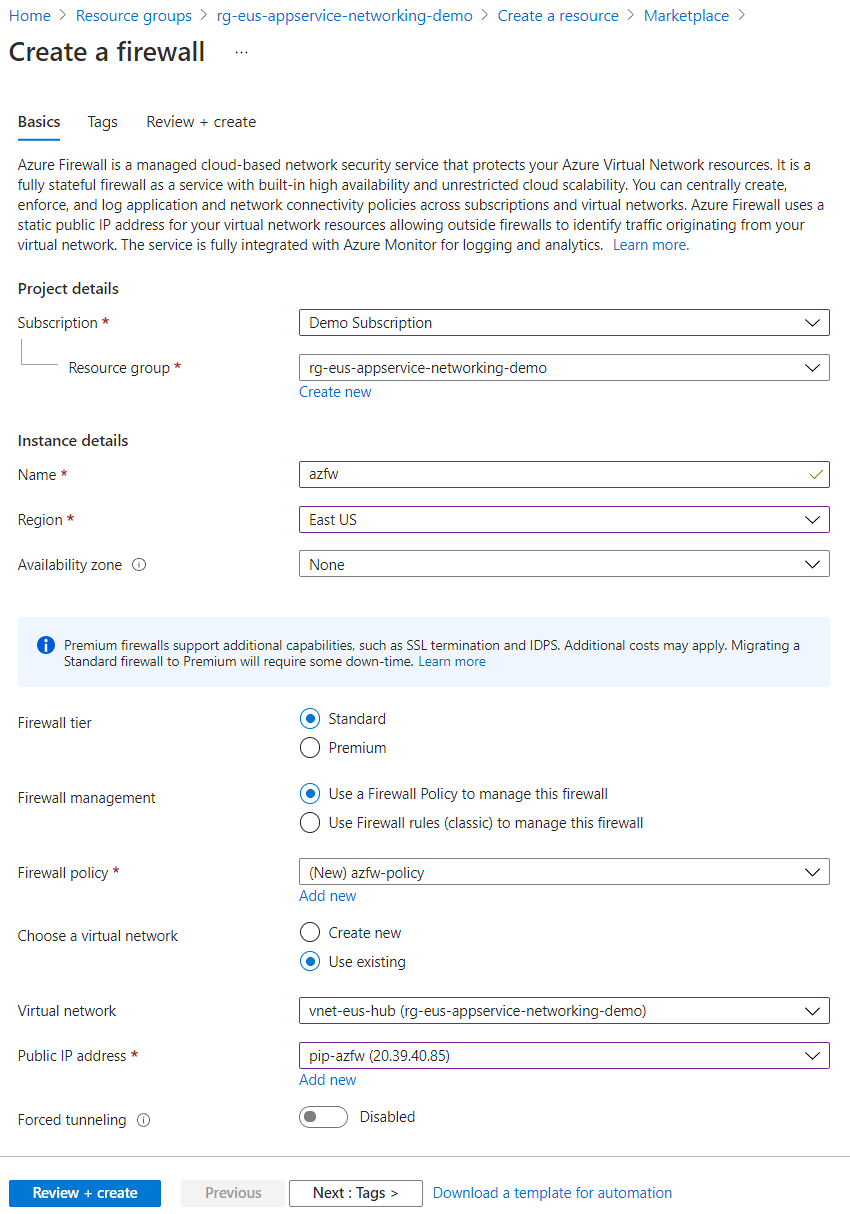
Select Review + create at the top of the page, and when validation passes, select Create. The firewall takes a few minutes to deploy.
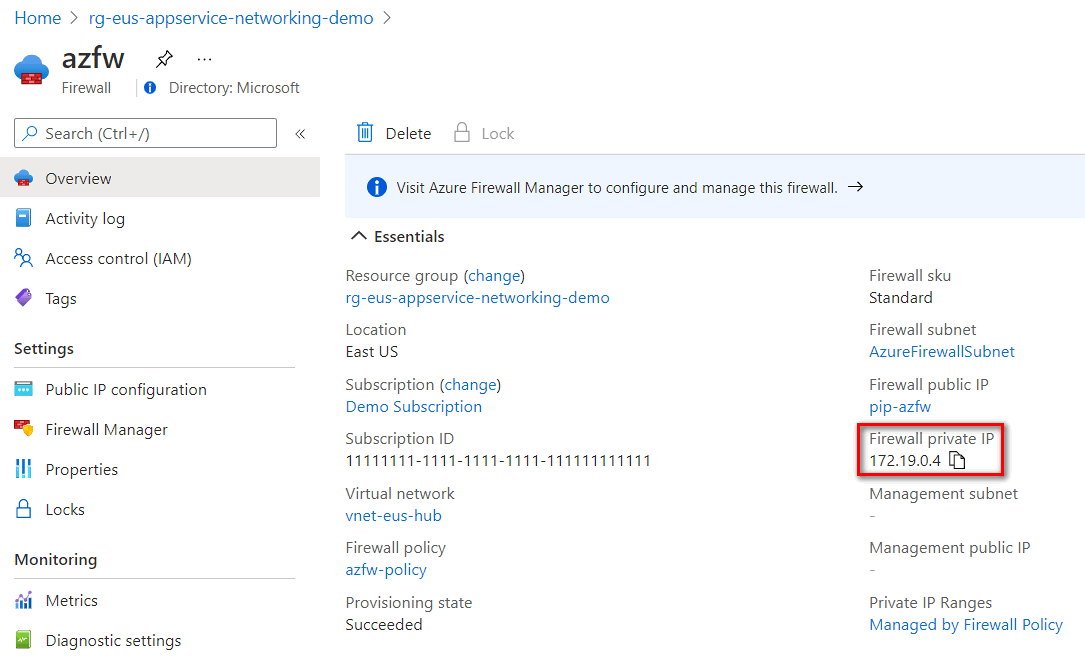
When deployment completes, select Go to resource.
On the firewall's Overview page, copy the Private IP address. You use the private IP address as the next hop address in the routing rule for the virtual network.
Route all traffic to the firewall
When you create a virtual network, Azure automatically creates a default route table for each of its subnets and adds system default routes to the table. In this step, you create a user-defined route table that routes all traffic to the firewall. You associate the user-defined route table with the App Service subnet in the integrated virtual network.
On your app's page in the Azure portal select Networking from the left navigation menu.
On the Networking page, under Integration subnet configuration at lower right, select Not configured next to User defined route.
On the Route tables page, select Create
Make sure the subscription and resource group are correct, and select the same Region as your firewall.
Provide a name for the route table.
For Propagate gateway routes, select No.
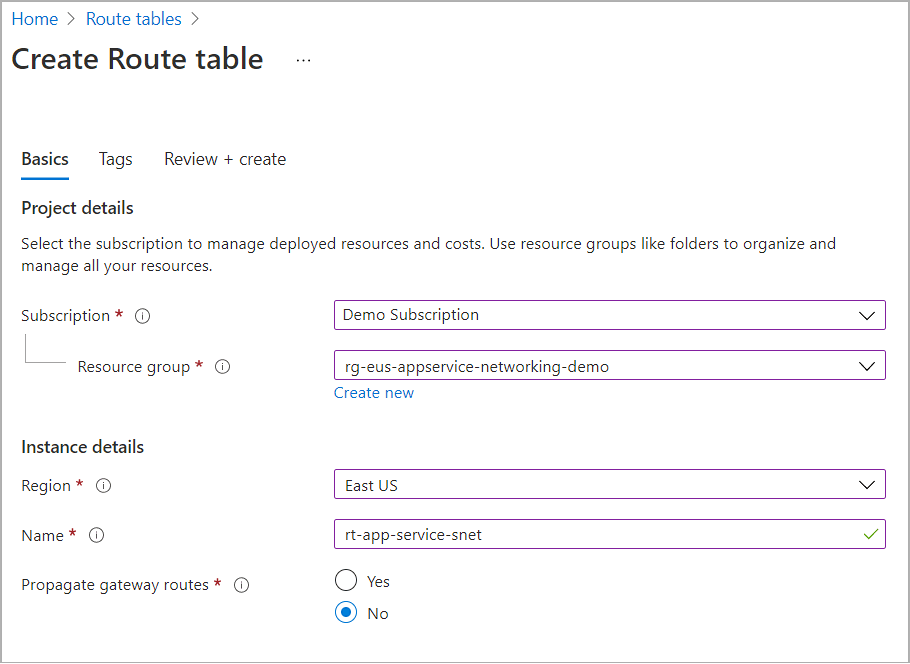
Select Review + create, and then select Create.
After deployment completes, select Go to resource, or go to your resource group and select the route table from the list of resources.
On the route table page, select Routes from the left navigation menu.
On the Routes page, select Add, and fill out the Add route screen as follows:
- Route name: Provide a name for the route.
- Destination type: Select IP Addresses.
- Destination IP addresses/CIDR ranges: Enter 0.0.0.0/0.
- Next hop type: Select Virtual appliance.
- Next hop address: Enter the private IP address for the firewall that you copied previously.
Select Add.
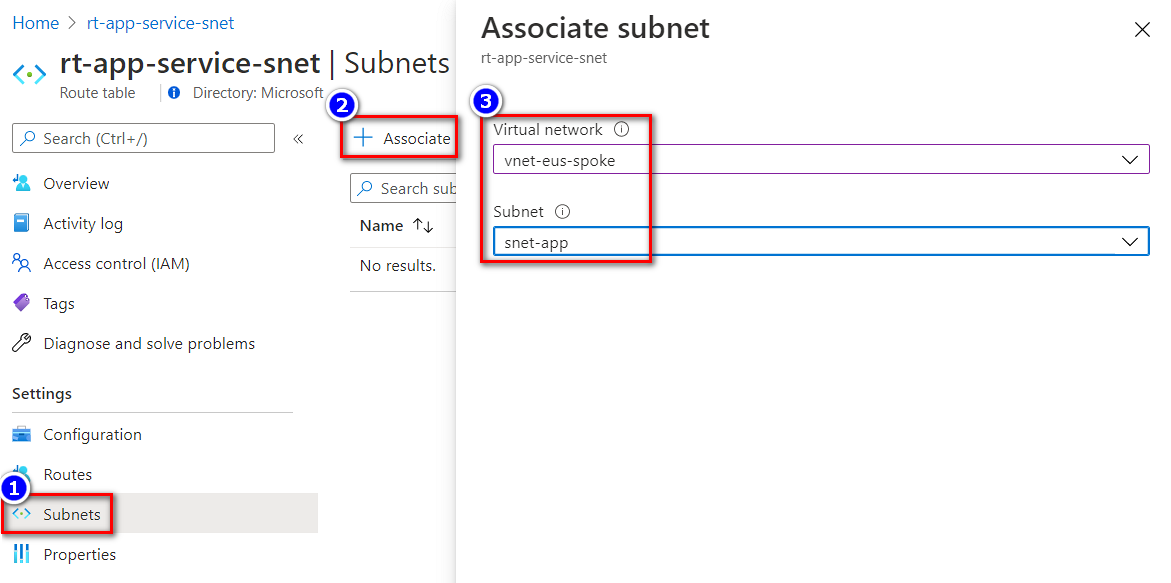
On the route table page, select Subnets from the left navigation menu.
On the Subnets page, select Associate.
On the Associate subnet screen, make sure your app's integrated virtual network and subnet are selected, or select them, and then select OK.
Outbound traffic from your app is now routed through the integrated virtual network to the firewall.
Configure firewall policies
To control App Service outbound traffic, add an application rule to firewall policy.
On your firewall's Overview page, select its firewall policy under Firewall policy.
On the firewall policy page, select Application rules from the left navigation menu.
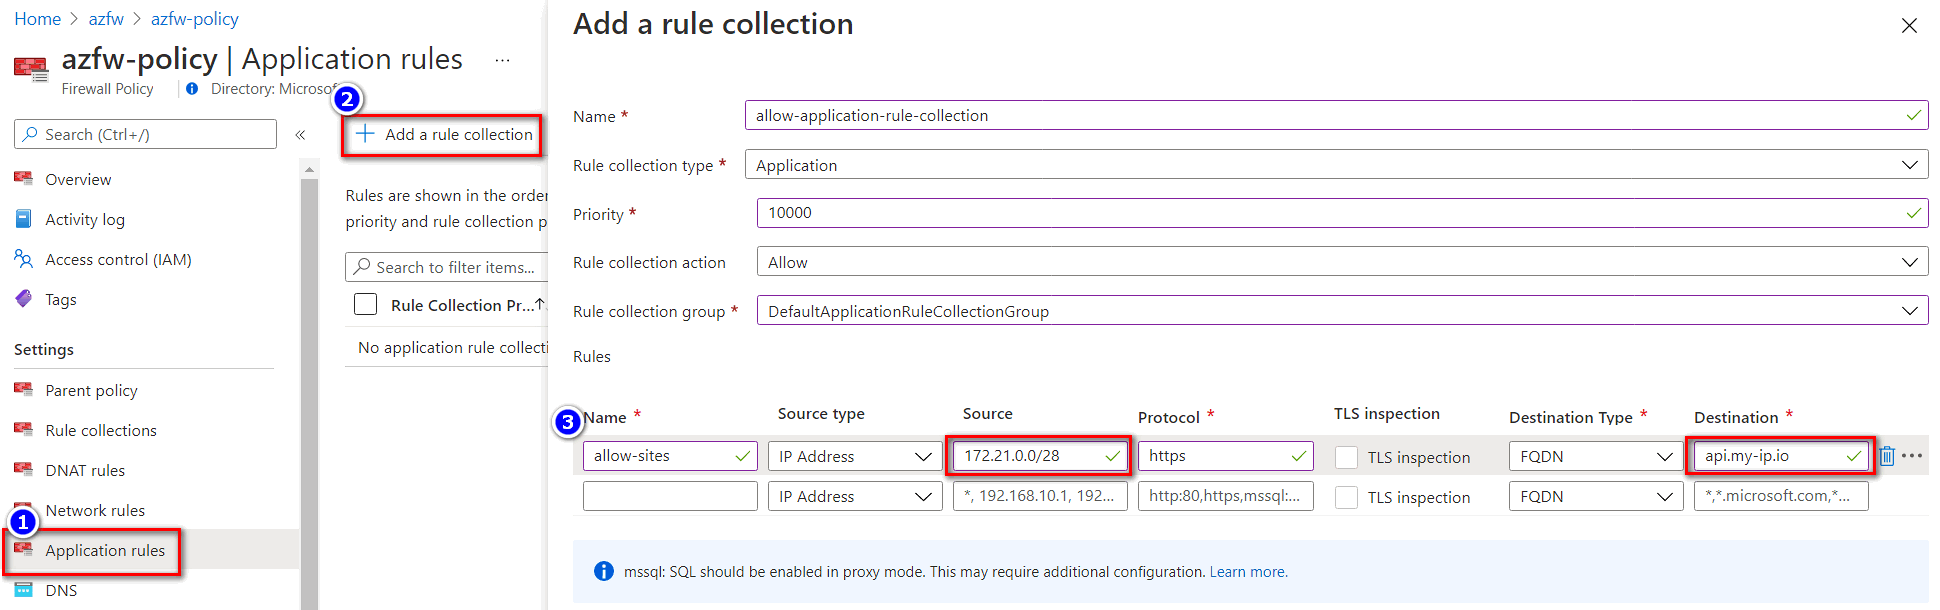
On the Application rules page, select Add a rule collection.
On the Add a rule collection screen, enter a Name and a Priority between 100 and 65000.
Under Rules, add a network rule with the App Service subnet as the source address, and specify a fully qualified domain name (FQDN) destination. The following example shows a destination FQDN of api.my-ip.io.
Select Add.
Note
Instead of specifying the App Service subnet as the source address, you can use the private IP address of the app directly. You can find your app's private IP address in the subnet by using the
WEBSITE_PRIVATE_IPenvironment variable.

Verify the outbound traffic
An easy way to verify the outbound connection of your configuration is to use the curl command from your app's Source Control Manager (SCM), also called Kudu, debug console.
In a browser, navigate to
https://<app-name>.scm.chinacloudsites.cn/DebugConsole.In the console, run
curl -s <protocol>://<fqdn-address>with a URL that matches the application rule you configured. For example, the following screenshot shows a successful response tohttps://api.my-ip.io.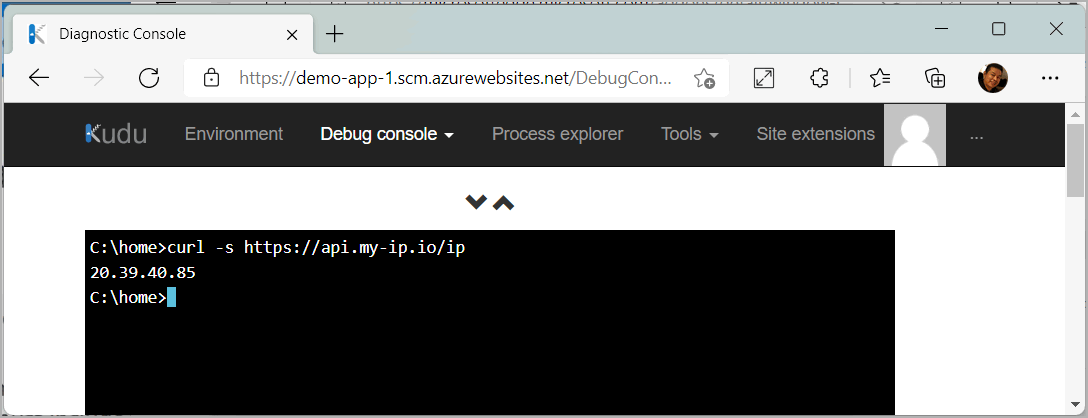
If you run curl -s <protocol>://<fqdn-address> with a URL that doesn't match the application rule you configured, you get no response, which indicates that your firewall blocked the outbound request from the app.
Firewall diagnostic logging
Because outbound requests are going through the firewall, you can capture them in the firewall logs by enabling firewall logging with the Azure Firewall Application Rule. For more information, see Structured Azure Firewall logs.
If you run the curl commands with diagnostic logs enabled, you can find them in the firewall logs.
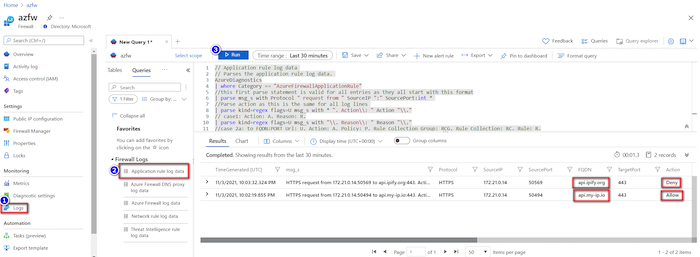
- In the Azure portal, navigate to your firewall.
- Select Logs from the left navigation menu.
- On the Queries hub screen, select Run in the Application rule log data tile.
You can see the two access logs in the query result.
