Note
Access to this page requires authorization. You can try signing in or changing directories.
Access to this page requires authorization. You can try changing directories.
In this quickstart, you learn how to create and deploy your first Node.js (Express) web app to Azure App Service. App Service supports various versions of Node.js on both Linux and Windows.
This quickstart configures an App Service app in the Free tier and incurs no cost for your Azure subscription.
Set up your initial environment
- Have an Azure account with an active subscription. Create a trial subscription.
- Install Node.js LTS. Run the command
node --versionto verify that Node.js is installed. - Install Visual Studio Code.
- Install the Azure App Service extension for Visual Studio Code.
- Have an Azure account with an active subscription. Create a trial subscription.
- Install Node.js LTS. Run the command
node --versionto verify that Node.js is installed. - Install Azure CLI, which you can use to run commands in a shell to create and configure Azure resources.
- Have an Azure account with an active subscription. Create a trial subscription.
- Install Node.js LTS. Run the command
node --versionto verify that Node.js is installed. - Have an FTP client, such as FileZilla, to transfer files to App Service.
Create your Node.js application
In this step, you create a basic Node.js application and ensure it runs on your computer.
Tip
If you already completed the Node.js tutorial, you can skip ahead to Deploy to Azure.
Create a Node.js application by using the express application generator, which is installed by default with Node.js and npm.
npx express-generator myExpressApp --view ejsIf this is the first time you've installed the generator, npx asks you to agree to the installation.
Change to the application's directory and install the npm packages.
cd myExpressApp && npm installUpdate dependencies to the most secure version.
npm audit fix --forceStart the development server with debug information.
DEBUG=myexpressapp:* npm startIn a browser, navigate to
http://localhost:3000. You should see something like this: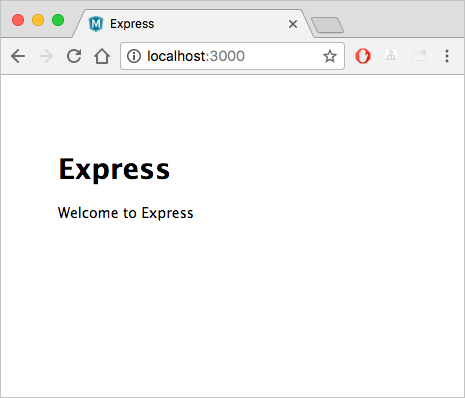
Deploy to Azure
Before you continue, ensure that you have all the prerequisites installed and configured.
Note
For your Node.js application to run in Azure, it needs to listen on the port provided by the PORT environment variable. In your generated Express app, this environment variable is already used in the startup script bin/www. (Search for process.env.PORT.)
Sign in to Azure
In the terminal, ensure you're in the myExpressApp directory, and then start Visual Studio Code with the following command:
code .In Visual Studio Code, in the Activity Bar, select the Azure logo.
Ensure that you're signed in with your Azure account.
Configure the App Service app and deploy code
Right-click App Services and select Create new Web App. A Linux container is used by default.
Type a globally unique name for your web app and select Enter. The name must be unique across all of Azure and use only alphanumeric characters (
A-Z,a-z, and0-9) and hyphens (-).In Select a runtime stack, select the Node.js version you want. Node 24 LTS is recommended.
In Select a pricing tier, select Free (F1) and wait for the resources to be created in Azure.
In the popup Always deploy the workspace "myExpressApp" to <app-name>", select Yes. Doing so ensures that, as long as you're in the same workspace, Visual Studio Code deploys to the same App Service app each time.
While Visual Studio Code creates the Azure resources and deploys the code, it shows progress notifications.
After deployment is complete, select Browse Website in the notification popup. The browser should display the Express default page.
In the terminal, ensure you're in the myExpressApp directory, and deploy the code in your local folder (myExpressApp) using the az webapp up command:
az webapp up --sku F1 --name <app-name>
- If the
azcommand isn't recognized, ensure you have the Azure CLI installed as described in Set up your initial environment. - Replace
<app_name>with a name that's unique across all of Azure. (Valid characters area-z,0-9, and-.) A good pattern is to use a combination of your company name and an app identifier. - The
--sku F1argument creates the web app on the Free pricing tier, which incurs no cost. - You can optionally include the argument
--location <location-name>where<location_name>is an available Azure region. You can retrieve a list of allowable regions for your Azure account by running theaz account list-locationscommand. - The command creates a Linux app for Node.js by default. To create a Windows app instead, use the
--os-typeargument. - If you see the error, "Could not auto-detect the runtime stack of your app," ensure you're running the command in the myExpressApp directory (See Troubleshooting auto-detect issues with az webapp up.)
The command might take a few minutes to complete. While running, it provides messages about creating the resource group, the App Service plan, and the app resource, configuring logging, and doing Zip deployment. It then returns a message that includes the app's URL, which is the app's URL on Azure.
The webapp '<app-name>' doesn't exist
Creating Resource group '<group-name>' ...
Resource group creation complete
Creating AppServicePlan '<app-service-plan-name>' ...
Creating webapp '<app-name>' ...
Configuring default logging for the app, if not already enabled
Creating zip with contents of dir /home/cephas/myExpressApp ...
Getting scm site credentials for zip deployment
Starting zip deployment. This operation can take a while to complete ...
Deployment endpoint responded with status code 202
You can launch the app at <URL>
{
  "URL": "<URL>",
  "appserviceplan": "<app-service-plan-name>",
  "location": "chinanorth2",
  "name": "<app-name>",
  "os": "<os-type>",
  "resourcegroup": "<group-name>",
  "runtime_version": "node|24",
  "runtime_version_detected": "0.0",
  "sku": "FREE",
  "src_path": "/home/cephas/myExpressApp"
}
Note
The az webapp up command does the following actions:
Create a default resource group.
Create a default App Service plan.
Create an app with the specified name.
Zip deploy all files from the current working directory, with build automation enabled.
Cache the parameters locally in the .azure/config file so that you don't need to specify them again when deploying later with
az webapp upor otheraz webappcommands from the project folder. The cached values are used automatically by default.
Create Azure resources
Sign in to the Azure portal.
To start creating a Node.js app, browse to https://portal.azure.cn/#create/Microsoft.WebSite.
In the Basics tab, under Project Details, ensure the correct subscription is selected and then select Create new to create a resource group. Type myResourceGroup for the name.

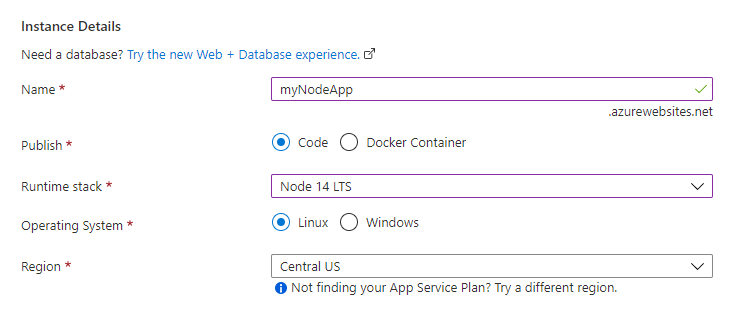
Under Instance details, type a globally unique name for your web app and select Code. Select Node 24 LTS in Runtime stack, an Operating System, and a Region you want to serve your app from.
Under Pricing plans, select Create new to create an App Service plan. Type myAppServicePlan for the name. To change to the Free tier, select Free F1 in the Pricing plan list.

Select the Review + create button at the bottom of the page.

After validation runs, select the Create button at the bottom of the page.
After deployment is complete, select Go to resource.

Get FTPS credentials
Azure App Service supports two types of credentials for FTP/S deployment. These credentials aren't the same as your Azure subscription credentials. In this section, you get the application-scope credentials to use with your FTP client.
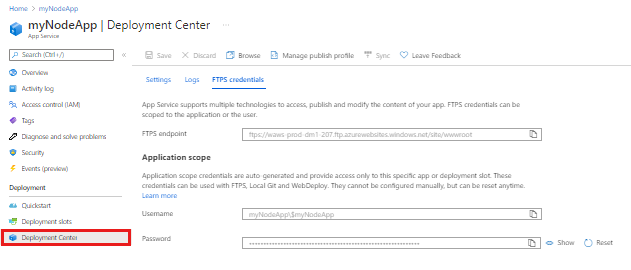
From the App Service app page, select Deployment Center under Deployment in the sidebar menu, and then select the FTPS Credentials tab.
Open your FTP client and navigate to your myExpressApp folder.
From the FTPS credentials tab, copy the FTPS endpoint, Username, and Password into your FTP client.
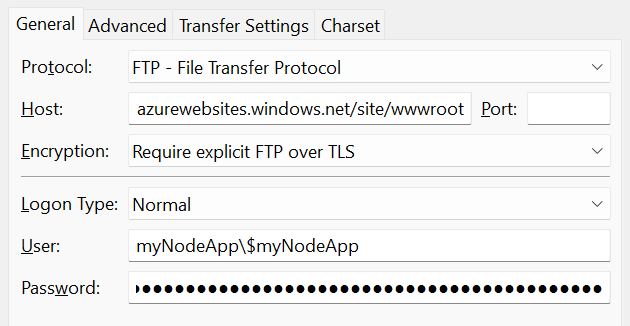
Select Connect in your FTP client.
Deploy files with FTPS
Copy all files and directories files to the /site/wwwroot directory in Azure.
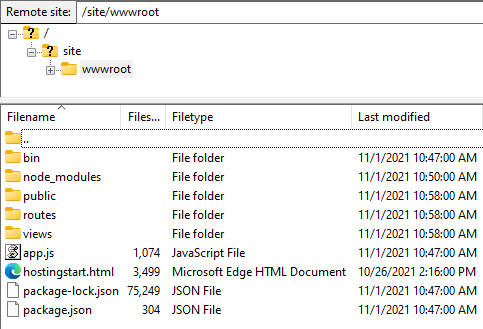
Browse to your app's URL to verify the app is running properly.
Redeploy updates
You can deploy changes to this app by making edits in Visual Studio Code, saving your files, and then redeploying to your Azure app. For example:
From the sample project, open views/index.ejs and change
<p>Welcome to <%= title %></p>to
<p>Welcome to Azure</p>
In the App Service explorer, select the Deploy to Web App icon again, and confirm by selecting Deploy again.
Wait for deployment to complete, then select Browse Website in the notification popup. You should see that the
Welcome to Expressmessage was changed toWelcome to Azure.
Save your changes, then redeploy the app using the az webapp up command again with no arguments for Linux. Add
--os-type Windowsfor Windows:az webapp upThis command uses values that are cached locally in the .azure/config file, such as the app name, resource group, and App Service plan.
Once deployment is complete, refresh the webpage. You should see that the
Welcome to Expressmessage was changed toWelcome to Azure.
Save your changes, then redeploy the app using your FTP client.
Once deployment is complete, refresh the webpage. You should see that the
Welcome to Expressmessage was changed toWelcome to Azure.
Stream logs
You can stream log output (calls to console.log()) from the Azure app directly in the Visual Studio Code output window.
In Resources in Visual Studio Code, right-click the app node and then select Start Streaming Logs.
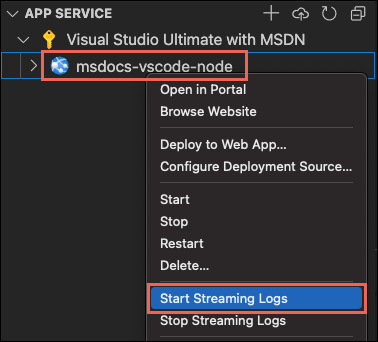
If asked to restart the app, select Yes. Once the app is restarted, the Visual Studio Code output window opens with a connection to the log stream.
After a few seconds, the output window shows a message indicating that you're connected to the log-streaming service. You can generate more output activity by refreshing the page in the browser.
Connecting to log stream...
2020-03-04T19:29:44  Welcome, you are now connected to log-streaming service. The default timeout is 2 hours.
Change the timeout with the App Setting SCM_LOGSTREAM_TIMEOUT (in seconds).
You can access the console logs generated from inside the app and the container in which it runs. Logs include any output generated by calls to console.log().
To stream logs, run the az webapp log tail command:
az webapp log tail
The command uses the resource group name cached in the .azure/config file.
You can also include the --logs parameter with the az webapp up command to automatically open the log stream on deployment.
Refresh the app in the browser to generate console logs, which include messages describing HTTP requests to the app. If no output appears immediately, try again in 30 seconds.
To stop log streaming at any time, select Ctrl+C in the terminal.
You can access the console logs generated from inside the app and the container in which it runs. You can stream log output (calls to console.log()) from the Node.js app directly in the Azure portal.
In the same App Service page for your app, use the sidebar menu to scroll to the Monitoring section and select Log stream.
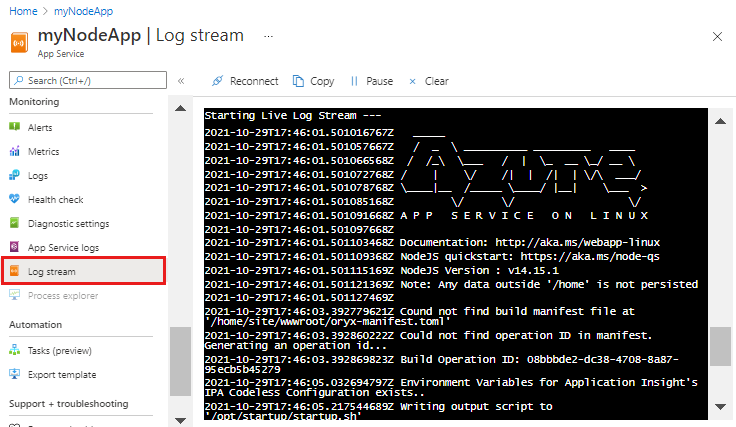
After a few seconds, the output window shows a message indicating that you're connected to the log-streaming service. You can generate more output activity by refreshing the page in the browser.
Connecting...
2021-10-26T21:04:14  Welcome, you are now connected to log-streaming service.
Starting Log Tail -n 10 of existing logs ----
/appsvctmp/volatile/logs/runtime/81b1b83b27ea1c3d598a1cdec28c71c4074ce66c735d0be57f15a8d07cb3178e.log
2021-10-26T21:04:08.614384810Z: [INFO]
2021-10-26T21:04:08.614393710Z: [INFO]  # Enter the source directory to make sure the script runs where the user expects
2021-10-26T21:04:08.614399010Z: [INFO]  cd "/home/site/wwwroot"
2021-10-26T21:04:08.614403210Z: [INFO]
2021-10-26T21:04:08.614407110Z: [INFO]  export NODE_PATH=/usr/local/lib/node_modules:$NODE_PATH
2021-10-26T21:04:08.614411210Z: [INFO]  if [ -z "$PORT" ]; then
2021-10-26T21:04:08.614415310Z: [INFO]          export PORT=8080
2021-10-26T21:04:08.614419610Z: [INFO]  fi
2021-10-26T21:04:08.614423411Z: [INFO]
2021-10-26T21:04:08.614427211Z: [INFO]  node /opt/startup/default-static-site.js
Ending Log Tail of existing logs ---
Clean up resources
In the preceding steps, you created Azure resources in a resource group. The steps in this quickstart put all the resources in this resource group. To clean up, you just need to remove the resource group.
In the Azure extension of Visual Studio Code, in the Group By list, select Group by Resource Group.
In the Resources list, expand the subscription, right-click the resource group you created earlier, and then select Delete Resource Group.
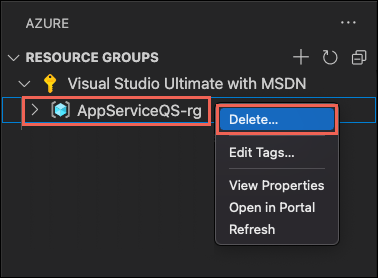
When prompted, confirm your deletion by entering the name of the resource group you're deleting. After you confirm, the resource group is deleted, and you see a notification when it's done.
In the preceding steps, you created Azure resources in a resource group. The resource group has a name like "appsvc_rg_Linux_chinanorth2" depending on your location.
If you don't expect to need these resources in the future, delete the resource group by running the following command:
az group delete --no-wait
The command uses the resource group name cached in the .azure/config file.
The --no-wait argument allows the command to return before the operation is complete.
You can delete the resource group, App service, and all related resources when they're no longer needed.
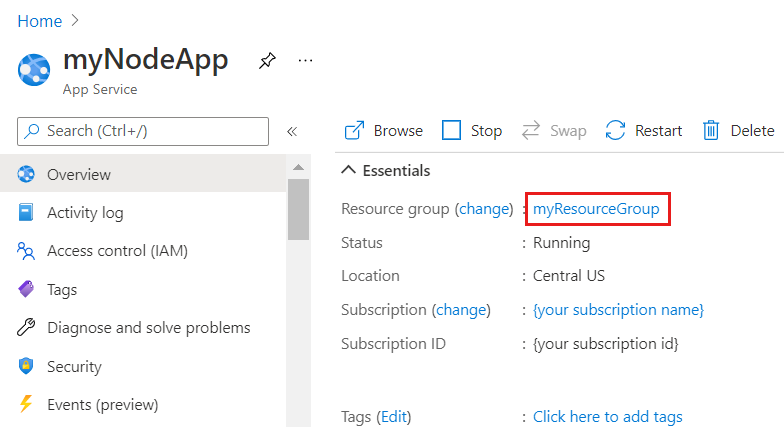
From your App Service overview page, select the resource group you created in the Create Azure resources step.
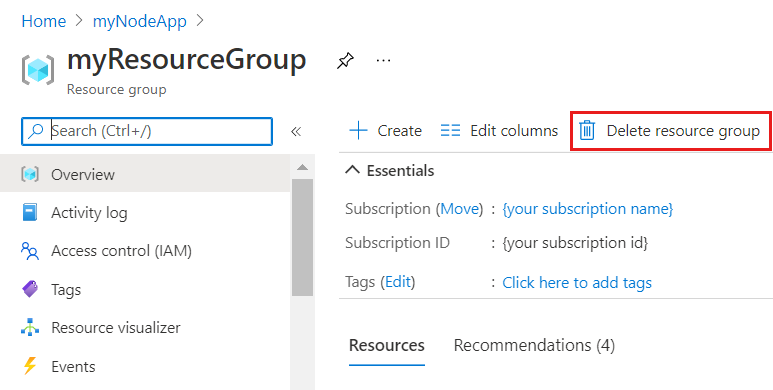
From the resource group page, select Delete resource group. Confirm the name of the resource group to finish deleting the resources.
Related content
Congratulations, you've successfully completed this quickstart!
Check out the other Azure extensions.
Or get them all by installing the Node Pack for Azure extension pack.
