Scaling your resources for a particular day of the week, or a specific date and time can reduce your costs while still providing the capacity you need when you need it.
You can use multiple profiles in autoscale to scale in different ways at different times. If for example, your business isn't active on the weekend, create a recurring profile to scale in your resources on Saturdays and Sundays. If black Friday is a busy day, create a profile to automatically scale out your resources on black Friday.
This article explains the different profiles in autoscale and how to use them.
You can have one or more profiles in your autoscale setting. Each time the autoscale service runs, it evaluates the profiles in the following order:
If a profile's date and time settings match the current time, autoscale applies that profile's rules and capacity limits. Only the first applicable profile is used.
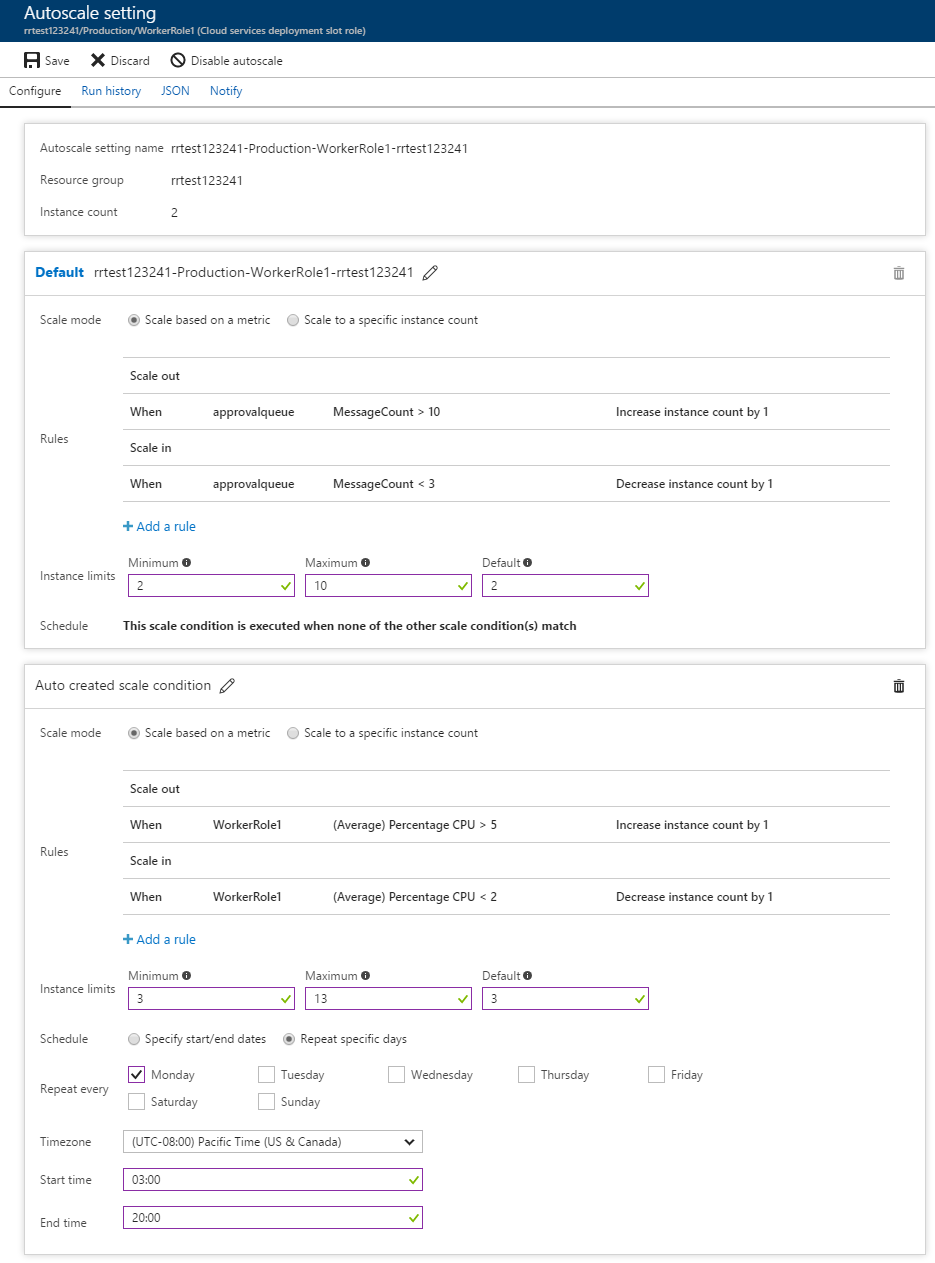
The following example shows an autoscale setting with a default profile and recurring profile.
Autoscale transitions between profiles based on their start times. The end time for a given profile is determined by the start time of the following profile.
In the Azure portal, the end time field becomes the next start time for the default profile. You can't specify the same time for the end of one profile and the start of the next. The portal forces the end time to be one minute before the start time of the following profile. During this minute, the default profile becomes active. If you don't want the default profile to become active between recurring profiles, leave the end time field empty.
The following examples define weekday and weekend recurring profiles for a virtual machine scale set. Each profile stays active until the next profile starts.
The following Azure CLI example uses the az monitor autoscale update command.
# User input variables - update values in <AngleBrackets>
resourceGroupName="<ResourceGroupName>"
vmssName="<VirtualMachineScaleSetName>"
autoscaleName="<AutoscaleSettingName>"

# Get the subscription ID from the current Azure CLI context
subscriptionId=$(az account show --query id --output tsv)

# Build virtual machine scale set resource ID
vmssPath="/subscriptions/$subscriptionId/resourceGroups/$resourceGroupName"
vmssProvider="Microsoft.Compute/virtualMachineScaleSets/$vmssName"
vmssResourceId="$vmssPath/providers/$vmssProvider"

# Build the profiles as JSON
profiles=$(jq -n --arg vmssResourceId "$vmssResourceId" '
  def scaleRule($operator; $threshold; $direction): {
    scaleAction: {
      direction: $direction,
      type: "ChangeCount",
      value: "1",
      cooldown: "PT5M"
    },
    metricTrigger: {
      metricName: "Inbound Flows",
      metricNamespace: "microsoft.compute/virtualmachinescalesets",
      metricResourceUri: $vmssResourceId,
      operator: $operator,
      statistic: "Average",
      threshold: $threshold,
      timeAggregation: "Average",
      timeGrain: "PT1M",
      timeWindow: "PT10M",
      dimensions: [],
      dividePerInstance: true
    }
  };
  [
    {
      name: "Weekday profile",
      capacity: {minimum: "3", maximum: "20", default: "3"},
      rules: [
        scaleRule("GreaterThan"; 100; "Increase"),
        scaleRule("LessThan"; 60; "Decrease")
      ],
      recurrence: {
        frequency: "Week",
        schedule: {
          timeZone: "E. Europe Standard Time",
          days: ["Monday"],
          hours: [4],
          minutes: [0]
        }
      }
    },
    {
      name: "Weekend profile",
      capacity: {minimum: "1", maximum: "3", default: "1"},
      rules: [],
      recurrence: {
        frequency: "Week",
        schedule: {
          timeZone: "E. Europe Standard Time",
          days: ["Saturday"],
          hours: [0],
          minutes: [1]
        }
      }
    }
  ]
')
profileSet="profiles=$profiles"

# Update the autoscale profiles
az monitor autoscale update \
  --name "$autoscaleName" \
  --resource-group "$resourceGroupName" \
  --set "$profileSet"
Note
Azure CLI commands use the Azure Resource Manager endpoint from the current CLI context, so management.chinacloudapi.cn doesn't need to be specified in the command syntax.
The following Azure PowerShell example uses the New-AzAutoscaleScaleRuleObject, New-AzAutoscaleProfileObject, and Update-AzAutoscaleSetting cmdlets.
# Set variables
$resourceGroupName = "<ResourceGroupName>"
$vmssName = "<VirtualMachineScaleSetName>"
$autoscaleName = "<AutoscaleSettingName>"

# Get the subscription ID from the current Azure PowerShell context
$subscriptionId = (Get-AzContext).Subscription.Id

# Build virtual machine scale set resource ID
$vmssPath = "/subscriptions/$subscriptionId/resourceGroups/$resourceGroupName"
$vmssProvider = "Microsoft.Compute/virtualMachineScaleSets/$vmssName"
$targetResourceId = "$vmssPath/providers/$vmssProvider"

# Define parameters for New-AzAutoscaleScaleRuleObject
$newAzAutoscaleScaleRuleObjectParams = @{
    MetricTriggerMetricName        = "Inbound Flows"
    MetricTriggerMetricNamespace   = "microsoft.compute/virtualmachinescalesets"
    MetricTriggerMetricResourceUri = $targetResourceId
    MetricTriggerTimeGrain         = (New-TimeSpan -Minutes 1)
    MetricTriggerStatistic         = "Average"
    MetricTriggerTimeWindow        = (New-TimeSpan -Minutes 10)
    MetricTriggerTimeAggregation   = "Average"
    MetricTriggerOperator          = "GreaterThan"
    MetricTriggerThreshold         = 100
    MetricTriggerDividePerInstance = $true
    ScaleActionDirection           = "Increase"
    ScaleActionType                = "ChangeCount"
    ScaleActionValue               = 1
    ScaleActionCooldown            = (New-TimeSpan -Minutes 5)
}
$scaleOutRule = New-AzAutoscaleScaleRuleObject @newAzAutoscaleScaleRuleObjectParams

# Define parameters for New-AzAutoscaleScaleRuleObject
$newAzAutoscaleScaleRuleObjectParams = @{
    MetricTriggerMetricName        = "Inbound Flows"
    MetricTriggerMetricNamespace   = "microsoft.compute/virtualmachinescalesets"
    MetricTriggerMetricResourceUri = $targetResourceId
    MetricTriggerTimeGrain         = (New-TimeSpan -Minutes 1)
    MetricTriggerStatistic         = "Average"
    MetricTriggerTimeWindow        = (New-TimeSpan -Minutes 10)
    MetricTriggerTimeAggregation   = "Average"
    MetricTriggerOperator          = "LessThan"
    MetricTriggerThreshold         = 60
    MetricTriggerDividePerInstance = $true
    ScaleActionDirection           = "Decrease"
    ScaleActionType                = "ChangeCount"
    ScaleActionValue               = 1
    ScaleActionCooldown            = (New-TimeSpan -Minutes 5)
}
$scaleInRule = New-AzAutoscaleScaleRuleObject @newAzAutoscaleScaleRuleObjectParams

# Define parameters for New-AzAutoscaleProfileObject
$newAzAutoscaleProfileObjectParams = @{
    Name                = "Weekday profile"
    CapacityDefault     = "3"
    CapacityMaximum     = "20"
    CapacityMinimum     = "3"
    RecurrenceFrequency = "week"
    ScheduleDay         = @("Monday")
    ScheduleHour        = @(4)
    ScheduleMinute      = @(0)
    ScheduleTimeZone    = "E. Europe Standard Time"
    Rule                = @($scaleOutRule, $scaleInRule)
}
$weekdayProfile = New-AzAutoscaleProfileObject @newAzAutoscaleProfileObjectParams

# Define parameters for New-AzAutoscaleProfileObject
$newAzAutoscaleProfileObjectParams = @{
    Name                = "Weekend profile"
    CapacityDefault     = "1"
    CapacityMaximum     = "3"
    CapacityMinimum     = "1"
    RecurrenceFrequency = "week"
    ScheduleDay         = @("Saturday")
    ScheduleHour        = @(0)
    ScheduleMinute      = @(1)
    ScheduleTimeZone    = "E. Europe Standard Time"
    Rule                = @()
}
$weekendProfile = New-AzAutoscaleProfileObject @newAzAutoscaleProfileObjectParams


# Define parameters for Update-AzAutoscaleSetting
$updateAzAutoscaleSettingParams = @{
    Name              = $autoscaleName
    ResourceGroupName = $resourceGroupName
    Enabled           = $true
    TargetResourceUri = $targetResourceId
    Profile           = @($weekdayProfile, $weekendProfile)
}
Update-AzAutoscaleSetting @updateAzAutoscaleSettingParams
Note
Azure PowerShell cmdlets use the Azure Resource Manager endpoint from the current Az context, so management.chinacloudapi.cn doesn’t need to be specified in the cmdlet syntax.
The following REST example uses the Autoscale settings REST API operation.
PUT https://management.chinacloudapi.cn/subscriptions/{subscriptionId}/resourceGroups/{resourceGroupName}/providers/Microsoft.Insights/autoscalesettings/{autoscaleSettingName}?api-version={apiVersion}
Authorization: Bearer {accessToken}
Content-Type: application/json

{
  "location": "<AzureRegion>",
  "properties": {
    "name": "<AutoscaleSettingName>",
    "enabled": true,
    "targetResourceUri": "/subscriptions/<SubscriptionId>/resourceGroups/<ResourceGroupName>/providers/Microsoft.Compute/virtualMachineScaleSets/<VirtualMachineScaleSetName>",
    "profiles": [
      {
        "name": "Weekday profile",
        "capacity": { "minimum": "3", "maximum": "20", "default": "3" },
        "rules": [
          {
            "scaleAction": { "direction": "Increase", "type": "ChangeCount", "value": "1", "cooldown": "PT5M" },
            "metricTrigger": {
              "metricName": "Inbound Flows",
              "metricNamespace": "microsoft.compute/virtualmachinescalesets",
              "metricResourceUri": "/subscriptions/<SubscriptionId>/resourceGroups/<ResourceGroupName>/providers/Microsoft.Compute/virtualMachineScaleSets/<VirtualMachineScaleSetName>",
              "operator": "GreaterThan", "statistic": "Average", "threshold": 100,
              "timeAggregation": "Average", "timeGrain": "PT1M", "timeWindow": "PT10M",
              "dimensions": [], "dividePerInstance": true
            }
          },
          {
            "scaleAction": { "direction": "Decrease", "type": "ChangeCount", "value": "1", "cooldown": "PT5M" },
            "metricTrigger": {
              "metricName": "Inbound Flows",
              "metricNamespace": "microsoft.compute/virtualmachinescalesets",
              "metricResourceUri": "/subscriptions/<SubscriptionId>/resourceGroups/<ResourceGroupName>/providers/Microsoft.Compute/virtualMachineScaleSets/<VirtualMachineScaleSetName>",
              "operator": "LessThan", "statistic": "Average", "threshold": 60,
              "timeAggregation": "Average", "timeGrain": "PT1M", "timeWindow": "PT10M",
              "dimensions": [], "dividePerInstance": true
            }
          }
        ],
        "recurrence": {
          "frequency": "Week",
          "schedule": { "timeZone": "E. Europe Standard Time", "days": ["Monday"], "hours": [4], "minutes": [0] }
        }
      },
      {
        "name": "Weekend profile",
        "capacity": { "minimum": "1", "maximum": "3", "default": "1" },
        "rules": [],
        "recurrence": {
          "frequency": "Week",
          "schedule": { "timeZone": "E. Europe Standard Time", "days": ["Saturday"], "hours": [0], "minutes": [1] }
        }
      }
    ],
    "notifications": [],
    "targetResourceLocation": "<AzureRegion>"
  }
}
Note
Template deployments use create-or-update operations, not partial updates.
The following Bicep example uses the Microsoft.Insights/autoscaleSettings resource type.
param autoscaleName string = '<AutoscaleSettingName>'
param azureRegion string = '<AzureRegion>'
param vmssName string = '<VirtualMachineScaleSetName>'

var vmssResourceId = resourceId(
    'Microsoft.Compute/virtualMachineScaleSets',
    vmssName
)

resource autoscaleSetting 'Microsoft.Insights/autoscaleSettings@<ApiVersion>' = {
    name: autoscaleName
    location: azureRegion
    properties: {
        name: autoscaleName
        enabled: true
        targetResourceUri: vmssResourceId
        profiles: [
            {
                name: 'Weekday profile'
                capacity: {
                    minimum: '3'
                    maximum: '20'
                    default: '3'
                }
                rules: [
                    {
                        scaleAction: {
                            direction: 'Increase'
                            type: 'ChangeCount'
                            value: '1'
                            cooldown: 'PT5M'
                        }
                        metricTrigger: {
                            metricName: 'Inbound Flows'
                            metricNamespace: 'microsoft.compute/virtualmachinescalesets'
                            metricResourceUri: vmssResourceId
                            operator: 'GreaterThan'
                            statistic: 'Average'
                            threshold: 100
                            timeAggregation: 'Average'
                            timeGrain: 'PT1M'
                            timeWindow: 'PT10M'
                            dimensions: []
                            dividePerInstance: true
                        }
                    }
                    {
                        scaleAction: {
                            direction: 'Decrease'
                            type: 'ChangeCount'
                            value: '1'
                            cooldown: 'PT5M'
                        }
                        metricTrigger: {
                            metricName: 'Inbound Flows'
                            metricNamespace: 'microsoft.compute/virtualmachinescalesets'
                            metricResourceUri: vmssResourceId
                            operator: 'LessThan'
                            statistic: 'Average'
                            threshold: 60
                            timeAggregation: 'Average'
                            timeGrain: 'PT1M'
                            timeWindow: 'PT10M'
                            dimensions: []
                            dividePerInstance: true
                        }
                    }
                ]
                recurrence: {
                    frequency: 'Week'
                    schedule: {
                        timeZone: 'E. Europe Standard Time'
                        days: [
                            'Monday'
                        ]
                        hours: [
                            4
                        ]
                        minutes: [
                            0
                        ]
                    }
                }
            }
            {
                name: 'Weekend profile'
                capacity: {
                    minimum: '1'
                    maximum: '3'
                    default: '1'
                }
                rules: []
                recurrence: {
                    frequency: 'Week'
                    schedule: {
                        timeZone: 'E. Europe Standard Time'
                        days: [
                            'Saturday'
                        ]
                        hours: [
                            0
                        ]
                        minutes: [
                            1
                        ]
                    }
                }
            }
        ]
        notifications: []
        targetResourceLocation: azureRegion
    }
}
After adapting this example to your configuration, save it as a .bicep file. For deployment instructions, see Deploy Bicep files with the Azure CLI or Deploy Bicep files with Azure PowerShell.
Note
Template deployments use create-or-update operations, not partial updates.
The following ARM template example uses the Microsoft.Insights/autoscaleSettings resource type.
{
  "$schema": "https://schema.management.azure.com/schemas/2019-04-01/deploymentTemplate.json#",
  "contentVersion": "1.0.0.0",
  "parameters": {
    "autoscaleName": {
      "type": "string",
      "defaultValue": "<AutoscaleSettingName>"
    },
    "azureRegion": {
      "type": "string",
      "defaultValue": "<AzureRegion>"
    },
    "vmssName": {
      "type": "string",
      "defaultValue": "<VirtualMachineScaleSetName>"
    }
  },
  "variables": {
    "vmssResourceId": "[resourceId('Microsoft.Compute/virtualMachineScaleSets', parameters('vmssName'))]"
  },
  "resources": [
    {
      "type": "Microsoft.Insights/autoscaleSettings",
      "apiVersion": "<ApiVersion>",
      "name": "[parameters('autoscaleName')]",
      "location": "[parameters('azureRegion')]",
      "properties": {
        "name": "[parameters('autoscaleName')]",
        "enabled": true,
        "targetResourceUri": "[variables('vmssResourceId')]",
        "profiles": [
          {
            "name": "Weekday profile",
            "capacity": {
              "minimum": "3",
              "maximum": "20",
              "default": "3"
            },
            "rules": [
              {
                "scaleAction": {
                  "direction": "Increase",
                  "type": "ChangeCount",
                  "value": "1",
                  "cooldown": "PT5M"
                },
                "metricTrigger": {
                  "metricName": "Inbound Flows",
                  "metricNamespace": "microsoft.compute/virtualmachinescalesets",
                  "metricResourceUri": "[variables('vmssResourceId')]",
                  "operator": "GreaterThan",
                  "statistic": "Average",
                  "threshold": 100,
                  "timeAggregation": "Average",
                  "timeGrain": "PT1M",
                  "timeWindow": "PT10M",
                  "dimensions": [],
                  "dividePerInstance": true
                }
              },
              {
                "scaleAction": {
                  "direction": "Decrease",
                  "type": "ChangeCount",
                  "value": "1",
                  "cooldown": "PT5M"
                },
                "metricTrigger": {
                  "metricName": "Inbound Flows",
                  "metricNamespace": "microsoft.compute/virtualmachinescalesets",
                  "metricResourceUri": "[variables('vmssResourceId')]",
                  "operator": "LessThan",
                  "statistic": "Average",
                  "threshold": 60,
                  "timeAggregation": "Average",
                  "timeGrain": "PT1M",
                  "timeWindow": "PT10M",
                  "dimensions": [],
                  "dividePerInstance": true
                }
              }
            ],
            "recurrence": {
              "frequency": "Week",
              "schedule": {
                "timeZone": "E. Europe Standard Time",
                "days": [
                  "Monday"
                ],
                "hours": [
                  4
                ],
                "minutes": [
                  0
                ]
              }
            }
          },
          {
            "name": "Weekend profile",
            "capacity": {
              "minimum": "1",
              "maximum": "3",
              "default": "1"
            },
            "rules": [],
            "recurrence": {
              "frequency": "Week",
              "schedule": {
                "timeZone": "E. Europe Standard Time",
                "days": [
                  "Saturday"
                ],
                "hours": [
                  0
                ],
                "minutes": [
                  1
                ]
              }
            }
          }
        ],
        "notifications": [],
        "targetResourceLocation": "[parameters('azureRegion')]"
      }
    }
  ]
}
After adapting this example to your configuration, save it as a .json file. For deployment instructions, see Deploy ARM templates with Azure CLI or Deploy ARM templates with Azure PowerShell.