Note
Access to this page requires authorization. You can try signing in or changing directories.
Access to this page requires authorization. You can try changing directories.
Granular role-based access control (RBAC) is a feature of Azure Monitor Log Analytics that implements fine-grained data access control.
Learn how to control access to logs based on roles, departments, and geographical locations. This includes scenarios like restricting HR personnel to employee data or limiting access to logs by country or department.
In this example scenario, well-known Log Analytics tables and fields are used to enforce row-level access. Data is segregated based on attributes like device type and user principal name (UPN).
For more information about granular RBAC concepts, see Granular role-based access control (RBAC) in Azure Monitor.
Prerequisites
The following prerequisites are required to complete this scenario:
- Azure Monitor Log Analytics workspace with tables
- A role assigned to your account giving permission to configure custom roles and assign them to users or groups with conditions like the Role Based Access Control Administrator or User Access Administrator.
Define the scenario
In this scenario, row-level access control is implemented in a restrictive manner with the CommonSecurityLog and a permissive manner to control the SigninLogs and DnsEvents tables in a Logs Analytics workspace. Conditions are set for a group of operators as follows:
- Set the network team's group access to only access the
CommonSecurityLogtable where the DeviceVendor name matches the network firewalls. This configuration uses the No access to data, except what is allowed strategy. - Give the tier 1 security analyst team access to all tables, but restrict the
SigninLogsandDnsEventstables to prevent them from accessing records containing the UPN or computername of the CEO. This configuration uses the Access to all data, except what isn't allowed strategy.
Role preparation
Select the built-in role, Log Analytics Data Reader for the simplest approach to the role assignment process.
Keep in mind, role assignments are additive, so remove any role assignments that give read access at the same scope or above the workspace. For example, if the Log Analytics Reader role was assigned to a user at the resource group level, a granular RBAC role assignment is not effective. For more information, see Configure granular RBAC role creation. If you select the Log Analytics Data Reader role, skip ahead to Assign selected role.
To use custom roles for the defined scenario, follow these steps to create one for the network team and another for the security team.
- From the resource group containing the prerequisite Log Analytics workspace, select Access control (IAM).
- Select Add custom role.
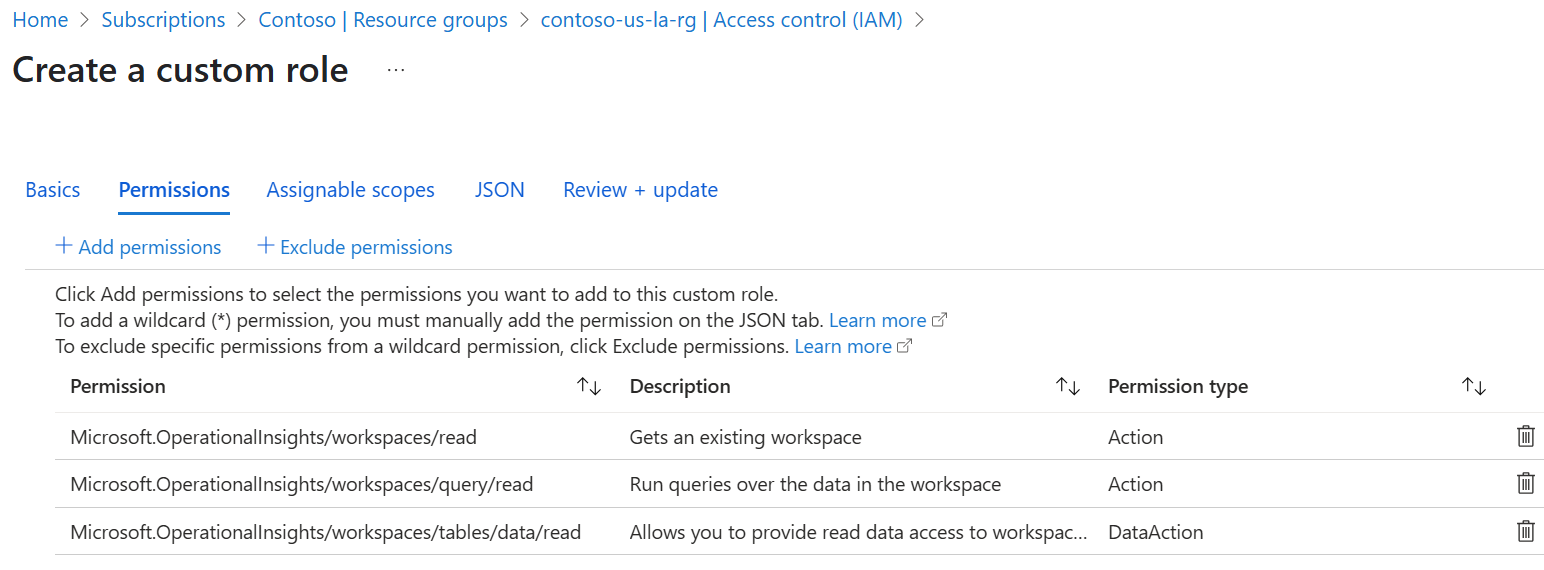
- Create the data access role with the following actions and data action at the resource group level:
| Custom role definition | Detail |
|---|---|
| Actions | Microsoft.OperationalInsights/workspaces/readMicrosoft.OperationalInsights/workspaces/query/read |
| Data actions | Microsoft.OperationalInsights/workspaces/tables/data/read |
This image shows how the custom role actions and data actions appear in the Add custom role page.

- Enter a name for the custom role, such as
Log Analytics Network Device team - Repeat steps 2-4 for the
Log Analytics Security Analysts tier 1custom role. Use the Clone a role option and choose theLog Analytics Network Device teamrole as a base.
Assign selected role
Assign the selected role to a user or group. For more information, see Assign granular RBAC roles.
- From the Log Analytics workspace, select Access control (IAM).
- Select Add role assignment.
- Select the
Log Analytics Network Device teamcustom role you created, then select Next. - Select the user or group you want to assign the role to, then select Next. This example assigns the role to the network team security group.
- Select Conditions > Add condition > Add action.
- Choose the Read workspace data data action > Select.
Here's how the action portion looks when completed:
Build restrictive condition
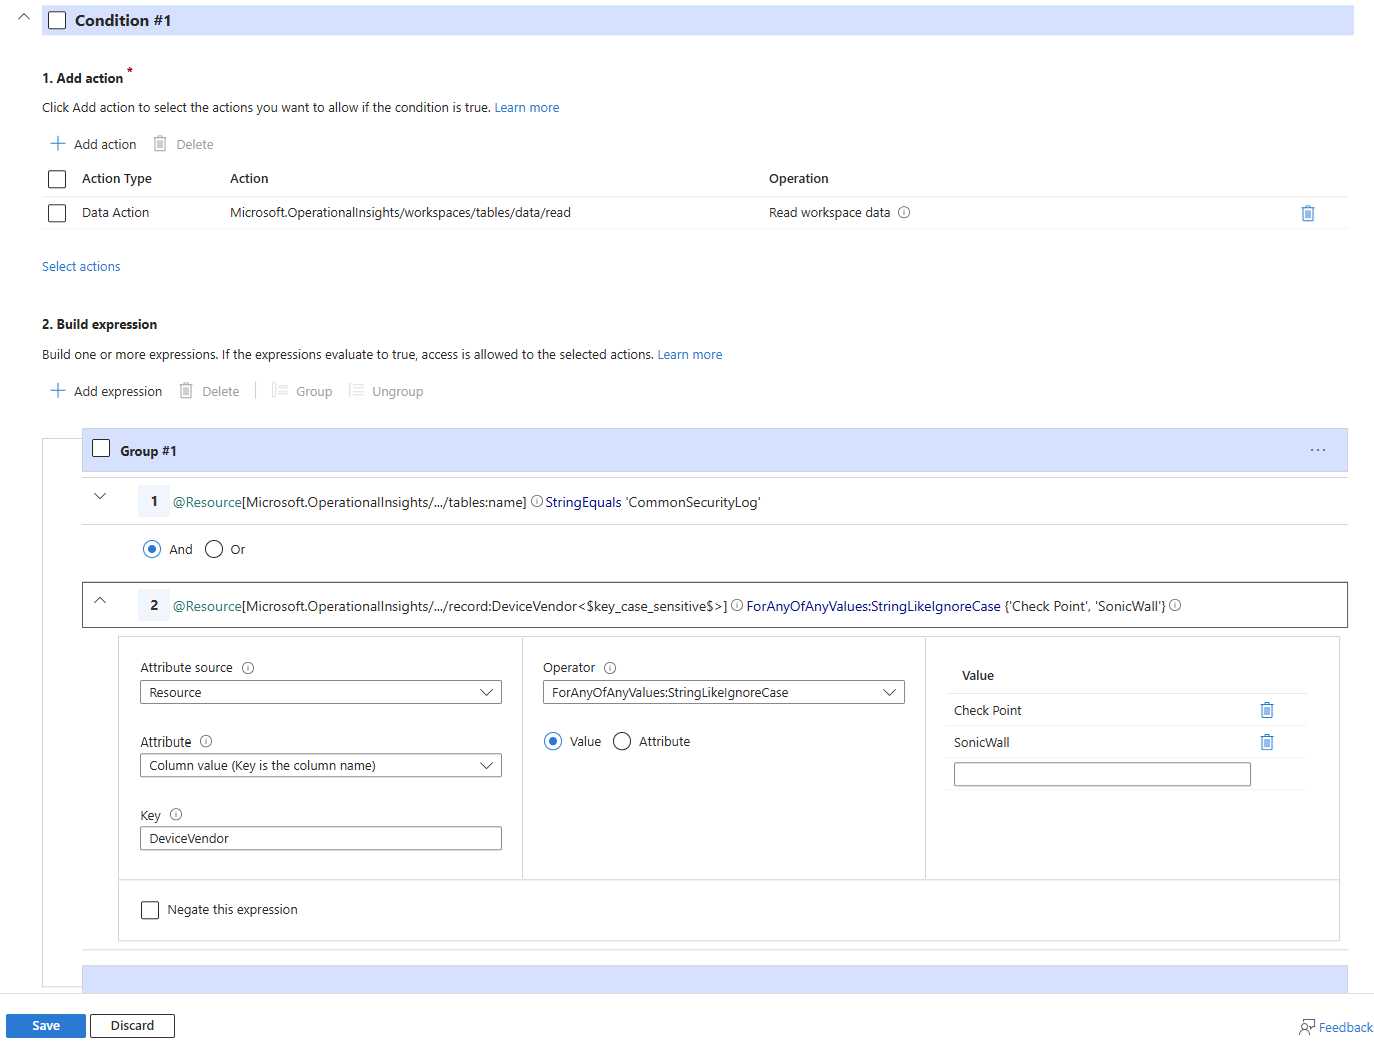
The first custom role uses the No access to data, except what is allowed strategy. In this use case, the network team only needs access to the CommonSecurityLog table, and only for records where the DeviceVendor matches their firewall solutions, either Check Point or SonicWall.
- In the Build expression section, select Add expression.
- Select Resource from the Attribute source dropdown.
- Select Table Name from the Attribute dropdown.
- Select StringEquals from the Operator dropdown.
- Type
CommonSecurityLogin the Value field. - Select Add expression, then select And to add another expression.
- Select Resource from the Attribute source dropdown.
- Select Column value from the Attribute dropdown.
- Enter
DeviceVendorfor the Key. - Select ForAnyOfAnyValues:StringLikeIgnoreCase from the Operator dropdown.
- In the Value fields, enter
Check PointandSonicWall. - Select expression 1 and 2 > select Group with the And radio button selected.
- Select Save.
Here's how the restrictive condition looks when completed:
Here's how the restrictive condition looks in code form:
(
 (
  !(ActionMatches{'Microsoft.OperationalInsights/workspaces/tables/data/read'})
 )
 OR
(
  (
   @Resource[Microsoft.OperationalInsights/workspaces/tables:name] StringEquals 'CommonSecurityLog'
   AND
   @Resource[Microsoft.OperationalInsights/workspaces/tables/record:DeviceVendor<$key_case_sensitive$>] ForAnyOfAnyValues:StringLikeIgnoreCase {'Check Point', 'SonicWall'}
  )
 )
)
For more information on programmatic ways to assign roles with conditions, see Add or edit ABAC conditions.
Allow up to 15 minutes for effective permissions to take effect.
Build permissive condition
The second custom role uses the Access to all data, except what isn't allowed strategy. In this use case, the tier 1 security analyst team needs access to all tables, but restricts access to the SigninLogs and DnsEvents tables to prevent accessing records for the UPN or computername of the CEO.
- Add a new role assignment, then create the permissive expression. From the Log Analytics workspace, select Access control (IAM).
- Select Add role assignment.
- Select the
Log Analytics Security Analysts tier 1custom role you created, then select Next. - Select the user or group you want to assign the role to, then select Next. This example assigns the role to the tier 1 analysts security group.
- Select Conditions > Add condition > Add action.
- Choose the Read workspace data data action > Select.
Expression 1
- In the Build expression section, select Add expression
- Select Resource from the Attribute source dropdown.
- Select Table Name from the Attribute dropdown.
- Select ForAnyOfAllValues:StringNotEquals from the Operator dropdown.
- Type
SigninLogsandDnsEventsin the Value fields. - Ensure the Or operator is selected after expression 1.
Expression 2
- Select Add expression
- Select Resource from the Attribute source dropdown.
- Select Table Name from the Attribute dropdown.
- Select StringEquals from the Operator dropdown.
- In the Value field, enter
SigninLogs.
Expression 3
- Select Add expression
- Select Resource from the Attribute source dropdown.
- Select Column value from the Attribute dropdown.
- Enter
UserPrincipalNamefor the Key. - Select StringNotEquals from the Operator dropdown.
- Type
CEO@contoso.comin the Value field. - Select expression 2 and 3 > select Group with the And radio button selected.
Expression 4
- Select Add expression
- Select Resource from the Attribute source dropdown.
- Select Table Name from the Attribute dropdown.
- Select StringEquals from the Operator dropdown.
- In the Value field, enter
DnsEvents.
Expression 5 - The limit in the visual editor is five, but more expressions can be added in the code editor.
- Select Add expression
- Select Resource from the Attribute source dropdown.
- Select Column value from the Attribute dropdown.
- Enter
ComputerNamefor the Key. - Select StringNotEquals from the Operator dropdown.
- Type
CEOlaptopin the Value field. - Select expression 4 and 5 > select Group with the And radio button selected.
- Select Save.
Here's how the permissive condition looks when completed - notice the Add expression button is disabled. This behavior is due to the maximum number of expressions reached.
Here's how the permissive condition looks in code form:
(
 (
  !(ActionMatches{'Microsoft.OperationalInsights/workspaces/tables/data/read'})
 )
 OR
 (
  @Resource[Microsoft.OperationalInsights/workspaces/tables:name] ForAnyOfAllValues:StringNotEquals {'SigninLogs', 'DnsEvents'}
  OR
  (
   @Resource[Microsoft.OperationalInsights/workspaces/tables:name] StringEquals 'SigninLogs'
   AND
   @Resource[Microsoft.OperationalInsights/workspaces/tables/record:UserPrincipalName<$key_case_sensitive$>] StringNotEquals 'CEO@contoso.com'
  )
  OR
  (
   @Resource[Microsoft.OperationalInsights/workspaces/tables:name] StringEquals 'DnsEvents'
   AND
   @Resource[Microsoft.OperationalInsights/workspaces/tables/record:Computer<$key_case_sensitive$>] StringNotEquals 'CEOlaptop1'
  )
 )
)
Allow up to 15 minutes for effective permissions to take effect.
Troubleshoot and monitor
For general ABAC troubleshooting, see Troubleshoot Azure role assignment conditions.
Changes to role assignments are logged in Azure Activity logs.
LAQueryLogs table records whether user queries executed with an applicable ABAC condition in the
ConditionalDataAccesscolumn. For more information, see LAQueryLogs table reference.Here's an example of an audited query run by a tier 1 security analyst that triggered the condition configured for the
SigninLogstable:The values used for table names and column values are case-sensitive. If a table name or value is incorrectly specified, the condition may fail, or yield unexpected behavior, and access to the requested data might be denied.
Invalid conditions that cause a logic error trigger a "400 Bad Request" error message for all affected users. The administrator must revise the condition. An example is setting a condition on a workspace level with a column that doesn't exist in any tables.


