Note
Access to this page requires authorization. You can try signing in or changing directories.
Access to this page requires authorization. You can try changing directories.
The Azure portal enables you to browse detailed information about resources across your Azure subscriptions. This article shows you how to filter information and use different views to better understand your resources.
This article focuses on filtering information in the All resources pane. Panes for individual resource types and services may have different options, but many of the same concepts apply.
Filter resources
Start exploring All resources by using filters to focus on a subset of your resources. The following screenshot shows filtering on resource groups, selecting two of the three resource groups in a subscription.
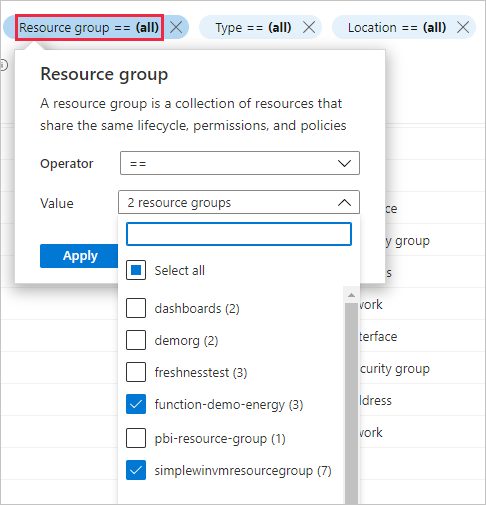
You can combine multiple filters, including filters based on text searches. For example, after selecting specific resource groups, you can enter text in the filter box, or select a different filter option.
To change which columns are included in a view, select Manage view, then select Edit columns.
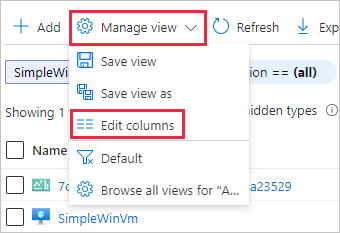
You can then add, remove, and rearrange columns. When you're finished, select Save.
Save, use, and delete views
You can save views that include the filters and columns you selected. To save and use a view:
Select Manage view, then select Save view.
Enter a name for the view, then select Save. The saved view now appears in the Manage view menu.
Try switching between Default and one of your own views to see how that affects the list of resources displayed.
You can also select Choose favorite view to use one of your views as the default views for All resources.
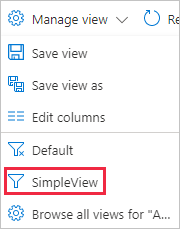
To delete a view that you created:
Select Manage view, then select Browse all views for "All resources".
In the Saved views pane, select the Delete icon
 next to the view that you want to delete. Select OK to confirm the deletion.
Export information from a view
You can export the resource information from a view. To export information in CSV format:
Select Export to CSV.

Save the file locally, then open the file in Excel or another application that supports the CSV format.
As you move around the portal, you may see other areas where you can export information, such as an individual resource group.
Run queries in Azure Resource Graph
Azure Resource Graph provides efficient and performant resource exploration with the ability to query at scale across a set of subscriptions. The All resources pane in the Azure portal includes a link to open a Resource Graph query scoped to the current filtered view.
To run a Resource Graph query:
Select Open query.

In Azure Resource Graph Explorer, select Run query to see the results.

For more information, see Run your first Resource Graph query using Azure Resource Graph Explorer.
Next steps
- Read an overview of the Azure portal overview.
- Learn how to create and share dashboards in the Azure portal.