Note
Access to this page requires authorization. You can try signing in or changing directories.
Access to this page requires authorization. You can try changing directories.
In this tutorial, you learn how to add tags to resources in your Bicep files. Tags help you logically organize your resources. The tag values show up in cost reports. This tutorial takes 8 minutes to complete.
Note
This article contains Bicep examples. Bicep is currently in preview. For more information, see Project Bicep.
Prerequisites
We recommend that you complete the tutorial about Quickstart templates, but it's not required.
You must have Visual Studio Code with the Bicep extension, and either Azure PowerShell or Azure CLI. For more information, see Bicep tools.
Review Bicep file
Your previous Bicep file deployed a storage account, App Service plan, and web app.
@minLength(3)
@maxLength(11)
param storagePrefix string

@allowed([
  'Standard_LRS'
  'Standard_GRS'
  'Standard_RAGRS'
  'Premium_LRS'
])
param storageSKU string = 'Standard_LRS'

param location string = resourceGroup().location
param appServicePlanName string = 'exampleplan'

@minLength(2)
@description('Base name of the resource such as web app name and app service plan.')
param webAppName string

@description('The Runtime stack of current web app.')
param linuxFxVersion string = 'php|7.0'

var uniqueStorageName = '${storagePrefix}${uniqueString(resourceGroup().id)}'
var webAppPortalName = '${webAppName}${uniqueString(resourceGroup().id)}'

resource stg 'Microsoft.Storage/storageAccounts@2019-04-01' = {
  name: uniqueStorageName
  location: location
  sku: {
    name: storageSKU
  }
  kind: 'StorageV2'
  properties: {
    supportsHttpsTrafficOnly: true
  }
}

resource appPlan 'Microsoft.Web/serverfarms@2016-09-01' = {
  name: appServicePlanName
  location: location
  sku: {
    name: 'B1'
    tier: 'Basic'
    size: 'B1'
    family: 'B'
    capacity: 1
  }
  kind: 'linux'
  properties: {
    perSiteScaling: false
    reserved: true
    targetWorkerCount: 0
    targetWorkerSizeId: 0
  }
}

resource site 'Microsoft.Web/sites@2020-06-01' = {
  name: webAppPortalName
  location: location
  kind: 'app'
  properties: {
    serverFarmId: appPlan.id
    siteConfig: {
      linuxFxVersion: linuxFxVersion
    }
  }
}

output storageEndpoint object = stg.properties.primaryEndpoints
After deploying these resources, you might need to track costs and find resources that belong to a category. You can add tags to help solve these issues.
Add tags
You tag resources to add values that help you identify their use. For example, you can add tags that list the environment and the project. You could add tags that identify a cost center or the team that owns the resource. Add any values that make sense for your organization.
The following example shows the changes to the Bicep file. Copy the whole file and replace your Bicep file with its contents.
@minLength(3)
@maxLength(11)
param storagePrefix string

@allowed([
  'Standard_LRS'
  'Standard_GRS'
  'Standard_RAGRS'
  'Premium_LRS'
])
param storageSKU string = 'Standard_LRS'

param location string = resourceGroup().location
param appServicePlanName string = 'exampleplan'

@minLength(2)
@description('Base name of the resource such as web app name and app service plan.')
param webAppName string

@description('The Runtime stack of current web app.')
param linuxFxVersion string = 'php|7.0'

param resourceTags object = {
  Environment: 'Dev'
  Project: 'Tutorial'
}

var uniqueStorageName = '${storagePrefix}${uniqueString(resourceGroup().id)}'
var webAppPortalName = '${webAppName}${uniqueString(resourceGroup().id)}'

resource stg 'Microsoft.Storage/storageAccounts@2019-04-01' = {
  name: uniqueStorageName
  location: location
  tags: resourceTags
  sku: {
    name: storageSKU
  }
  kind: 'StorageV2'
  properties: {
    supportsHttpsTrafficOnly: true
  }
}

resource appPlan 'Microsoft.Web/serverfarms@2016-09-01' = {
  name: appServicePlanName
  location: location
  tags: resourceTags
  sku: {
    name: 'B1'
    tier: 'Basic'
    size: 'B1'
    family: 'B'
    capacity: 1
  }
  kind: 'linux'
  properties: {
    perSiteScaling: false
    reserved: true
    targetWorkerCount: 0
    targetWorkerSizeId: 0
  }
}

resource site 'Microsoft.Web/sites@2016-08-01' = {
  name: webAppPortalName
  location: location
  tags: resourceTags
  kind: 'app'
  properties: {
    serverFarmId: appPlan.id
    siteConfig: {
      linuxFxVersion: linuxFxVersion
    }
  }
}

output storageEndpoint object = stg.properties.primaryEndpoints
Deploy Bicep file
It's time to deploy the Bicep file and look at the results.
If you haven't created the resource group, see Create resource group. The example assumes you've set the bicepFile variable to the path to the Bicep file, as shown in the first tutorial.
To run this deployment cmdlet, you must have the latest version of Azure PowerShell.
New-AzResourceGroupDeployment `
  -Name addtags `
  -ResourceGroupName myResourceGroup `
  -TemplateFile $bicepFile `
  -storagePrefix "store" `
  -storageSKU Standard_LRS `
  -webAppName demoapp
Note
If the deployment failed, use the verbose switch to get information about the resources being created. Use the debug switch to get more information for debugging.
Verify deployment
You can verify the deployment by exploring the resource group from the Azure portal.
Sign in to the Azure portal.
From the left menu, select Resource groups.
Select the resource group you deployed to.
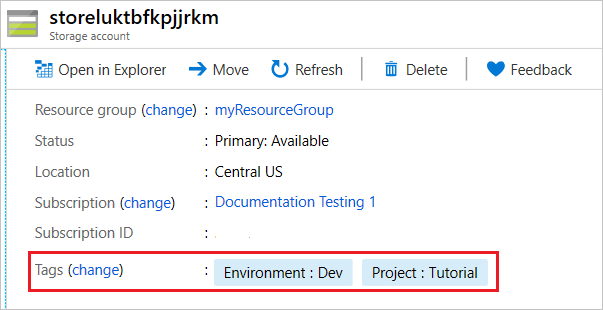
Select one of the resources, such as the storage account resource. You see that it now has tags.

Clean up resources
If you're moving on to the next tutorial, you don't need to delete the resource group.
If you're stopping now, you might want to clean up the resources you deployed by deleting the resource group.
- From the Azure portal, select Resource group from the left menu.
- Enter the resource group name in the Filter by name field.
- Select the resource group name.
- Select Delete resource group from the top menu.
Next steps
In this tutorial, you added tags to the resources. In the next tutorial, you'll learn how to use parameter files to simplify passing in values to the deployment.