Note
Access to this page requires authorization. You can try signing in or changing directories.
Access to this page requires authorization. You can try changing directories.
Applies to: ![]() Azure SQL Database
Azure SQL Database
This article provides the steps required to create, configure, and manage elastic jobs for Azure SQL Database. You can accomplish many of these steps in the Azure portal and by using T-SQL, PowerShell, and the REST API. Elastic jobs enable the running of one or more Transact-SQL (T-SQL) scripts in parallel across many databases. For more information, learn more about the job automation concepts in Azure SQL Database or read more about Elastic jobs in Azure SQL Database.
Create and configure the elastic job agent
Create or identify an empty S1 or higher Azure SQL Database, using the DTU purchase model. This database should be in the same server as the job agent. This database is used as the job database during elastic job agent creation. You can create a single database via the Azure portal, Azure CLI, Azure CLI (sql up), or PowerShell.
Create an elastic job agent in the Azure portal or with PowerShell.
The instructions to create an elastic job agent in the Azure portal are as follows:
- In the Azure portal, search for Elastic Job agents. Select Create to begin provisioning a new elastic job agent resource. Or, follow this link to create an Elastic Job agent in the Azure portal.
- Provide an Elastic job agent name.
- Choose a Subscription and Resource group for the agent. If necessary, create a new resource group. An elastic job can target databases in other resource groups, subscriptions, even other Azure regions.
- Choose the Azure SQL Database logical server to be the elastic job agent server.
- Choose a Job database in the logical server to be the elastic job agent database. Some validation ensures that the database is suitable.
- Under Service tier, choose JA 100.
- Select Next: Identity.
- There are two methods of authentication for the job agent to target server(s)/database(s), Microsoft Entra authentication with a user-assigned managed identity (UMI), or database-scoped credentials.
- Create the UMI outside of the elastic job agent provisioning process, or use an existing UMI. Select Add User-Assigned Managed Identity. Select the UMI. Select Add.
- To use database-scoped credentials, see steps later in this tutorial.
- Select Next: Tags.
- Consider using Azure tags. For example, the "Owner" or "CreatedBy" tag to identify who created the resource, and the Environment tag to identify whether this resource is in Production, Development, etc. For more information, see Develop your naming and tagging strategy for Azure resources.
- Select Review + create.
- Validate your new elastic job agent selections on the Review + create page, then select Create.
- Further steps are required to authenticate to target server(s)/database(s). Continue the steps in the following sections of this tutorial article.
Create job agent authentication
The elastic job agent must be able to authenticate to each target server or database. In this section, we cover the steps necessary for the elastic job agent to authenticate to server(s)/database(s) in target groups.
There are two options for authentication of an elastic job agent to targets:
- Use database users mapped to user-assigned managed identity (UMI) to authenticate to target server(s)/database(s).
- Using a UMI with Microsoft Entra authentication (formerly Azure Active Directory) is the recommended method.
- Use database users mapped to database-scoped credentials in each database.
- Previously, database-scoped credentials were the only option for the elastic job agent to authenticate to targets.
Use Microsoft Entra authentication with a user-assigned managed identity (UMI)
Use Microsoft Entra (formerly Azure Active Directory) authentication with a user-assigned managed identity (UMI). This is the recommended authentication method.
- Enable Microsoft Entra (formerly Azure Active Directory) authentication on all job target logical server(s)/database(s), and on the job output logical server.
- Create a user-assigned managed identity (UMI) or use an already existing UMI.
- A new UMI can be created through the Azure portal, Azure CLI, PowerShell, Resource Manager, or REST API.
- Assign the UMI to the created elastic job agent.
- It's recommended to assign a UMI when creating the elastic job agent, see the steps in Create and configure the elastic job agent. When creating a job agent in the Azure portal, in the Identity tab, assign to the elastic job agent.
- To update an existing elastic job agent to use a UMI, on the Azure portal page for the elastic job agent, navigate to Identity under the Security menu in the resource menu. Select and assign the UMI to the elastic job agent.
- When creating or updating an elastic job agent with the
New-AzSqlElasticJobAgentorSet-AzSqlElasticJobAgentPowerShell cmdlets, use the parameters:-IdentityType UserAssigned -IdentityID <identity resource path>. For example:$parameters = @{ Name = '<job agent name>' ResourceGroupName = '<Resource_Group_Name>' IdentityType = 'UserAssigned' IdentityID = '/subscriptions/fa58cf66-caaf-4ba9-875d-f1234/resourceGroups/<resource group name>/providers/Microsoft.ManagedIdentity/userAssignedIdentities/<UMI name here>' } Set-AzSqlElasticJobAgent @parameters - The REST API can also be used to create or update the elastic job agent.
- Create a target group and add targets for the jobs. Define the target group and targets (the databases you want to run the job against) using PowerShell or define the target group and targets using T-SQL.
- In each of the target server(s)/database(s), create a contained user mapped to the UMI or database-scoped credential, using T-SQL or PowerShell:
- In the output database, create and assign permissions to the UMI job user. Connect to the output database and run the following example script for a user named
jobuserUMI:CREATE USER [jobuserUMI] FROM EXTERNAL PROVIDER; GO - If output parameters are specified in the
sp_add_jobstepcall in the @output_table_name argument, the Job Agent UMI or database-scoped credential must be granted permissions to CREATE TABLE and INSERT data into that output table.GRANT CREATE TABLE TO [job_user]; GRANT SELECT,INSERT,UPDATE,DELETE ON [dbo].[output_table_name] TO job_user; - In each of the target server(s)/database(s), grant the database user needed permissions to execute job scripts. These permissions vary based on the requirements of the T-SQL query.
Use database-scoped credentials
You can use a database-scoped credential in the job database and in each target server/database for authentication. In the past, database-scoped credentials were the only option available with elastic jobs.
Note
If a UMI is assigned to the Job Agent, SQL Authentication will not be used to connect to its targets. Job Agent will only use Microsoft Entra authentication with the UMI to connect to all of its target databases.
- Create a database-scoped credential in the job database.
- Define the target group (the databases you want to run the job against) using PowerShell or define targets using T-SQL.
- Create a job agent login/user in each target database where the job will run. The login/user on each target server/database must have the same name as the identity of the database-scoped credential for the job user, and the same password as the database-scoped credential for the job user.
- Use PowerShell to add the credential and user to each target database.
- For more information on adding users, see Authorize server and database access using logins and user accounts.
- In the output database, create and assign permissions to the job user.
- Connect to the
masterdatabase of the logical server that hosts the output database. If one does not already exist, create SQL authenticated login with the same name as the identity of the database-scoped credential for the job user, and the same password as the database-scoped credential for the job user.CREATE LOGIN [job_user] WITH PASSWORD '<same_password_as_database-scoped_credential>' GO - Connect to the output database and run the following example script for a user named
job_user:CREATE USER [job_user] FROM LOGIN [job_user]; GO - If output parameters are specified in the
sp_add_jobstepcall in the @output_table_name argument, the Job Agent UMI or database-scoped credential must be granted permissions to CREATE TABLE and INSERT data into that output table.GRANT CREATE TABLE TO [job_user]; GRANT SELECT,INSERT,UPDATE,DELETE ON [dbo].[output_table_name] TO job_user;
- Connect to the
- In each of the target server(s)/database(s), grant the database user needed permissions to execute job scripts. These permissions vary based on the requirements of the T-SQL query.
Create, run, and manage jobs
- Use PowerShell to create a job or use T-SQL to create a job.
- Add steps to each elastic job. A target group must be chosen for each job step. Use PowerShell to add job steps or use T-SQL to add job steps.
- Use PowerShell to run a job or use T-SQL to run a job.
- Monitor job execution status using the Azure portal, monitor jobs with PowerShell or monitor jobs with T-SQL.
Configure Azure SQL elastic jobs private endpoint
Each target server can be reached via a service-managed private endpoint, created and managed by Azure, and exclusively for use with elastic jobs. Creating an elastic jobs private endpoint establishes a private link between the elastic job and the target server. Once configured, all communication between the elastic job agent and the target server will occur through the private endpoint.
Configuration is easy. You must create a private endpoint for each desired target server and the job output server to enable this communication.
- In the Elastic job agent navigation menu, under Security, select Private endpoints.
- Select Add a server and create private endpoint.
- The Create private endpoint window opens.
- You can select a target server from any Subscription, anywhere in Azure.
- Select a target Azure SQL Database logical server in that subscription.
- Provide a Private endpoint name.
- Select Create private endpoint. The deployment will take a few moments. Soon, the Connection status on the Private endpoints page will show Pending.
- In the Azure portal, navigate to the target Azure SQL Database logical server.
- As an administrator of that target Azure SQL Database logical server, in the SQL server navigation menu, under Security, select Networking.
- Select Private access.
- Approve the pending private endpoint request.
- The Connection status on the Private endpoints page will show Approved. Now, any communication between the job agent and any databases or elastic pools in that target Azure SQL Database logical server will go through the service-managed private endpoint.
- As an administrator of that target Azure SQL Database logical server, in the SQL server navigation menu, under Security, select Networking. It is not necessary to enable Public access for the purpose of elastic jobs.
Configure job agent alerts with Azure Monitor
Configure Azure Monitor Alerts on the elastic job agent resource to be notified on job execution status. For example, you can be notified of failure/success of a job via user-configured Action groups.
You can create elastic job agent alerts by using the Azure portal, PowerShell, or the REST API.
Create job agent alerts by using the Azure portal
Create Azure Monitor Alert rules with the Azure portal, Azure CLI, PowerShell, and REST API. Alert rules for elastic jobs operate similarly as with other alert rules, such as for Azure SQL Database.
To proceed with the Azure portal:
- On the Azure portal resource menu for the Elastic Job agent, go to the Monitoring menu and select Alerts.
- Under the Set up alert rules on this resource prompt, select Create alert rule.
- On the Create an alert rule page, the Select a signal page opens. Select the elastic jobs metrics Elastic Jobs Executions Failed, Elastic Jobs Executions Successful, or Elastic Jobs Executions Timed Out.
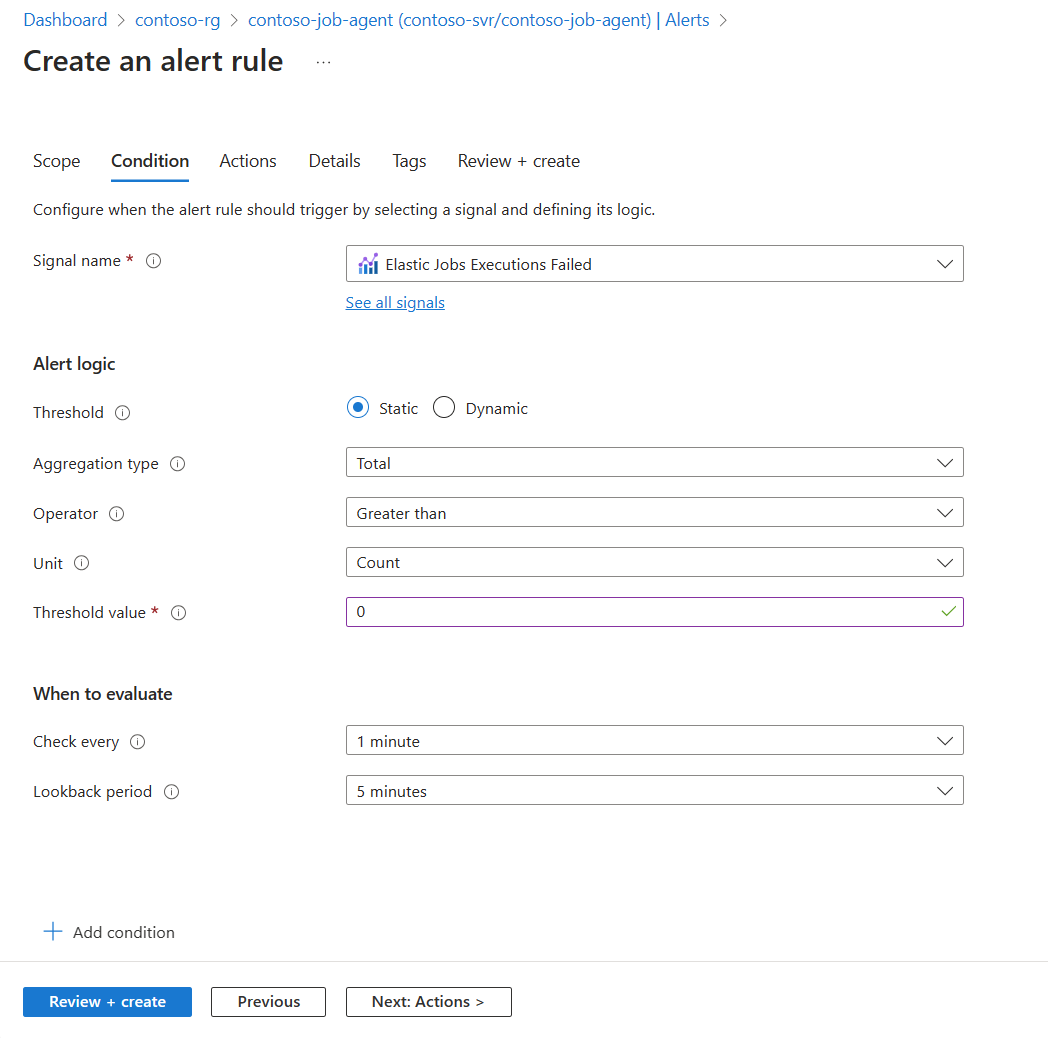
- Under Alert logic, leave the Threshold, Aggregation type, Operator, and Unit as default.
- Set Threshold value to
0. Leave other settings as default. - Select Next: Actions.
- Select Create action group or choose an existing action group.
- Create Azure Monitor Alert action groups in the Azure portal to set notification settings, for example, to email administrators or developers of the failure.
- Test the Alert action group.
- Select Next: Details.
- Provide a Subscription and Resource group as Project details.
- Provide Alert rule details for the alert communication. Provide an Alert rule name.
- Select Tags and provide metadata, such as CreatedBy or Environment for this Alert.
- Select Review + Create. Select Create. It might take a few minutes for the alert rule to display in the Azure portal.
- Optionally, create Azure Monitor Alert processing rules using the Azure portal, Azure CLI, or PowerShell. Use alert processing rules to decide what happens when an alert is triggered, like suppressing notifications or applying specific actions to certain types of alerts.

Scale the job agent
By default, job agents are created at JA100, allowing up to 100 elastic job executions concurrently. Initiating a service level change is an asynchronous operation and the new service level will be made available after a short provisioning delay.
If you need more than 100 concurrent executions of elastic job agents, higher service levels are available, see Concurrent capacity tiers. You can currently change the service level of a job agent via the Azure portal, PowerShell, or REST API.
Exceeding the service level with concurrent jobs will create queuing delays before jobs start in excess of the service level's concurrent jobs limit.
Scale the elastic job agent by using the Azure portal
- Navigate to the Elastic Job agent page in the Azure portal.
- Select Pricing Tier or select Scale Up/Down from the context menu.
- Choose a new service tier from the Service tier dropdown list.
- Review the cost card.
- Select Update.
Scale the elastic job agent by using PowerShell
The optional -ServiceObjective parameter for Set-AzSqlElasticJobAgent can be used to specify a new service objective. For example:
$parameters = @{
    Name = '<job agent name>'
    ResourceGroupName = '<Resource_Group_Name>'
    ServiceObjective = 'JA200'
}
Set-AzSqlElasticJobAgent @parameters
Scale the elastic job agent by using REST API
You can use the Job agent REST API to scale a job agent. For example:
{
"id": "/subscriptions/00000000-1111-2222-3333-444444444444/resourceGroups/group1/providers/Microsoft.Sql/servers/server1/jobAgents/agent1",
"name": "agent1",
"type": "Microsoft.Sql/servers/jobAgents",
"location": "chinanorth3",
"sku": {
"name": "JA100  ",
"capacity": 100
},
"properties": {
"databaseId": "/subscriptions/00000000-1111-2222-3333-444444444444/resourceGroups/group1/providers/Microsoft.Sql/servers/server1/databases/db1"
}
}