Register Windows Admin Center with Azure
Applies to: Azure Stack HCI, versions 22H2 and 21H2; Windows Server 2022, Windows Server 2019
This article describes how to register Windows Admin Center with Azure.
To use Azure services with Windows Admin Center, you must register your Windows Admin Center instance with Azure. This is a prerequisite if you use Windows Admin Center to register Azure Stack HCI with Azure.
Before you begin
There are several requirements and things to consider before you begin the registration process:
You must install Windows Admin Center on a management computer.
If you don't already have an Azure account, first create an account before starting the registration process.
If you use Windows Admin Center to register Azure Stack HCI with Azure, make sure to register Windows Admin Center on the same management computer you plan to use to register Azure Stack HCI, using the same Microsoft Entra ID (tenant) ID.
If your network is configured to use a proxy server for internet connection, make sure that you configure the proxy settings on the Windows Admin Center settings. After the proxy settings are configured, to avoid registration failures restart the ServerManagmentGateway (Windows Admin Center) service on the server running Windows Admin Center before proceeding with Microsoft Entra registration.
Unless you're a Microsoft Entra admin or you have an existing Azure application ID, you need to contact your Microsoft Entra admin to either provide an existing Azure application ID or grant consent to a new application ID that you'll create as part of the registration process.
How to register Windows Admin Center with Azure
Follow these steps to open the registration pane:
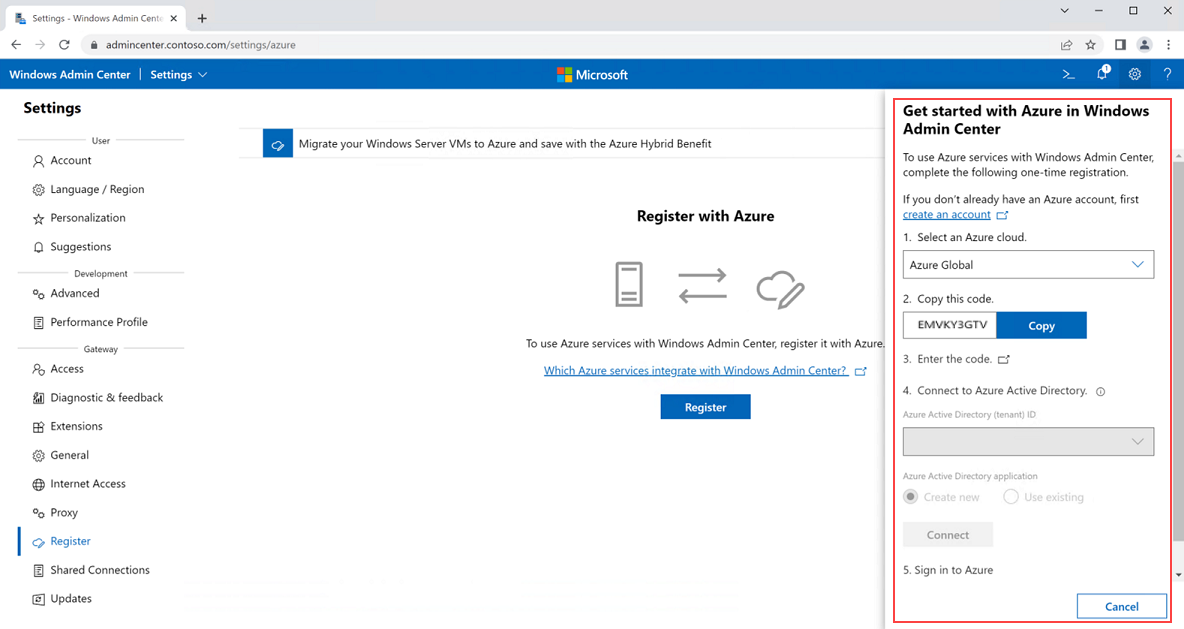
In Windows Admin Center, select the Settings gear icon from the top right corner of the page.
From the Settings menu in the left pane, go to Gateway > Register.
Select the Register button on the center of the page. The registration pane appears on the right of the page.
Follow these one-time registration steps in the registration pane to register Windows Admin Center with Azure:
Select an Azure China from the Select an Azure cloud dropdown menu.
Select the Copy button.
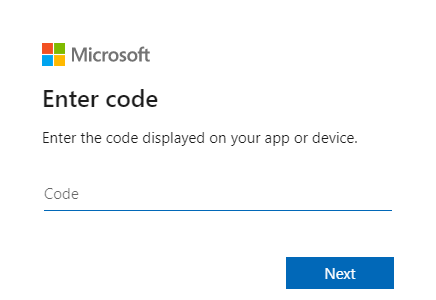
Select the Enter the code link. This opens the Enter code window in a new browser tab. Paste the code you copied from Step 2 and then select Next.
After pasting in the code, an interactive Sign in window appears. Enter the email address associated with the Azure account you want to use with Windows Admin Center. The exact prompts that you see varies depending on your security settings (for example, two-factor authentication). Follow the prompts to sign in.
After signing in, you get a confirmation that you're signed into the Windows Admin Center application on your device. Close the confirmation window and return to the original registration page.
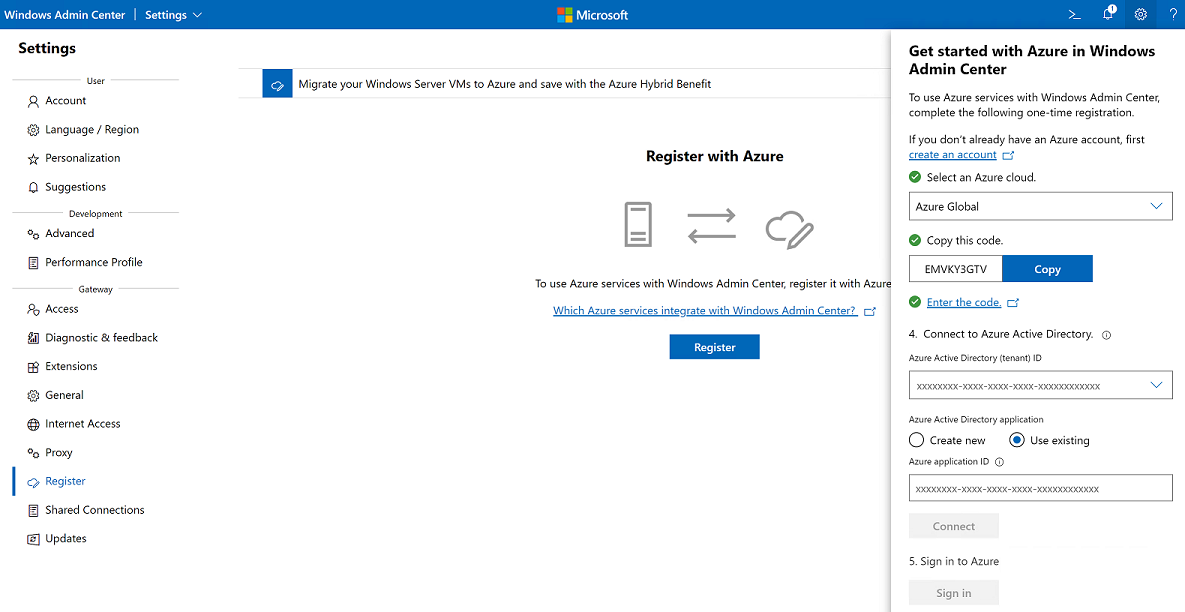
Connect to Microsoft Entra ID by supplying your Microsoft Entra ID (tenant) ID and application ID. If you already have an Azure tenant ID and you've completed the preceding steps, the tenant ID dropdown may be pre-populated and may contain multiple options. Select the correct tenant ID.
If your Microsoft Entra administrator has provided you with an application ID, select Use existing and enter the application ID.
If you have an existing ID but don't know what it is, follow the steps described in Get tenant and app ID values for signing in to retrieve it.
If you don't have an existing ID, select Create new.
Select Connect.
If you're a Microsoft Entra admin or if you used an existing application ID, you should see a confirmation that you're now connected to Microsoft Entra ID. You may see a Permissions requested dialog box. Select Accept.
If you're not a Microsoft Entra admin and you created a new application ID in the previous step by selecting Create new, ask your Microsoft Entra admin to grant consent to the new Azure application ID.
Select Sign in to sign into your Azure account.
Note
If you get a notice that you need admin approval, it might be because the Microsoft Entra admin must grant permissions in the Azure portal, as described in Grant consent to the new Azure application ID. If they've already done that and you're still getting the notice, try refreshing Windows Admin Center and signing in again by going to Settings > Account.
After Windows Admin Center is registered with Azure, you're ready to register Azure Stack HCI with Azure.
Grant consent to a new Azure application ID
Note
This procedure applies only if you a Microsoft Entra admin.
If you're a Microsoft Entra admin, follow these steps to grant consent to a new Azure application ID:
Sign in to the Azure portal.
Navigate to Microsoft Entra ID.
Select App registrations.
Select All applications and search for WindowsAdminCenter.
Select the display name that matches the address of the Windows Admin Center system you're registering. Take note of the Application (client) ID displayed near the top of the page. You may need to provide it to one or more users in your organization so they can register Windows Admin Center on their PCs.
Navigate to API permissions and select Grant admin consent. If you plan to use the same application ID for multiple users, proceed to the next step; otherwise, you're done.
For convenience and ease of management, it's possible to enable multiple users in an organization to register Windows Admin Center on their PCs using the same Azure app ID. To do this, all users must register Windows Admin Center to the same domain and port, usually https://localhost:6516. This also requires the Microsoft Entra admin to add redirect URIs in the Azure portal.
While still viewing the app registration in the Azure portal for the Windows Admin Center instance you're registering, select Authentication under Manage from the left pane.
In the Redirect URIs box, you will see an existing URI representing the first Windows Admin Center system that registered to the app ID. Select Add URI and add two new redirect URIs: http://localhost:6516 and https://localhost:6516. Select Save.
Important
Make sure to provide your users with the correct Azure tenant ID and the application ID from step 5, and tell them to select Use existing application ID when registering Windows Admin Center. Note that if a Microsoft Entra admin doesn't add redirect URIs and more than one user tries to register Windows Admin Center to the same app ID, they will get an error that the reply URL doesn't match.
Unregister Windows Admin Center
When you unregister Windows Admin Center from Azure, it removes the association between Windows Admin Center and the Azure app ID that was provided by your Microsoft Entra admin or created when you registered Windows Admin Center. It doesn't delete the Azure app or affect any Azure services used by servers or clusters managed by Windows Admin Center.
Follow these steps to unregister Windows Admin Center from Azure:
Launch Windows Admin Center and select the Settings gear icon from the top right corner of the page.
From the Gateway menu in the left pane, select Register.
From the Register with Azure pane, select the Unregister button.
In the confirmation dialog, select Confirm.
Next steps
You're now ready to:


