Virtual machine load balancing
Applies to: Azure Stack HCI, versions 22H2; Windows Server 2022, Windows Server 2019, Windows Server 2016
A key consideration for HCI deployments is the capital expenditure (CapEx) required to go into production. It's common to add redundancy to avoid under-capacity during peak traffic in production, but this increases CapEx. This redundancy is often needed because some servers in the cluster are hosting more virtual machines (VMs), while other servers are underutilized.
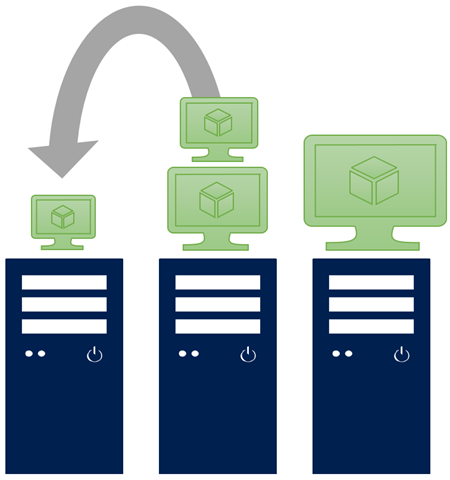
VM load balancing is a feature that allows you to optimize server utilization in your clusters. It identifies over-committed servers and live migrates VMs from those servers to under-committed servers. Failure policies such as anti-affinity, fault domains (sites), and possible owners are honored.
VM load balancing evaluates a server's load based on the following heuristics:
- Current memory pressure: Memory is the most common resource constraint on a Hyper-V host.
- CPU utilization averaged over a five-minute window: Mitigates any server in the cluster from becoming over-committed.
How does VM load balancing work?
VM load balancing occurs automatically when you add a new server to your cluster and can also be configured to perform periodic, recurring load balancing.
When a new server is added to a cluster
When you join a new server to your cluster, the VM load balancing feature automatically balances capacity from the existing servers to the newly added server in the following order:
- The memory pressure and CPU utilization are evaluated on the existing servers in the cluster.
- All servers exceeding the threshold are identified.
- The servers with the highest memory pressure and CPU utilization are identified to determine priority of balancing.
- VMs are live migrated (with no downtime) from a server that exceeds the threshold to the newly added server in the cluster.
Recurring load balancing
By default, VM load balancing is configured for periodic balancing: the memory pressure and CPU utilization on each server in the cluster are evaluated for balancing every 30 minutes. Here's the flow of the steps:
- The memory pressure and CPU utilization are evaluated on all servers in the cluster.
- All servers exceeding the threshold and those below the threshold are identified.
- The servers with the highest memory pressure and CPU utilization are identified to determine priority of balancing.
- VMs are live migrated (with no downtime) from a server that exceeds the threshold to another server that is under the minimum threshold.
Configure VM load balancing using Windows Admin Center
The easiest way to configure VM load balancing is using Windows Admin Center.
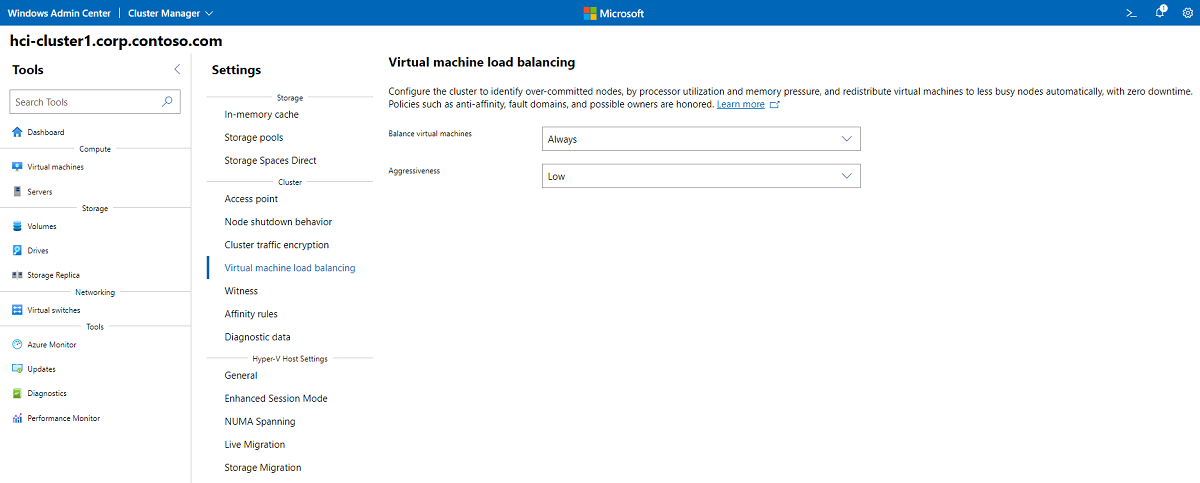
Connect to your cluster and go to Tools > Settings.
Under Settings, select Virtual machine load balancing.
Under Balance virtual machines, select Always to load balance upon server join and every 30 minutes, Server joins to load balance only upon server joins, or Never to disable the VM load balancing feature. The default setting is Always.
Under Aggressiveness, select Low to live migrate VMs when the server is more than 80% loaded, Medium to migrate when the server is more than 70% loaded, or High to average the servers in the cluster and migrate when the server is more than 5% above average. The default setting is Low.
Configure VM load balancing using Windows PowerShell
You can configure if and when load balancing occurs using the cluster common property AutoBalancerMode. To control when to balance the cluster, run the following in PowerShell, substituting a value from the table below:
(Get-Cluster).AutoBalancerMode = <value>
| AutoBalancerMode | Behavior |
|---|---|
| 0 | Disabled |
| 1 | Load balance upon server join |
| 2 (default) | Load balance upon server join and every 30 minutes |
You can also configure the aggressiveness of balancing by using the cluster common property AutoBalancerLevel. To control the aggressiveness threshold, run the following in PowerShell, substituting a value from the table below:
(Get-Cluster).AutoBalancerLevel = <value>
| AutoBalancerLevel | Aggressiveness | Behavior |
|---|---|---|
| 1 (default) | Low | Move when host is more than 80% loaded |
| 2 | Medium | Move when host is more than 70% loaded |
| 3 | High | Average servers in the cluster and move when host is more than 5% above average |
To check how the AutoBalancerLevel and AutoBalancerMode properties are set, run the following in PowerShell:
Get-Cluster | fl AutoBalancer*
Next steps
For related information, see also:


