Note
Access to this page requires authorization. You can try signing in or changing directories.
Access to this page requires authorization. You can try changing directories.
This article describes how to migrate to the new file server infrastructure for hosting the Azure App Service on Azure Stack Hub Resource Provider content file share.
Back up App Service secrets
When you recover App Service from backup, you must provide the App Service keys used by the initial deployment. This information should be saved as soon as App Service is successfully deployed and stored in a safe location. The resource provider infrastructure configuration is recreated from backup during recovery using App Service recovery PowerShell cmdlets.
Use the admin portal to back up App Service secrets by following these steps:
Sign in to the Azure Stack Hub administrator portal as the service admin.
Browse to App Service -> Secrets.
Select Download Secrets.
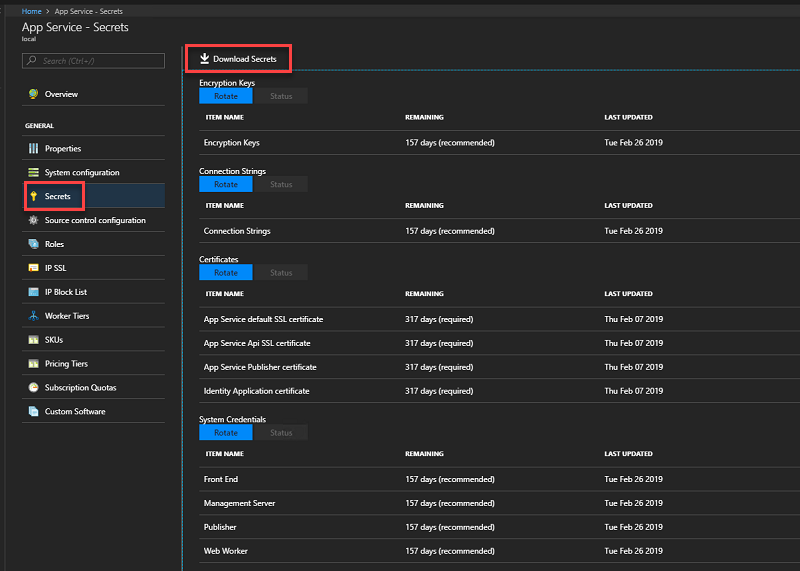
When secrets are ready for downloading, click Save and store the App Service secrets (SystemSecrets.JSON) file in a safe location.

Note
Repeat these steps every time the App Service secrets are rotated.
Back up the existing App Service file share
App Service stores tenant app info in the file share. This file share must be backed up regularly along with the App Service databases so that as little data as possible is lost if a restore or migration is required.
To back up the App Service file share content, use Azure Backup Server or another method to regularly copy the file share content to the location to which you've saved all previous recovery info.
For example, you can run these commands to use Robocopy from a Windows PowerShell (not PowerShell ISE) console session:
$source = "<file share location>"
$destination = "<remote backup storage share location>"
net use $destination /user:<account to use to connect to the remote share in the format of domain\username> *
robocopy $source $destination
net use $destination /delete
Restore the App Service file share content to a new File Server
After you prepare the new file server to host the App Service file share, you must restore the tenant file share content from backup. You can use whatever method you have available to copy the files into the newly created App Service file share location. This example on the file server uses PowerShell and Robocopy to connect to a remote share and copy the files to the share:
$source = "<remote backup storage share location>"
$destination = "<local file share location>"
net use $source /user:<account to use to connect to the remote share in the format of domain\username> *
robocopy /E $source $destination
net use $source /delete
In addition to copying the file share contents, you must also reset permissions on the file share itself. To reset permissions, open an admin command prompt on the file server computer and run the ReACL.cmd file. The ReACL.cmd file is located in the App Service installation files in the BCDR directory.
Migrate the file share
In the Azure Stack Hub admin portal, navigate to Network Security Groups and select the ControllersNSG Network Security Group.
By default, Remote Desktop is disabled to all App Service infrastructure roles. Modify the Inbound_Rdp_2289 rule action to Allow access.
Navigate to the resource group containing the App Service Resource Provider deployment, by default the name is AppService.<region> and connect to CN0-VM.
Open an Administrator PowerShell session and run net stop webfarmservice.
Repeat steps 3 and 4 for all other controllers.
Return to the CN0-VM remote desktop session.
Copy the App Service secrets file to the controller.
In an administrator PowerShell session run:
Restore-AppServiceStamp -FilePath <local secrets file> -OverrideContentShare <new file share location> -CoreBackupFilePath <filepath>A prompt appears to confirm the key values, verify and press ENTER to continue, or close the PowerShell session to cancel.
Once the cmdlet runs, all worker instances from custom worker tiers will be removed, and then added back via the next PowerShell script.
In the same administrative PowerShell session or a new Administrative PowerShell session, run:
Restore-AppServiceRolesThis command inspects the Virtual Machine Scale Sets associated and performs corresponding actions, including adding back the instances of the custom worker tiers.
In the same or in a new administrative PowerShell session, run the command net start webfarmservice.
Repeat the previous step for all other controllers.
In the Azure Stack admin portal, navigate back to the ControllersNSG Network Security Group.
Modify the Inbound_Rdp_3389 rule to deny access.
Update file server credentials
If the credentials changed, you must update the file share credentials to connect to the new file server (FileShareOwnerCredential and FileShareUserCredential).
- In the Azure Stack admin portal, navigate to the ControllersNSG Network Security Group.
- By default, remote desktop access is disabled to all App Service infrastructure roles. Modify the Inbound_Rdp_3389 rule action to Allow access.
- Navigate to the resource group containing the App Service Resource Provider deployment. By default, the resource group is named with the format
AppService.<region>, and connected to CN0-VM. - Launch the Web Cloud Management Console.
- Check the Web Cloud Management Console -> Web Cloud screen and verify that both Controllers are Ready.
- Select Credentials.
- Next, select the credential you wish to update. In this example, select FileShareOwnerCrdential or FileShareUserCredential and select Edit – either from the menu bar or from the right click context menu.
- Enter the new credential details and then select OK.
- Repeat for FileShareUserCredential if that has also changed.
- Once you complete updating the credentials, you must restart CN0-VM.
- Wait for CN0-VM and verify that the role is marked as Ready in the admin portal, under App Service -> Roles.
- Restart CN1-VM and verify that the role is marked as Ready
- Once both controllers are marked as Ready, repair all other role instances, such as Management, Front End etc., one set at a time.
- In the Azure Stack admin portal, navigate back to the ControllersNSG Network Security Group.
- Modify the Inbound_Rdp_3389 rule to deny access.