Note
Access to this page requires authorization. You can try signing in or changing directories.
Access to this page requires authorization. You can try changing directories.
Before you can test offers and plans and create resources, you'll need a user account for the Azure Stack Hub user portal. You create a user account in your Microsoft Entra tenant, by using the Azure portal or PowerShell.
Create user account using the Azure portal
You must have an Azure subscription to use the Azure portal.
Sign in to the Azure portal.
Using the Directory + Subscription filter icon in the upper right, switch to the Microsoft Entra directory tenant you're using for Azure Stack Hub.
Using the search bar at the top, search for and select the Microsoft Entra ID service.
In the left pane, select Users.
On the Users page, select + New user.
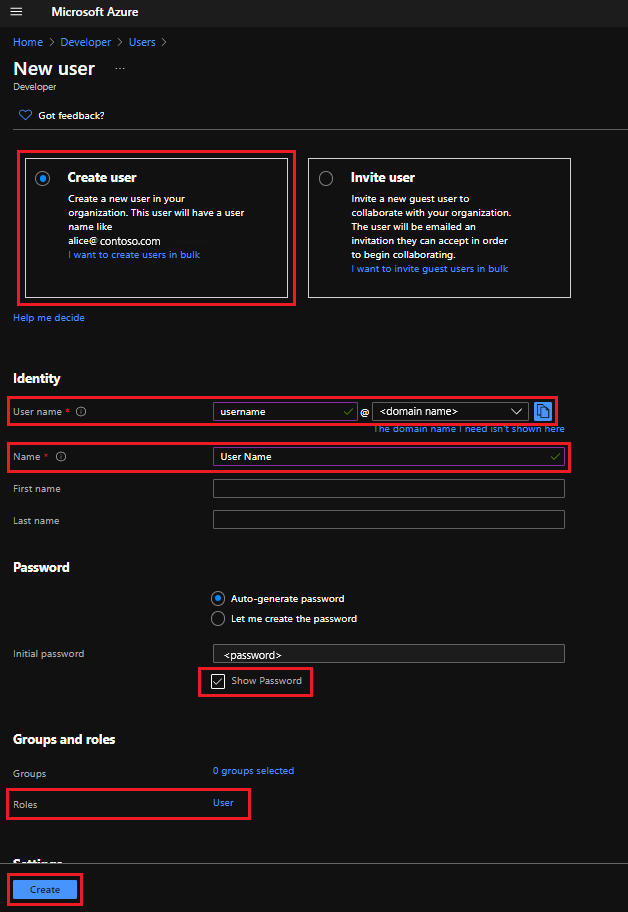
On the New user page, select Create user then fill in the required info:
- User name (required): The identifier used for sign in. For example,
mary@contoso.com. The domain part of the user name must use either the initial default domain name,<yourdomainname>.partner.onmschina.cn, or a custom domain name, such ascontoso.com. For more information about how to create a custom domain name, see How to add a custom domain name to Microsoft Entra ID. - Name (required): The first and last name of the new user. For example,
Mary Parker. - Show Password: Select the checkbox and copy the autogenerated password provided in Initial password. You'll need this password for the initial sign-in process.
- Groups and roles: Make sure the User directory role is selected.
- Settings and Job info: Optionally, you can add more info about the user. You can also add user info later. For more details, see How to add or change user profile information.
- User name (required): The identifier used for sign in. For example,
Select Create. You should see a "Successfully created user" notification in the upper right.
Sign out and sign in to the Azure portal again, with the new account using the password you saved. Change the password when prompted.
Sign in to the Azure Stack Hub user portal with the new account to see the user portal.
Create a user account using PowerShell
If you don't have an Azure subscription, you can't use the Azure portal to add a tenant user account. In this case, you can use the Microsoft Graph module for Windows PowerShell instead.
Install the Microsoft Graph PowerShell SDK for Windows PowerShell with these steps:
- Open an elevated Windows PowerShell command prompt (run Windows PowerShell as admin).
- Run the Install-Module Microsoft.Graph command.
- If you're prompted to install the NuGet provider, select Y and Enter.
- If you're prompted to install the module from PSGallery, select Y and Enter.
Run the following cmdlet to connect.
Connect-MgGraph -Scopes 'User.ReadWrite.All' -Environment ChinaAfter you connect, complete the sequence by adding the new user:
# Create the new user account (be sure to replace all <placeholder> values first)
$PasswordProfile = @{ Password = '<password>' }
New-MgUser -DisplayName "<UserName>" -PasswordProfile $passwordProfile -UserPrincipalName "<username>@<yourdomainname>" -MailNickName "<MailNickName>" -AccountEnabled
Sign in to the Azure portal with the new user account. Change the password when prompted.
Sign in to the Azure Stack Hub user portal with the new account to see the user portal.
Next steps
- Learn how to create and test a subscription by subscribing to an offer
- Add Azure Stack Hub users in AD FS

