Note
Access to this page requires authorization. You can try signing in or changing directories.
Access to this page requires authorization. You can try changing directories.
Important
Starting from Azure Stack Hub build 2108, the SQL and MySQL resource providers are offered to subscriptions that have been granted access. If you want to start using this feature, or if you need to upgrade from a previous version, open a support case and our support engineers will guide you through the deployment or upgrade process.
Use the Azure Stack Hub SQL Server resource provider to expose SQL databases as an Azure Stack Hub service.
The SQL resource provider runs as a service on a Windows Server 2016 Server Core virtual machine.
The SQL resource provider runs as a service on a special Add-on RP Windows Server.
Important
Only the resource provider should create items on servers that host SQL or MySQL. Items created on a host server that aren't created by the resource provider are unsupported, and may result in a mismatched state.
Important
The V2.x SQL/MySQL resource provider uses the Deployment Resource Provider (DRP) installation mechanism, which isn't supported on the ASDK. Therefore, the V2.x SQL/MySQL resource provider isn't supported on the ASDK.
Prerequisites
If you've already installed a resource provider, you've likely completed the following prerequisites, and can skip this section. Otherwise, complete these steps before continuing:
Register your Azure Stack Hub instance with Azure, if you haven't done so. This step is required as you'll be connecting to and downloading items to marketplace from Azure.
If you're not familiar with the Marketplace Management feature of the Azure Stack Hub administrator portal, review Download marketplace items from Azure and publish to Azure Stack Hub. The article walks you through the process of downloading items from Azure to the Azure Stack Hub marketplace. It covers both connected and disconnected scenarios. If your Azure Stack Hub instance is disconnected or partially connected, there are additional prerequisites to complete in preparation for installation.
Update your Microsoft Entra home directory. Starting with build 1910, a new application must be registered in your home directory tenant. This app will enable Azure Stack Hub to successfully create and register newer resource providers (like Event Hubs and others) with your Microsoft Entra tenant. This is an one-time action that needs to be done after upgrading to build 1910 or newer. If this step isn't completed, marketplace resource provider installations will fail.
- After you've successfully updated your Azure Stack Hub instance to 1910 or greater, follow the instructions for cloning/downloading the Azure Stack Hub Tools repository.
- Then, follow the instructions for Updating the Azure Stack Hub Microsoft Entra Home Directory (after installing updates or new Resource Providers).
SQL Server resource provider prerequisites
You'll need a computer and account that can access:
- the Azure Stack Hub administrator portal.
- the privileged endpoint (needed only when you're deploying SQL Server resource provider V1 or upgrading from SQL Server resource provider V1 to SQL Server resource provider V2).
- the Azure Resource Manager admin endpoint,
https://adminmanagement.region.<fqdn>, where<fqdn>is your fully qualified domain name. - the Internet, if your Azure Stack Hub was deployed to use Microsoft Entra ID as your identity provider.
Download the supported version of SQL resource provider binary according to the version mapping table below. For V2 SQL resource provider, download the marketplace item to Azure Stack Hub.
Supported Azure Stack Hub version SQL RP version Windows Server that RP service is running on 2206, 2301, 2306, 2311 SQL RP version 2.0.13.x Microsoft AzureStack Add-on RP Windows Server 1.2009.0 2108, 2206 SQL RP version 2.0.6.x Microsoft AzureStack Add-on RP Windows Server 1.2009.0 Make sure that the required Windows Server VM is downloaded to Azure Stack Hub Marketplace. Manually download the image according to the version mapping table above if needed.
Ensure datacenter integration prerequisites are met:
Prerequisite Reference Conditional DNS forwarding is set correctly. Azure Stack Hub datacenter integration - DNS Inbound ports for resource providers are open. Azure Stack Hub datacenter integration - Ports and protocols inbound PKI certificate subject and SAN are set correctly. Azure Stack Hub deployment mandatory PKI prerequisites
Azure Stack Hub deployment PaaS certificate prerequisitesPrepare the certificate. (For integrated systems installations only.)
- You must provide the SQL PaaS PKI certificate described in the optional PaaS certificates section of Azure Stack Hub deployment PKI requirements. The Subject Alternative Name (SAN) must adhere to the following naming pattern: CN=*.dbadapter.<region>.<fqdn>, with password protected.
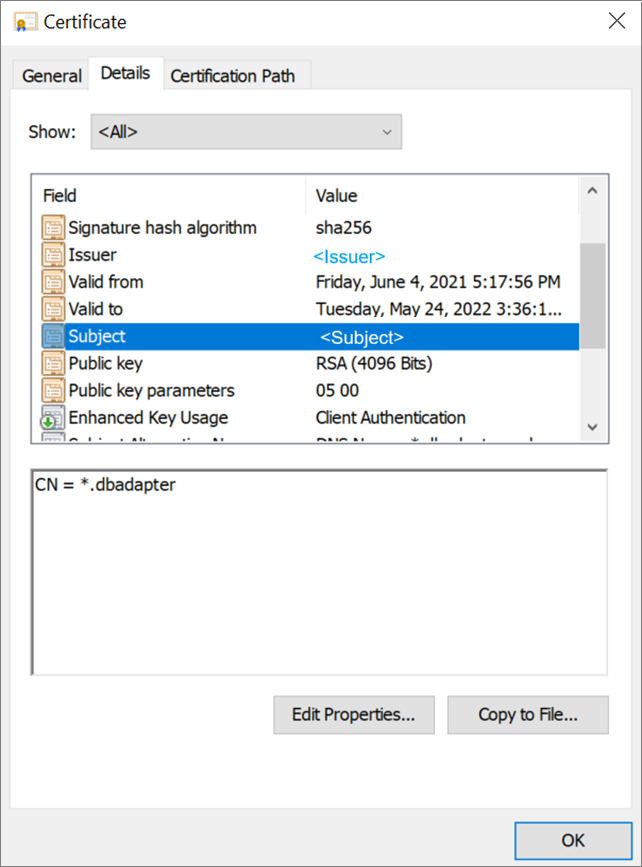
- When deploying SQL Server resource provider V1, place the .pfx file in the location specified by the DependencyFilesLocalPath parameter. Don't provide a certificate for ASDK systems.
- When deploying SQL Server resource provider V2, prepare the certificate for the following installation steps.
- You must provide the SQL PaaS PKI certificate described in the optional PaaS certificates section of Azure Stack Hub deployment PKI requirements. The Subject Alternative Name (SAN) must adhere to the following naming pattern: CN=*.dbadapter.<region>.<fqdn>, with password protected.
Disconnected scenario
When deploying SQL Server resource provider V2 in a disconnected scenario, follow the download marketplace items to Azure Stack Hub instruction to download the SQL Server resource provider item and Add-on RP Windows Server item to your Azure Stack Hub environment.
When deploying SQL Server resource provider V1 in a disconnected scenario, complete the following steps to download the required PowerShell modules and register the repository manually.
Sign in to a computer with internet connectivity and use the following scripts to download the PowerShell modules.
Import-Module -Name PowerShellGet -ErrorAction Stop
Import-Module -Name PackageManagement -ErrorAction Stop

# path to save the packages, c:\temp\azs1.6.0 as an example here
$Path = "c:\temp\azs1.6.0"
Depending on the version of resource provider that you are deploying, run one of the scripts.
# for resource provider version >= 1.1.93.0
Save-Package -ProviderName NuGet -Source https://www.powershellgallery.com/api/v2 -Name AzureRM -Path $Path -Force -RequiredVersion 2.5.0
Save-Package -ProviderName NuGet -Source https://www.powershellgallery.com/api/v2 -Name AzureStack -Path $Path -Force -RequiredVersion 1.8.2
# for resource provider version <= 1.1.47.0 Save-Package -ProviderName NuGet -Source https://www.powershellgallery.com/api/v2 -Name AzureRM -Path $Path -Force -RequiredVersion 2.3.0 Save-Package -ProviderName NuGet -Source https://www.powershellgallery.com/api/v2 -Name AzureStack -Path $Path -Force -RequiredVersion 1.6.0Then you copy the downloaded packages to a USB device.
Sign in to the disconnected workstation and copy the packages from the USB device to a location on the workstation.
Register this location as a local repository.
# requires -Version 5
# requires -RunAsAdministrator
# requires -Module PowerShellGet
# requires -Module PackageManagement

$SourceLocation = "C:\temp\azs1.6.0"
$RepoName = "azs1.6.0"

Register-PSRepository -Name $RepoName -SourceLocation $SourceLocation -InstallationPolicy Trusted

New-Item -Path $env:ProgramFiles -name "SqlMySqlPsh" -ItemType "Directory"
Deploy the SQL resource provider V2
If you are upgrading from a V1 version, refer to the doc Update the SQL Server resource provider.
Start installation
If you haven't already, sign in to the Azure Stack Hub administrator portal, select Marketplace Management on the left, select Resource providers.
Once SQL resource provider and other required software have been downloaded, Marketplace Management shows the "SQL Server resource provider" packages with a status of "Not Installed". There may be other packages that show a status of "Downloaded".

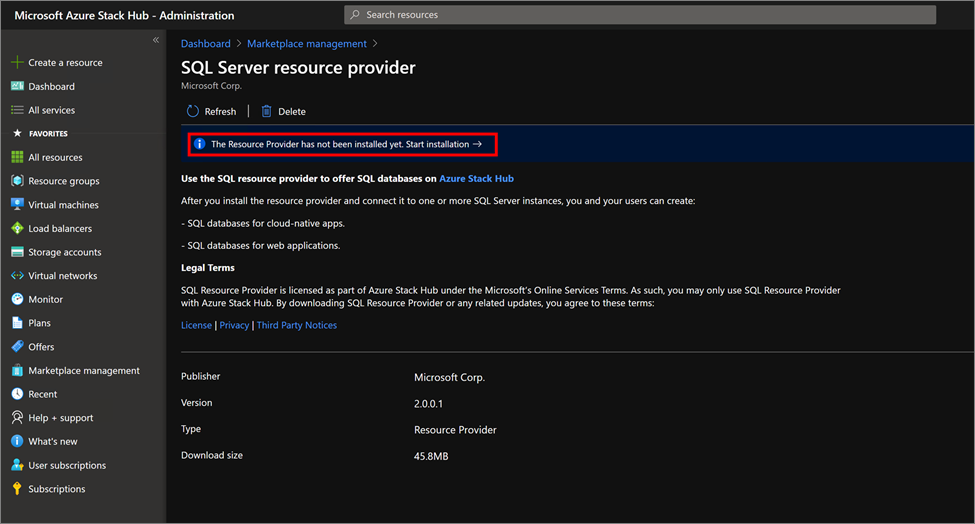
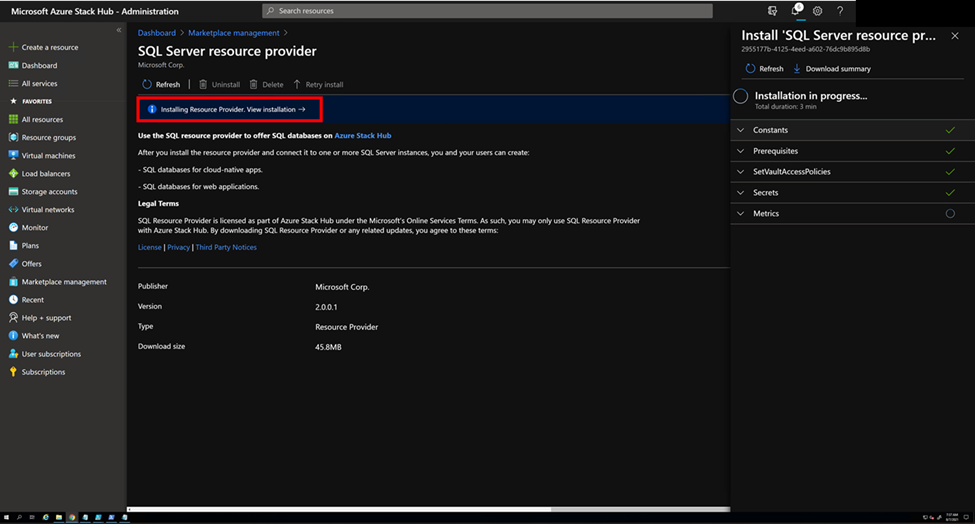
Select the row you wish to install. The SQL Server resource provider install package page shows a blue banner across the top. Select the banner to start the installation.
Install prerequisites
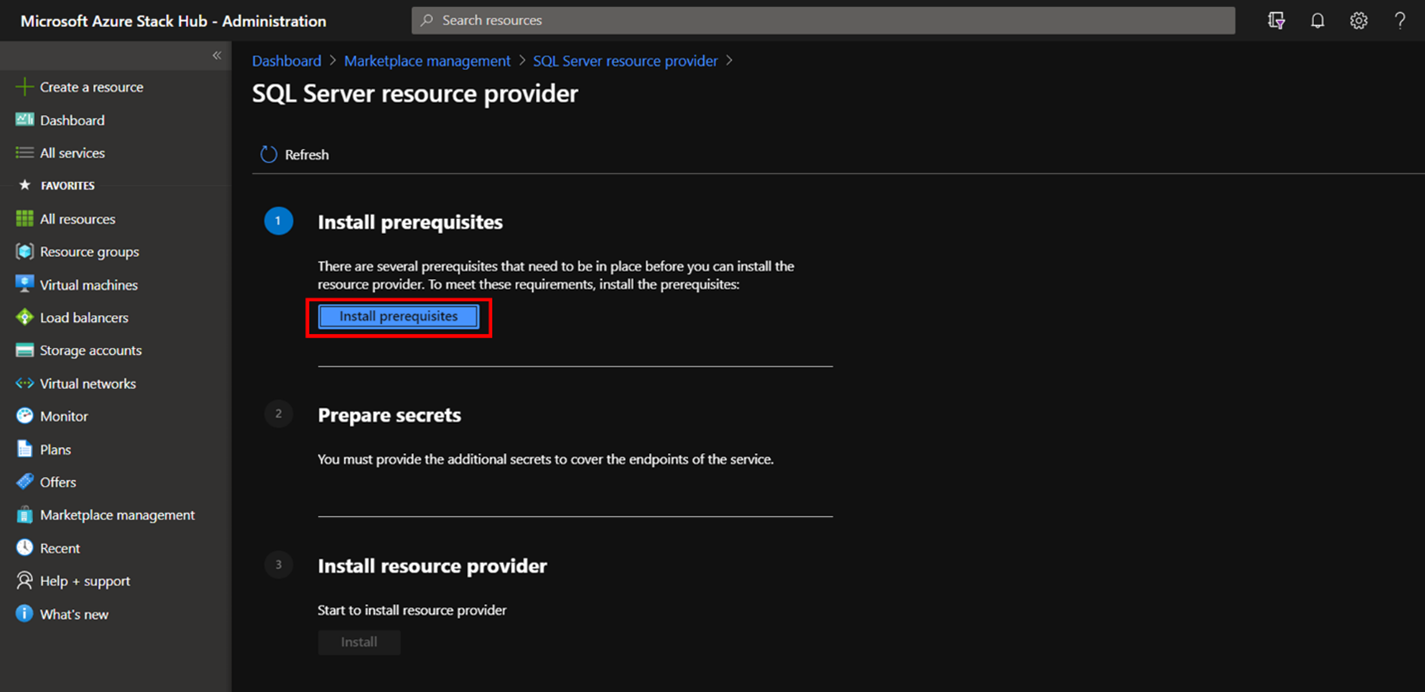
Next you're transferred to the install page. Select Install Prerequisites to begin the installation process.
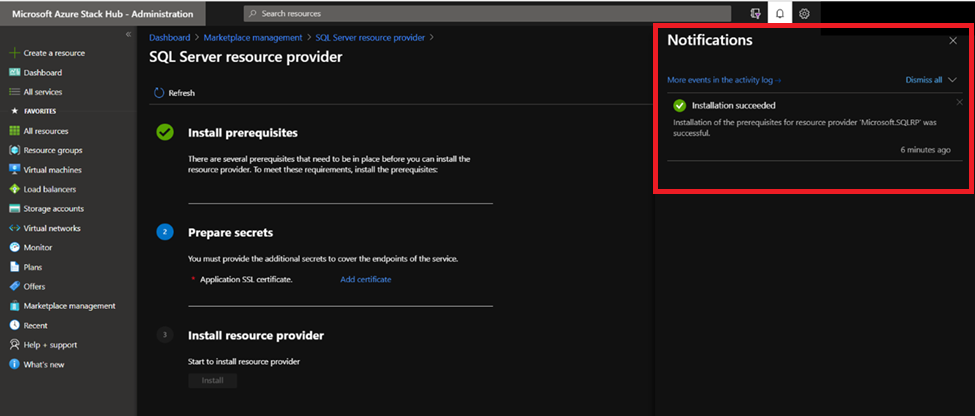
Wait until the installation of prerequisites succeeds. You should see a green checkmark next to Install prerequisites before proceeding to the next step.
Prepare secrets
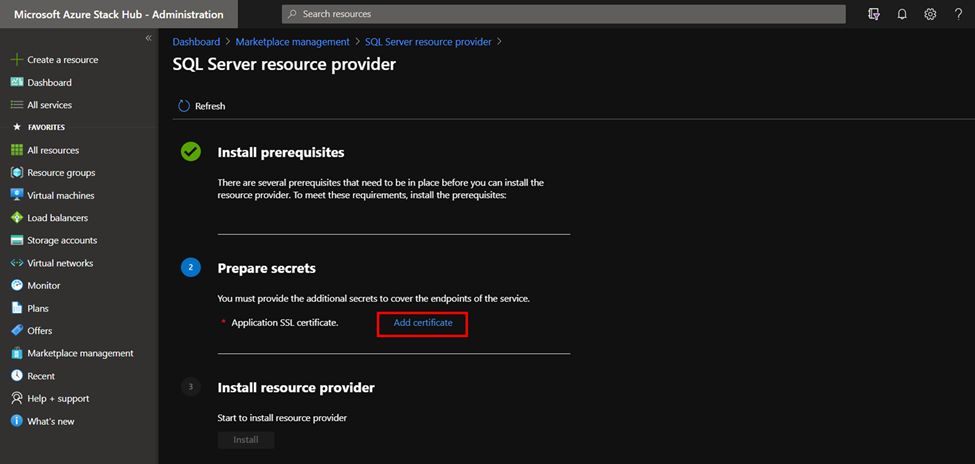
Under the 2. Prepare secrets step, select Add certificate, and the Add a certificate panel will appear.
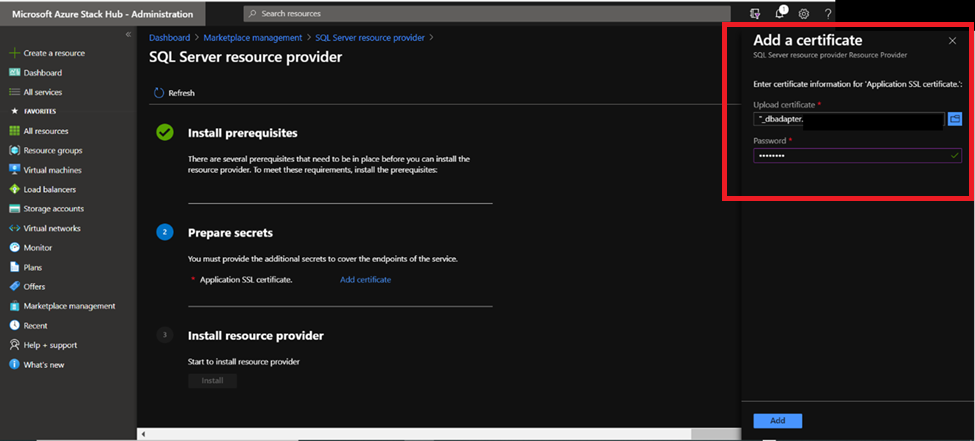
Select the browse button on Add a certificate, just to the right of the certificate filename field. Select the .pfx certificate file you procured when completing the prerequisites.
Enter the password you provided to create a secure string for SQL Server resource provider SSL Certificate. Then select Add.
Install resource provider
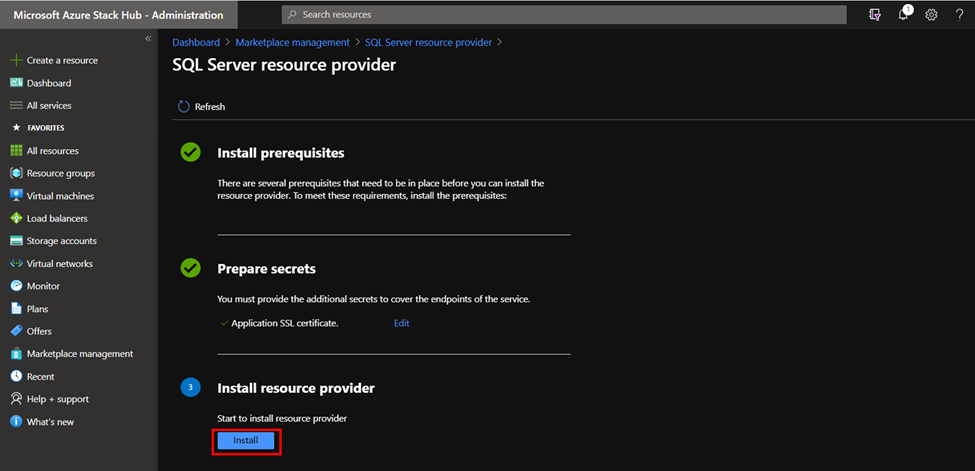
When the installation of the certificate succeeds, you should see a green checkmark next to Prepare secrets before proceeding to the next step. Now select the Install button next to 3 Install resource provider.
Next you'll see the following page, which indicates that SQL resource provider is being installed.
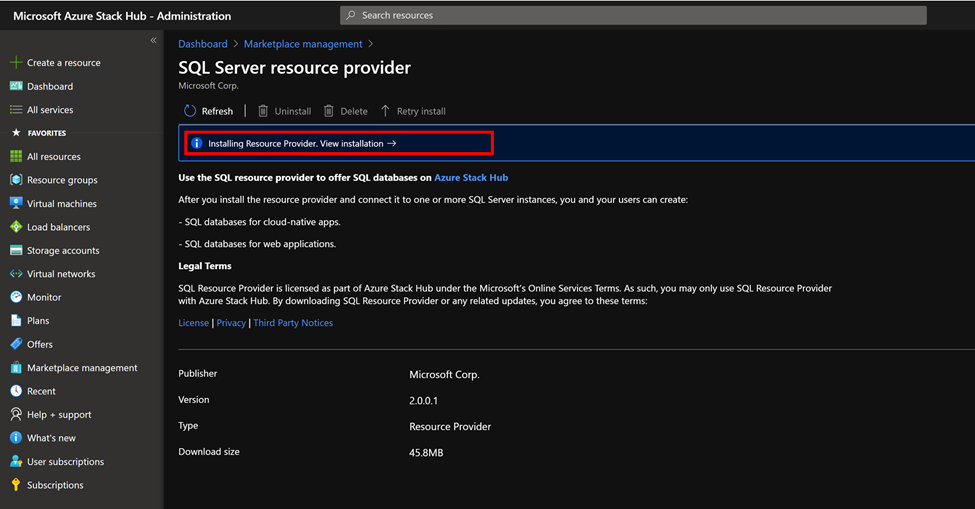
Wait for the installation complete notification. This process usually takes one or more hours, depending on your Azure Stack Hub type.
Verify that the installation of SQL Server resource provider has succeeded, by returning to the Marketplace Management, Resource Providers page. The status of SQL Server resource provider should show "Installed".

Deploy the SQL resource provider V1
After you've completed all of the prerequisites, run the self-extractor to extract the downloaded installation package to a temporary directory. run the DeploySqlProvider.ps1 script from a computer that can access both the Azure Stack Hub Azure Resource Manager admin endpoint and the privileged endpoint, to deploy the SQL resource provider. The DeploySqlProvider.ps1 script is extracted as part of the SQL resource provider binary that you downloaded for your version of Azure Stack Hub.
Important
Before deploying the resource provider, review the release notes to learn about new functionality, fixes, and any known issues that could affect your deployment.
To deploy the SQL resource provider, open a new elevated PowerShell window (not PowerShell ISE) and change to the directory where you extracted the SQL resource provider binary files.
Important
We strongly recommend using Clear-AzureRmContext -Scope CurrentUser and Clear-AzureRmContext -Scope Process to clear the cache before running the deploy or update script.
Run the DeploySqlProvider.ps1 script, which completes the following tasks:
- Uploads the certificates and other artifacts to a storage account on Azure Stack Hub.
- Publishes gallery packages so you can deploy SQL databases using the gallery.
- Publishes a gallery package for deploying hosting servers.
- Deploys a VM using the Windows Server 2016 core image or Microsoft AzureStack Add-on RP Windows Server image you downloaded, and then installs the SQL resource provider.
- Registers a local DNS record that maps to your resource provider VM.
- Registers your resource provider with the local Azure Resource Manager for the operator account.
Note
When the SQL resource provider deployment starts, the system.local.sqladapter resource group is created. It may take up to 75 minutes to finish the required deployments to this resource group. You should not place any other resources in the system.local.sqladapter resource group.
DeploySqlProvider.ps1 parameters
You can specify the following parameters from the command line. If you don't, or if any parameter validation fails, you're prompted to provide the required parameters.
| Parameter name | Description | Comment or default value |
|---|---|---|
| CloudAdminCredential | The credential for the cloud admin, necessary for accessing the privileged endpoint. | Required |
| AzCredential | The credentials for the Azure Stack Hub service admin account. Use the same credentials that you used for deploying Azure Stack Hub. The script will fail if the account you use with AzCredential requires multifactor authentication (MFA). | Required |
| VMLocalCredential | The credentials for the local admin account of the SQL resource provider VM. | Required |
| PrivilegedEndpoint | The IP address or DNS name of the privileged endpoint. | Required |
| AzureEnvironment | The Azure environment of the service admin account used for deploying Azure Stack Hub. Required only for Microsoft Entra deployments. Supported environment name is AzureChinaCloud. | AzureChinaCloud |
| DependencyFilesLocalPath | For integrated systems only, your certificate .pfx file must be placed in this directory. You can optionally copy one Windows Update MSU package here. | Optional (mandatory for integrated systems) |
| DefaultSSLCertificatePassword | The password for the .pfx certificate. | Required |
| MaxRetryCount | The number of times you want to retry each operation if there's a failure. | 2 |
| RetryDuration | The timeout interval between retries, in seconds. | 120 |
| Uninstall | Removes the resource provider and all associated resources (see the following notes). | No |
| DebugMode | Prevents automatic cleanup on failure. | No |
Deploy the SQL resource provider using a custom script
If you're deploying the SQL resource provider version 1.1.33.0 or previous versions, you need to install specific versions of AzureRm.BootStrapper and Azure Stack Hub modules in PowerShell.
If you're deploying the SQL resource provider version 1.1.47.0 or later, the deployment script will automatically download and install the necessary PowerShell modules for you to path C:\Program Files\SqlMySqlPsh.
# Install the AzureRM.Bootstrapper module, set the profile, and install the AzureStack module
# Note that this might not be the most currently available version of Azure Stack Hub PowerShell
Install-Module -Name AzureRm.BootStrapper -RequiredVersion 0.5.0 -Force
Use-AzureRmProfile -Profile 2018-03-01-hybrid -Force
Install-Module -Name AzureStack -RequiredVersion 1.6.0
Note
In disconnected scenario, you need to download the required PowerShell modules and register the repository manually as a prerequisite.
To eliminate any manual configuration when deploying the resource provider, you can customize the following script. Change the default account information and passwords as needed for your Azure Stack Hub deployment.
# Use the NetBIOS name for the Azure Stack Hub domain. On the Azure Stack Hub SDK, the default is AzureStack but could have been changed at install time.
$domain = "AzureStack"

# For integrated systems, use the IP address of one of the ERCS VMs
$privilegedEndpoint = "AzS-ERCS01"

# Provide the Azure environment used for deploying Azure Stack Hub. Required only for Azure AD deployments. Supported values for the <environment name> parameter is AzureChinaCloud depending which Azure subscription you're using.
$AzureEnvironment = "<EnvironmentName>"

# Point to the directory where the resource provider installation files were extracted.
$tempDir = 'C:\TEMP\SQLRP'

# The service admin account can be Azure Active Directory or Active Directory Federation Services.
$serviceAdmin = "admin@mydomain.partner.onmschina.cn"
$AdminPass = ConvertTo-SecureString 'P@ssw0rd1' -AsPlainText -Force
$AdminCreds = New-Object System.Management.Automation.PSCredential ($serviceAdmin, $AdminPass)

# Set credentials for the new resource provider VM local admin account.
$vmLocalAdminPass = ConvertTo-SecureString 'P@ssw0rd1' -AsPlainText -Force
$vmLocalAdminCreds = New-Object System.Management.Automation.PSCredential ("sqlrpadmin", $vmLocalAdminPass)

# Add the cloudadmin credential that's required for privileged endpoint access.
$CloudAdminPass = ConvertTo-SecureString 'P@ssw0rd1' -AsPlainText -Force
$CloudAdminCreds = New-Object System.Management.Automation.PSCredential ("$domain\cloudadmin", $CloudAdminPass)

# Change the following as appropriate.
$PfxPass = ConvertTo-SecureString 'P@ssw0rd1' -AsPlainText -Force

# For version 1.1.47.0 or later, the PowerShell modules used by the RP deployment are placed in C:\Program Files\SqlMySqlPsh
# The deployment script adds this path to the system $env:PSModulePath to ensure correct modules are used.
$rpModulePath = Join-Path -Path $env:ProgramFiles -ChildPath 'SqlMySqlPsh'
$env:PSModulePath = $env:PSModulePath + ";" + $rpModulePath

# Change to the directory folder where you extracted the installation files. Don't provide a certificate on ASDK!
. $tempDir\DeploySQLProvider.ps1 `
    -AzCredential $AdminCreds `
    -VMLocalCredential $vmLocalAdminCreds `
    -CloudAdminCredential $cloudAdminCreds `
    -PrivilegedEndpoint $privilegedEndpoint `
    -AzureEnvironment $AzureEnvironment `
    -DefaultSSLCertificatePassword $PfxPass `
    -DependencyFilesLocalPath $tempDir\cert
When the resource provider installation script finishes, refresh your browser to make sure you can see the latest updates and close the current PowerShell session.
Verify the V1 deployment using the Azure Stack Hub portal
- Sign in to the administrator portal as the service admin.
- Select Resource Groups.
- Select the system.<location>.sqladapter resource group.
- On the summary page for Resource group Overview, there should be no failed deployments.
- Finally, select Virtual machines in the administrator portal to verify that the SQL resource provider VM was successfully created and is running.
Important configuration for Microsoft Entra ID
If your Azure Stack Hub is using Microsoft Entra ID as an identity provider, make sure the VM that has installed SQL Server resource provider has outbound internet connectivity.
If there is a need to get the IP of the VM that has installed SQL Server resource provider (i.e. add the IP to your firewall allowlist), you need to open a support case and have the support engineer make the SQL Server resource provider subscription temporarily visible. Then you can locate the VM in the subscription and get its IP.