Note
Access to this page requires authorization. You can try signing in or changing directories.
Access to this page requires authorization. You can try changing directories.
Use the template in this article to connect an Azure Stack Hub virtual machine (VM) to an on-premises iSCSI target. Set up the VM to use storage hosted outside of your Azure Stack Hub and elsewhere in your datacenter. This article looks at using a Windows machine as the iSCSI target.
You can find the template in the lucidqdreams fork of Azure Intelligent Edge Patterns GitHub repository. The template is in the storage-iSCSI folder. The template sets up the infrastructure necessary on the Azure Stack Hub side to connect to an iSCSI target. This infrastructure includes a virtual machine that acts as the iSCSI initiator along with its accompanying VNet, NSG, PIP, and storage. After you deploy the template, run two PowerShell scripts to complete the configuration. Run one script on the on-premises VM (target) and run the other script on the Azure Stack Hub VM (initiator). When you complete these steps, you add on-premises storage to your Azure Stack Hub VM.
Overview
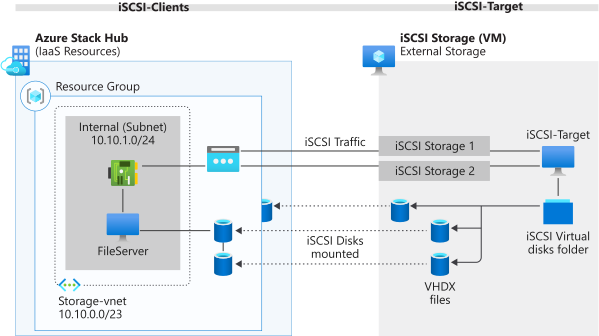
The following diagram shows a VM hosted on Azure Stack Hub with an iSCSI mounted disk from a Windows machine on-premises (physical or virtual). By using the iSCSI protocol, the VM can mount storage external to Azure Stack Hub inside your Azure Stack Hub hosted VM.
Requirements
- An on-premises machine (physical or virtual) running Windows Server 2016 Datacenter or Windows Server 2019 Datacenter.
- Required Azure Stack Hub Marketplace items:
- Windows Server 2016 Datacenter or Windows Server 2019 Datacenter (latest build recommended).
- PowerShell DSC extension.
- Azure Custom Script Extension.
- An existing virtual or physical machine. Ideally, this machine has two network adapters. This machine could also be another iSCSI target such as a SAN.
Things to consider
- The template applies a Network Security Group to the subnet. Review this configuration and make additional allowances as needed.
- The Microsoft Tunnel NSG has an RDP deny rule. Set this rule to allow if you want to access the VMs through the public IP address.
- This solution doesn't take DNS resolution into account.
- Change your Chapusername and Chappassword. The Chappassword must be 12 to 16 characters in length.
- The template uses a static IP address for the VM as the iSCSI connection uses the local address in the configuration.
- The template uses a BYOL Windows License.
- You can also connect Linux-based systems to the iSCSI targets. You can find instructions in the iSCSI Initiator article in the Ubuntu documentation.
Options
- Use your own Blob storage account and SAS token by using the _artifactsLocation and _artifactsLocationSasToken parameters.
- The template provides default values for VNet naming and IP addressing.
- This configuration has only one iSCSI NIC coming from the iSCSI client. The product team tested a number of configurations to utilize separate subnets and NICs but ran into problems with multiple gateways and trying to create a separate storage subnet to isolate traffic and actually be truly redundant.
- Keep these values within legal subnet and address ranges or deployment might fail.
- The primary purpose of the PowerShell DSC package is to check for pending reboots. You can customize this DSC further if needed. For more information, see ComputerManagementDsc.
Resource group template (iSCSI client)
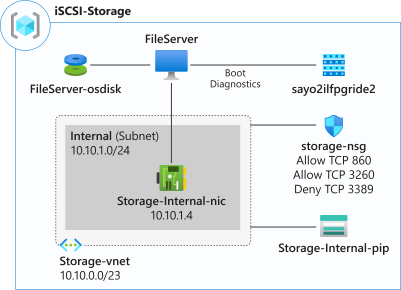
The following diagram shows the resources deployed from the template to create the iSCSI client you can use to connect to the iSCSI target. The template deploys the VM and other resources. In addition, it runs the prepare-iSCSIClient.ps1 script and reboots the VM.
The deployment process
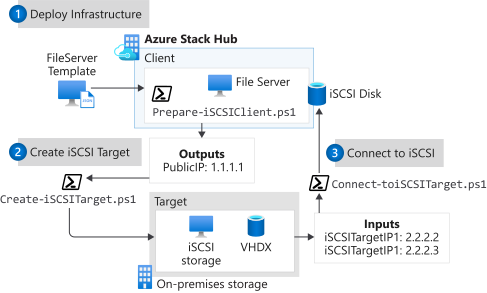
The resource group template generates output that's meant to be the input for the next step. It mainly focuses on the server name and the Azure Stack Hub public IP address where the iSCSI traffic originates. For this example:
- Deploy the infrastructure template.
- Deploy an Azure Stack Hub VM to a VM hosted elsewhere in your datacenter.
- Run
Create-iSCSITarget.ps1using the IP address and server name outputs from the template as in-out parameters for the script on the iSCSI target, which can be a virtual machine or physical server. - Use the external IP address or addresses of the iSCSI Target server as inputs to run the
Connect-toiSCSITarget.ps1script.
Inputs for azuredeploy.json
| Parameters | default | description |
|---|---|---|
| WindowsImageSKU | 2019-Datacenter | Select the base Windows VM image. |
| VMSize | Standard_D2_v2 | Enter the VM size. |
| VMName | FileServer | VM name. |
| adminUsername | storageadmin | The name of the Administrator of the new VM. |
| adminPassword | The password for the Administrator account of the new VMs. Default value is subscription ID. | |
| VNetName | Storage | The name of VNet. This value labels the resources. |
| VNetAddressSpace | 10.10.0.0/23 | Address Space for VNet. |
| VNetInternalSubnetName | Internal | VNet Internal Subnet Name. |
| VNetInternalSubnetRange | 10.10.1.0/24 | Address Range for VNet Internal Subnet. |
| InternalVNetIP | 10.10.1.4 | Static Address for the internal IP of the File Server. |
| _artifactsLocation | ||
| _artifactsLocationSasToken |
Deployment steps
- Deploy the iSCSI client infrastructure by using
azuredeploy.json. - Run
Create-iSCSITarget.ps1on the on-premises server iSCSI target. When the template finishes, runCreate-iSCSITarget.ps1on the on-premises server iSCSI target by using the outputs from the first step. - Run
Connect-toiSCSITarget.ps1on the iSCSI client.
Adding iSCSI storage to existing VMs
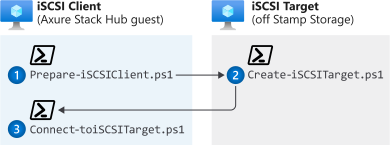
You can also run the scripts on an existing virtual machine to connect from the iSCSI client to an iSCSI target. This flow works if you're creating the iSCSI target yourself. This diagram shows the execution flow of the PowerShell scripts. You can find these scripts in the Script directory:
Prepare-iSCSIClient.ps1
- Installation of Multipath I/O services
- installation of Multipath-IO services
- Setting the iSCSI initiator service startup to automatic
- enabling support for multipath MPIO to iSCSI
- Enabling automatic claiming of all iSCSI volumes
- Setting the disk timeout to 60 seconds
Reboot the system after installing these prerequisites. The MPIO load-balancing policy requires a reboot so that it can be set.
Create-iSCSITarget.ps1
Run the Create-iSCSITarget.ps1 script on the storage server. You can create multiple disks and targets that restrict initiators. Run this script multiple times to create many virtual disks that you can attach to different targets. You can connect multiple disks to one target.
| Input | default | description |
|---|---|---|
| RemoteServer | FileServer | The name of the server connecting to the iSCSI Target |
| RemoteServerIPs | 1.1.1.1 | The IP Address the iSCSI traffic comes from |
| DiskFolder | C:\iSCSIVirtualDisks | The folder and drive where the virtual disks are stored |
| DiskName | DiskName | The name of the disk VHDX file |
| DiskSize | 5GB | The VHDX disk size |
| TargetName | RemoteTarget01 | The target name used to define the target configuration for the iSCSI client. |
| ChapUsername | username | The username for Chap authentication |
| ChapPassword | userP@ssw0rd! | The password for Chap authentication. It must be 12 to 16 characters |
Connect-toiSCSITarget.ps1
The Connect-toiSCSITarget.ps1 script is the final script. Run it on the iSCSI client. It mounts the disk presented by the iSCSI target to the iSCSI client.
| Input | default | description |
|---|---|---|
| TargetiSCSIAddresses | "2.2.2.2","2.2.2.3" | The IP addresses of the iSCSI target |
| LocalIPAddresses | "10.10.1.4" | The internal IP Address the iSCSI traffic comes from |
| LoadBalancePolicy | C:\iSCSIVirtualDisks | The IP Address the iSCSI traffic comes from |
| ChapUsername | username | The username for Chap authentication |
| ChapPassword | userP@ssw0rd! | The password for Chap authentication. It must be 12 to 16 characters |
Next steps
Differences and considerations for Azure Stack Hub networking