Note
Access to this page requires authorization. You can try signing in or changing directories.
Access to this page requires authorization. You can try changing directories.
This article describes how to back up and restore Hyper-V virtual machines using Microsoft Azure Backup Server (MABS).
Note
When the trim is performed within the guest OS, the tracking of incremental blocks is reset, resulting in a full backup. The trim within the guest OS releases unused blocks of the virtual disk (VHDX) and optimizes the disk size. However, this reduces the size of the VHDX and changes the SequenceNumber of the tracked incremental blocks, resulting in a full backup size. Unless the purpose is to improve the efficiency of storage on the Hyper-V host side, we recommend you to stop the trim process within the guest to avoid an increase in backup size.
Supported scenarios
MABS can back up virtual machines running on Hyper-V host servers in the following scenarios:
Virtual machines with local or direct storage - Back up virtual machines hosted on Hyper-V host standalone servers that have local or directly attached storage. For example: a hard drive, a storage area network (SAN) device, or a network attached storage (NAS) device. The MABS protection agent must be installed on all hosts.
Virtual machines in a cluster with CSV storage - Back up virtual machines hosted on a Hyper-V cluster with Cluster Shared Volume (CSV) storage. The MABS protection agent is installed on each cluster node.
Host versus guest backup
MABS can do a host or guest-level backup of Hyper-V VMs. At the host level, the MABS protection agent is installed on the Hyper-V host server or cluster and protects the entire VMs and data files running on that host. At the guest level, the agent is installed on each virtual machine and protects the workload present on that machine.
Both methods have pros and cons:
| Host-level backups | Guest-level backup |
|---|---|
| - These backups are flexible because they work regardless of the type of OS running on the guest machines and don't require the installation of the MABS protection agent on each VM. - If you deploy host level backup, you can recover an entire virtual machine, or files and folders (item-level recovery). |
- This backup is useful if you want to protect specific workloads running on a virtual machine. - At host-level you can recover an entire VM or specific files, but it won't provide recovery in the context of a specific application. For example, to recover specific SharePoint items from a backed-up VM, you should do guest-level backup of that VM. Use guest-level backup if you want to protect data stored on passthrough disks. Passthrough allows the virtual machine to directly access the storage device and doesn't store virtual volume data in a VHD file. |
How the backup process works?
MABS performs backup with VSS as follows:
The MABS block-based synchronization engine makes an initial copy of the protected virtual machine and ensures that the copy of the virtual machine is complete and consistent.
After the initial copy is made and verified, MABS uses the Hyper-V VSS writer to capture backups. The VSS writer provides a data-consistent set of disk blocks that are synchronized with the MABS server. This approach provides the benefit of a "full backup" with the MABS server, while minimizing the backup data that must be transferred across the network.
The MABS protection agent on a server that's running Hyper-V uses the existing Hyper-V APIs to determine whether a protected virtual machine also supports VSS.
If a virtual machine complies with the requirements for online backup and has the Hyper-V integration services component installed, then the Hyper-V VSS writer recursively forwards the VSS request through to all VSS-aware processes on the virtual machine. This operation occurs without the MABS protection agent being installed on the virtual machine. The recursive VSS request allows the Hyper-V VSS writer to ensure that disk- write operations are synchronized so that a VSS snapshot is captured without the loss of data.
The Hyper-V integration services component invokes the Hyper-V VSS writer in Volume Shadow Copy Services (VSS) on virtual machines to ensure that their application data is in a consistent state.
If the virtual machine doesn't comply with online backup requirements, MABS automatically uses the Hyper-V APIs to pause the virtual machine before they capture data files.
After the initial baseline copy of the virtual machine synchronizes with the MABS server, all changes that are made to the virtual machine resources are captured in a new recovery point. The recovery point represents the consistent state of the virtual machine at a specific time. Recovery point captures can occur at least one time a day. When a new recovery point is created, MABS uses block-level replication in conjunction with the Hyper-V VSS writer to determine which blocks have been altered on the server that's running Hyper-V after the last recovery point was created. These data blocks are then transferred to the MABS server and are applied to the replica of the protected data.
The MABS server uses VSS on the volumes that host recovery data so that multiple shadow copies are available. Each of these shadow copies provides a separate recovery. VSS recovery points are stored on the MABS server. The temporary copy that's made on the server running Hyper-V is only stored for the duration of the MABS synchronization.
Note
Starting in Windows Server 2016, Hyper-V virtual hard disks have built-in change tracking known as resilient change tracking (RCT). MABS uses RCT (the native change tracking in Hyper-V), which decreases the need for time-consuming consistency checks in scenarios such as VM crashes. RCT provides better resiliency than the change tracking provided by VSS snapshot-based backups. MABS V3 optimizes network and storage consumption further by transferring only the changed data during any consistency checks.
Backup prerequisites
The following table lists the prerequisites to back up Hyper-V virtual machines with MABS:
| Prerequisite | Details |
|---|---|
| MABS prerequisites | - If you want to perform item-level recovery for virtual machines (recover files, folders, volumes), then you'll need to have the Hyper-V role enabled on the MABS server (the Hyper-V role gets installed by default during the installation of MABS). If you only want to recover the virtual machine and not item-level, then the role isn't required. - You can protect up to 800 virtual machines of 100 GB each on one MABS server and allow multiple MABS servers that support larger clusters. - MABS excludes the page file from incremental backups to improve virtual machine backup performance. - MABS can back up a Hyper-V server or cluster in the same domain as the MABS server, or in a child or trusted domain. If you want to back up Hyper-V in a workgroup or an untrusted domain, you'll need to set up authentication. For a single Hyper-V server, you can use NTLM or certificate authentication. For a cluster, you can use certificate authentication only. - Using the host-level backup to back up virtual machine data on passthrough disks isn't supported. In this scenario, we recommend you use host-level backup to back up VHD files and guest-level backup to back up the other data that isn't visible on the host. -You can back up VMs stored on deduplicated volumes. |
| Hyper-V VM prerequisites | - The version of Integration Components that's running on the virtual machine should be the same as the version of the Hyper-V host. - For each virtual machine backup you'll need free space on the volume hosting the virtual hard disk files to allow Hyper-V enough room for differencing disks (AVHDs) during backup. The space must be at least equal to the calculation Initial disk size*Churn rate*Backup window time. If you're running multiple backups on a cluster, you'll need enough storage capacity to accommodate the AVHDs for each of the virtual machines using this calculation. - To back up virtual machines located on Hyper-V host servers running Windows Server 2012 R2, the virtual machine should have a SCSI controller specified, even if it's not connected to anything. (In Windows Server 2012 R2 backup, the Hyper-V host mounts a new VHD in the VM and then later dismounts it. Only the SCSI controller can support this and therefore is required for online backup of the virtual machine. Without this setting, event ID 10103 will be issued when you try to back up the virtual machine.) |
| Linux prerequisites | - You can back up Linux virtual machines using MABS. Only file-consistent snapshots are supported. |
| Back up VMs with CSV storage | - For CSV storage, install the Volume Shadow Copy Services (VSS) hardware provider on the Hyper-V server. Contact your storage area network (SAN) vendor for the VSS hardware provider. - If a single node shuts down unexpectedly in a CSV cluster, MABS will perform a consistency check against the virtual machines that were running on that node. - If you need to restart a Hyper-V server that has BitLocker Drive Encryption enabled on the CSV cluster, you must run a consistency check for Hyper-V virtual machines. |
| Back up VMs with SMB storage | - Turn on auto-mount on the server that's running Hyper-V to enable virtual machine protection. - Disable TCP Chimney Offload. - Ensure that all Hyper-V machine$ accounts have full permissions on the specific remote SMB file shares. - Ensure that the file path for all virtual machine components during recovery to alternate location is fewer than 260 characters. If not, recovery might succeed, but Hyper-V won't be able to mount the virtual machine. - The following scenarios aren't supported: Deployments where some components of the virtual machine are on local volumes and some components are on remote volumes; an IPv4 or IPv6 address for storage location file server, and recovery of a virtual machine to a computer that uses remote SMB shares. - You'll need to enable the File Server VSS Agent service on each SMB server - Add it in Add roles and features > Select server roles > File and Storage Services > File Services > File Service > File Server VSS Agent Service. |
Note
Windows Server 2008, 2008 R2, 2012 and 2012 R2 have reached End of Support (EOS). Review your usage and plan OS upgrades and migrations accordingly. For more information, see End of support for:
Perform in-place upgrade to Windows Server 2016, 2019, 2022, or 2025.
Back up Hyper-V virtual machines
To back up a virtual machine, follow these steps:
Set up your MABS server and your storage. When setting up your storage, use these storage capacity guidelines.
- Average virtual machine size - 100 GB
- Number of virtual machines per MABS server - 800
- Total size of 800 VMs - 80 TB
- Required space for backup storage - 80 TB
Set up the MABS protection agent on the Hyper-V server or Hyper-V cluster nodes.
On the MABS Administrator console, select Protection > Create protection group to open the Create New Protection Group wizard.
On the Select Group Members page, select the VMs you want to protect from the Hyper-V host servers on which they're located. We recommend you put all VMs that will have the same protection policy into one protection group. To make efficient use of space, enable colocation. Colocation allows you to locate data from different protection groups on the same disk or tape storage, so that multiple data sources have a single replica and recovery point volume.
On the Select Data Protection Method page, specify a protection group name. Select I want short-term protection using Disk and select I want online protection if you want to back up data to Azure using the Azure Backup service.
On Specify Short-Term Goals > Retention range, specify how long you want to retain disk data. In Synchronization frequency, specify how often incremental backups of the data should run. Alternatively, instead of selecting an interval for incremental backups you can enable Just before a recovery point. With this setting enabled, MABS will run an express full backup just before each scheduled recovery point.
Note
If you're protecting application workloads, recovery points are created in accordance with Synchronization frequency, provided the application supports incremental backups. If it doesn't, then MABS runs an express full backup, instead of an incremental backup, and creates recovery points in accordance with the express backup schedule.
The backup process doesn't back up the checkpoints associated with VMs.On the Review disk allocation page, review the storage pool disk space allocated for the protection group.
Total Data size is the size of the data you want to back up, and Disk space to be provisioned on MABS is the space that MABS recommends for the protection group. MABS chooses the ideal backup volume, based on the settings. However, you can edit the backup volume choices in the Disk allocation details. For the workloads, select the preferred storage in the dropdown menu. Your edits change the values for Total Storage and Free Storage in the Available Disk Storage pane. Underprovisioned space is the amount of storage MABS suggests you add to the volume, to continue with backups smoothly in the future.
On the Choose Replica Creation Method page, specify how the initial replication of data in the protection group will be performed. If you select to Automatically replicate over the network, we recommended you choose an off-peak time. For large amounts of data or less than optimal network conditions, consider selecting Manually, which requires replicating the data offline using removable media.
On the Consistency Check Options page, select how you want to automate consistency checks. You can enable a check to run only when replica data becomes inconsistent, or according to a schedule. If you don't want to configure automatic consistency checking, you can run a manual check at any time by right-clicking the protection group and selecting Perform Consistency Check.
After you create the protection group, initial replication of the data occurs in accordance with the method you selected. After initial replication, each backup takes place in line with the protection group settings. If you need to recover backed up data, note the following:
Back up replica virtual machines
If MABS is running on Windows Server 2012 R2 or greater, then you can back up replica virtual machines. This is useful for several reasons:
Reduces the impact of backups on the running workload - Taking a backup of a virtual machine incurs some overhead as a snapshot is created. Once the backup process gets offloaded to a secondary remote site, the running workload is no longer affected by the backup operation. This is applicable only to deployments where the backup copy is stored on a remote site. For example, you might take daily backups and store data locally to ensure quick restore times, but take monthly or quarterly backups from replica virtual machines stored remotely for long-term retention.
Saves bandwidth - In a typical remote branch office/headquarters deployment you need an appropriate amount of provisioned bandwidth to transfer backup data between sites. If you create a replication and failover strategy, in addition to your data backup strategy, you can reduce the amount of redundant data sent over the network. By backing up the replica virtual machine data rather than the primary, you save the overhead of sending the backed-up data over the network.
Enables hoster backup - You can use a hosted datacenter as a replica site, with no need for a secondary datacenter. In this case, the hoster SLA requires consistent backup of replica virtual machines.
A replica virtual machine is turned off until a failover is initiated, and VSS can't guarantee an application-consistent backup for a replica virtual machine. So the backup of a replica virtual machine will be crash-consistent only. If crash-consistency can't be guaranteed, then the backup will fail and this might occur in a number of conditions:
The replica virtual machine isn't healthy and is in a critical state.
The replica virtual machine is resynchronizing (in the Resynchronization in Progress or Resynchronization Required state).
Initial replication between the primary and secondary site is in progress or pending for the virtual machine.
.hrl logs are being applied to the replica virtual machine, or a previous action to apply the .hrl logs on the virtual disk failed, or was canceled or interrupted.
Migration or failover of the replica virtual machine is in progress
Recover backed-up Hyper-V virtual machines
When you can recover a backed up virtual machine, you use the Recovery wizard to select the virtual machine and the specific recovery point.
To open the Recovery Wizard and recover a virtual machine, follow these steps:
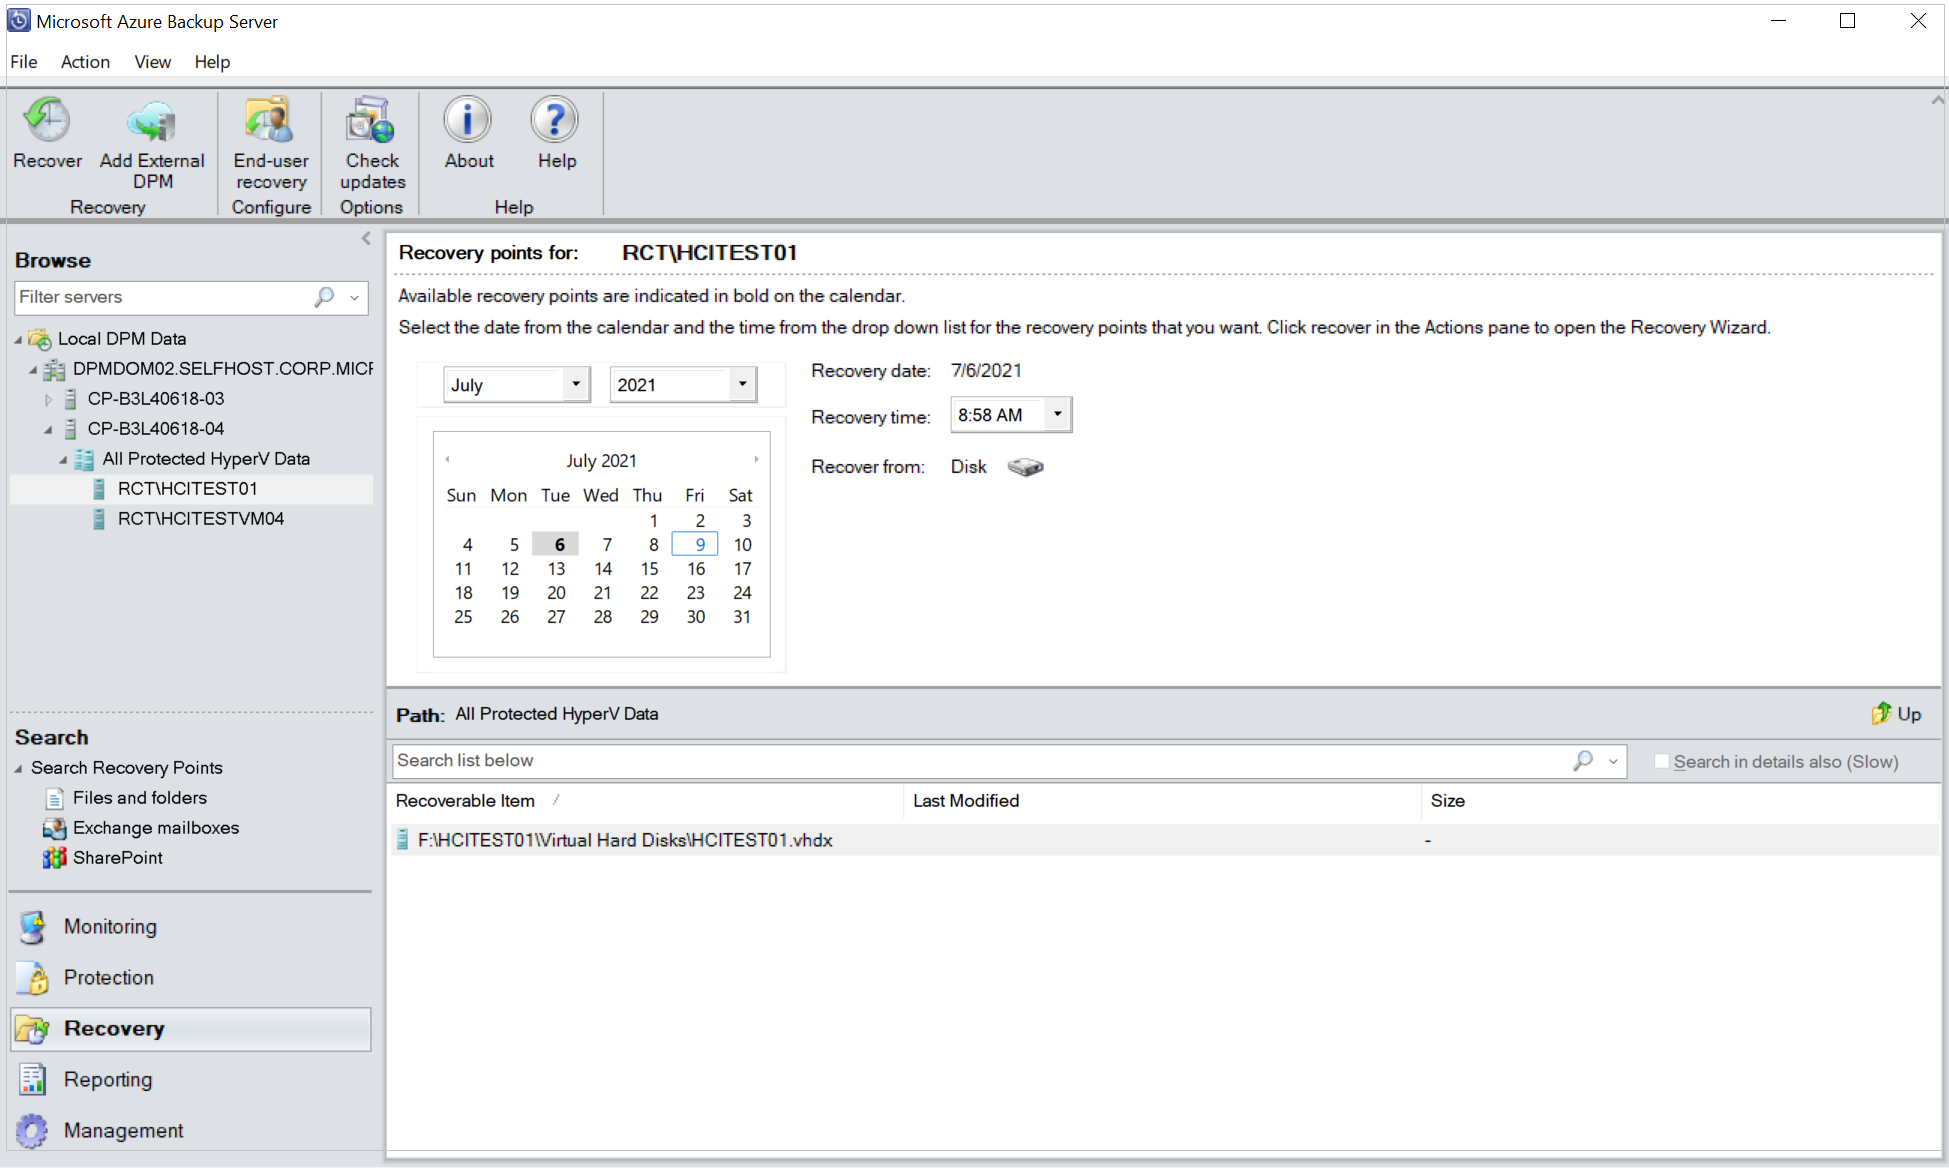
On the MABS Administrator console, type the name of the VM, or expand the list of protected items, navigate to All Protected HyperV Data, and select the VM you want to recover.
On the Recovery points for pane, on the calendar, select any date to see the recovery points available. Then in the Path pane, select the recovery point you want to use in the Recovery wizard.
From the Actions menu, select Recover to open the Recovery Wizard.
The VM and recovery point you selected appear in the Review Recovery Selection screen. Select Next.
On the Select Recovery Type screen, select where you want to restore the data and then select Next.
Recover to original instance: When you recover to the original instance, the original VHD and all associated checkpoints are deleted. MABS recovers the VHD and other configuration files to the original location using Hyper-V VSS writer. At the end of the recovery process, virtual machines are still highly available. The resource group must be present for recovery. If it isn't available, recover to an alternate location and then make the virtual machine highly available.
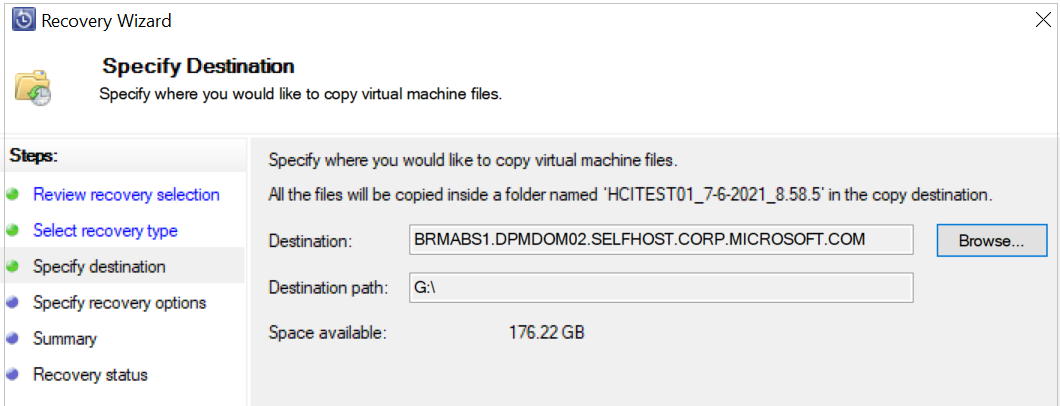
Recover as virtual machine to any host: MABS supports alternate location recovery (ALR), which provides a seamless recovery of a protected Hyper-V virtual machine to a different Hyper-V host, independent of processor architecture. Hyper-V virtual machines that are recovered to a cluster node won't be highly available. If you choose this option, the Recovery Wizard presents you with an additional screen for identifying the destination and destination path.
Note
If you select the original standalone Hyper-V host or the original Hyper-V cluster and restore to any node of the cluster the behavior is the same as Recover to original instance. The original Virtual Machine and all associated checkpoints are deleted.
Copy to a network folder: MABS supports item-level recovery (ILR), which allows you to do item-level recovery of files, folders, volumes, and virtual hard disks (VHDs) from a host-level backup of Hyper-V virtual machines to a network share or a volume on a MABS protected server. The MABS protection agent doesn't have to be installed inside the guest to perform item-level recovery. If you choose this option, the Recovery Wizard presents you with an additional screen for identifying the destination and destination path.
On Specify Recovery Options configure the recovery options and select Next:
- If you're recovering a VM over low bandwidth, select Modify to enable Network bandwidth usage throttling. After turning on the throttling option, you can specify the amount of bandwidth you want to make available and the time when that bandwidth is available.
- Select Enable SAN based recovery using hardware snapshots if you've configured your network.
- Select Send an e-mail when the recovery completes and then provide the email addresses, if you want email notifications sent once the recovery process completes.
On the Summary screen, make sure all details are correct. If the details aren't correct, or you want to make a change, select Back. If you're satisfied with the settings, select Recover to start the recovery process.
The Recovery Status screen provides information about the recovery job.
Restore an individual file from a Hyper-V VM
You can restore individual files from a protected Hyper-V VM recovery point, both disk and online. This feature is only available for Windows Server VMs. Restoring individual files is similar to restoring the entire VM, except you browse into the VMDK and find the file(s) you want, before starting the recovery process.
To recover an individual file or select files from a Windows Server VM, follow these steps:
Note
With MABS v4 and later, you can restore an individual file from a Hyper-V VM from both disk and online recovery points. The VM should be a Windows Server VM.
Additionally, for item-level recovery from an online recovery point, ensure that the Hyper-V role is installed on the MABS Server, automatic mounting of volumes is enabled, and the VM VHD doesn't contain a dynamic disk. The item-level recovery for online recovery points works by mounting the VM recovery point using iSCSI for browsing, and only one VM can be mounted at a given time.
On the MABS Administrator Console, select Recovery view.
On the Browse pane, browse or filter to find the VM you want to recover. Once you select a Hyper-V VM or folder, the Recovery points for pane displays the available recovery points.
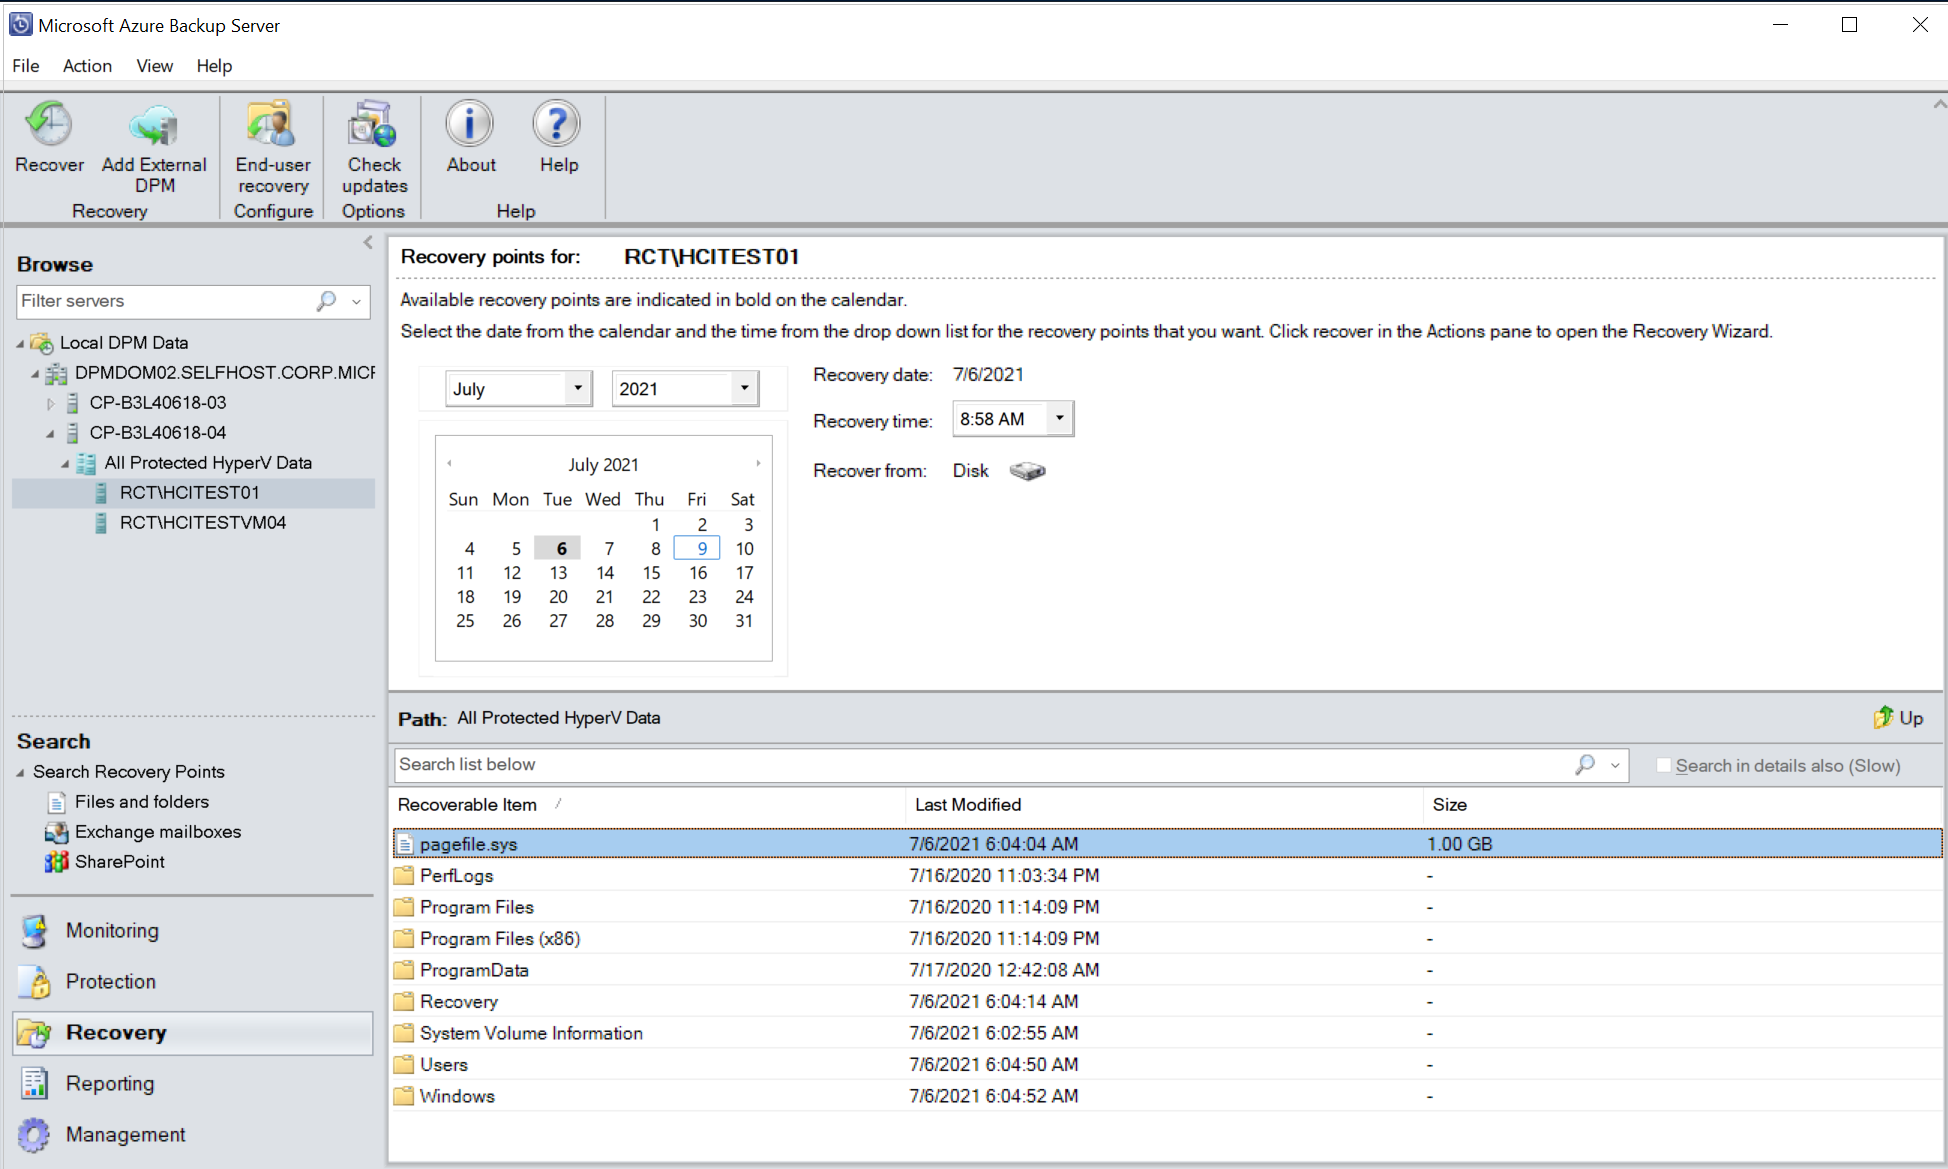
On the Recovery Points for pane, use the calendar to select the date that contains the desired recovery point(s). Depending on how the backup policy has been configured, dates can have more than one recovery point. Once you've selected the day when the recovery point was taken, make sure you've chosen the correct Recovery time. If the selected date has multiple recovery points, choose your recovery point by selecting it in the Recovery time drop-down menu. Once you chose the recovery point, the list of recoverable items appears in the Path pane.
To find the files you want to recover, in the Path pane, double-click the item in the Recoverable item column to open it.
If you use an online recovery point, wait until the recovery point is mounted. Once the mount is complete, select the VM, VHD disk, and the volume you want to restore until the files and folders are listed.
Select the file, files, or folders you want to recover. To select multiple items, press the Ctrl key while selecting each item. Use the Path pane to search the list of files or folders appearing in the Recoverable Item column.Search list below doesn't search into subfolders. To search through subfolders, double-click the folder. Use the Up button to move from a child folder into the parent folder. You can select multiple items (files and folders), but they must be in the same parent folder. You can't recover items from multiple folders in the same recovery job.
Once you've selected the item(s) for recovery, in the Administrator Console tool ribbon, select Recover to open the Recovery Wizard. In the Recovery Wizard, the Review Recovery Selection screen shows the selected items to be recovered.
On the Specify Recovery Options screen, if you want to enable network bandwidth throttling, select Modify. To leave network throttling disabled, select Next. No other options on this wizard screen are available for VMware VMs. If you choose to modify the network bandwidth throttle, in the Throttle dialog, select Enable network bandwidth usage throttling to turn it on. Once enabled, configure the Settings and Work Schedule.
On the Select Recovery Type screen, select Next. You can only recover your file(s) or folder(s) to a network folder.
On the Specify Destination screen, select Browse to find a network location for your files or folders. MABS creates a folder where all recovered items are copied. The folder name has the prefix, MABS_day-month-year. When you select a location for the recovered files or folder, the details for that location (Destination, Destination path, and available space) are provided.
On the Specify Recovery Options screen, choose which security setting to apply. You can opt to modify the network bandwidth usage throttling, but throttling is disabled by default. Also, SAN Recovery and Notification aren't enabled.
On the Summary screen, review your settings and select Recover to start the recovery process. The Recovery status screen shows the progression of the recovery operation.
Tip
You can perform item-level restore of online recovery points for Hyper-V VMs running Windows also from Add external DPM Server to recover VM files and folders quickly.
Note
By default, eight parallel recoveries are supported. You can increase the number of parallel restore jobs by adding the following registry key:
Key Path: HKLM\Software\Microsoft\Microsoft Data Protection Manager\Configuration\ MaxParallelRecoveryJobs
- 32 Bit DWORD: HyperV
- Data:
<number>