Note
Access to this page requires authorization. You can try signing in or changing directories.
Access to this page requires authorization. You can try changing directories.
HTTPS acceleration description
- It supports HTTPS acceleration for wildcard domain names.
- The types of acceleration supported are those supported by the Standard and Standard Plus editions of the CDN, such as web acceleration, download acceleration, VOD acceleration, image processing acceleration, and live streaming acceleration.
- You can choose return-to-source protocol types, such as HTTP return to source, HTTPS return to source, or protocol following.
- You can force HTTP requests to jump to HTTPS requests.
- Acceleration for the Mainland China region and overseas (global acceleration) is supported.
Preconditions for certificate use
Users manage HTTPS certificates in Azure Key Vault. Azure CDN requires you to create an Azure Active Directory (AAD) application and obtain the HTTPS certificate in the access key vault through the AAD application. Configure the key vault as explained in Configure the key vault and save the information below for use in configuring the key vault.
- DNS name of the key vault
- Azure Active Directory application (client) ID
- Azure Active Directory application (client) password
There are currently two ways for users to configure the key vault:
Go to the CDN Management Portal and configure the key vault on the certificate management page. The steps for this are shown below:
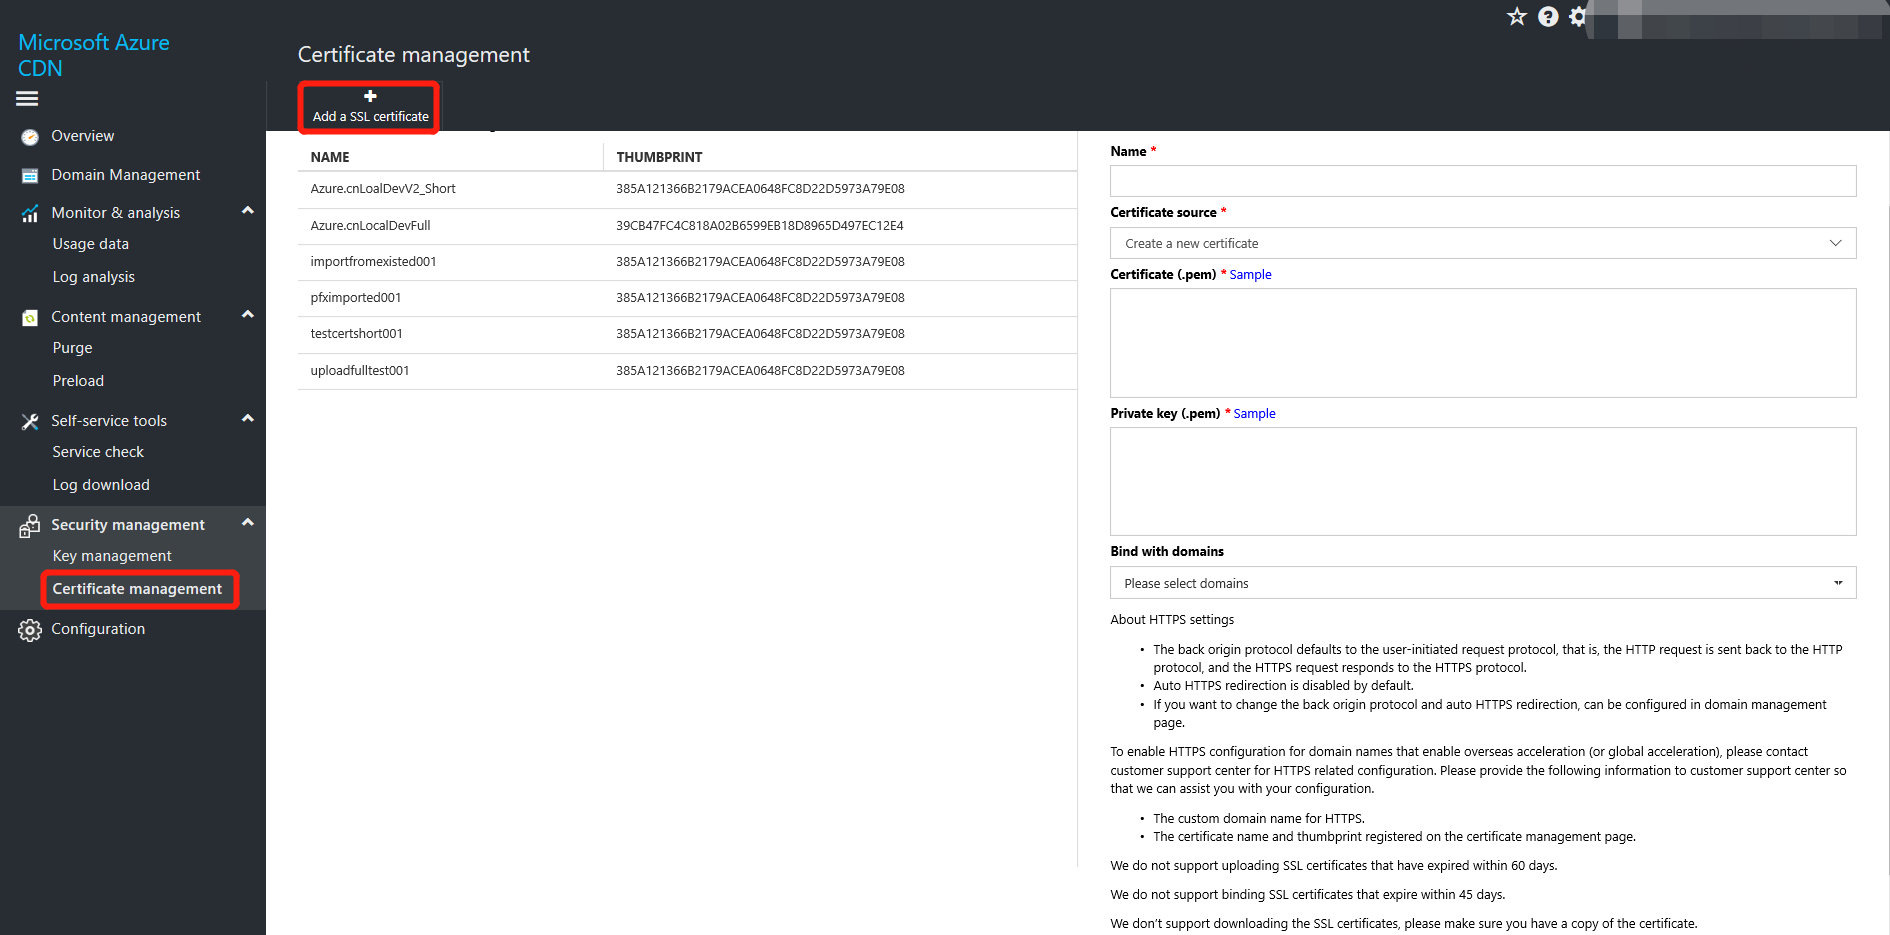
a. Click "Add an SSL Certificate", then "Configure" to enter the configuration management page.
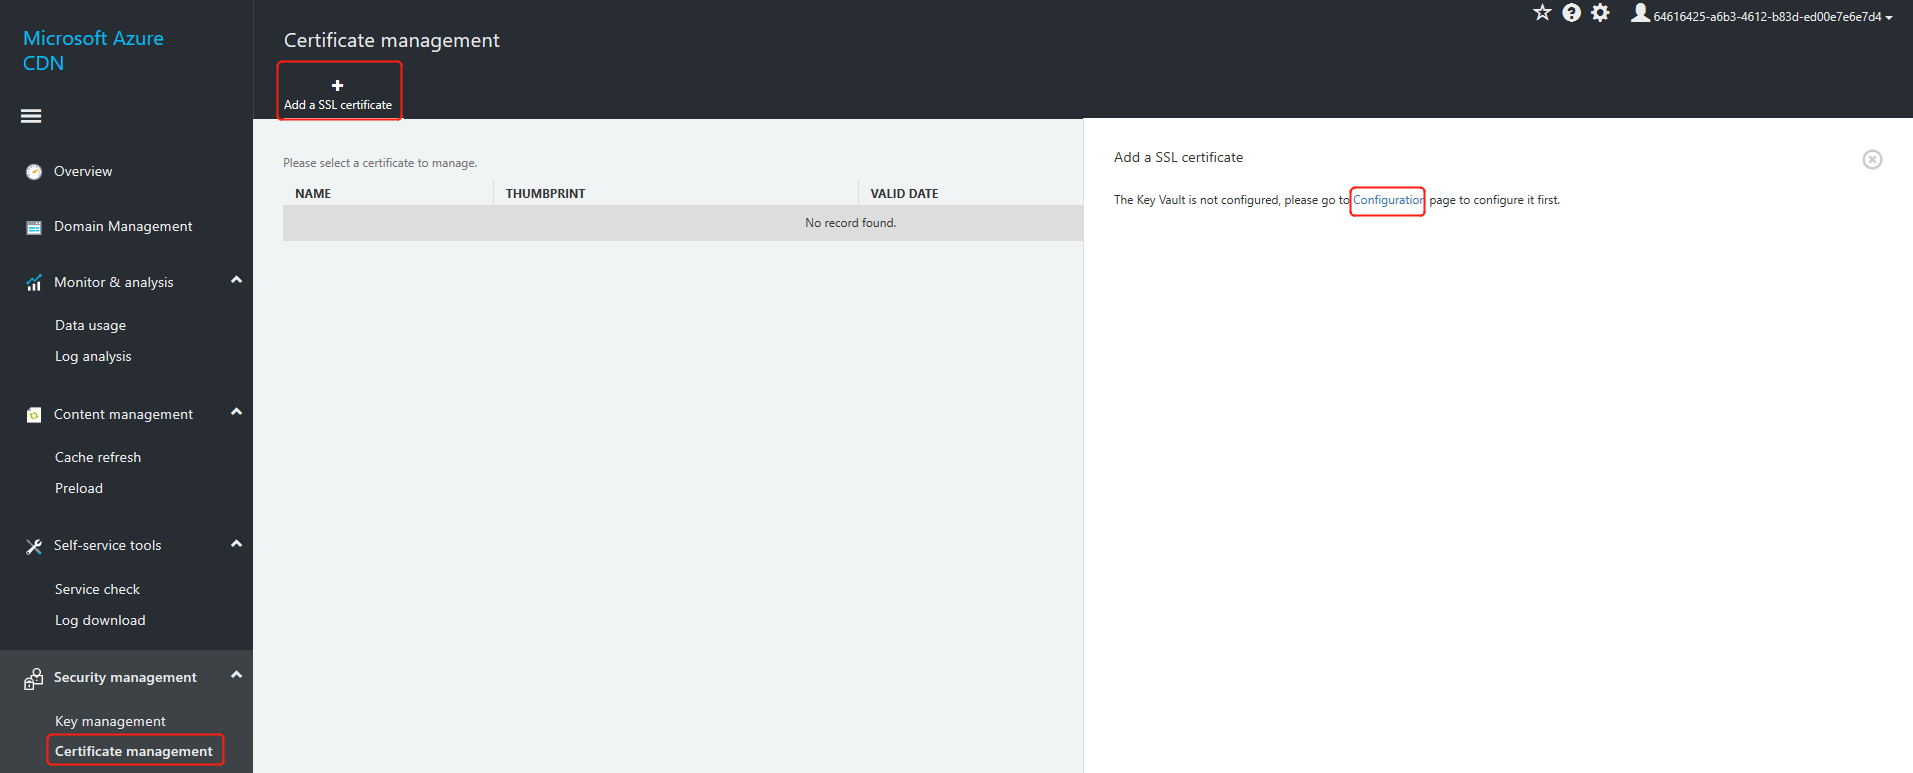
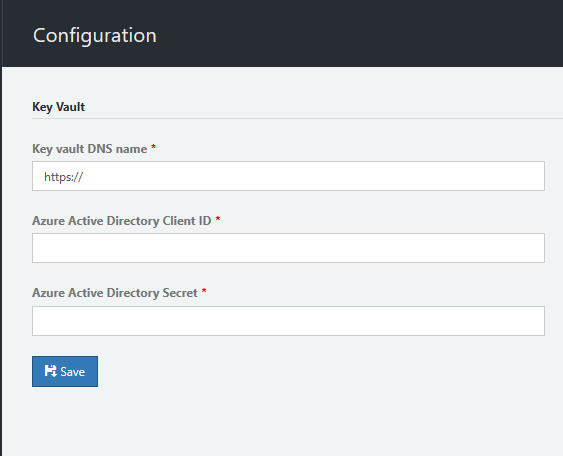
b. In the key vault configuration interface, enter the following information that you saved when you configured the key vault, then click "Save".
Key vault DNS name
Azure Active Directory application (client) ID
Azure Active Directory application (client) password
c. After saving the information, you can click "Certificate Management" to return to the certificate management page.
Certificates
HTTPS acceleration for user-owned certificates is based on SNI technology. SNI certificates allow multiple HTTPS clients to share the same IP address.
Important
SNI certificates do not support all versions of Internet Explorer on Windows XP, so you will be notified if the browser you are using is not trusted.
After you enable HTTPS acceleration, you need to upload the certificate and private key for the accelerated domain name. The certificate must match the domain name, and the private key must match the certificate. Otherwise, there will be an authentication error.
Important
Certificate and domain name binding is not supported for certificates that expire in less than 45 days, and uploading is not supported for certificates that expire in less than 60 days.
You can view details of certificates, but you cannot download certificates or view private keys. Take the appropriate precautions to safeguard the relevant information.
Certificate chains are supported. The individual PEM files for the certificate chain must include multiple certificates in the following order: public certificate, intermediate certificate, root certificate. Each certificate must start and finish with
-----BEGIN CERTIFICATE-----and-----END CERTIFICATE-----.
Certificate format
PEM and PFX certificate formats are supported. Certificates in other formats are currently not supported, and need to be converted into PEM format, which can be done using OpenSSL tools. See the section "Converting common certificate formats."
ECDSA is not supported
Certificates start and finish with
-----BEGIN CERTIFICATE-----and-----END CERTIFICATE-----.PKCS1 and PKCS8 encoding are currently supported for private keys. The format for PKCS1-encoded private keys starts with
-----BEGIN RSA PRIVATE KEY-----and ends with-----END RSA PRIVATE KEY-----; PKCS8-encoded private keys start and finish with-----BEGIN PRIVATE KEY-----and-----END PRIVATE KEY-----.Important
You can perform private key encoding format conversion using OpenSSL tools, for example:
openssl.exe pkcs8 -topk8 -inform PEM -outform PEM -in yourkeyfile.key -out yourconverted.key -nocrypt
Converting common certificate formats
Convert DER format to PEM
Certificate conversion:
openssl x509 -in cert.der -inform DER -out cert.pem -outform PEMPrivate key conversion:
openssl rsa -in privagekey.der -inform DER -out privatekey.pem -outform PEM
How to enable HTTPS acceleration yourself
After the key vault is configured, you need to enable the HTTPS service on the Azure CDN Management interface, upload the certificate in PEM or PFK format, or use a certificate that already exists in the key vault.
You can enable customer-supplied certificate HTTPS acceleration for all CDN domain names that meet the conditions (CDN domains with all standard version acceleration types in paid accounts).
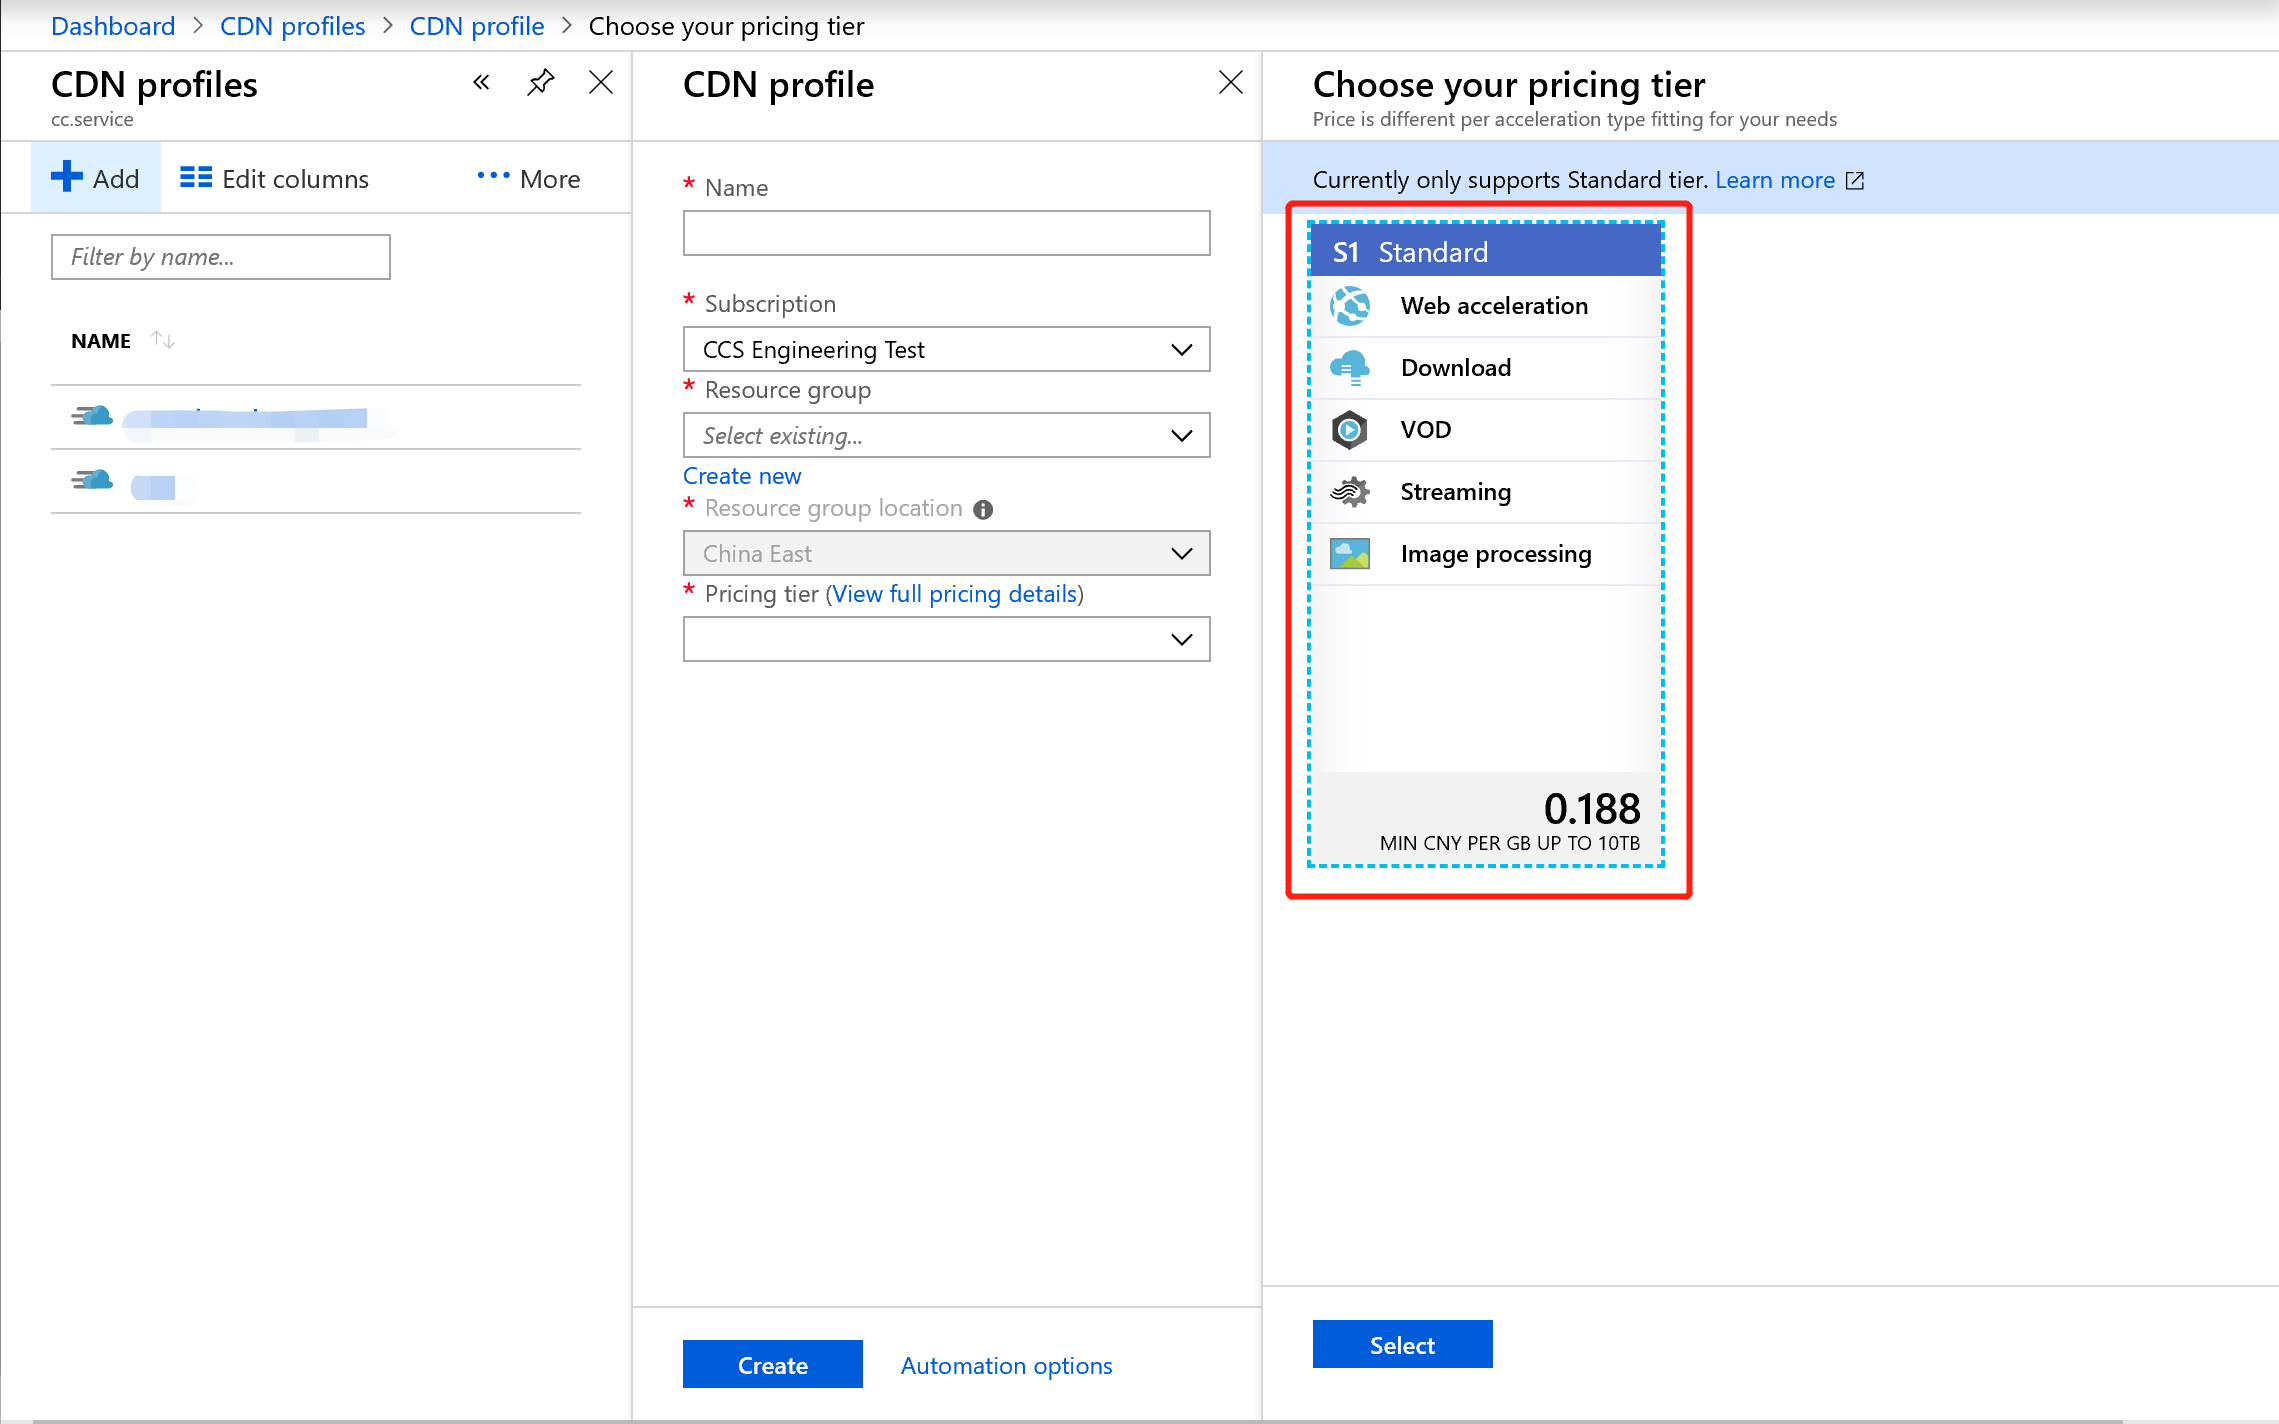
If you need to create a new CDN profile and node in the Azure portal and enable customer-supplied certificate HTTPS acceleration, select "S1 Standard" for the pricing tier.
- "S1 Standard" is the Standard edition of the CDN, which supports static content acceleration, including web acceleration, download acceleration, VOD acceleration, and image processing.
- "P1 Standard Plus" is the Standard Plus edition, which refers to live streaming acceleration.
Click Manage to go to the Azure CDN Management Portal.
CDN profile interface in the Azure portal:
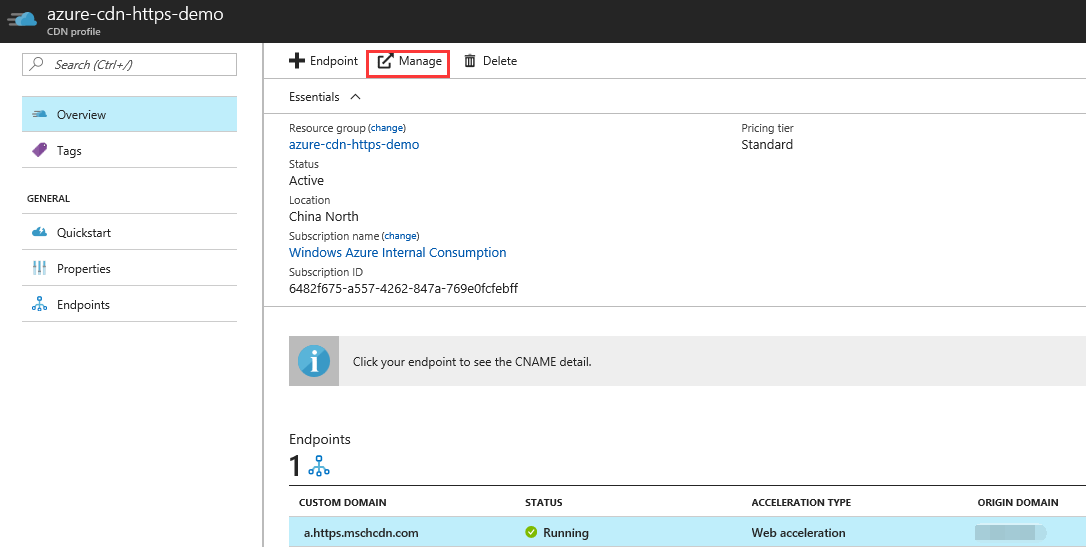
The Azure CDN Management Portal interface:
Upload a certificate: Click Certificate Management, then "Add an SSL certificate".
Note
If you have not configured Key Vault to store certificate information yet, refer to Configuring Key Vault.
In the certificate management interface, enter a name for the certificate so that you can identify it. You need to enable the HTTPS service's domain name certificate to upload. The certificate must be in PEM format. Currently only the RSA PKCS8 and PKCS1 encoding format is supported for keys. See the preceding section on "Certificates" for specifics concerning certificate format conversion.
Important
After you have uploaded the certificate, you need to go to the certificate management or domain name management interface to bind the certificate to the domain name before the certificate can be deployed. Uploading is not supported for certificates that expire in less than 60 days.
If you have already configured the key vault to save certificate information, you can directly upload the certificate.
Important
Certificate and domain name binding is not supported for certificates that expire in less than 45 days.
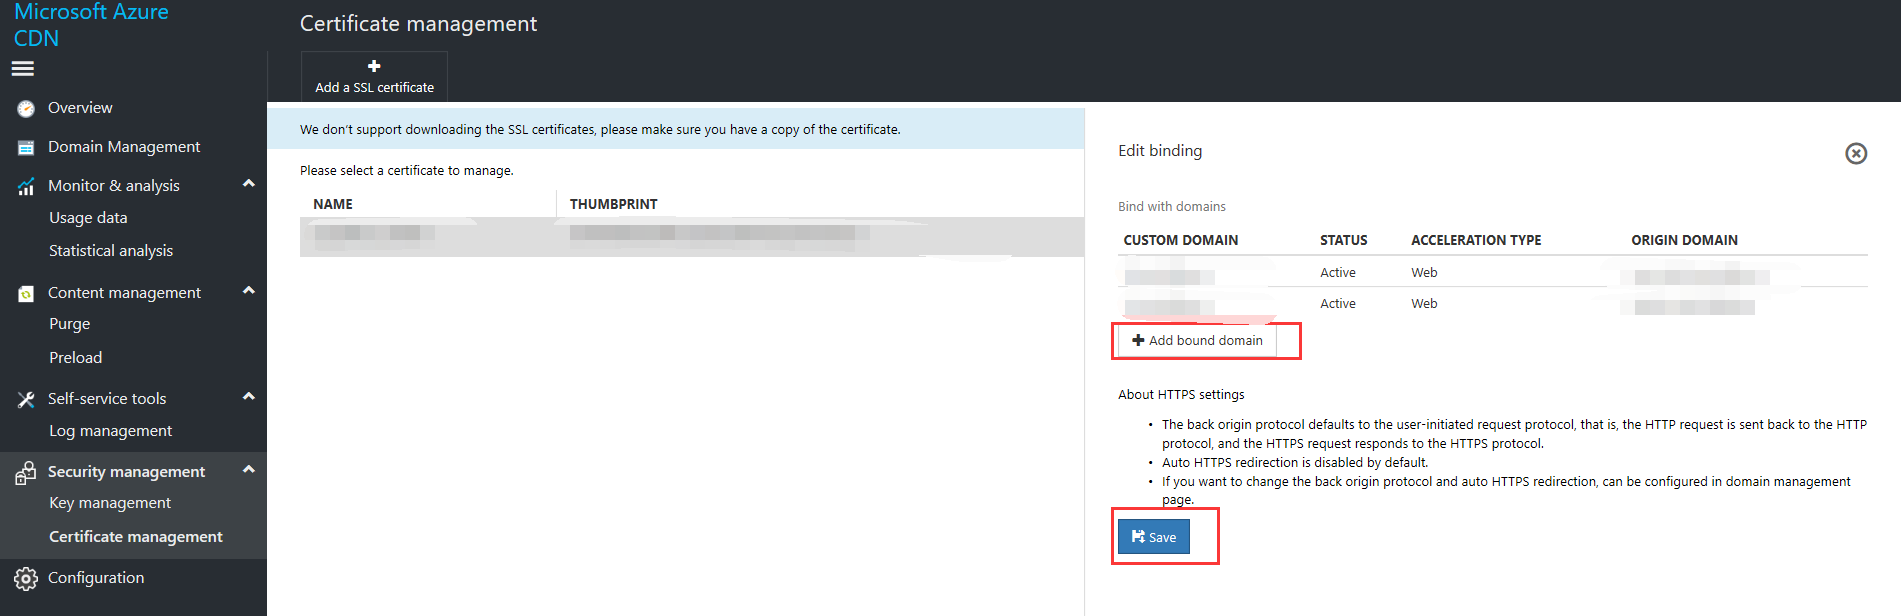
Users can bind certificates to domain names in one of the following three ways:
You can directly select the domain name you want to bind when you upload the certificate in Certificate Management.
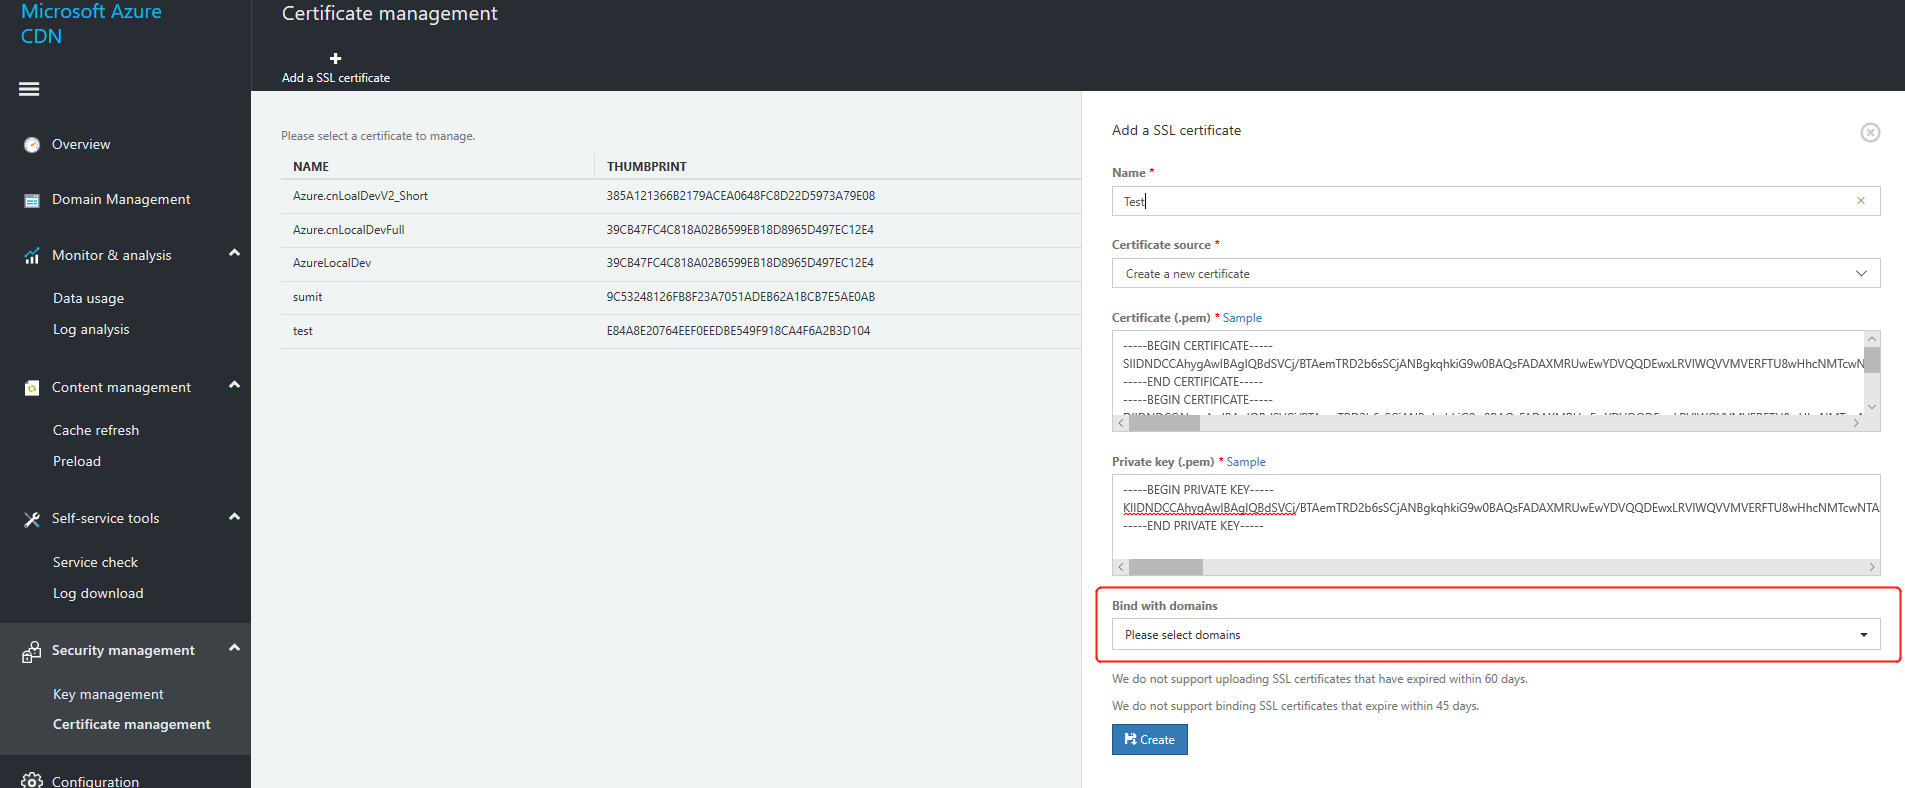
You can also bind the domain name after you have uploaded the certificate by selecting the certificate on the management page and selecting "Edit bindings" -> "Add bound domain name."
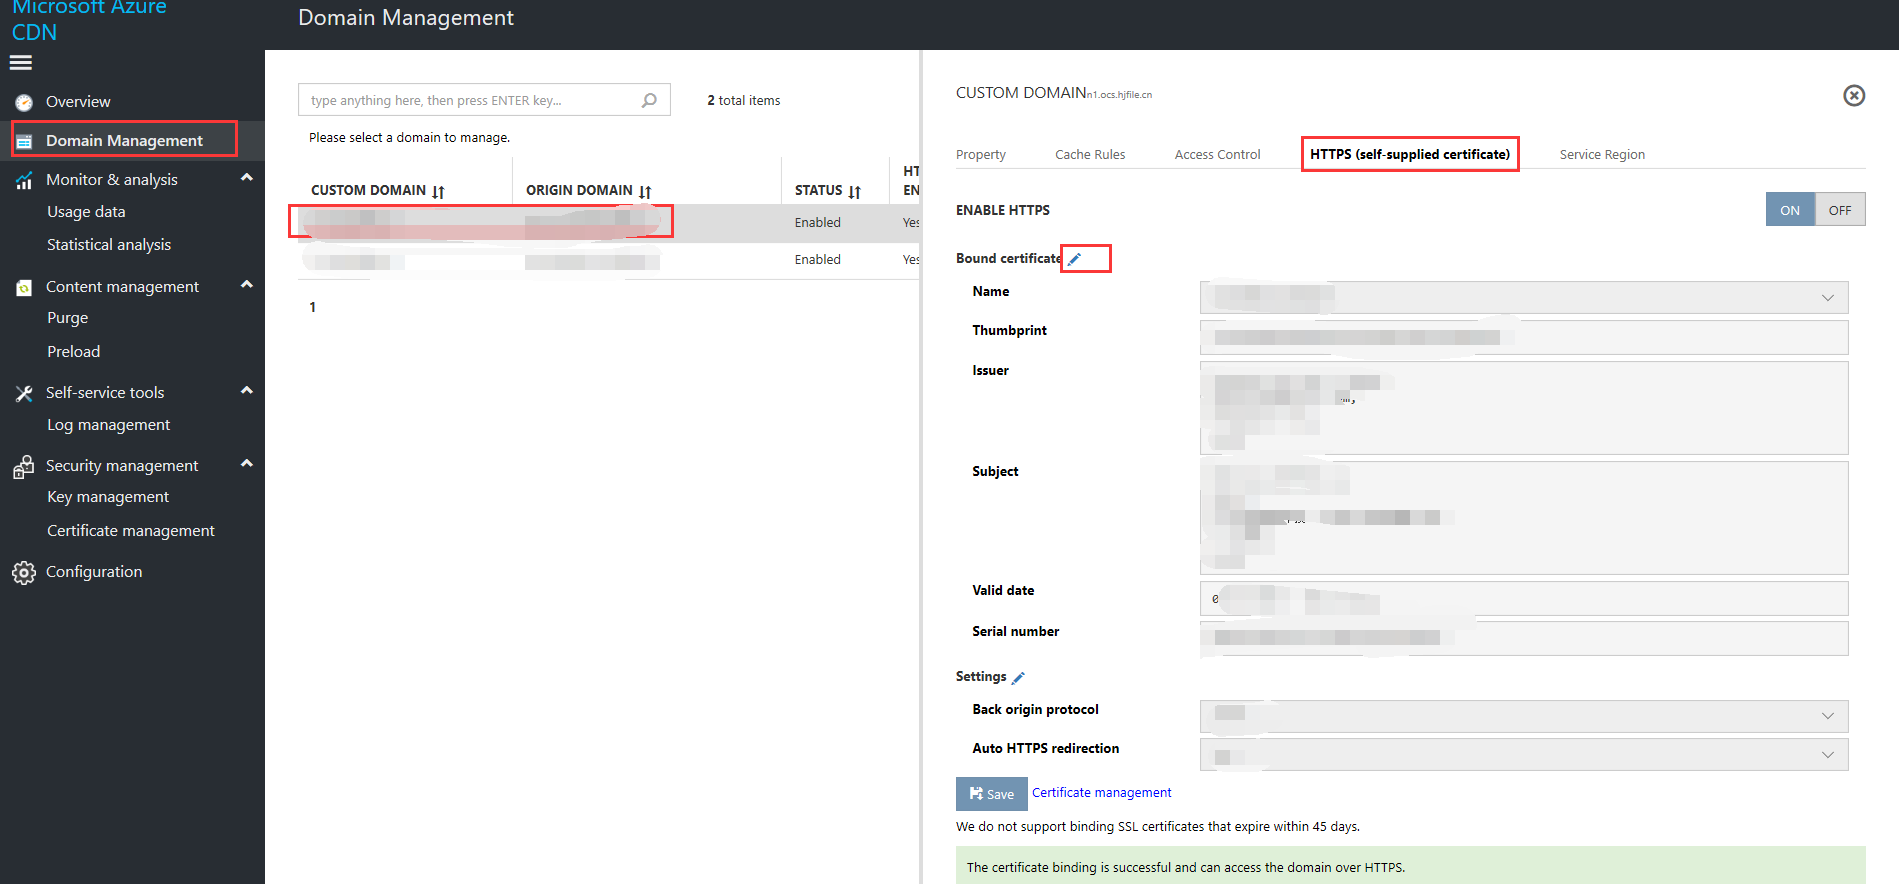
Alternatively, click Domain Name Management and select the domain name you need to enable the HTTPS service for. Select "HTTPS (Customer-supplied Certificate)" in the interface on the right-hand side, then click "Enable" to bind a certificate. Select an uploaded certificate from the uploaded certificate drop-down list, then click OK. If you do not have a compliant certificate, click Certificate Management and refer to Step 2 to upload a certificate.
Certificate deployment: After you bind a domain name, the system will notify you that "The certificate is currently being deployed and will generally take effect within 2-4 hours. Please contact us if deployment is not completed within 24 hours.
You can set return-to-source mode, force HTTPS redirection, then click Save.
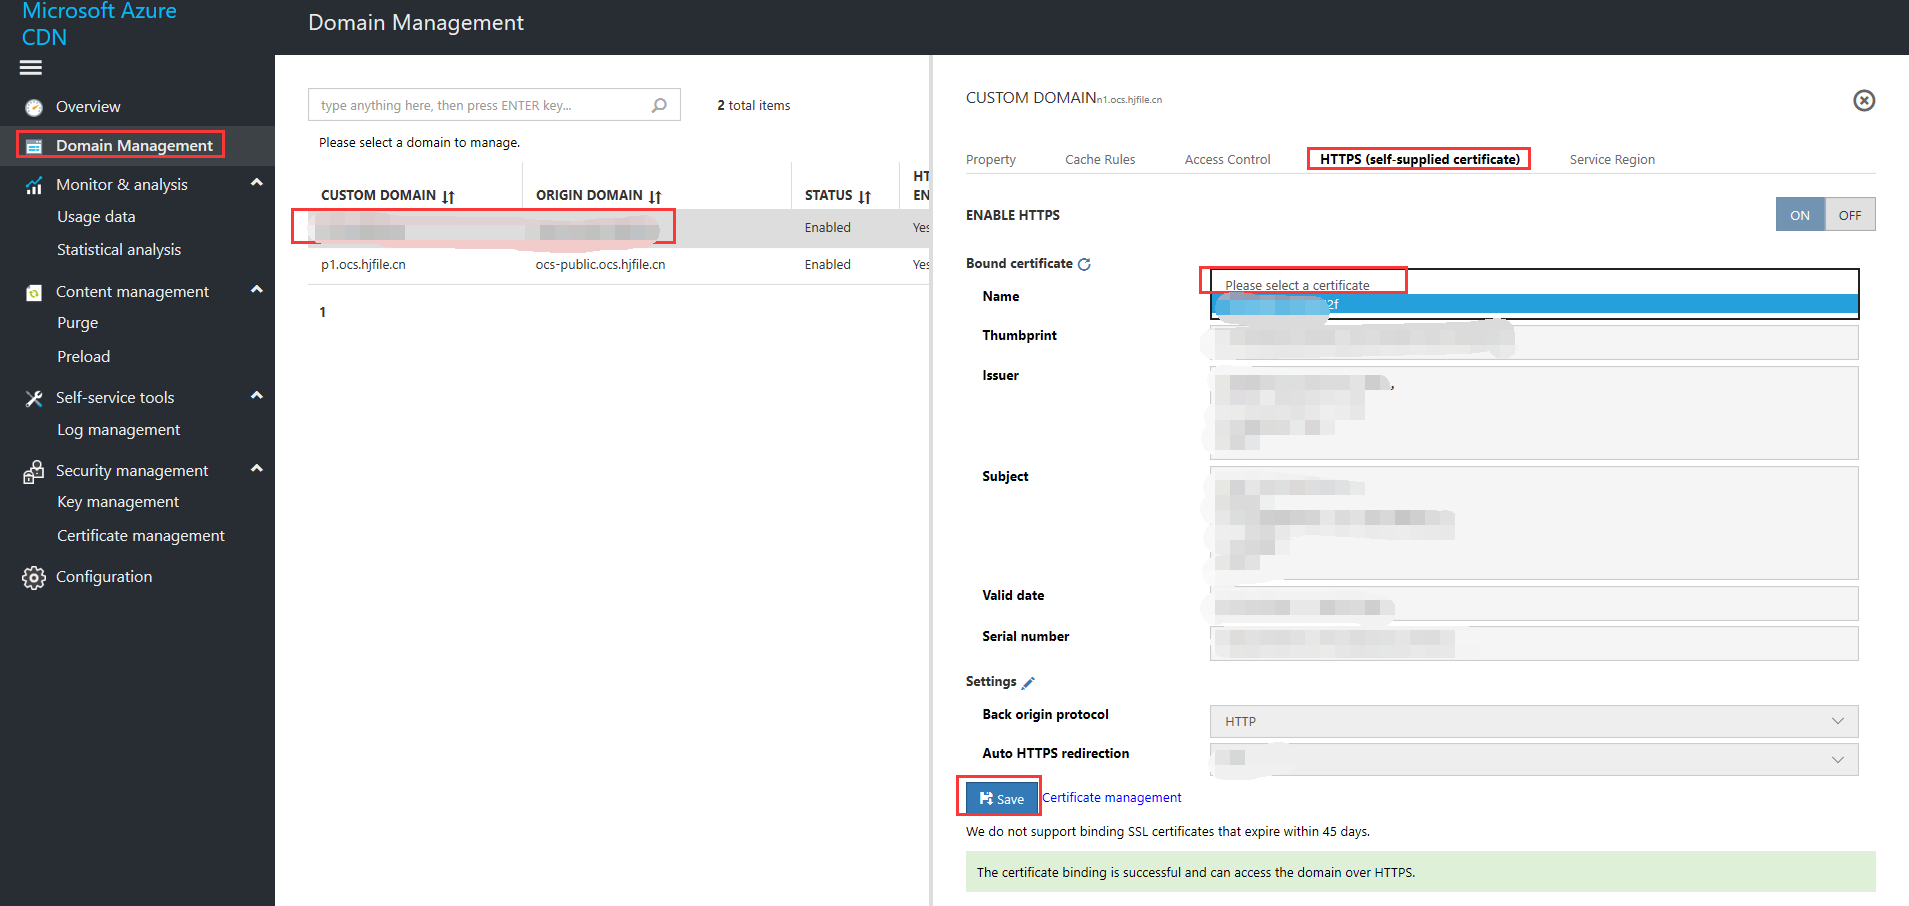
After the domain name has been successfully bound, the system will notify you that "The certificate has been successfully bound. You can access the accelerated domain name via HTTPS." You will also be able to view details of the certificate. The "HTTPS status (customer-supplied certificate)" for the domain name will also change to "Active."
Select the domain name to view details of the certificate.
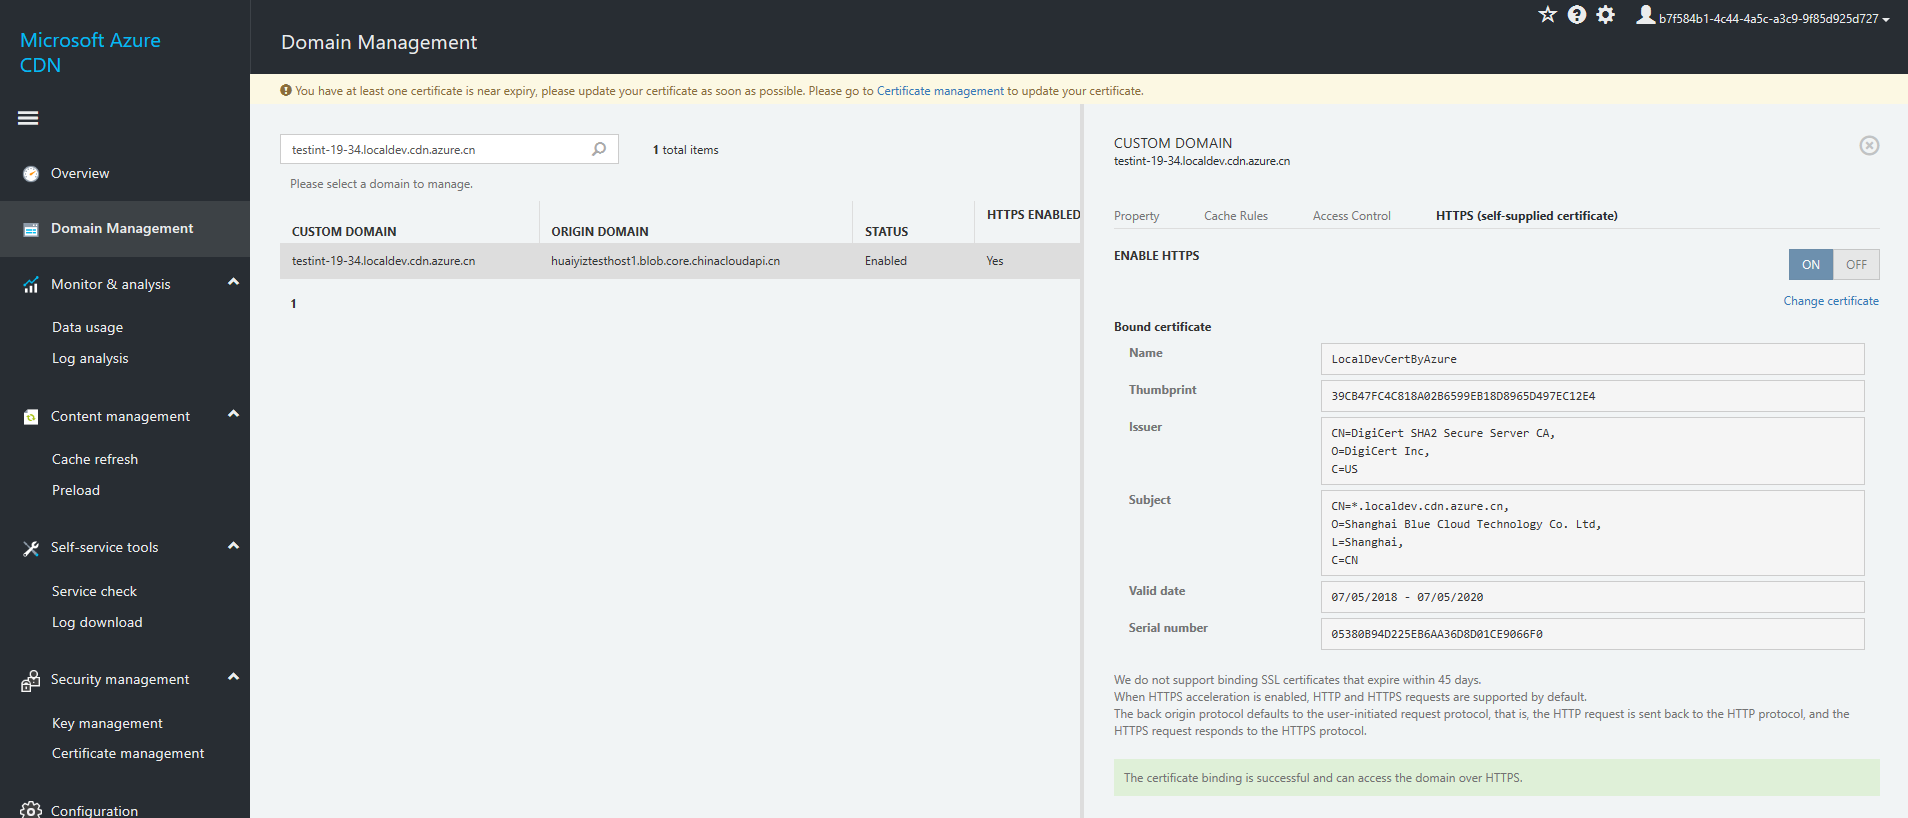
The "HTTPS status (customer-supplied certificate)" for the domain name will change to "Active."

The number of domain names bound to certificates in "Certificate Management" will also change.

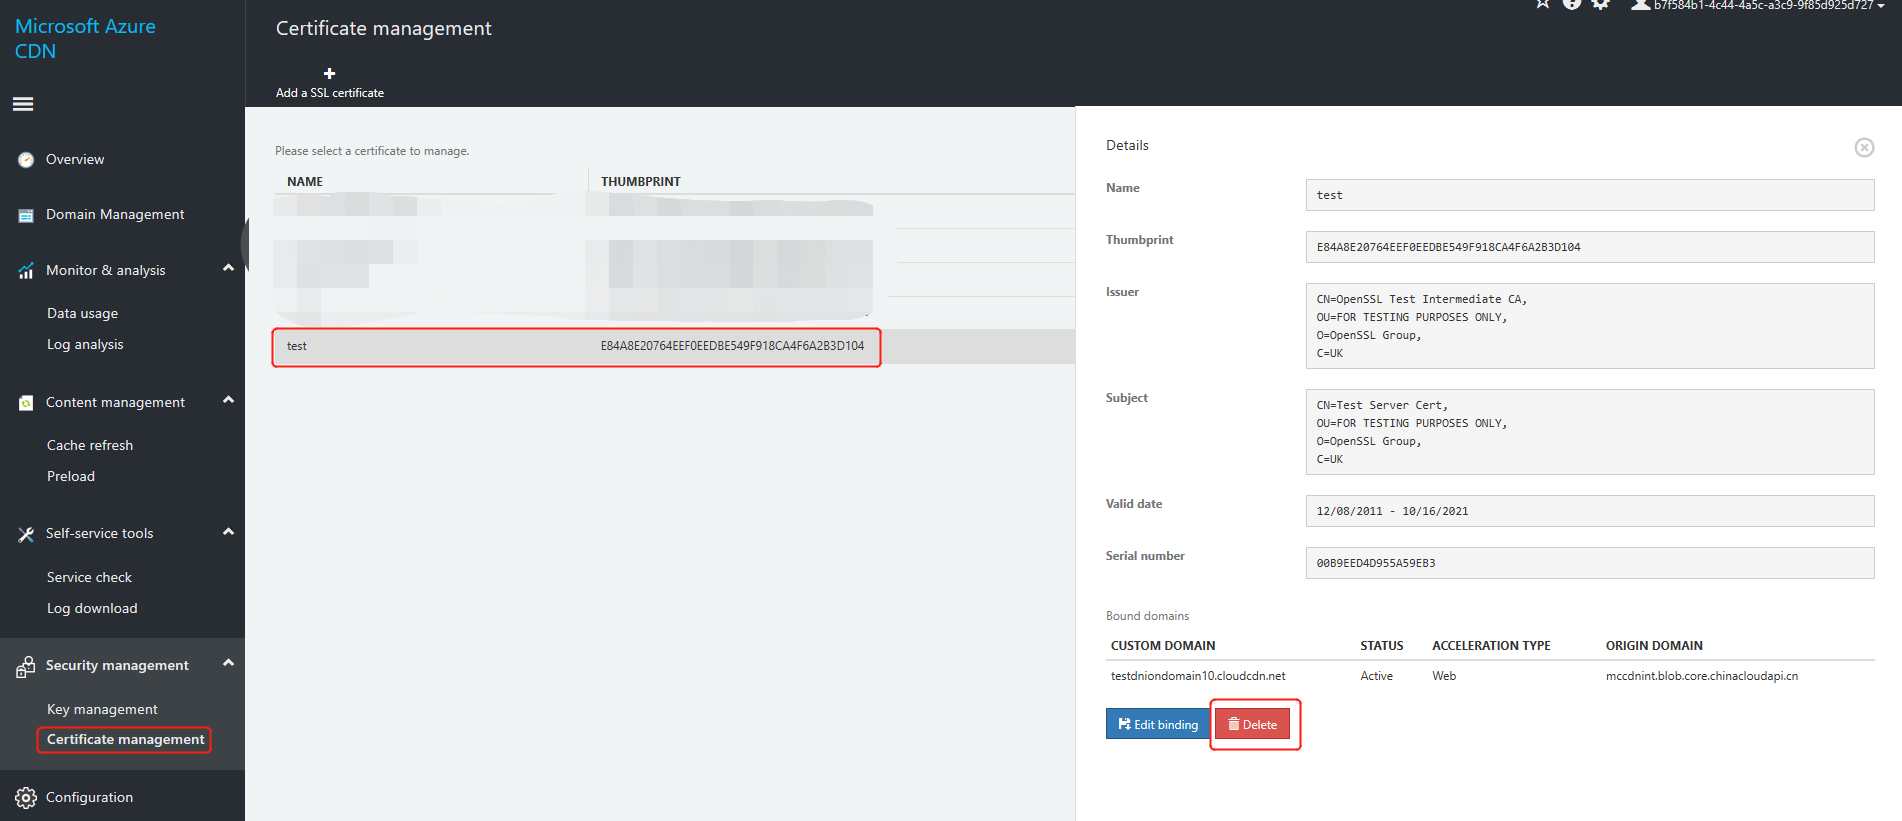
View certificate details: Select any certificate in Certificate Management to view details of the certificate and details of all bound domain names.
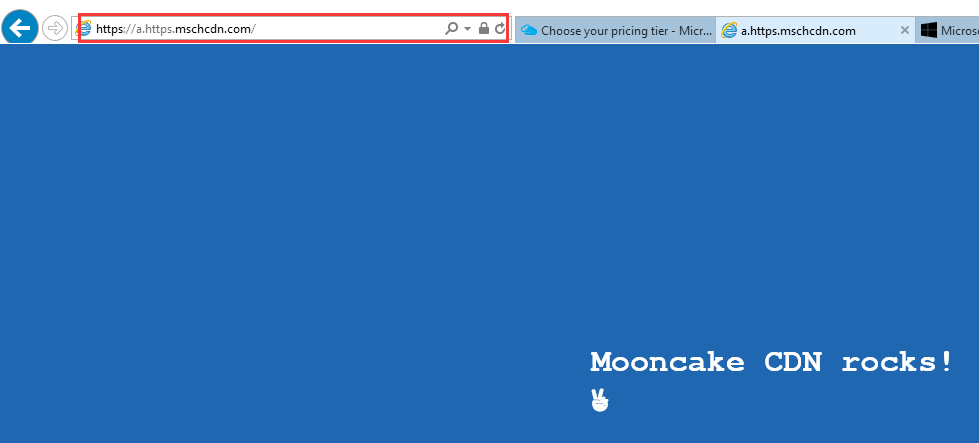
Check whether it has taken effect. If you see a small lock flag when you access the domain name by using HTTPS, this symbol indicates that HTTPS acceleration was successfully activated.
Replace and delete certificates
Delete a certificate
You can delete a certificate by deleting it from Certificate Management. Select the certificate you want to delete and then press Delete in the window on the right.
Important
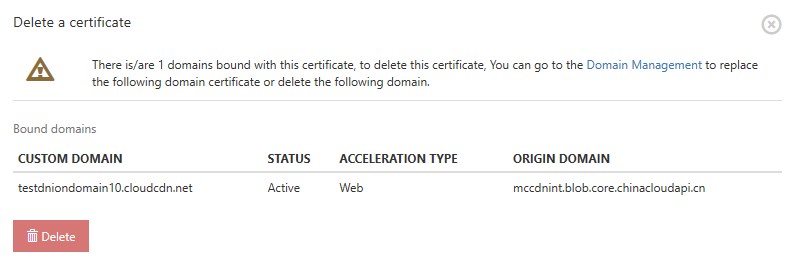
If a certificate has a bound domain name, you must unbind the certificate and the domain name before you can delete the certificate. Otherwise, a pop-up message will appear saying that you need to delete the certificate. You can replace the certificate for the domain name or delete the domain name directly. See the section on replacing certificates for details on how to replace a certificate.
Replace a certificate
If the certificate has expired or is about to expire, you can upload a new, valid certificate and complete the certificate replacement process for the corresponding domain name in Domain Name Management.
Select the domain name that you want to replace the certificate for, go to HTTPS (customer-supplied certificate), and replace the certificate:
Select the certificate that needs to be replaced. You can set return-to-source mode, force HTTPS redirection, then click Save.
Repeat steps 4, 5, 6, and 7 from the process to automatically enable HTTPS acceleration.
Certificate Auto Rotate
Azure CDN integrated with Azure Key Vault to simplify certificate renewal process. For HTTP certificates managed via Azure Key Vault, Azure CDN has the capability to fetch new certificates and distribute them to the CDN platform therefore saving your time from manually reuploading the new certificates on Azure CDN.
The Certificate Auto Rotate feature can be activated when the following conditions are met:
- Complete setup with Azure Key Vault and Azure CDN Certificate Management
- Certificate must meet the following conditions in order for it to be processed by CDN platform correctly:
- Certificate chain information is complete with chain order details
- Cannot be self-signed
- Subject Alternative Name field must contain the domain being supported
- RSA key only, EC is not supported
- This feature is only available for certificates managed by Azure Key Vault. Certificates uploaded via Azure CDN portal directly is unable to leverage this feature
- Grant Microsoft.AzureFrontDoor-Cdn(621bd413-f6cc-4be5-b3fe-a82c12af6629) access to your Azure Key Vault certificates
- Register the service principal for Azure CDN in your tenant's Azure Active Directory with AppID 621bd413-f6cc-4be5-b3fe-a82c12af6629
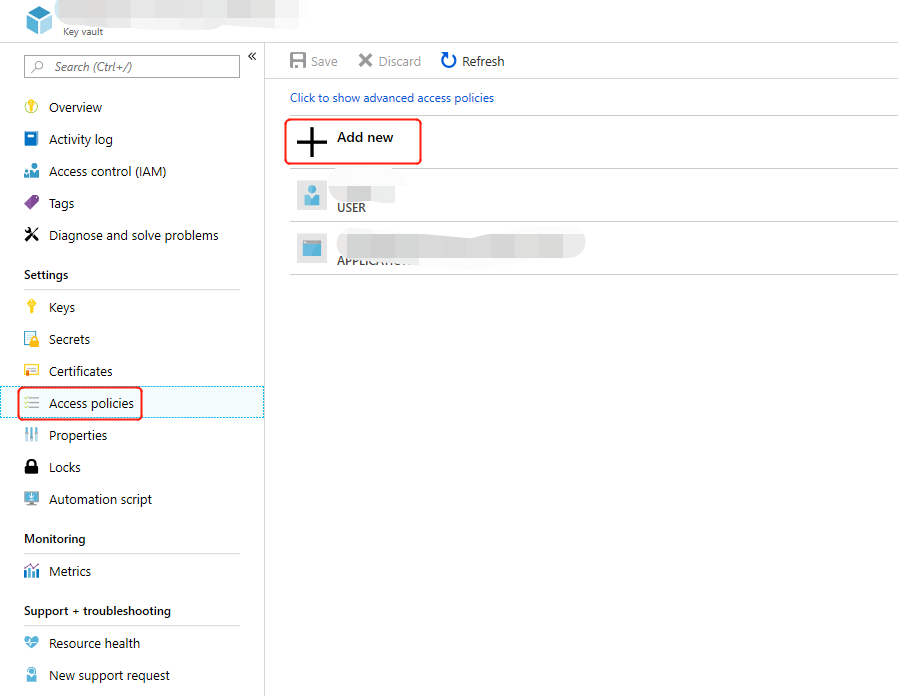
- In your key vault account, select Access policies.
- Select Add new or Create to create a new access policy.
- In Secret permissions, select Get & List to allow Front Door to retrieve the certificate.
- In Certificate permissions, select Get & List to allow Front Door to retrieve the certificate.
- In Select principal, search for 621bd413-f6cc-4be5-b3fe-a82c12af6629, and select Microsoft.AzureFrontDoor-Cdn. Select Next.
- In Application, select Next.
- In Review + create, select Create.
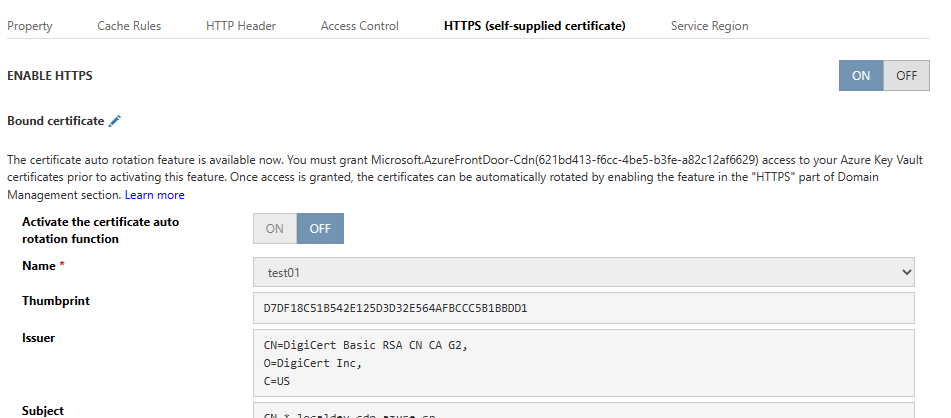
To Activate the certificate auto rotation function , visit Domain Management , select Custom Domain and navigate to HTTPS(Self-supplied certificate)
Important
When multiple domains are using the same HTTPS certificate, this function needs to be activated through individual custom domains It should take less than 12 hours for a feature enabled certificate to be deployed once renewed with Key Vault, please raise a support ticket if the deployment did not complete after 12 hours.
Certificate Management portal's thumbprint information will be updated when certificate auto rotation function is activated
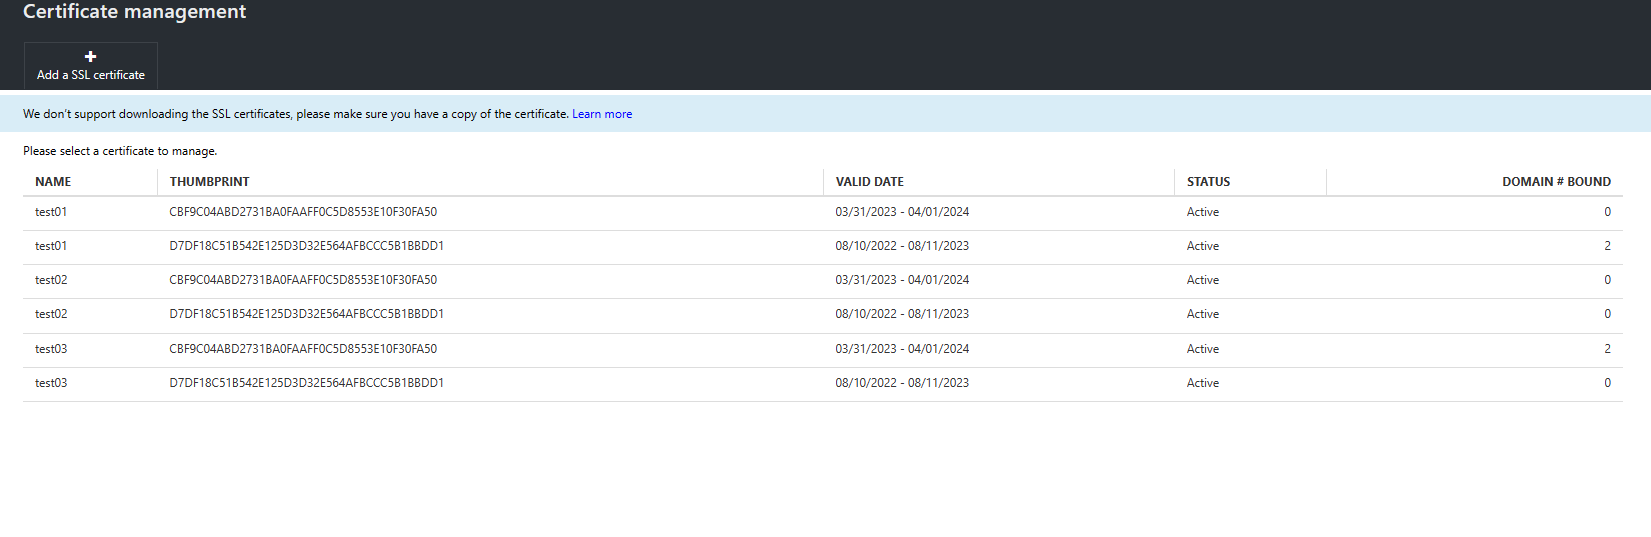
Name: Custom name of the certificate
Thumbprint: A certificate may have one or multiple thumbprints assocaited. A certificate being renewed will end up with two thumprints at least presenting the current certificate, and the new certificate being requested
Domain: The Domain(s) associated with the certificate. Click on the certificate to find more details.
Register Azure CDN
Register the service principal for Azure CDN as an app in your Azure Active Directory (Azure AD) by using Azure PowerShell or the Azure CLI.
Note
This action requires Global Administrator role permissions in Azure AD. The registration only needs to be performed once per Azure AD tenant. The application ID is assigned by Azure specifically for Azure CDN Command for reference:
Connect-AzureAD -TenantID {yourTenantId} -AzureEnvironmentName AzureChinaCloud
$role = Get-AzureADDirectoryRole | Where-Object {$_.displayName -eq 'Global Administrator'}
The role assigned is only for the subscription selected unless you define a different scope.
Azure PowerShell
If needed, install Azure PowerShell in PowerShell on your local machine.
In PowerShell, run the following command:
New-AzADServicePrincipal -ApplicationId "621bd413-f6cc-4be5-b3fe-a82c12af6629"
Azure CLI
If need, install Azure CLI on your local machine.
In CLI, run the following command:
az ad sp create --id 621bd413-f6cc-4be5-b3fe-a82c12af6629
Accelerated Regions Global Acceleration
Enable overseas acceleration or global acceleration
Select Acceleration Region, Enable Overseas, or Enable Global Acceleration (Global Acceleration includes acceleration in both Mainland China and overseas), then click Save. 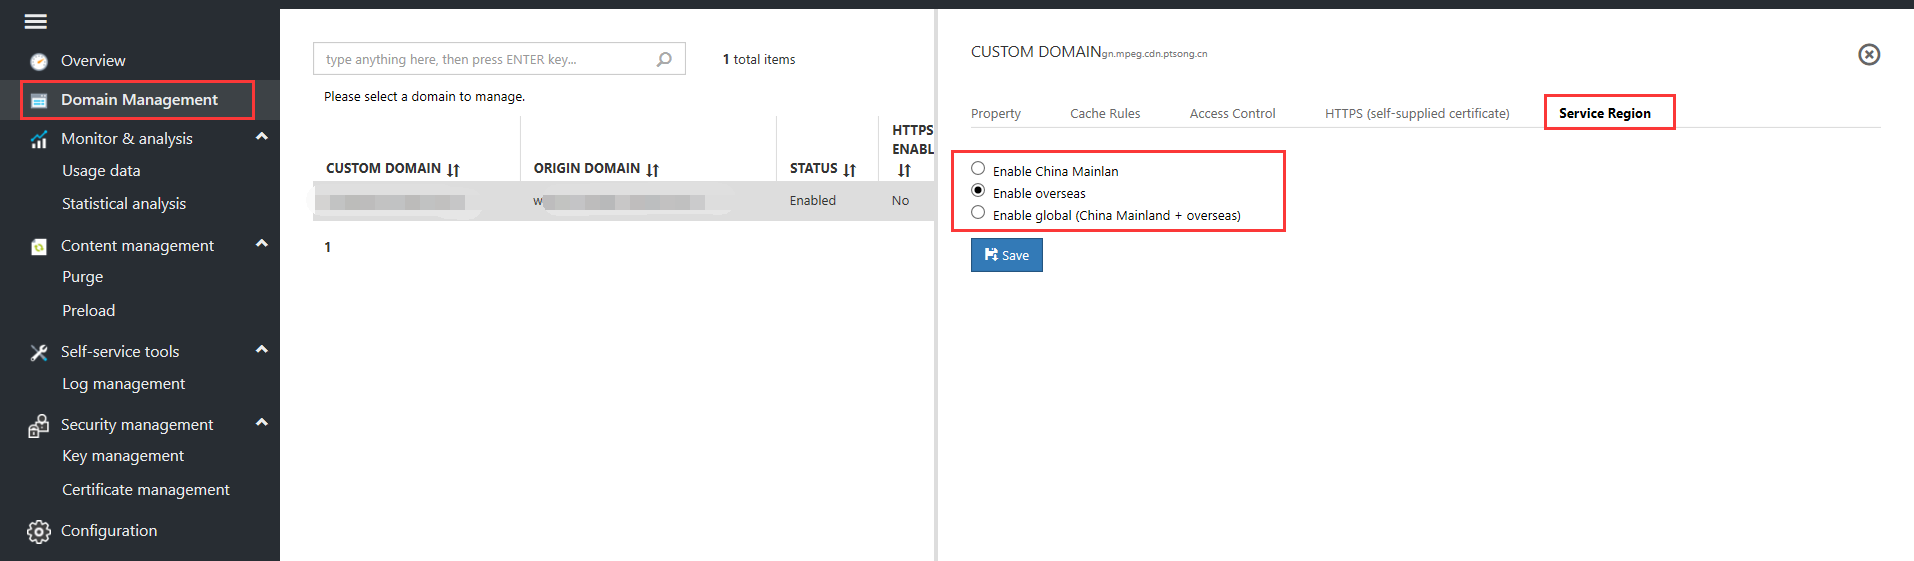
Important
Overseas acceleration will need approximately 1 hour to take effect after it is enabled.
Check if overseas acceleration has taken effect
Check the list in Domain Management to see whether the acceleration types include overseas acceleration 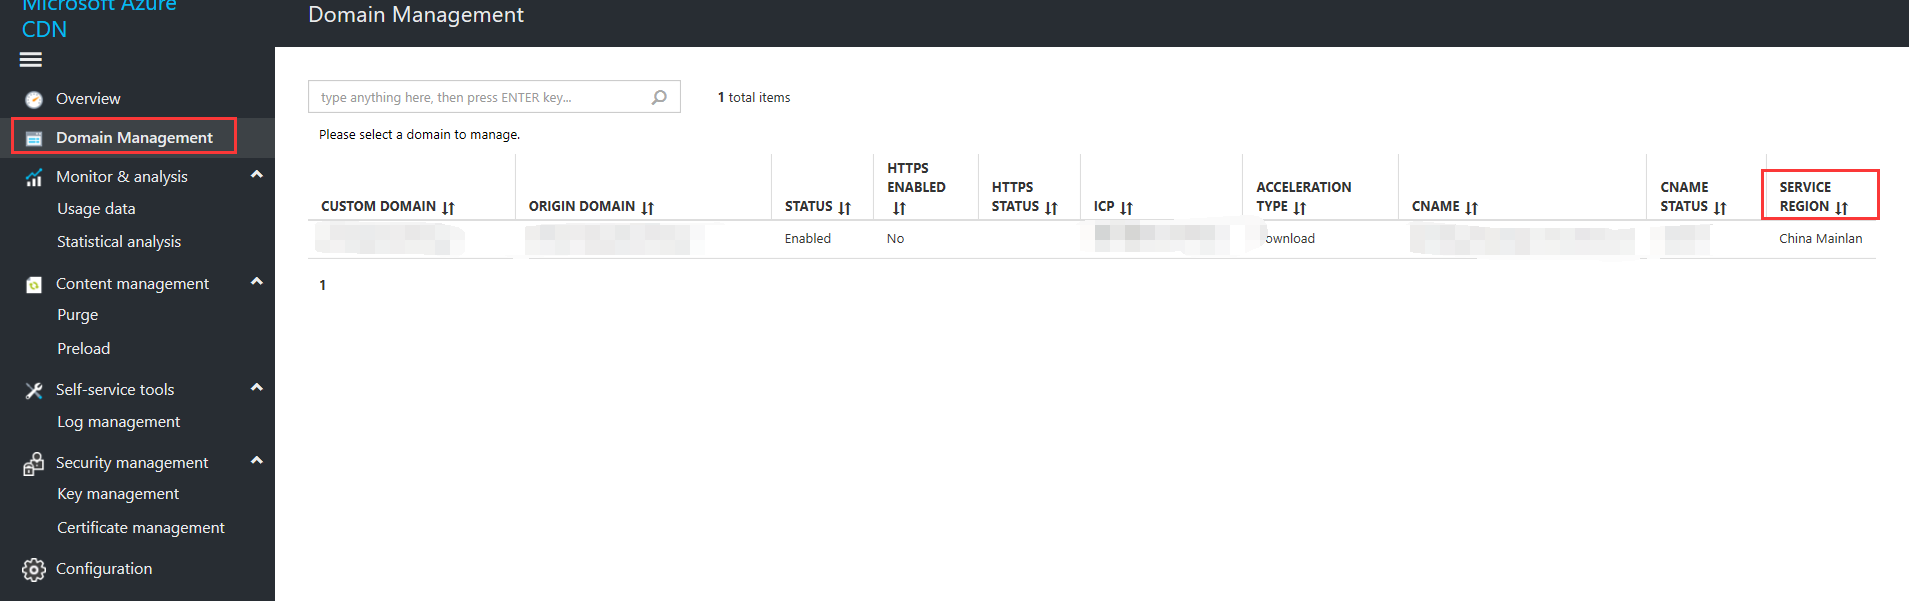
Check overseas billing method
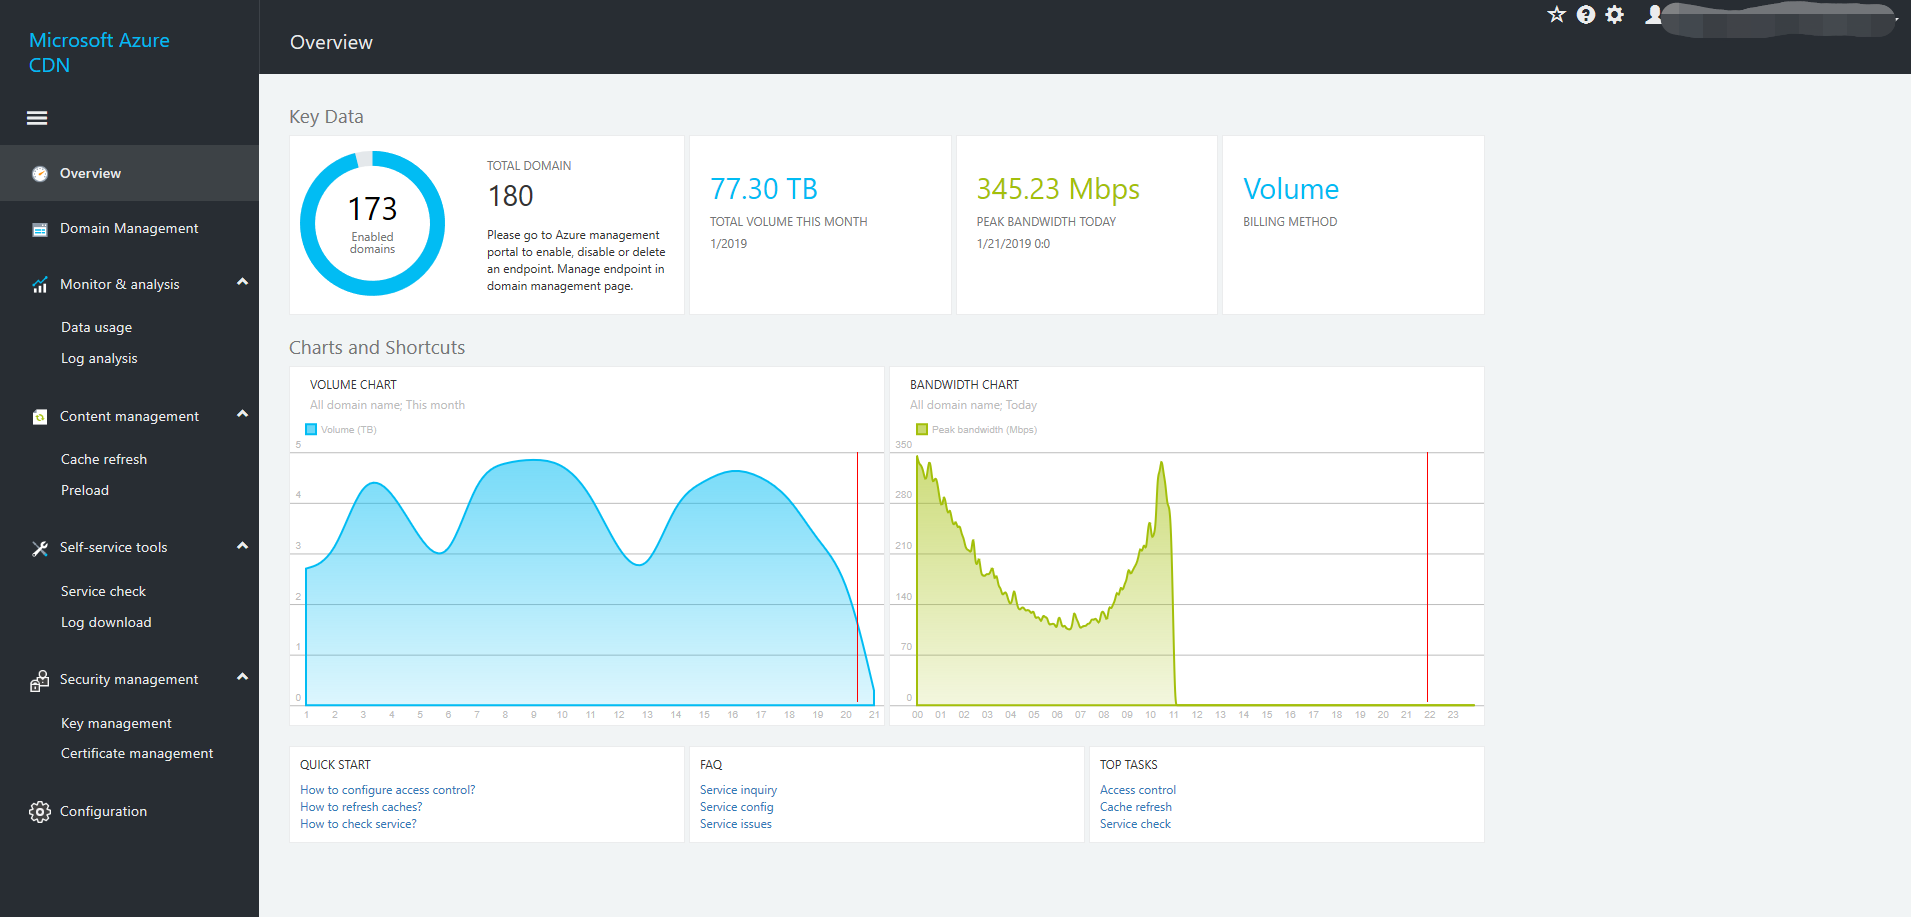
On the Overview page check the billing method to see whether overseas acceleration is included 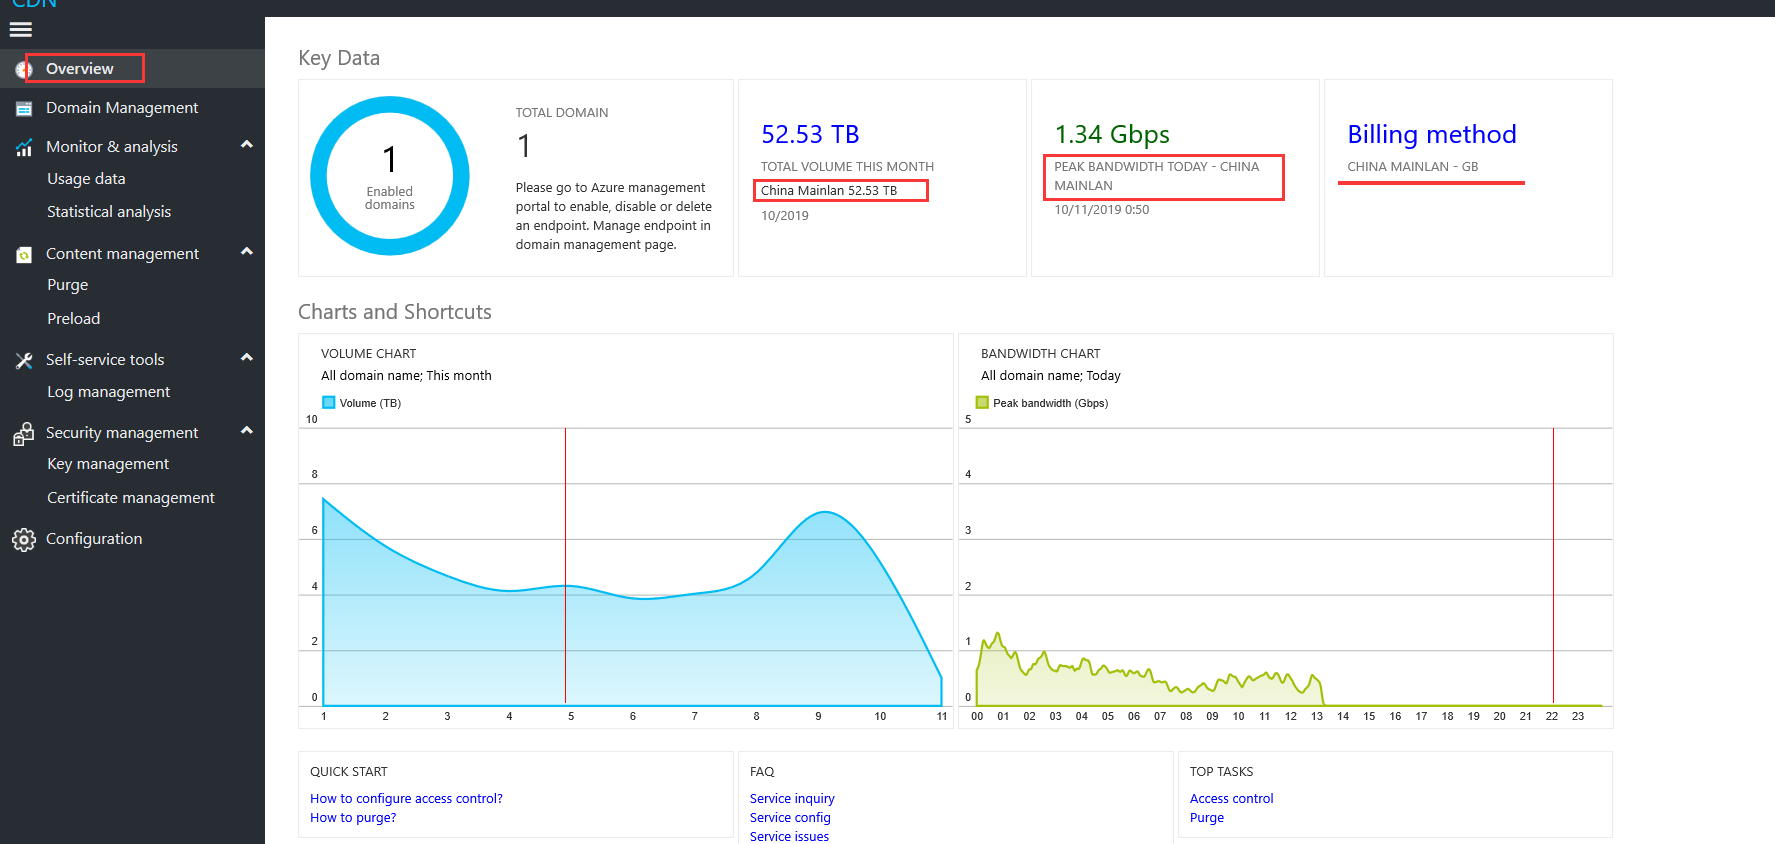
Key vault configuration
You can use the following two methods to create key vaults and Azure Active Directory application registrations.
Windows users can use the PowerShell scripts provided by Azure CDN.
All users can create key vaults manually on the Azure website.
Note
Please be sure to save the following information:
- Key vault DNS name
- Azure Active Directory application (client) ID
- Azure Active Directory application (client) password
1. Use the PowerShell scripts provided by Azure CDN to configure a key vault
Download all files from GitHub to a local directory, such as C:\Download
You can use admin privileges to select any of the following methods for running the required script:
- Run the file OneClick_SetupKeyVault.cmd: recommended method. Perform one-click configuration using the default parameters.
- Run the file OneClick_SetupKeyVault.ps1: for users with special requirements. To finish configuring, specify an Azure subscription number, resource group, key vault name, and AAD app name.
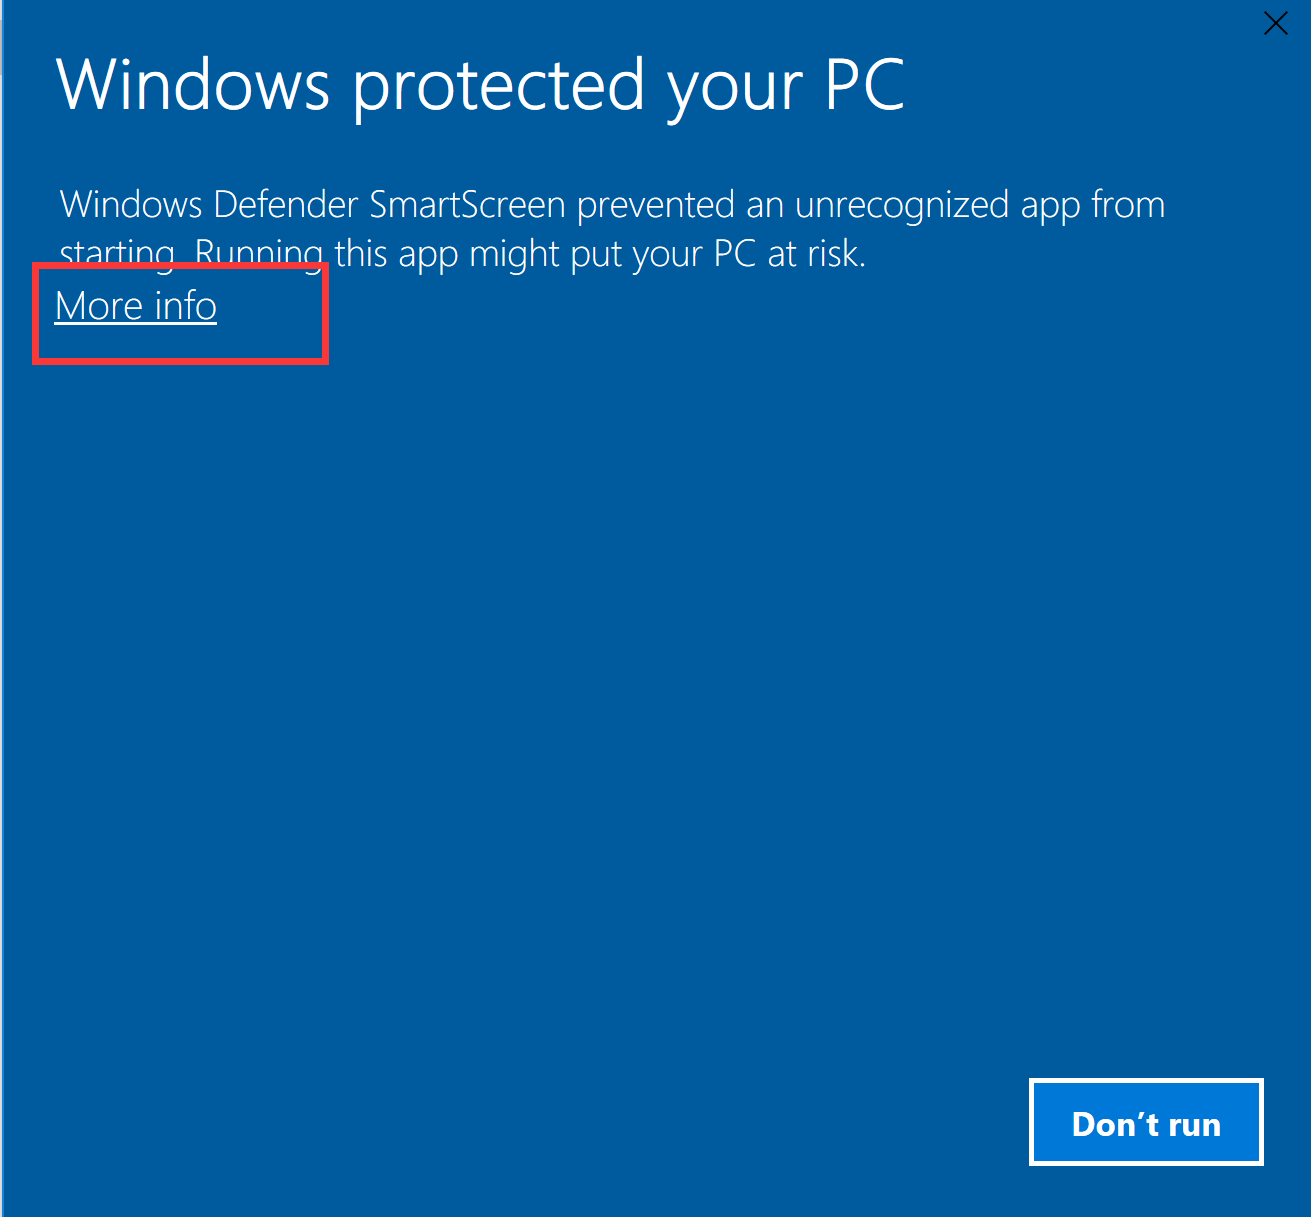
If your computer displays the following message, click on More Information, then on Run Anyway.
Please follow the prompts to confirm running the script
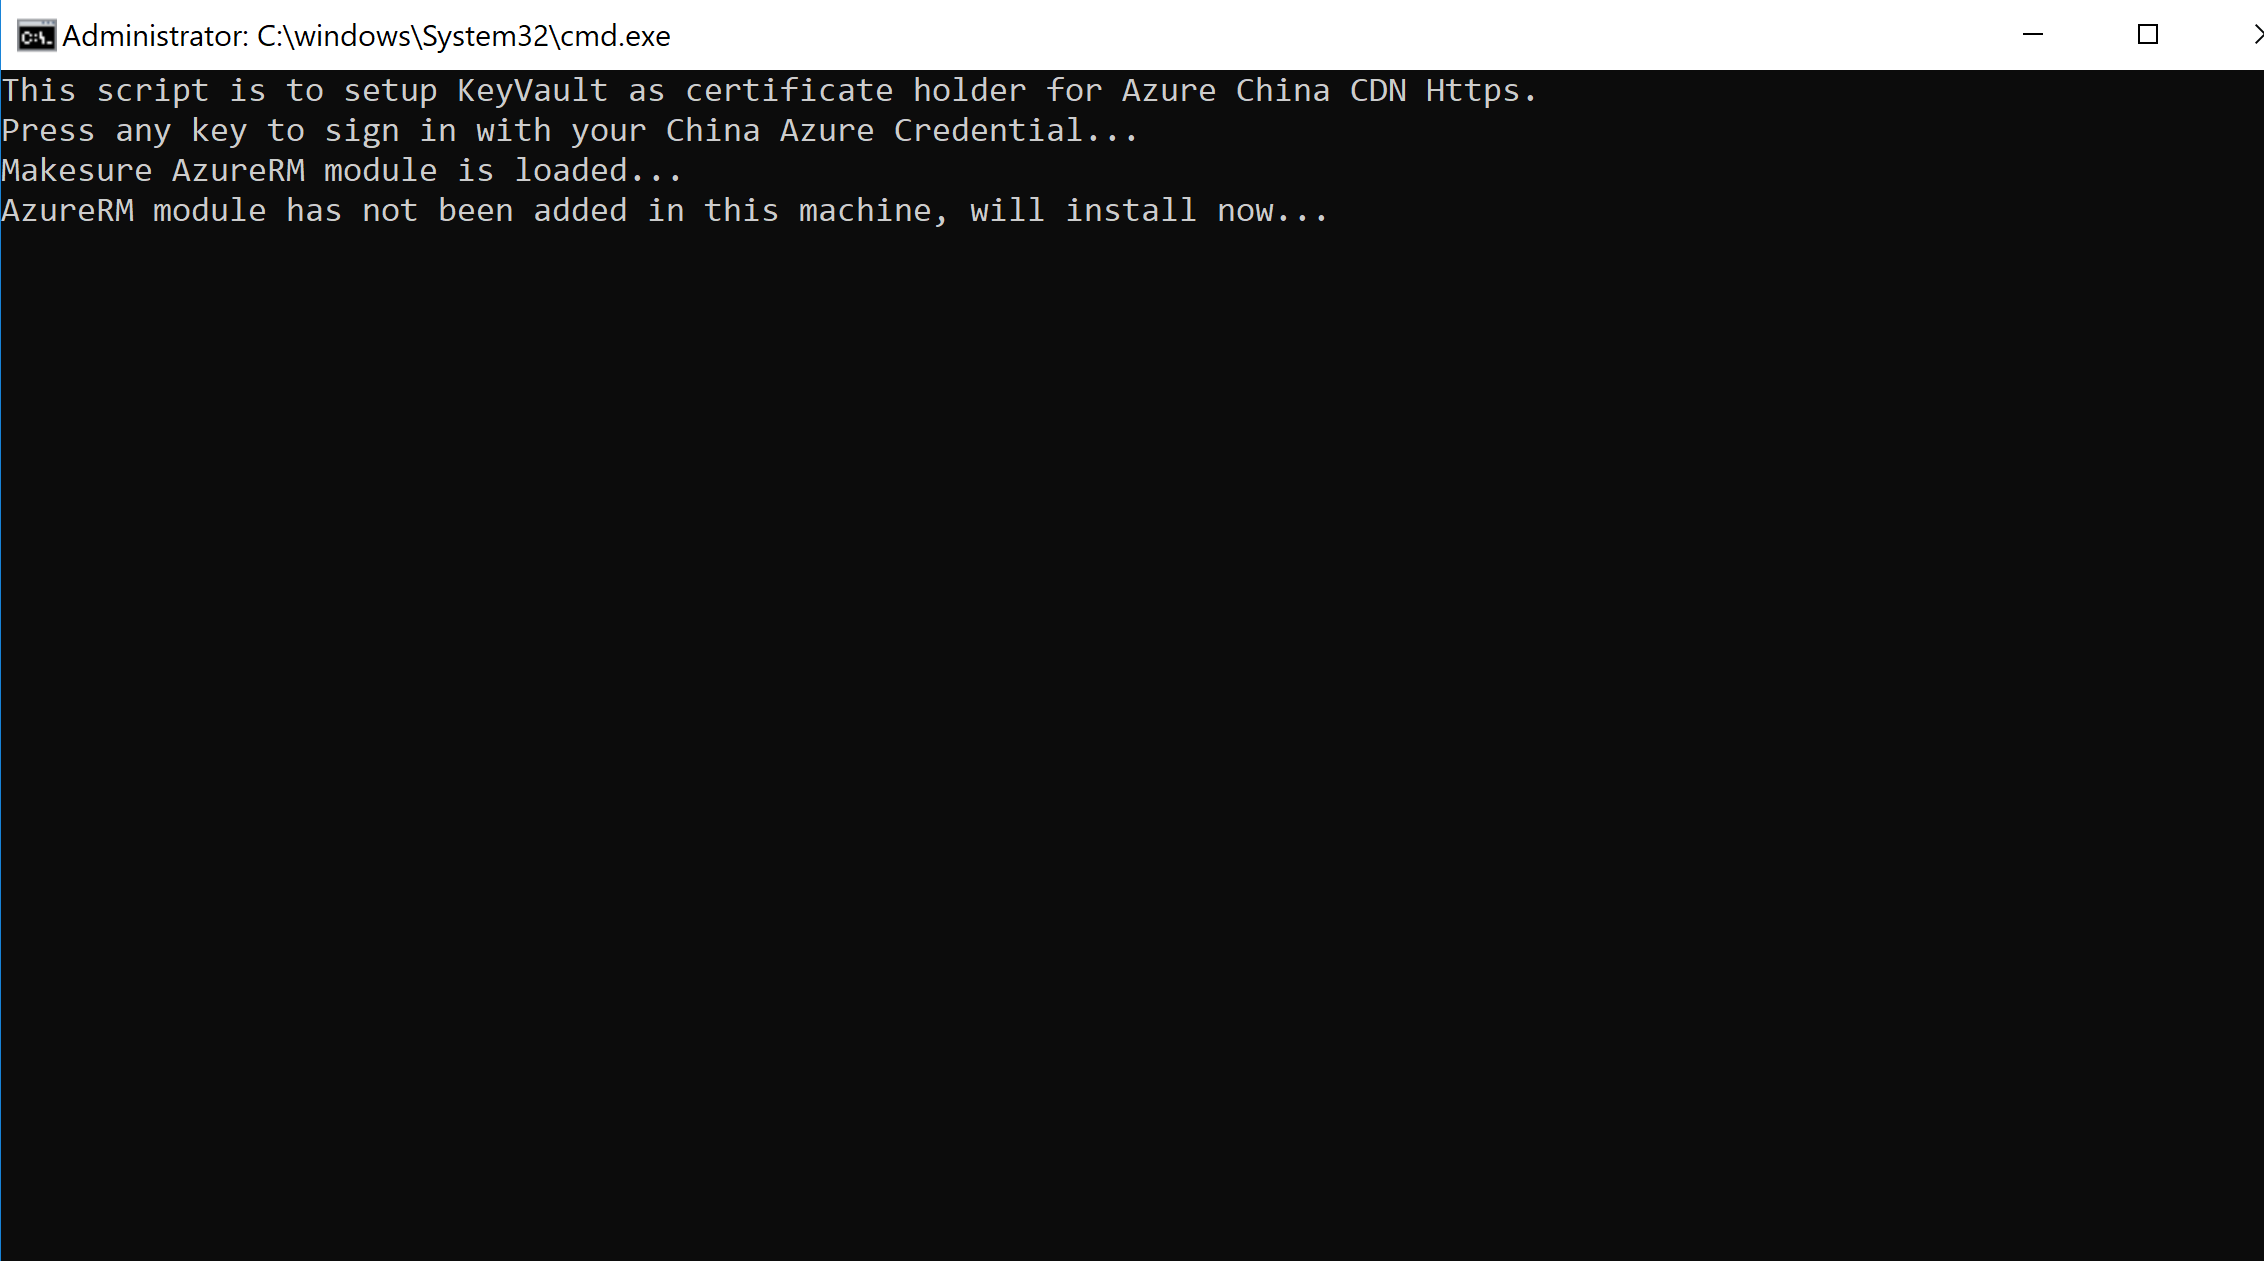
If the corresponding runtime is not installed, please follow these steps to install the runtime library:
a. Enter Y to allow the installation of the runtime library needed to run the script.
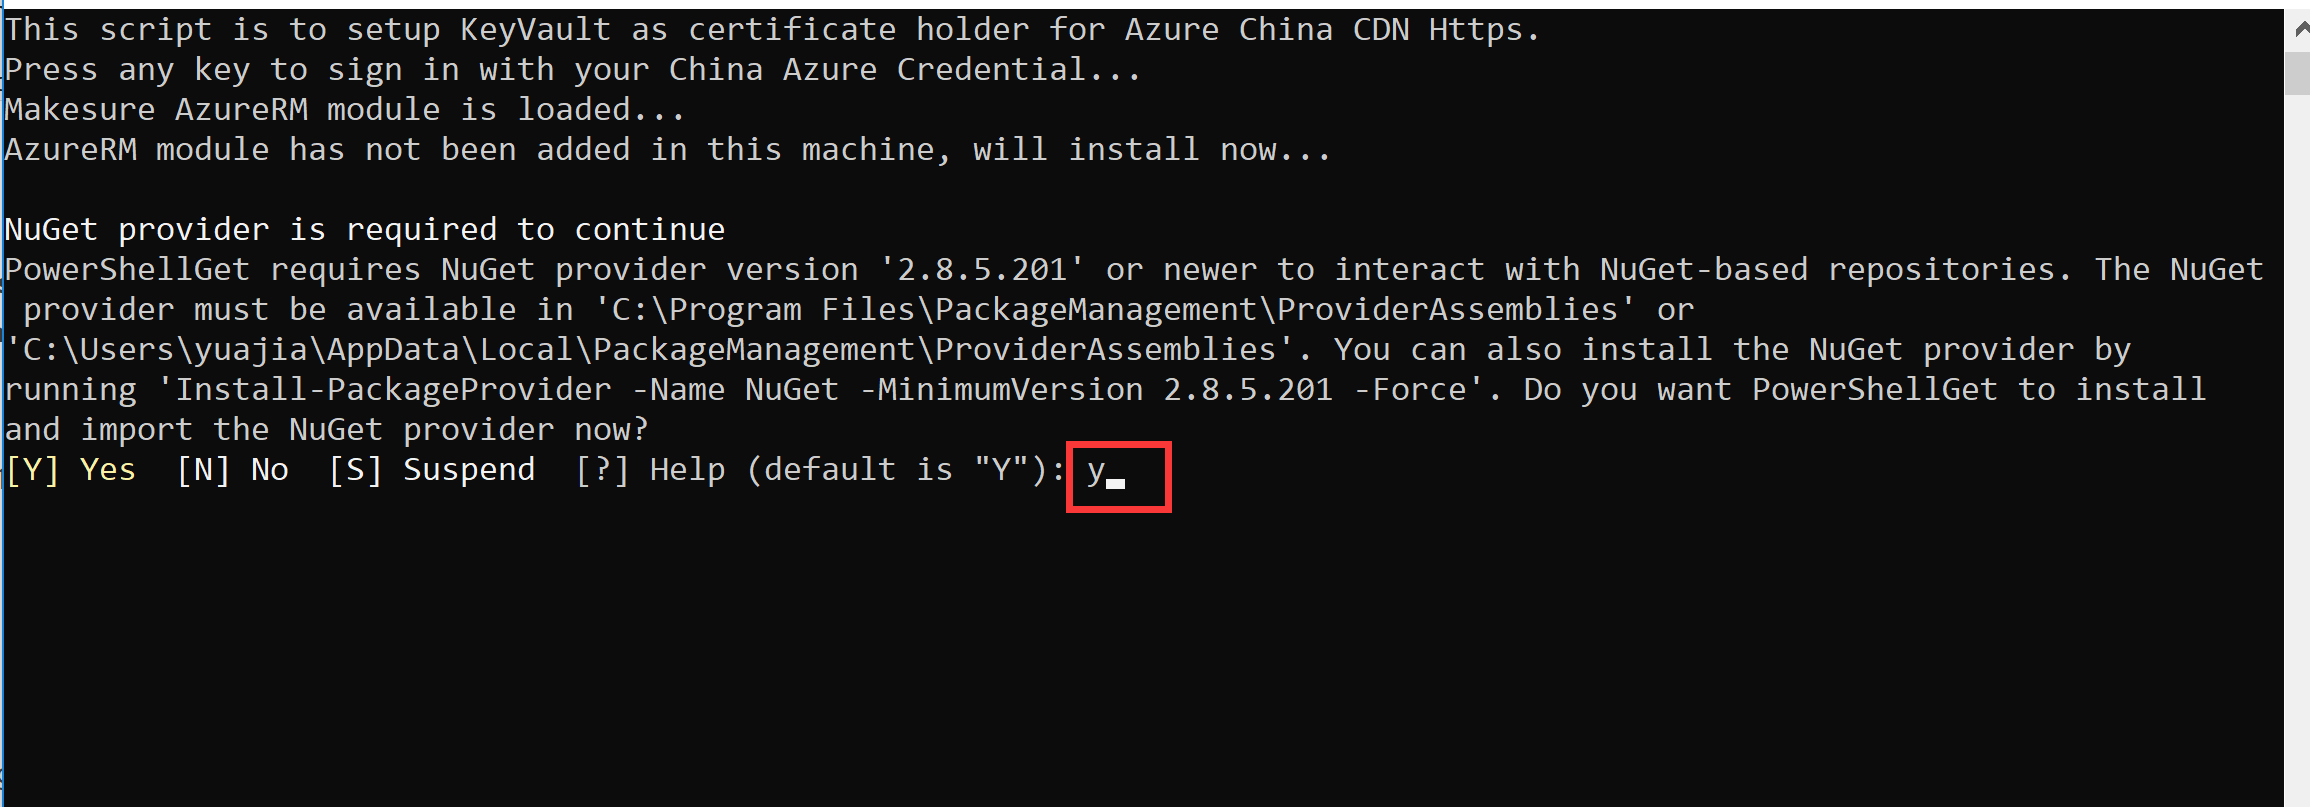
b. Please enter Y, which is also to allow the installation of the runtime library needed to run the script.
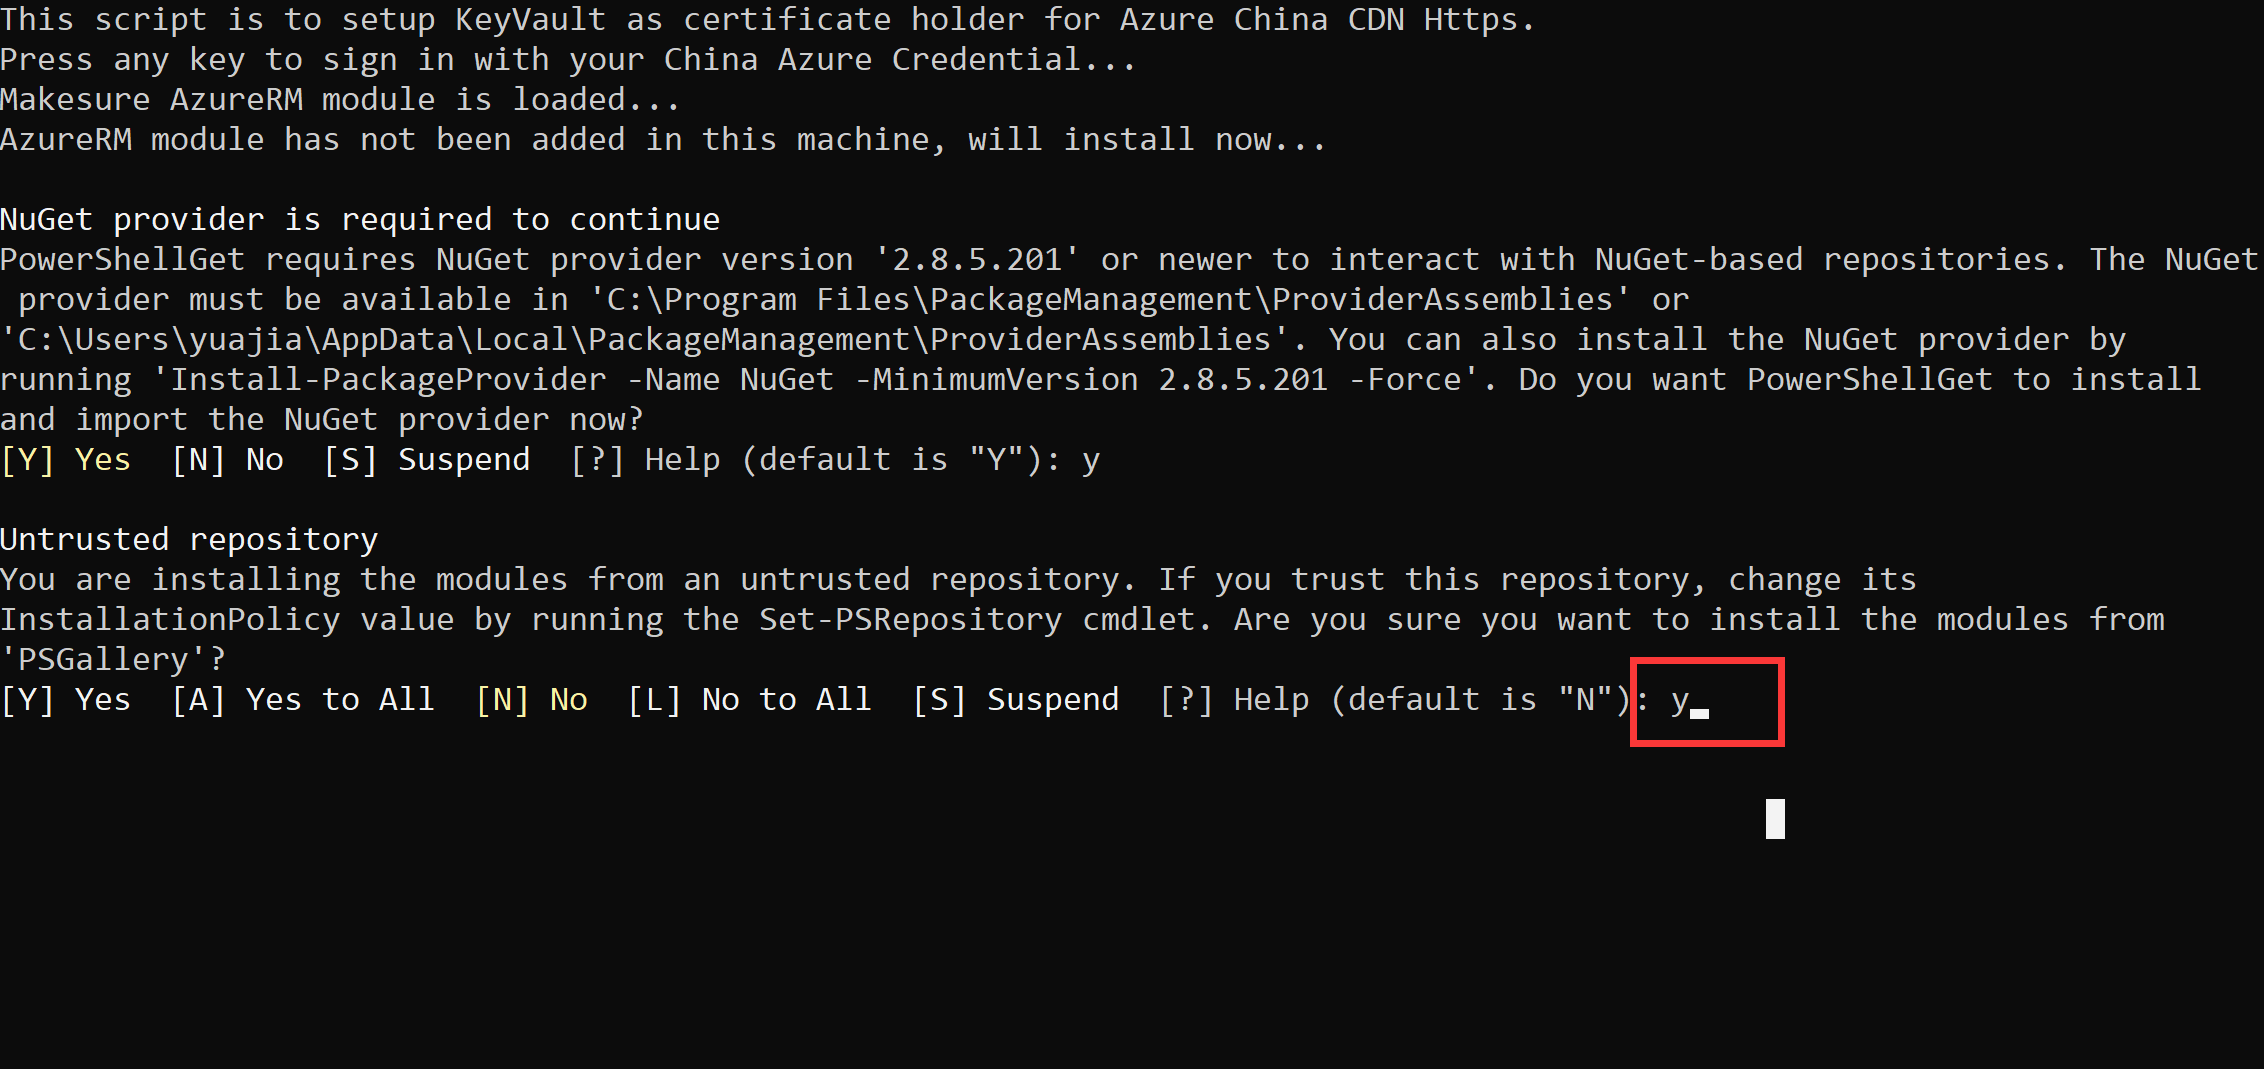
c. The runtime library needed to run the script is being installed, this will take around 5-10 minutes.

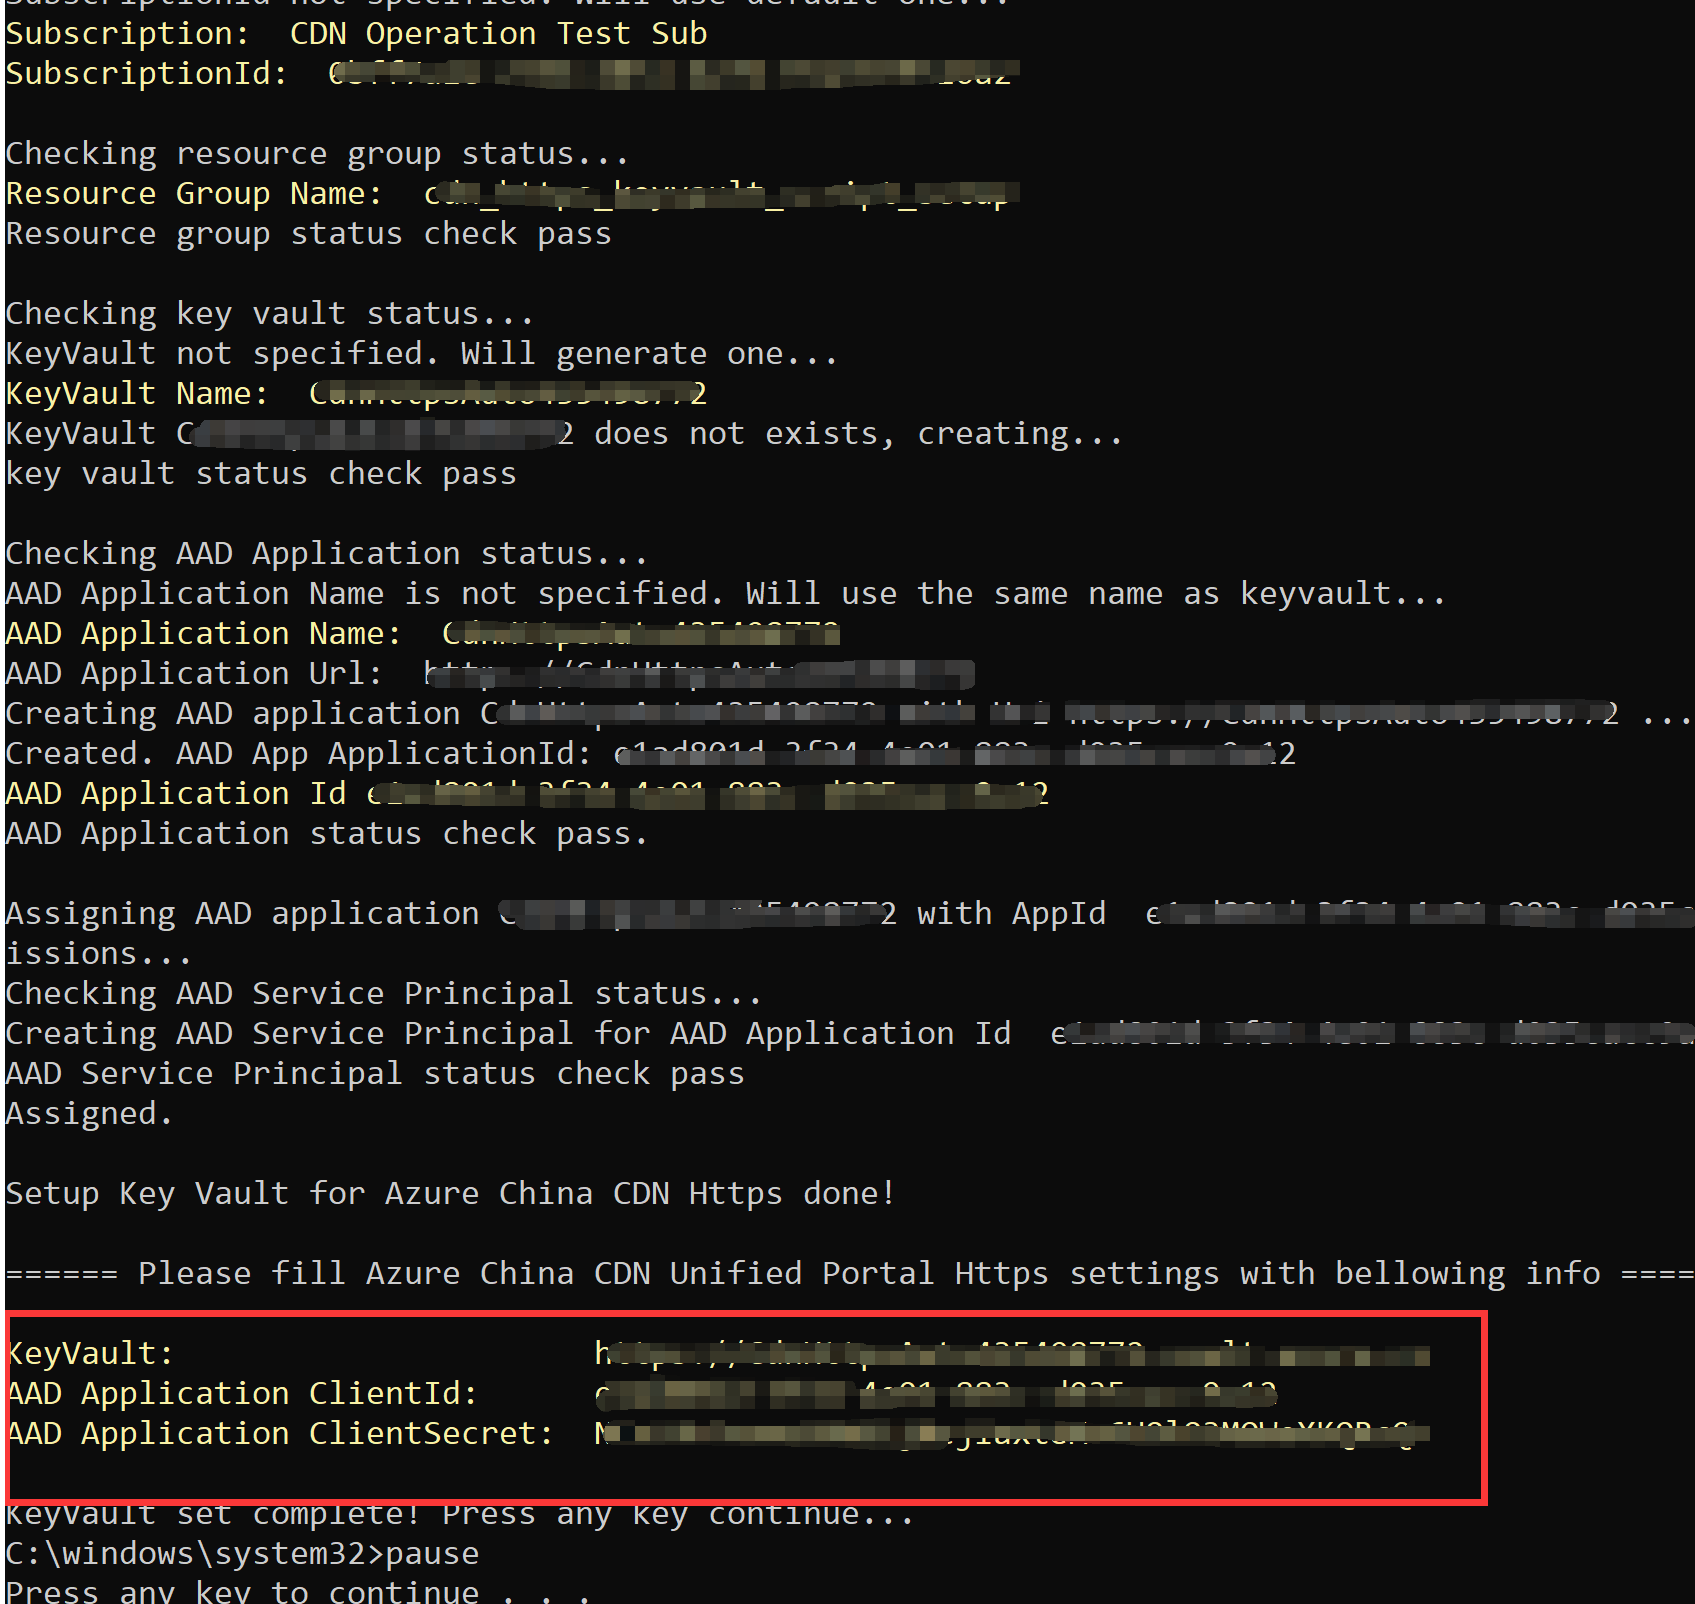
The installation of the runtime library is complete. Please enter your Azure username and password in the popup dialog box and click OK.
You will receive the information shown in the screenshot below. Please save the values for KeyVault (the key vault's DNS name), AAD Application ClientId (the Azure Active Directory client ID) and AAD Application ClientSecret (the Azure Active Directory password).
2. Manually configure a key vault in the Azure portal
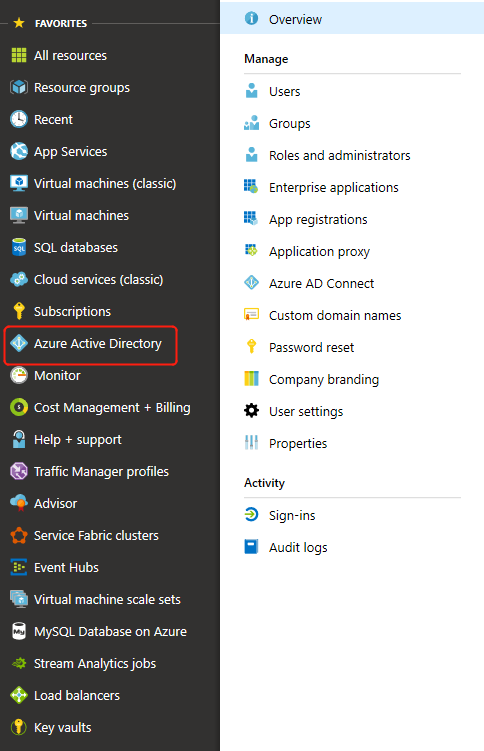
Create an Azure Active Directory to control key vault permissions
Visit the Azure website https://portal.azure.cn/ and go to Azure Active Directory.
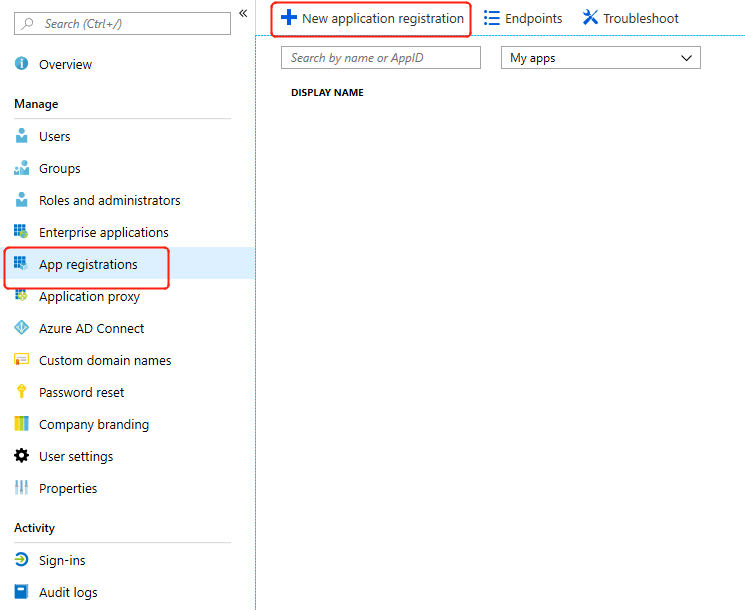
Click "App registrations" and "New registration".
Enter a meaningful name for your application (for example: MyKeyVaultAADApp). Select the appropriate account in "Supported account types." If you don't know the account type, click "Help me choose..." to learn about different account types.
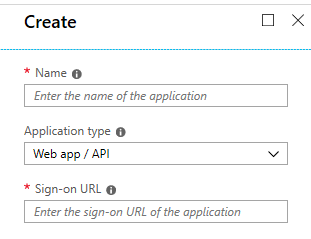
Redirect URI (optional): There is an option to enter any valid URI (for example: https://mykeyvaultaadaap/) and click "Register." This can also be left blank.
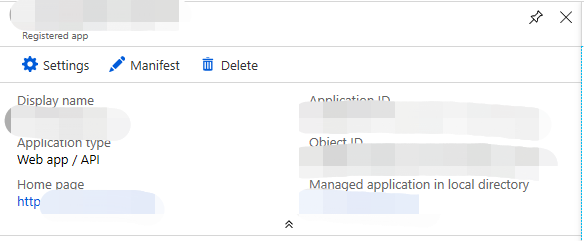
Copy the "Application (client) ID" value.
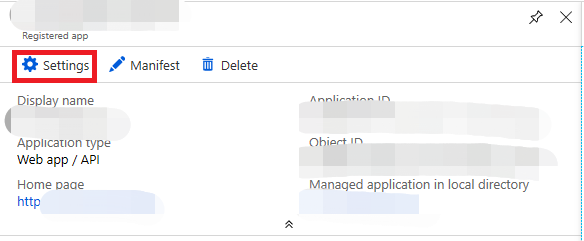
Click "Certificate and password" on the left, then click "Enter client password" in the client password field.
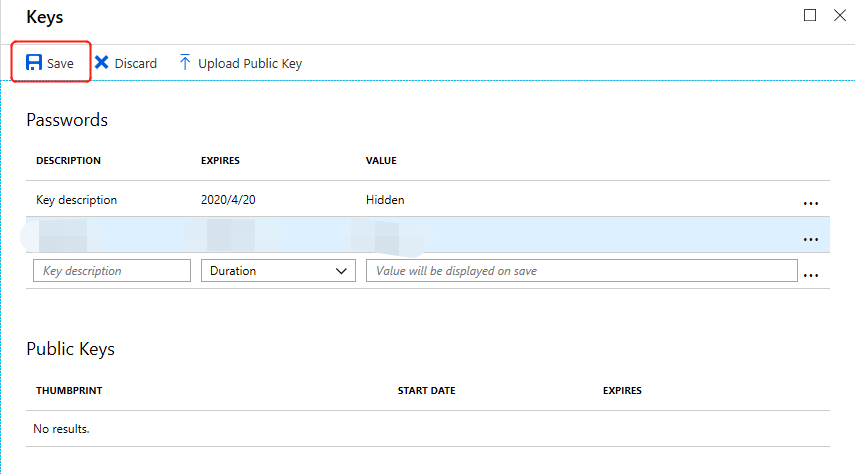
On the Add Client Password page, fill in the details in the "Description" field (this can also be left blank), select "Never" under "Expires", then click "Add."
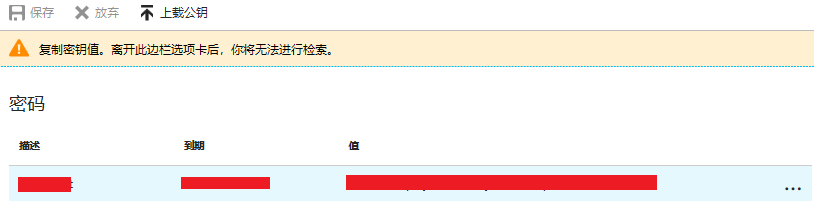
The client password value is added. The password value is displayed in the "Value" field on the page. Click "Copy" to save the password. Please note that after leaving this sidebar tab, you will not be able to retrieve it.
Manually create a key vault
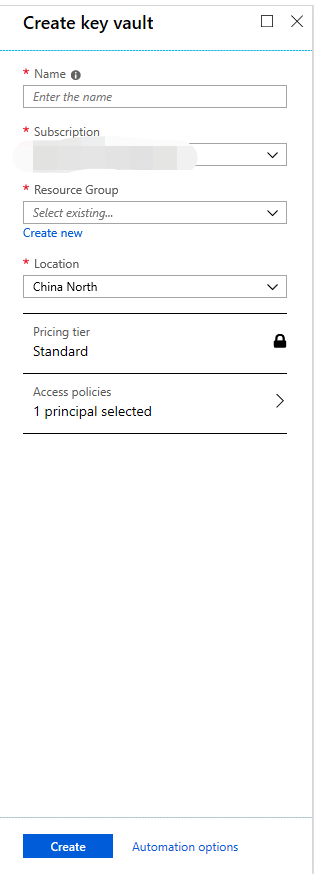
Click on Create Resource, enter "key vault" in the search box, and press Enter.

Select Key Vault and click Create.
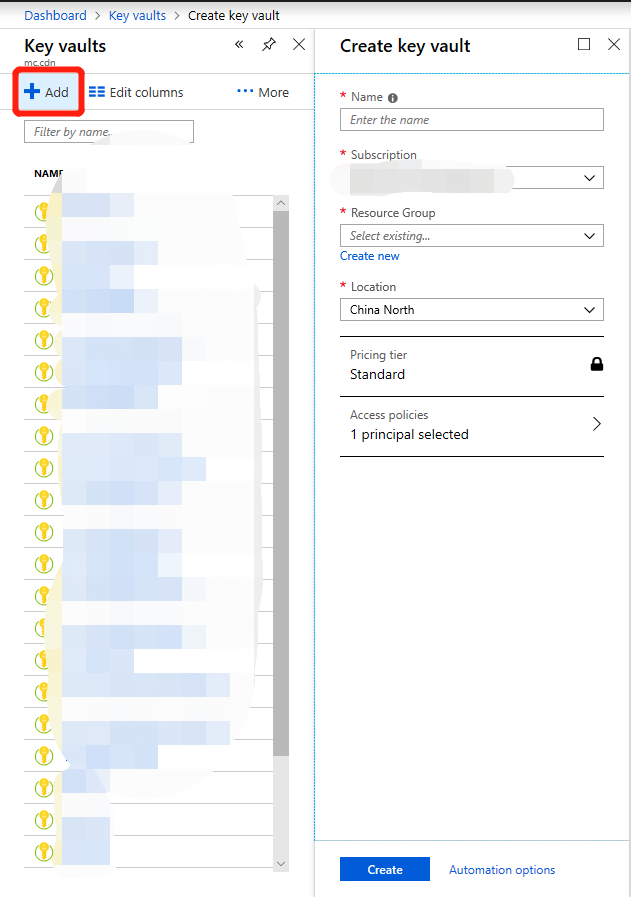
After you enter a meaningful name for your key vault (for example: MyCertificateKeyVault), along with the subscription, resource group, and location, click on Create.
Enter the key vault you created, then copy and record the DNS name.
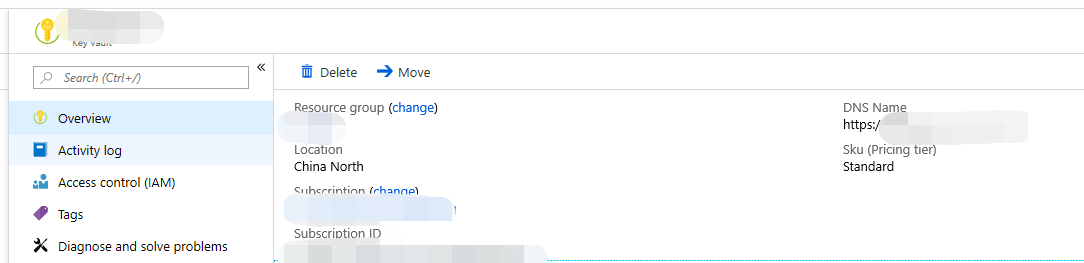
Important
Please be sure to save the DNS name for your key vault
Configure Azure Active Directory access policies for key vaults
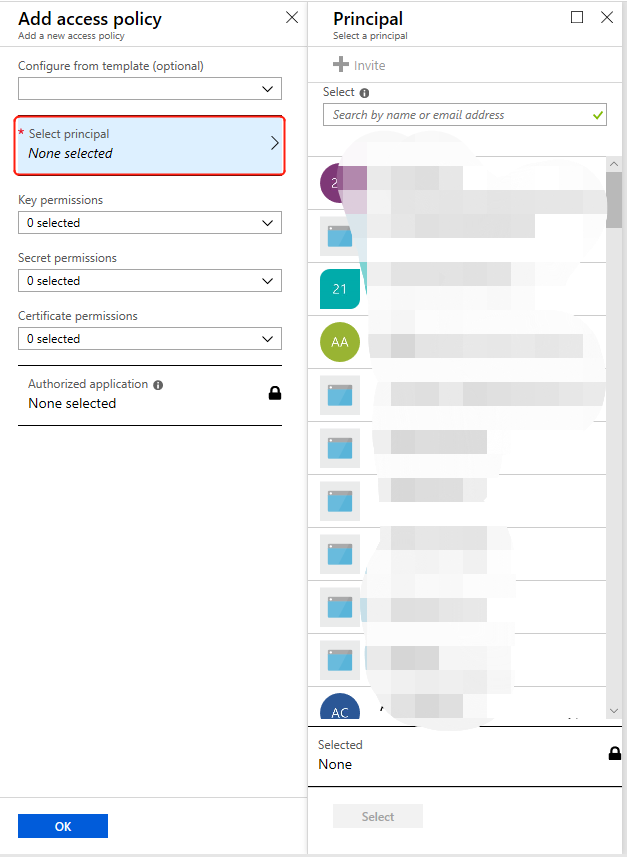
Click Access Policy, then "Add access policy".
Click "Select Principal", enter the name of your Azure Active Directory application in the selection input box (you can also select from the drop-down), select your Azure Active Directory application, then click "Select".
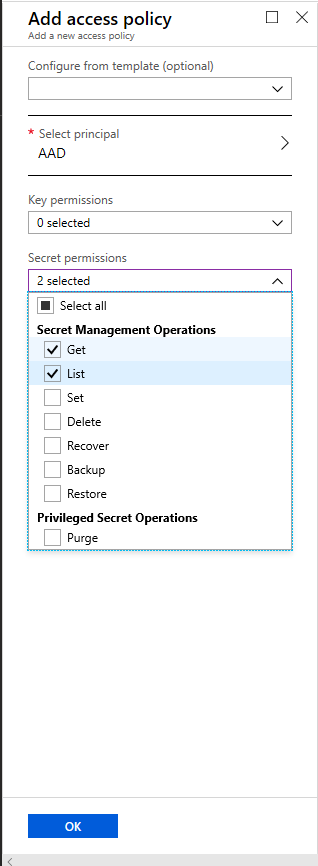
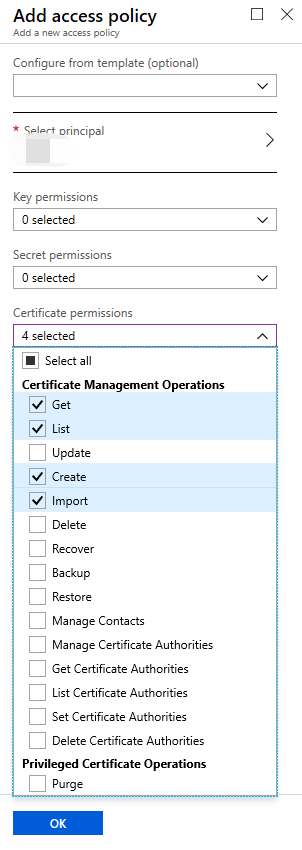
Select Get and List for Secret Permissions, select Get, List, Create and Import for Certificate Permissions, then click on OK. This is the minimum level of permissions required for the CDN to correctly acquire the certificate and complete the subsequent configuration.
Click on Save.

Pricing
Standard Edition service pricing applies to HTTPS acceleration with customer-supplied certificates. See the Azure website for specific billing methods.