Note
Access to this page requires authorization. You can try signing in or changing directories.
Access to this page requires authorization. You can try changing directories.
The Azure Content Delivery Network portal has been redesigned so that function modules are categorized, and a number of new management functions have been added. At present, clicking on the Management button from the Azure portal will redirect you to the new version of the Management Portal.
The functions of the new version of the Management Portal are shown below:
- Overview
- Domain name management
- Monitoring and Analysis
- Content Management
- Self-service Tools
- Security Management
Overview of the Azure Content Delivery Network management page
From the Overview page, you can view the basic details for your Content Delivery Network subscription account. You can view key data such as the total number of accelerated domain names, enabled domain names, total traffic for the current month, and peak bandwidth for the current day. You can also view the traffic trend graph and bandwidth trend graph for the current month.
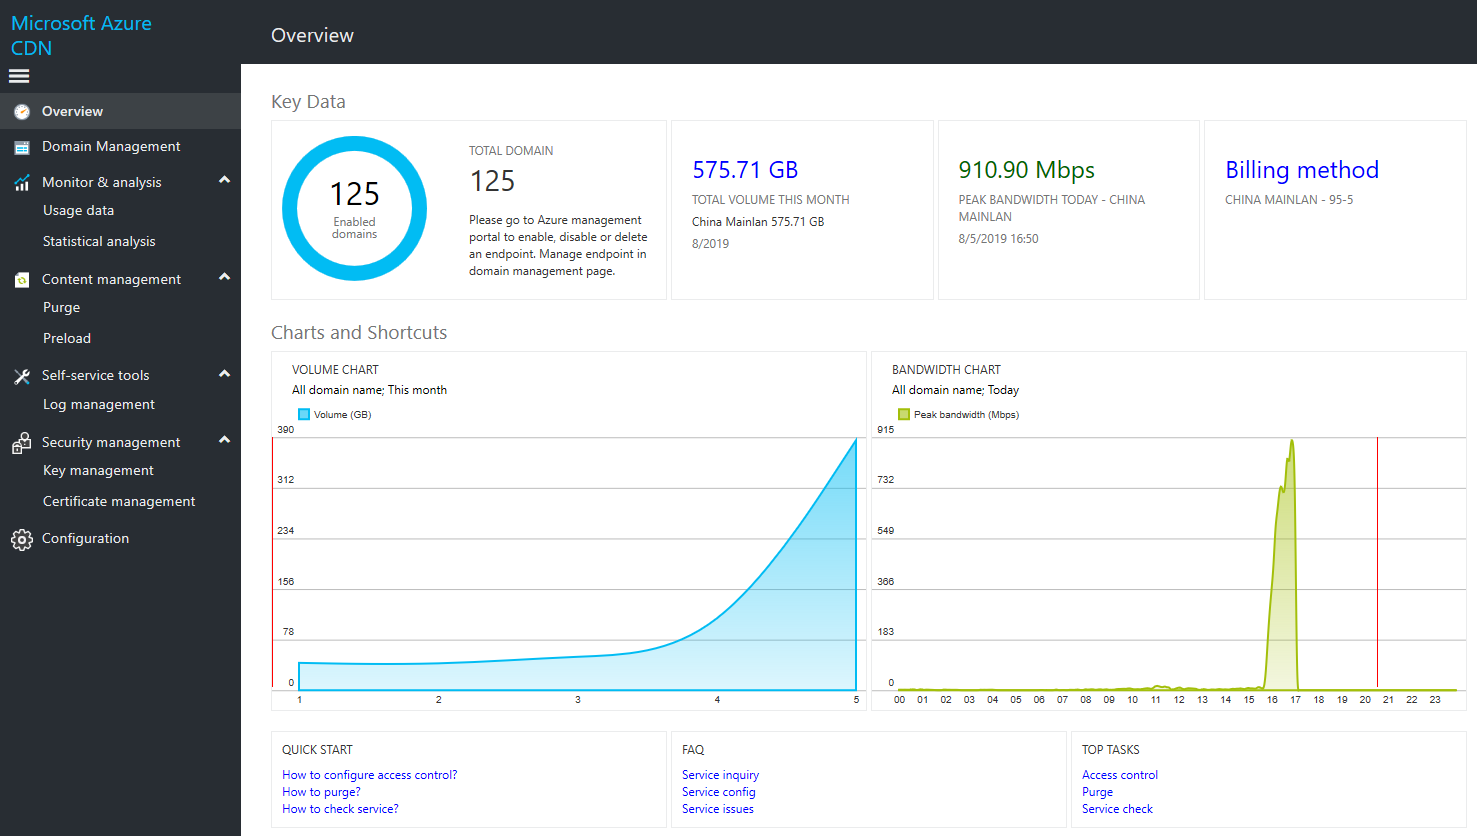
*Number of domain names:
Statistics on accelerated domain names that were already created under the current Azure subscriptions.
*Accelerated domain names that are already enabled:
Statistics on accelerated domain names that are currently enabled under the current Azure subscriptions.
*Total traffic for the current month:
Total traffic in megabytes (MB) that were used by all accelerated domain names under the current Azure subscriptions during the current month.
*Traffic for the current month:
Details of traffic for each day in the current month under the current Azure subscriptions. If you need more detailed traffic information, you can select Traffic Reports in the left navigation pane to go to the traffic statistics report page.
*Monthly bandwidth: Details of the peak bandwidth in kilobits per second (Kb/s) for each day in the current month. If you need more detailed bandwidth information, click Bandwidth Reports in the left navigation pane to go to the bandwidth statistics report page.
Domain name management
Select Domain Name Management in the left navigation pane to display a list view of all Content Delivery Network acceleration domain names that were created under the current Azure subscriptions. You can search for the domain name you want to manage from the search box. You can also select various subscriptions in the Azure subscriptions drop-down list to see details of Content Delivery Network acceleration domain names under the various subscriptions. You can also select the corresponding domain name line to perform operations such as Edit Configuration, Cache Rule Configuration, or Access Control Management for the selected domain names.
Accelerated domain name list view
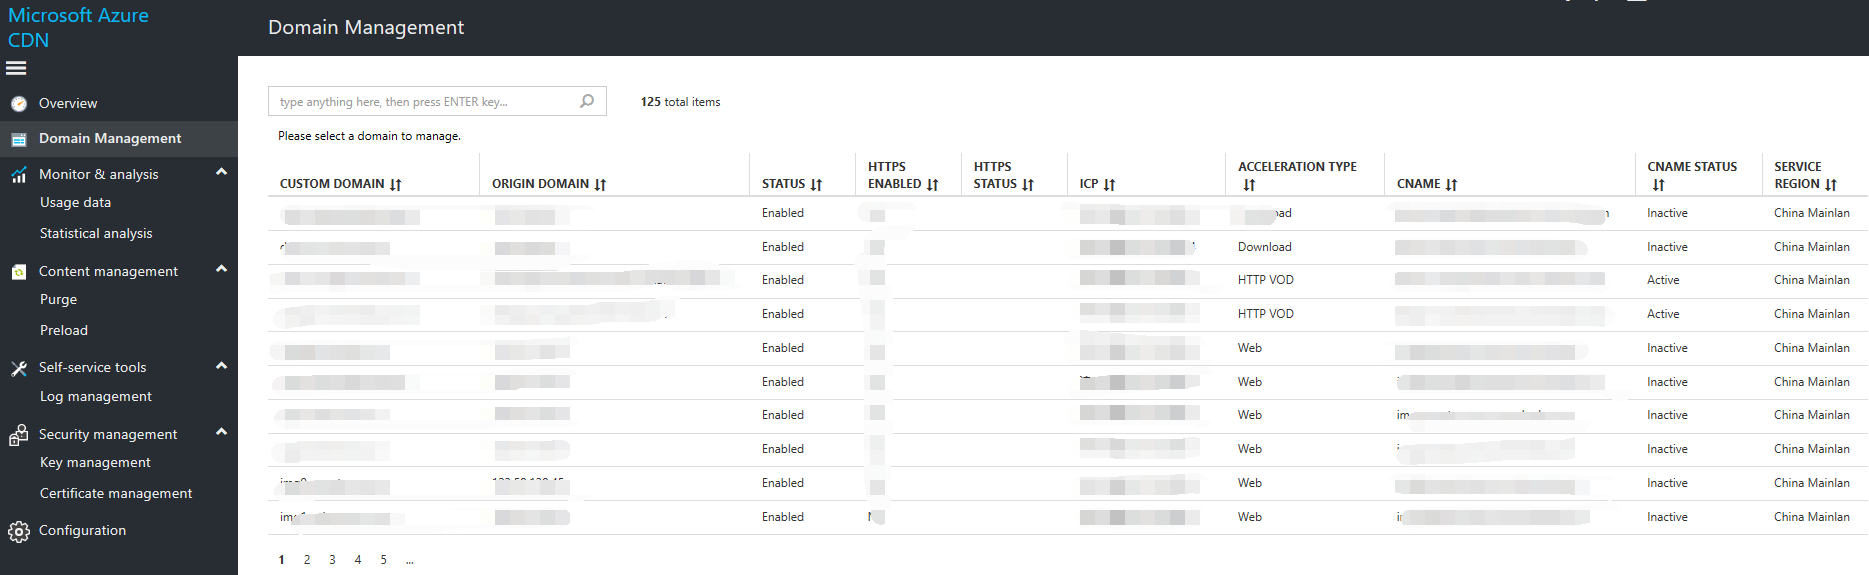
The domain name list view includes:
- Custom domain names, which are used to access Content Delivery Network-cached content. These domain names must be accompanied by the corresponding ICP record details.
- Source station addresses, which are the origin domain for content that is cached on the Content Delivery Network.
- Status, which may be either enabled or disabled (including ICP approval, requires CNAME configuration, disabled, and other non-enabled statuses).
- ICP record information corresponding to domain names.
- Acceleration type, which includes the acceleration types that are currently supported: website acceleration, download acceleration, HTTP VoD acceleration, "live-streaming media acceleration, "HTTPS acceleration, and image processing acceleration).
- The Azure CDN platform provides CNAMEs, all of which are appended with .mcchcdn.com. The domain name provider maps its custom domain names to these CNAMEs.
- CNAME status can be Active or Inactive.
Note
You need to configure the CNAME mapping details for your accelerated domain name after the Content Delivery Network service takes effect (within 60 minutes). You can then map it to the network domain name that is provided by Microsoft.
Note
Only domain names with an enabled status can use the network service normally.
1. Properties
When you select a domain name line, a view of the operations that you can perform to change the domain names appears at the right. From the Properties view, you can edit the source station domain name or host header.
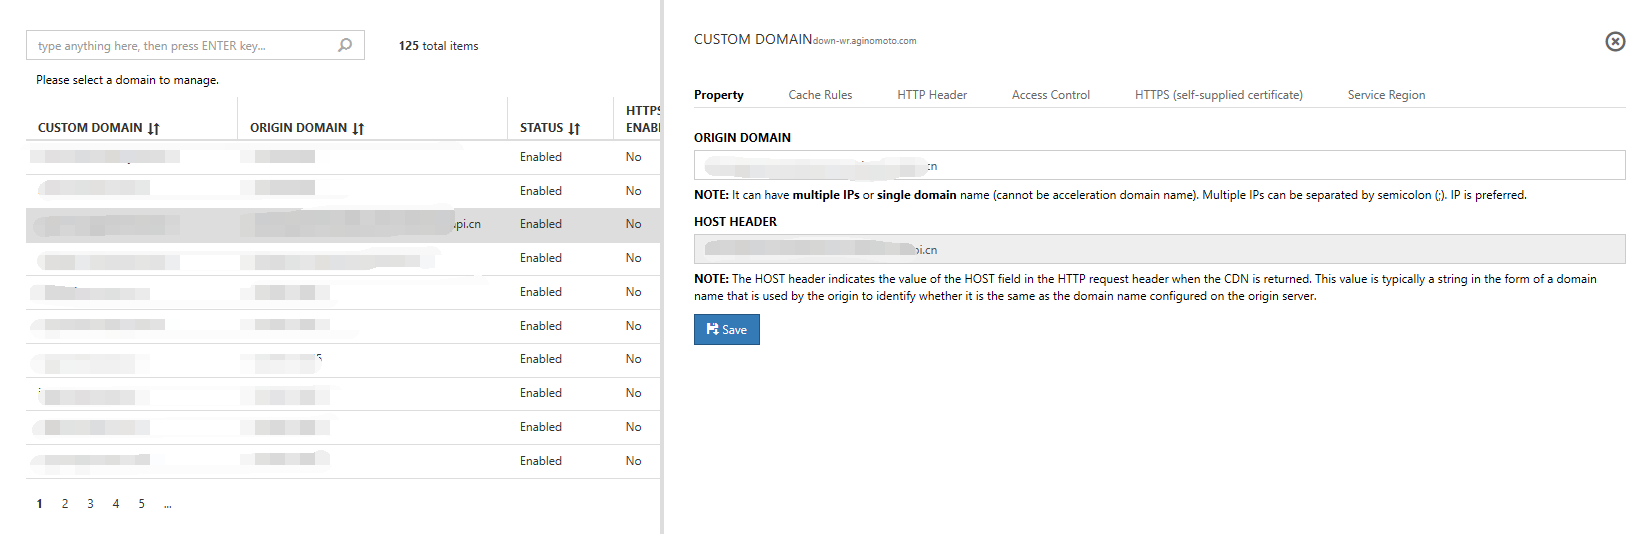
Note
The value of the host string in the HTTP request header if the host header indicates the return-to-source Content Delivery Network is generally a character string in the form of a domain name. The source station uses this domain name to identify whether it is the same as the domain name that was configured on the source station.
2. Caching rules
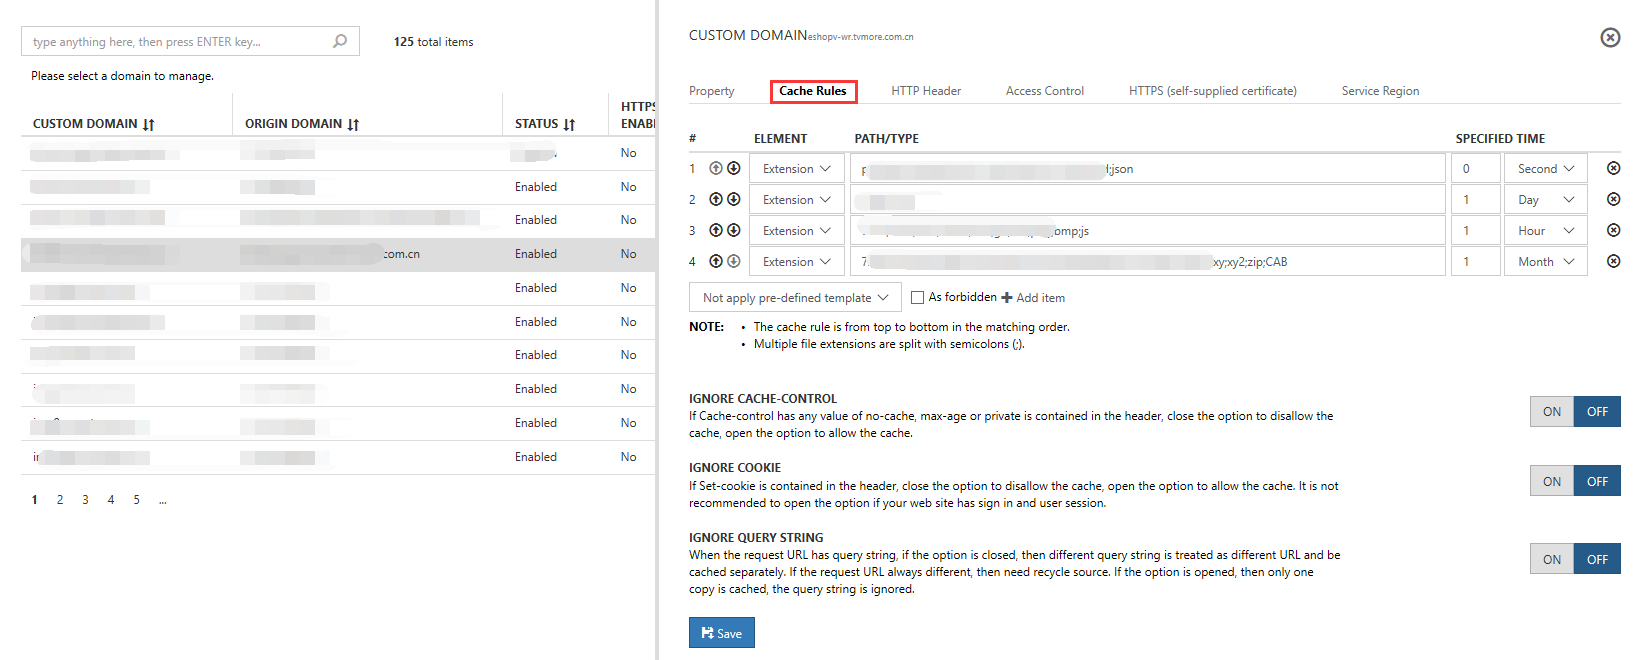
When you select a domain name line, a view of the operations that you can perform to change the domain names appears at the right. The system sets default rules based on the cache rules. You can adjust these settings to your own requirements. User rules are given priority in matching. If there are no hits for user rules, the system default cache rules are implemented item by item.
Note
- The cache rules are implemented from top to bottom
Cache rule configuration
You can select Cache rule configuration, and then set the required cache rules for domain names, including:
Directory-based configuration:
Directories must begin with a forward slash (/) (for example, /pic, /doc, or /htdoc/data). The back-end matches all files within the designated directory, including subdirectories.
File extension-based configuration:
The back-end matches common file extensions, such as .jpg, .png, .gif, .txt, .m4v, or .mp3. The back-end matches the specified file suffixes within all folders.
Full path-based configuration:
This configuration is used to specify a single file, and it must start with a forward slash (/) (for example, /sites/doc/example.doc).
Note
- If the path that you enter is a forward slash (/), it will match the home page.
- The character strings that you enter when you configure rules must not include any of the following special characters: {, }, (, ), [, ], ., ?, *, , ^, or $.
- Entering a time of "0" means that caching is prohibited.
*Cache configuration order:
The system matches each item consecutively on the basis of the order of configuration. The rule that is configured first is given the highest priority level. After a rule is matched, subsequent rules are no longer matched.
*Custom templates:
Use Apply a custom template to quickly create cache configuration rules. The previous diagram shows a rule that is created after you go to Apply a custom template and then select Common files. You can edit the automatically created rules as required.
*Prohibiting cache setup:
If you select the Set to caching prohibited option, the accelerated domain name is not cached.
3. HTTP response headers
The term HTTP message header refers to the protocol header components of request and response messages in the Hypertext Transfer Protocol (HTTP). HTTP message headers are used to accurately describe the resources, servers or client-end behavior that is being obtained, and to define the specific operational parameters of the HTTP transaction. HTTP message headers, including general headers, request headers, response headers and entity headers.
The HTTP response header configuration function enables you to add custom, user-configured headers to the return response header, for the purpose of implementing cross-domain access or user-defined response behaviors.
Note:
- HTTP response header configuration involves the configuration of domain names, so the configuration will affect the response behavior of all resources under the relevant domain name.
- HTTP response headers only affect response behavior on the client end (e.g. a browser), and have no effect on the CDN's caching behavior.
Explanation of HTTP response header configuration
The Azure CDN provides support for 11 types of response header configuration, as well as user-defined header configuration.
| Response headers | Explanation | Sample |
|---|---|---|
| Cache-Control | Specifies the caching mechanism that the response adheres to. | Cache-Control: public, max-age=31536000 |
| Content-Disposition | The file name that the active client (e.g. the browser) downloads and is set to download by default. | Content-Disposition: attachment; filename="cool.html" |
| Content-Language | Specifies the language of the response object. | Content-Language: en-US |
| Access-Control-Allow-Origin | Specifies the allowed cross-domain request origins. As stipulated by the HTTP protocol, Access-Control-Allow-Origin can only be set to * or a domain name (which must start with http:// or https://) | Access-Control-Allow-Origin: https://www.azure.cn Access-Control-Allow-Origin: * |
| Access-Control-Allow-Headers | Specifies the allowed cross-domain request fields. | Access-Control-Request-Headers: origin, x-requested-with |
| Access-Control-Allow-Methods | Specifies the permitted cross-domain request method. | Access-Control-Allow-Methods: POST, GET, OPTIONS, DELETE |
| Access-Control-Max-Age | Specifies the caching time for preflight request results for a specific resource specifying a cross-domain request. | Access-Control-Max-Age: 86400 |
| Access-Control-Expose-Headers | The user-defined header information to which access is allowed when specifying the cross-domain request. | Access-Control-Expose-Headers: Content-Length, Content-Type |
| Strict-Transport-Security | HSTS (HTTP Strict Transport Security), RFC6797, is intended to force the client (e.g. a browser) to use HTTPS to create server connections. | Strict-Transport-Security : max-age=31536000; includeSubDomains |
| Customize | Supports the addition of user-defined headers, and user-defined key-value settings. | X-CDN-From: Azure |
Unsupported response header configuration parameters:
"Date"
"Expires",
"Content-Type",
"Content-Encoding",
"Content-Length",
"Transfer-Encoding",
"If-Modified-Since",
"Last-Modified",
"Connection",
"Content-Range",
"ETag",
"Accept-Ranges",
"Age",
"Authentication-Info",
"Proxy-Authenticate",
"Retry-After",
"Set-Cookie",
"Vary",
"WWW-Authenticate",
"Content-Location",
"Content-MD5",
"Content-Range",
"Meter",
"Allow",
Response header configuration process
Go to the CDN control panel, click on Domain Name Management and select Custom Domain Name, then press "Add" from the HTTP response header options.
![][42]
Select the corresponding response header from the drop-down list of options under parameters. You can also customize this and enter "values".
![][43]
Press Save. If the operation is successful, the page will display "Operation at ** is being performed".
![][44]
4. Access control
You can use access-control management to set up and configure referrer blacklists and whitelists, and thereby implement an anti-theft chain.
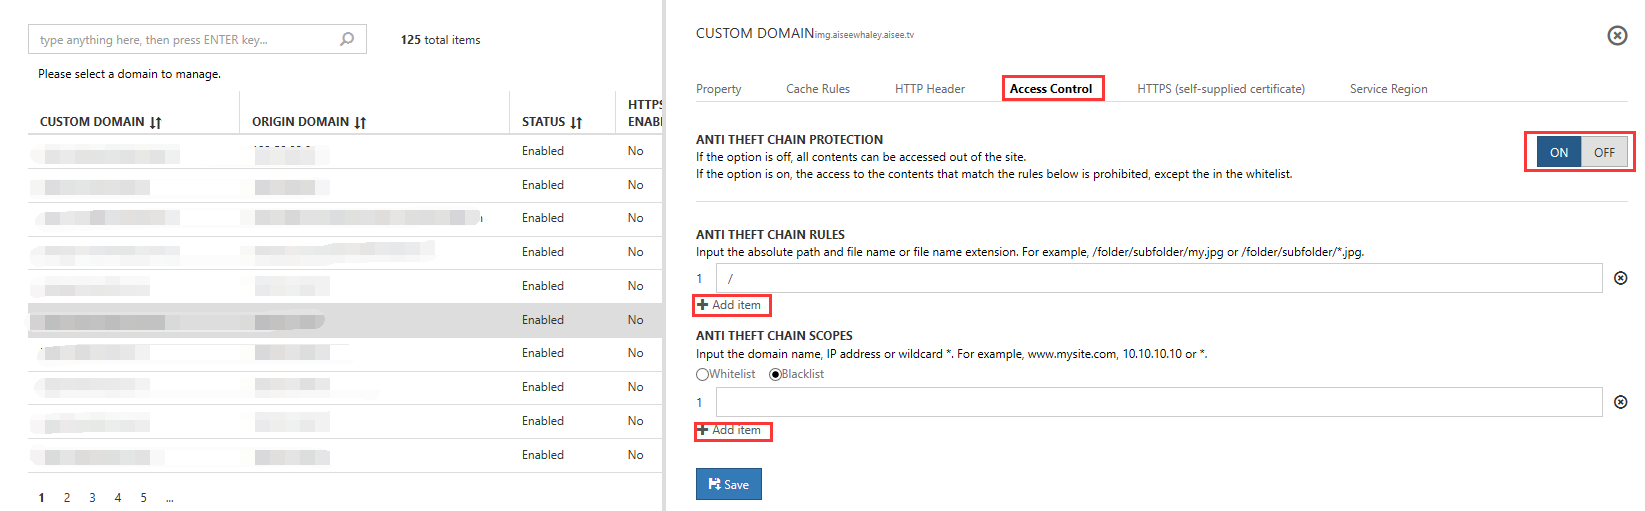
After you enable the anti-theft chain, you can edit the external link rules. Each rule is made up of a path and a file name (for example, /*.png means all png files in the root directory).
Each rule is made up of a path and a file name (for example, /*.png means all png files in the root directory).
- If you set up a blacklist, access is denied if the referrer is in the blacklist, but is otherwise permitted.
- If you set up a whitelist, access is permitted only if the referrer is one of the domain names in the whitelist.
When you select Submit and wait for the operation to finish, the interface shows whether the operation was successful. If you select Submit and the close button, the dialog box closes immediately. The next time you open the dialog box, it displays the status of the last operation.
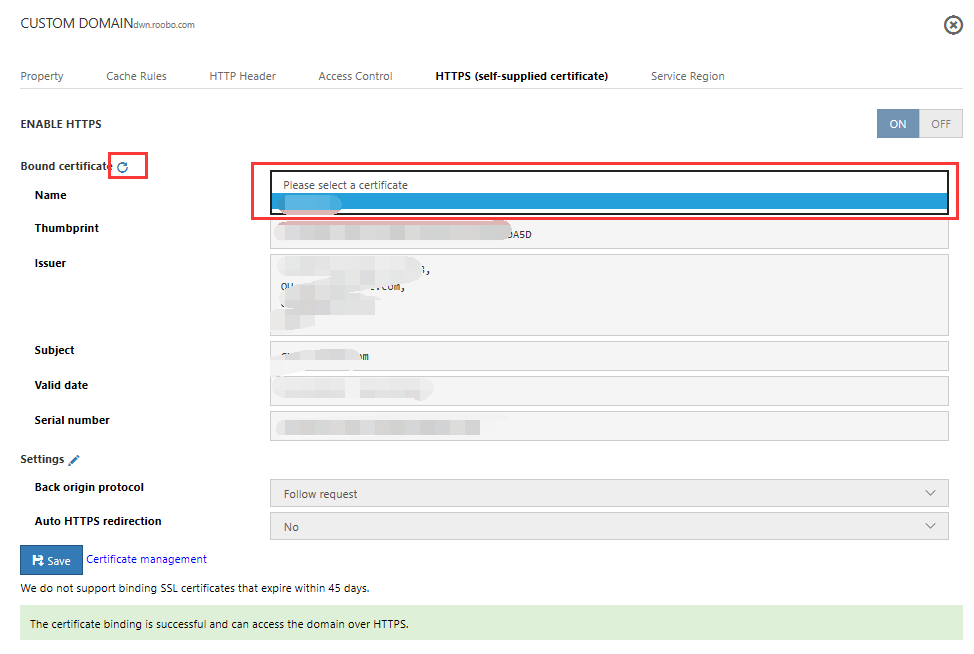
5. Enable HTTPS (customer-supplied certificates)
Select the domain name that you want to enable HTTPS services for, select HTTPS (customer-supplied certificates) from the interface on the right. Then select "Enable" to bind a certificate. Select a downloaded certificate from the drop-down list box beneath the uploaded certificates. Select Confirm. If there are no compliant certificates, click on "Certificate Management" in Security Management, then upload the certificate from Certificate Management. 
Certificate deployment: After you bind a domain name, the system will notify you that "The certificate is currently being deployed and will generally take effect within 2-4 hours. Please contact us if deployment is not completed within 24 hours. "
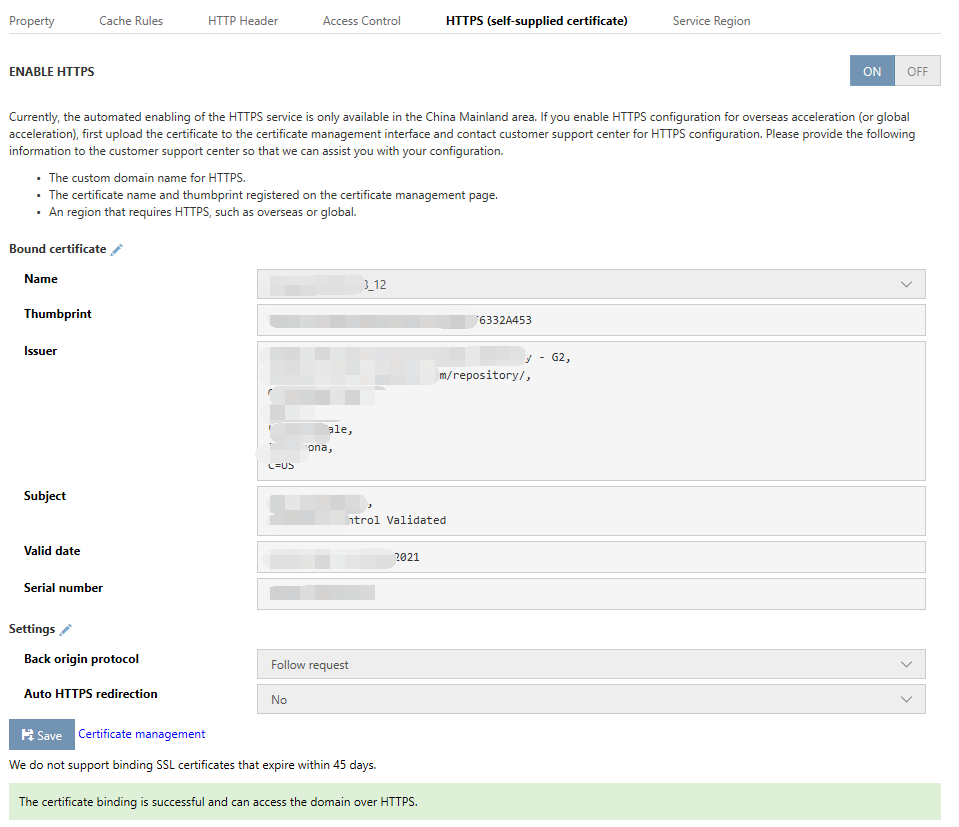
After the domain name has been successfully bound, the system will notify you that "The certificate has been successfully bound. You can access the accelerated domain name via HTTPS," and you will be able to view details of the certificate. The "HTTPS status (customer-supplied certificate)" for the domain name will also change to "Active."
Select the domain name to view details of the certificate.
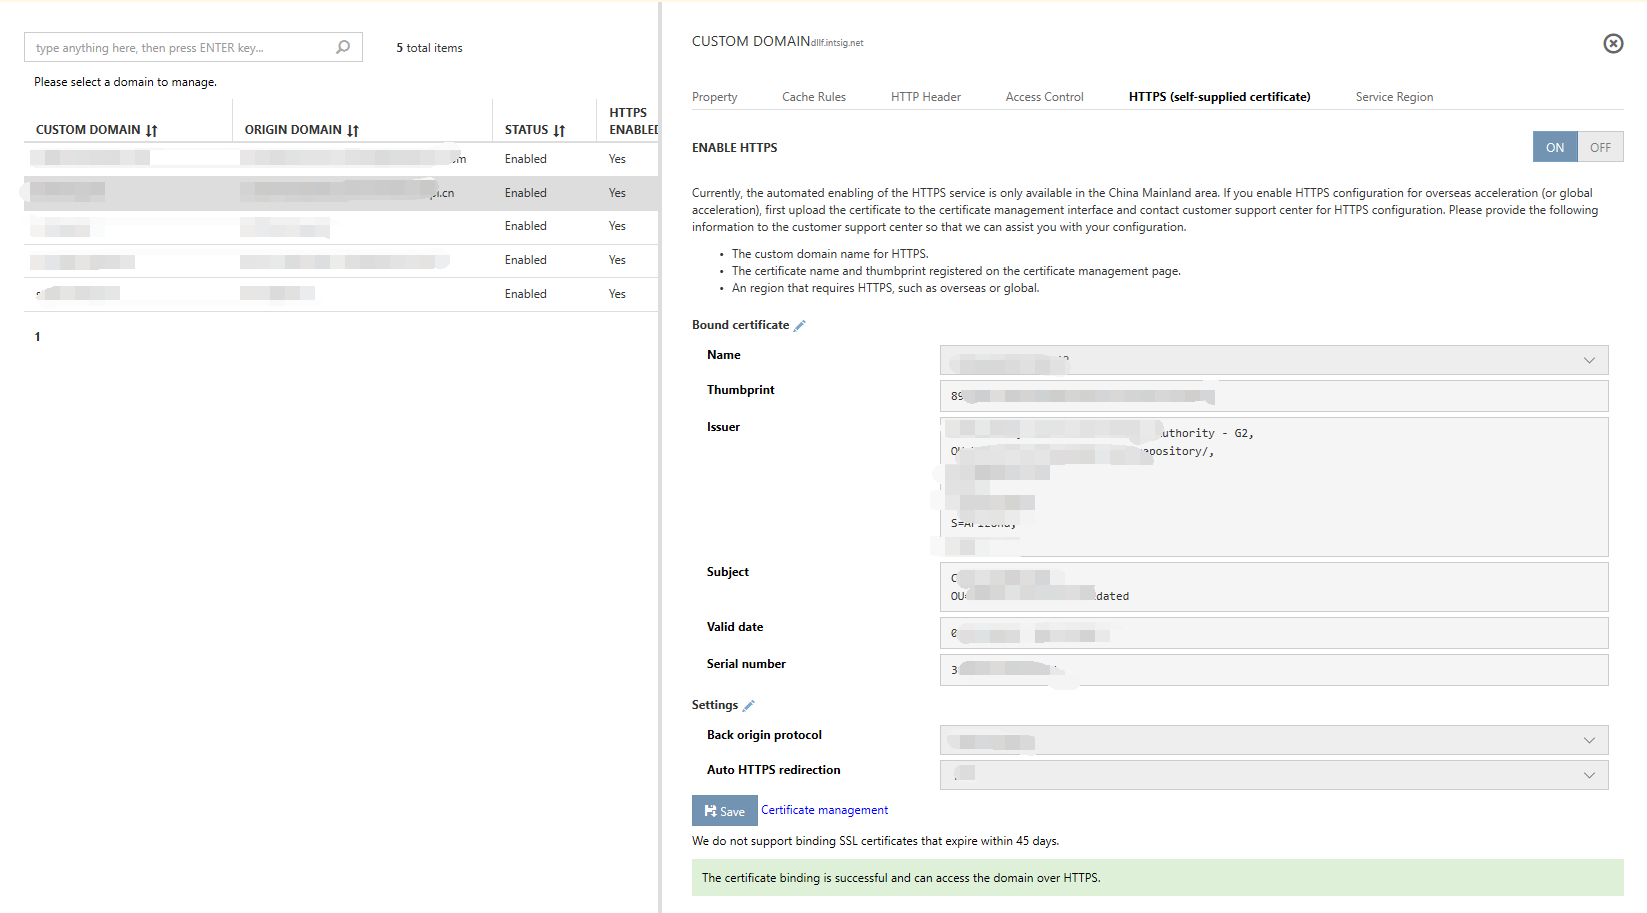
The "HTTPS status (customer-supplied certificate)" for the domain name will change to "Active."

Replacing a certificate: If you have already enabled the HTTPS customer-supplied certificate service, you can replace the certificate for the corresponding domain name in Domain Name Management.
Select the domain name that you want to replace the certificate for, go to HTTPS (customer-supplied certificate), and replace the certificate:
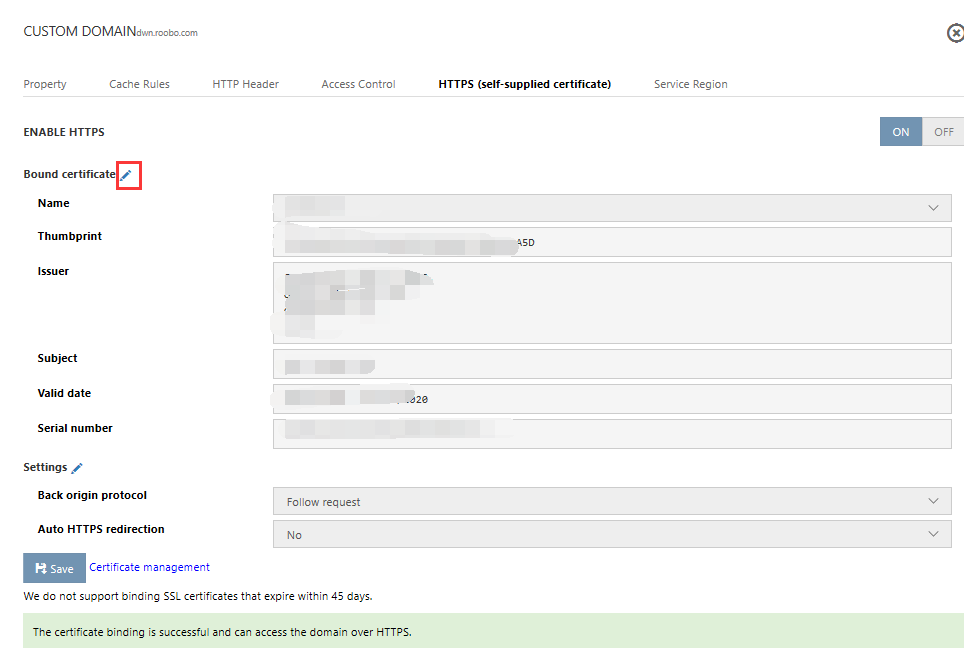
Select the certificate that you want to replace and select Save.
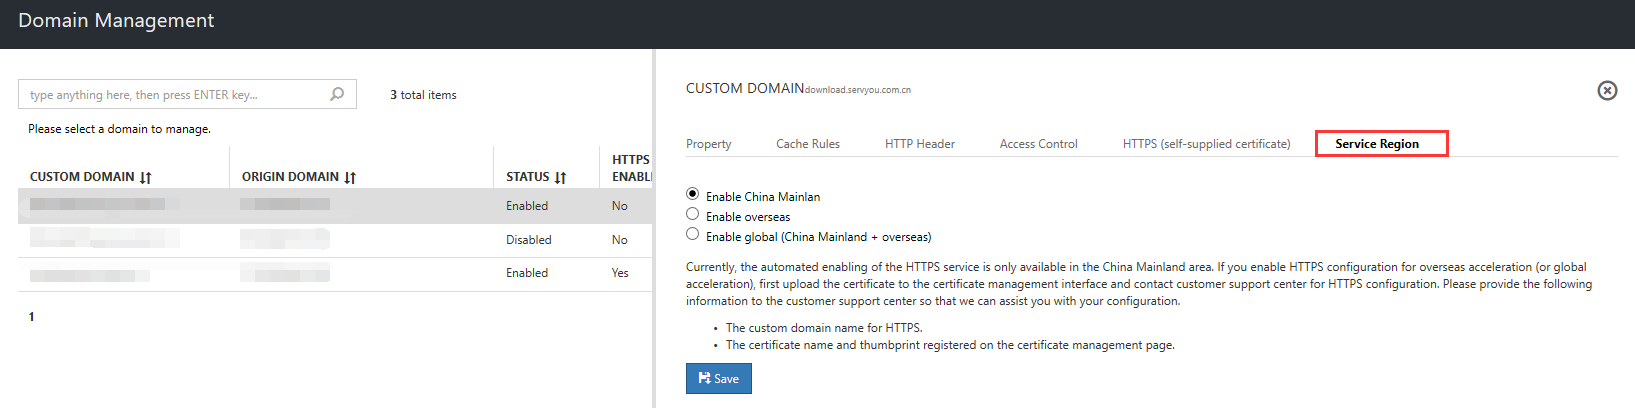
6. Accelerated Regions Enable overseas acceleration
In Domain Name Management click the domain names that require overseas acceleration, select Accelerated Regions, and enable overseas acceleration or global acceleration
Created CDN domain names have domestic acceleration enabled by default. To enable overseas acceleration or global acceleration, use the CDN Management Portal.
If you only need to enable overseas acceleration, please set the CNAME to Azure CDN after enabling overseas acceleration to avoid incurring domestic acceleration costs. (Global acceleration includes acceleration for both Mainland China and overseas)
Note
If you need to enable HTTPS acceleration for overseas acceleration or global acceleration, please upload a certificate in the certificate management interface first and contact 21Vianet to configure the HTTPS service. Please take the following actions so that we can help you with the configuration process.
- Make sure the CDN domain name of the HTTPS is enabled.
- The certificate name and fingerprint that you registered on the Certificate Management page.
Monitoring and analysis
Traffic bandwidth
Select the custom accelerated domain name (individual domain names or all of them) and time range that you want to view Then click Refresh. The interface displays traffic and bandwidth statistics reports that meet the conditions you specified. For data format details and implications, refer to the explanations on the actual interface page.
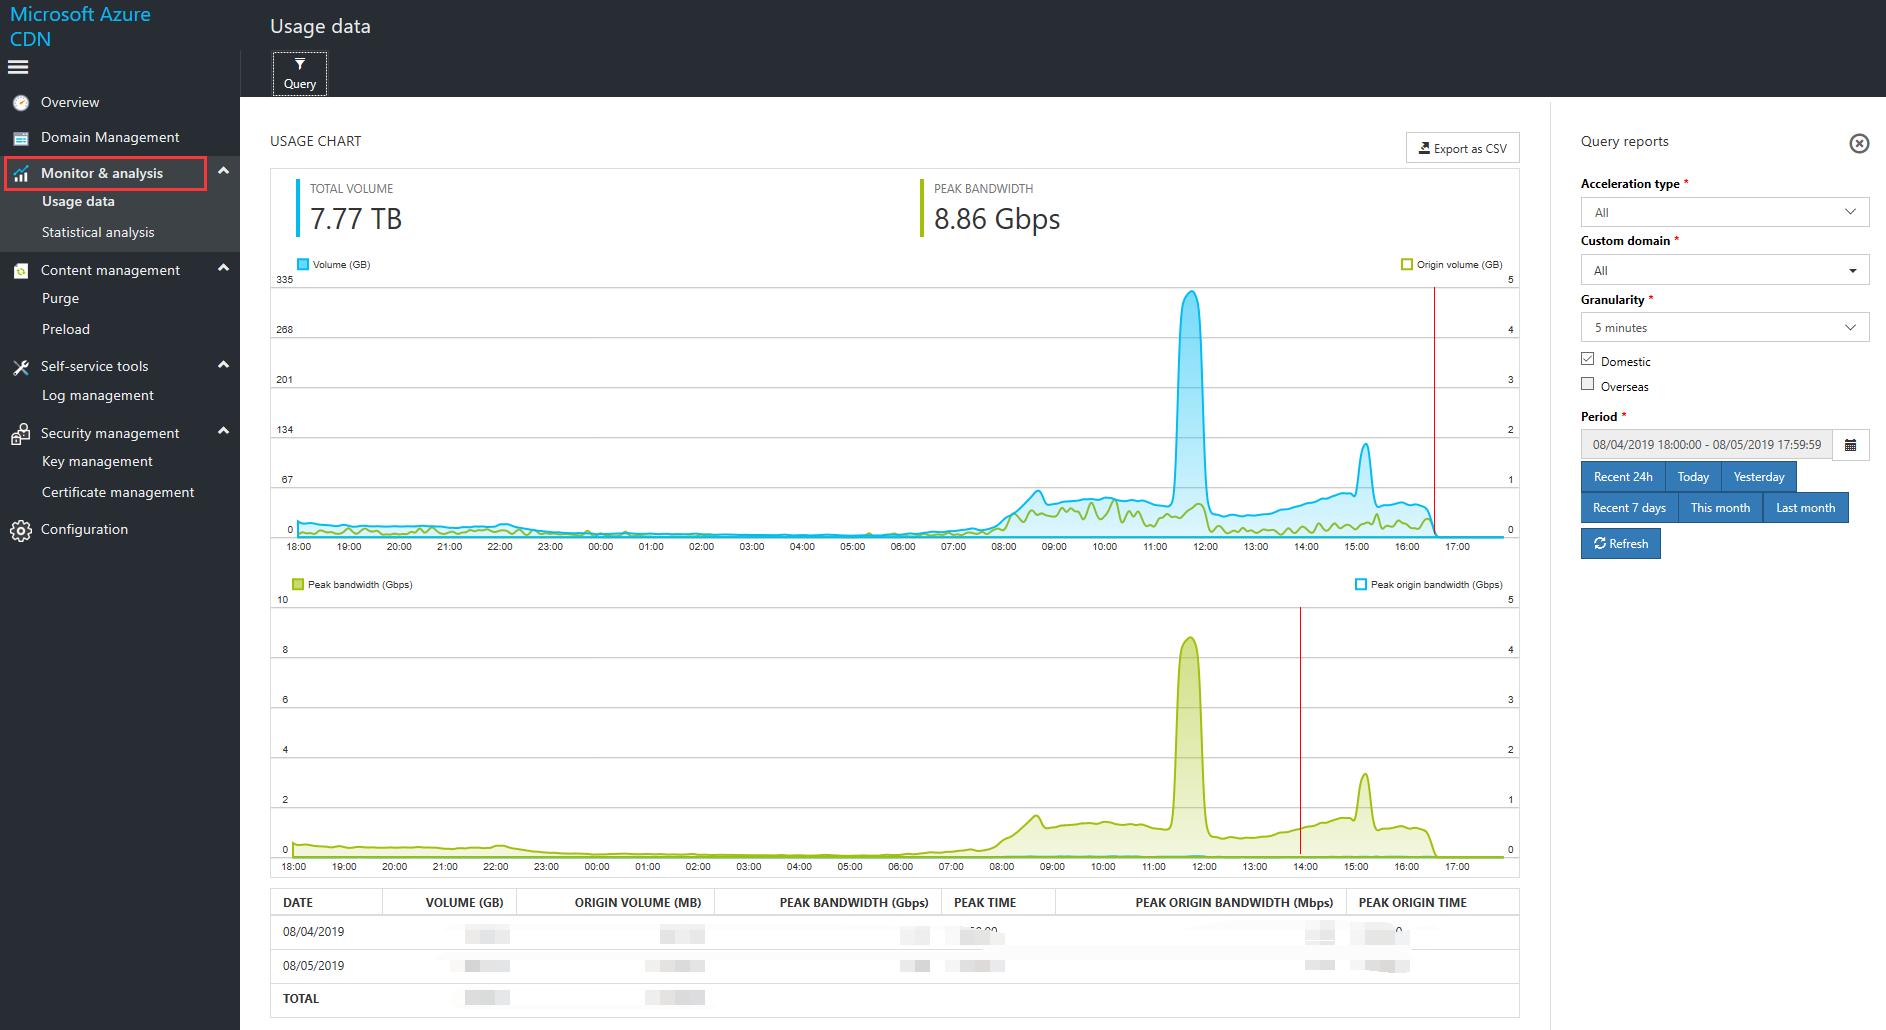
Traffic statistics reports have the following functions:
- If you have multiple Azure subscriptions, you can check traffic statistics for individual subscriptions, as well as return-to-source traffic statistics.
- If you have Azure subscriptions with multiple accelerated domain names, you can view individual accelerated domain name traffic (and return-to-source traffic) statistics results and summaries of all accelerated domain name traffic (and return-to-source traffic).
- The highest level of precision for queries is accurate to the minute.
- Traffic statistics provide multiple time-range types for queries. You can query traffic statistics for the last 24 hours, the last seven days, and the previous month. You can also check traffic and return-to-source traffic for a specific time period, which cannot exceed 60 days.
Bandwidth statistics reports have the following functions:
- If you have multiple Azure subscriptions, you can check bandwidth statistics for individual subscriptions, as well as return-to-source bandwidth statistics.
- If you have Azure subscriptions with multiple accelerated domain names, you can view individual accelerated domain name bandwidth (and return-to-source traffic) statistics results and summaries of all accelerated domain name bandwidth (and return-to-source traffic) information.
- The highest level of precision for queries is accurate to the minute.
- Bandwidth statistics display the time at which peak bandwidth levels occur.
- Bandwidth statistics provide flexible time range options for queries. You can query bandwidth statistics for the last 24 hours and the previous month. You can also check bandwidth statistics for a specific time period, which cannot exceed 60 days.
Statistical Analysis
Statistical analysis provides access statistics, status code statistics, hit rate statistics, and charts for regional distribution, ISP distribution, peak bandwidth, and access rates, for users who have enabled the log download function.
Statistical data generally has a lag of 8-12 hours, so you will start to see statistical analysis data 8-12 hours after enabling the log download function.
In View Statistics, select "Acceleration Type", "Custom Domain Name", and the "Time" region for which you want to view log analysis results. The default is the last 24 hours, but due to the 8-hour lag, what is shown for the last 24 hours will be the data from 24 hours ago to 12 hours ago.
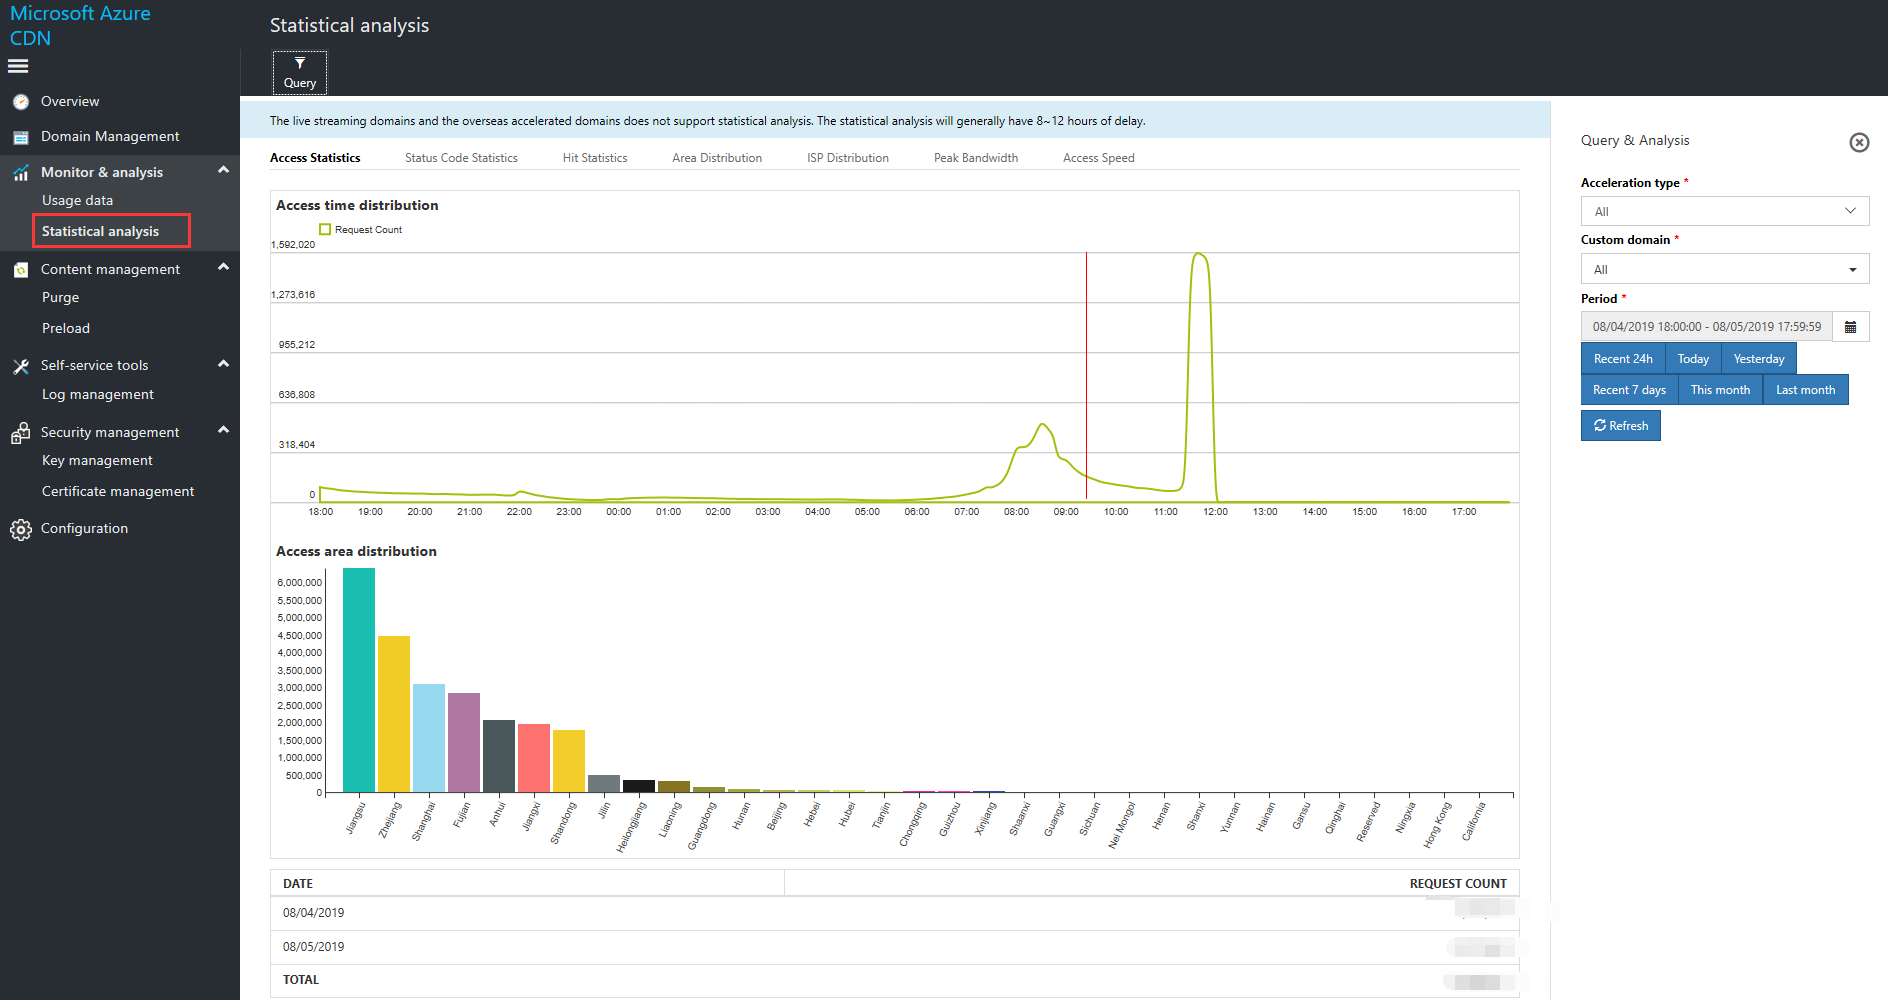
Statistical analysis provides the following functions:
Access statistics: View the number of requests and the regional distribution for a particular domain name within a specific time period.
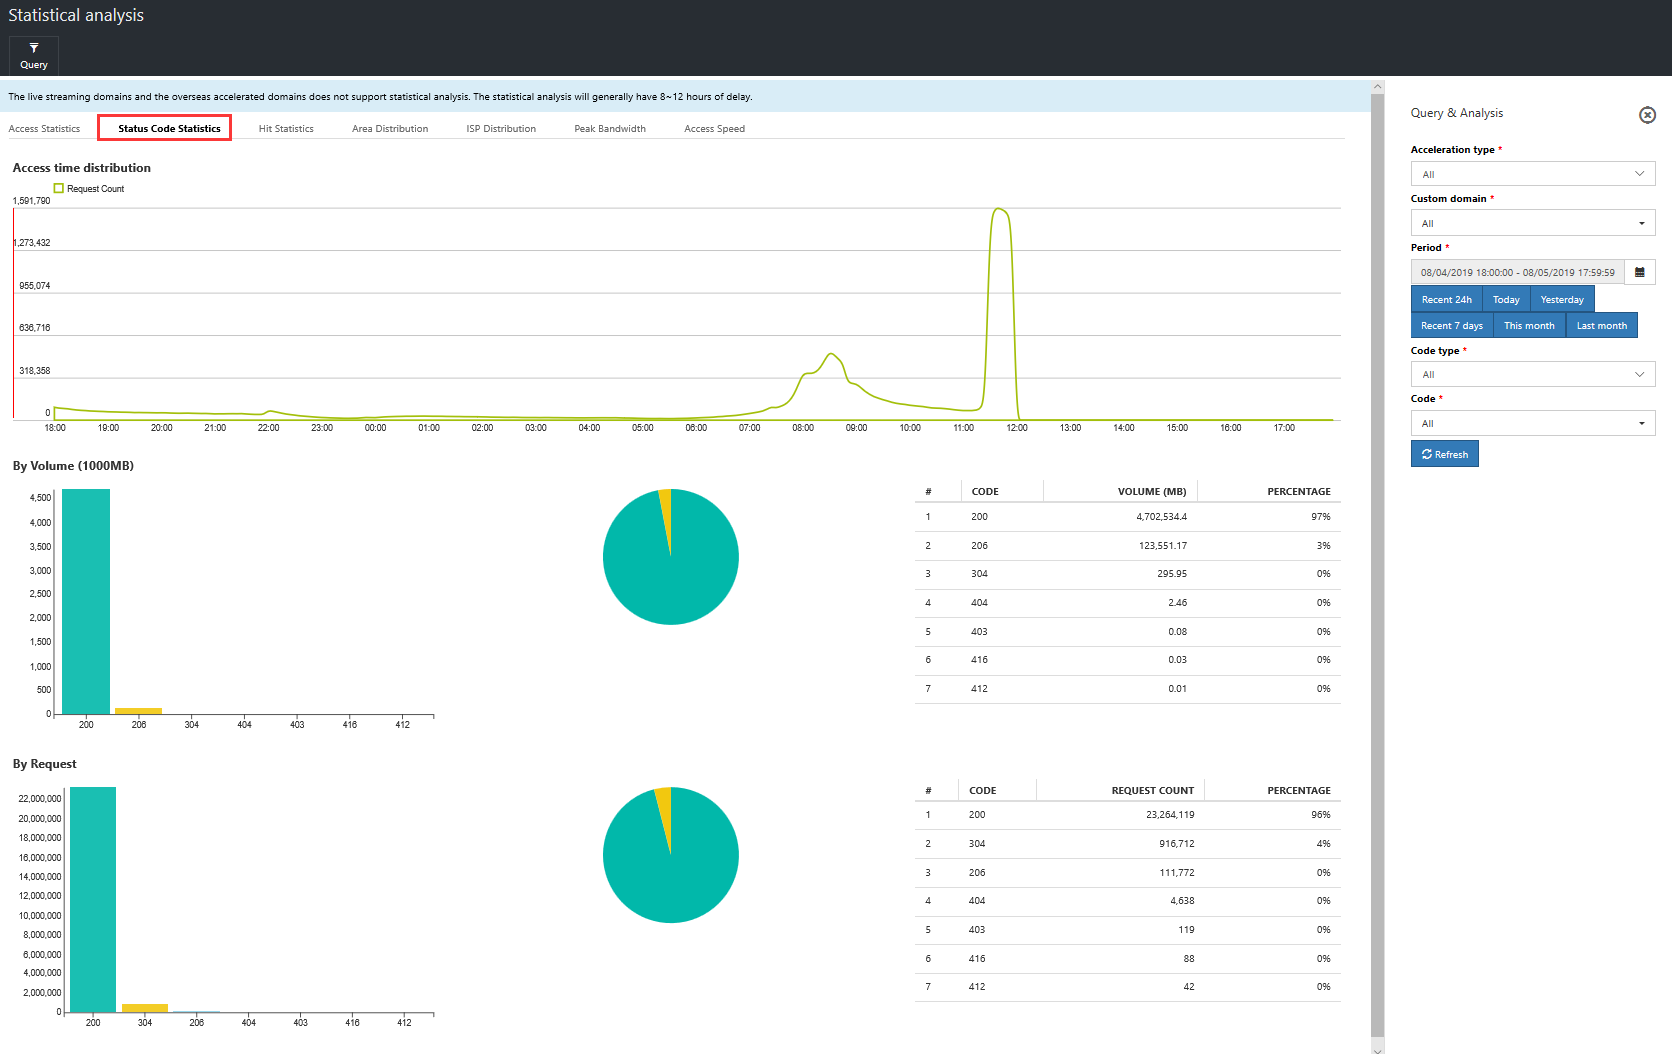
Status code statistics: View status code analysis by request and traffic for a particular domain name within a specific time period, for example the ratios of 2XX, 3XX, 4XX, and 5XX.
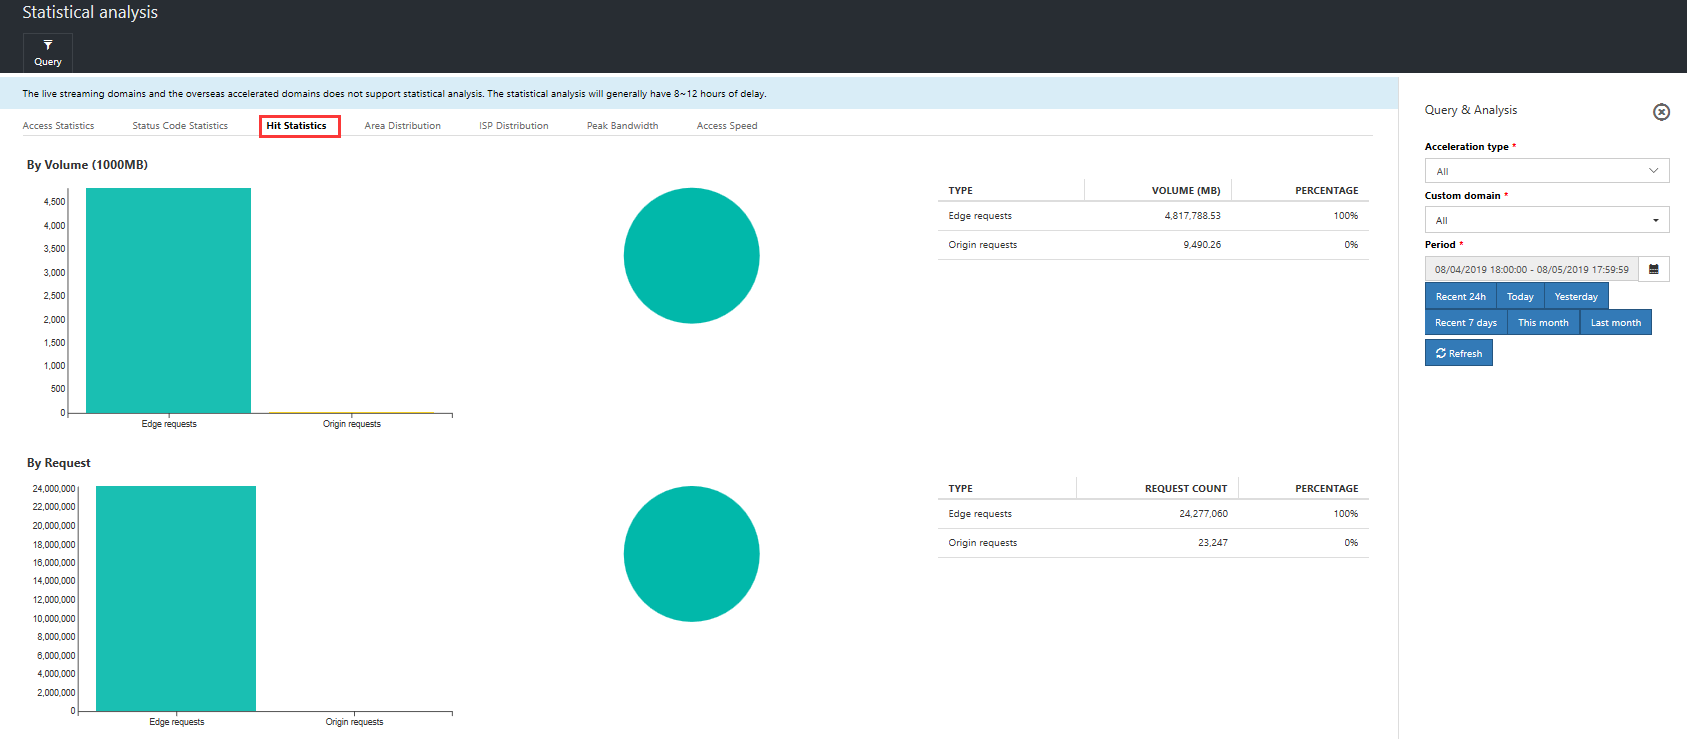
Hit rate data: View the ratio of hit rates and returns to source by requests and traffic for a particular domain name within a specific time period.
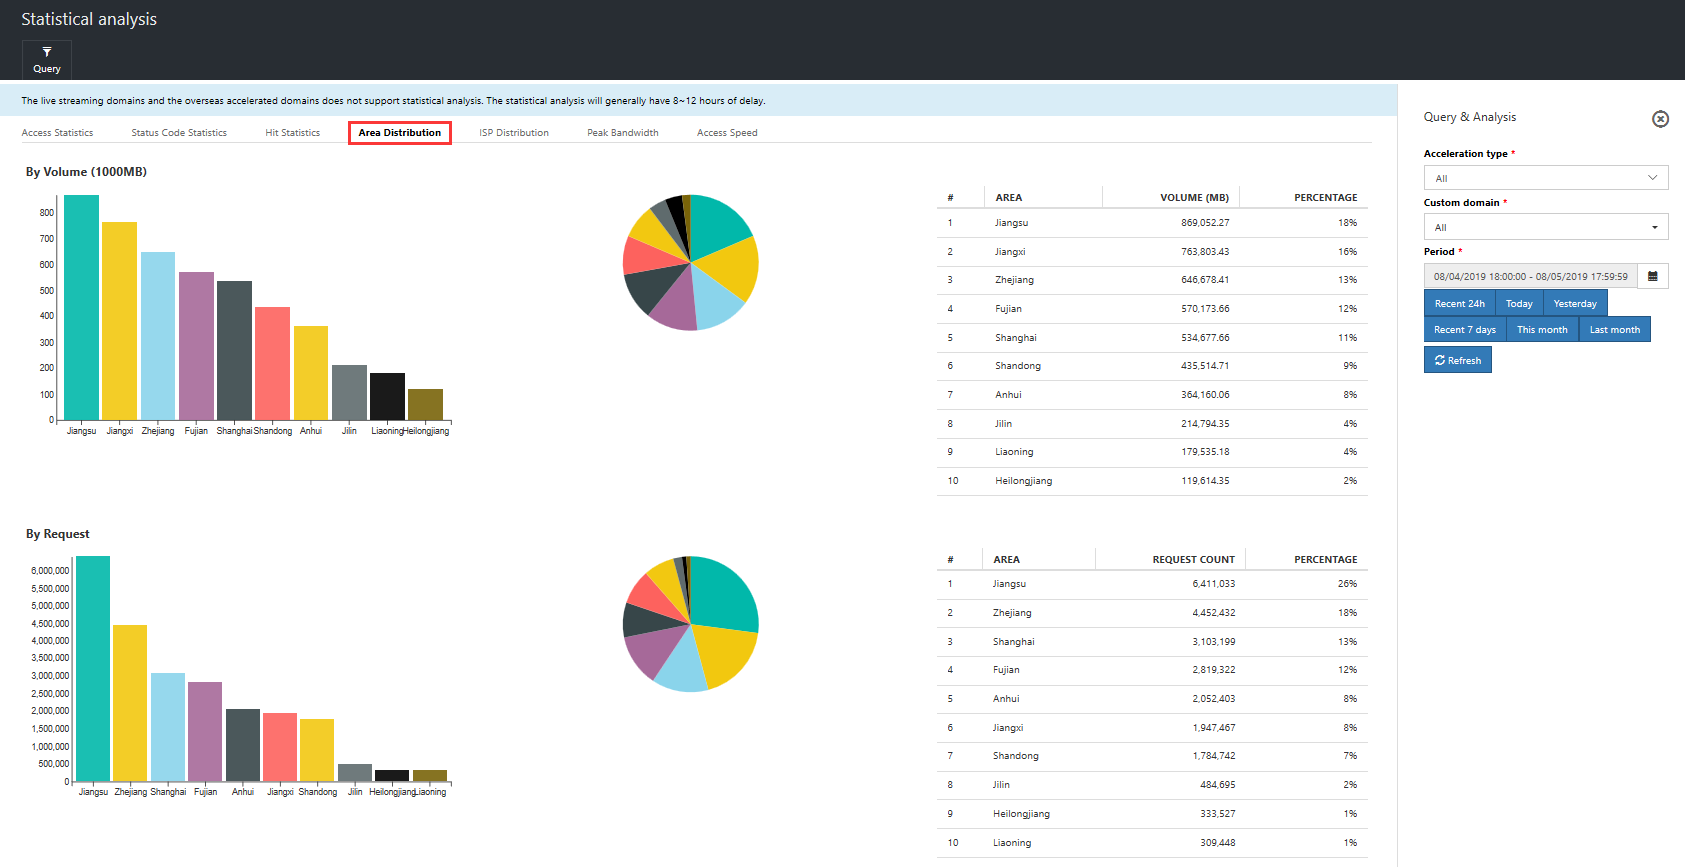
Regional distribution: View the top 10 regions by request and traffic, as well as their share of the totals, for a particular domain name within a specific time period.
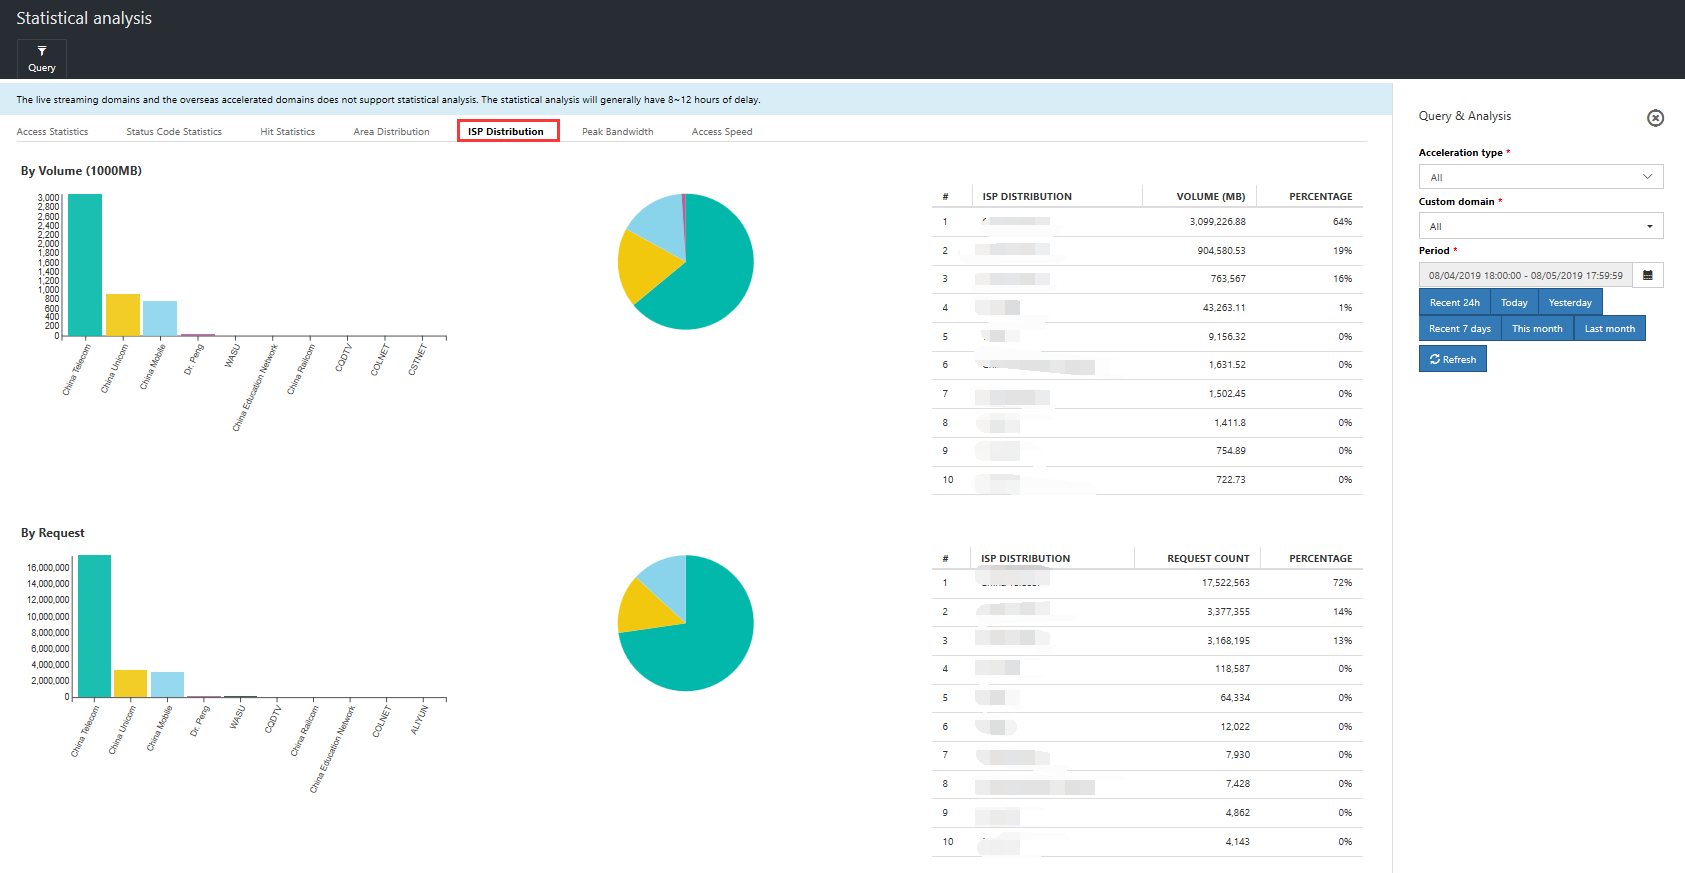
Operator distribution: View the top 10 operators by request and traffic, as well as their share of the totals, for a particular domain name within a specific time period.
Peak bandwidth: view the peak bandwidth for a particular domain name during a particular time period.
![][45]
Access rates:
- By time - view the access rate for a particular domain name during a particular time period.
- By region - view access rates for different regions.
- By ISP - view access rates for different ISPs.
![][46]
![][47]
Content management
Cache refresh
Select Cache Refresh in the lower-left navigation pane to perform a manual refresh of the specified files or directories.
Cache-refresh list view
In the Query Previous Data view at the right of the cache-refresh list view, select the domain name, time range, and status that you want to check, and then click Refresh. The interface displays cache-refresh records that match the conditions you entered. 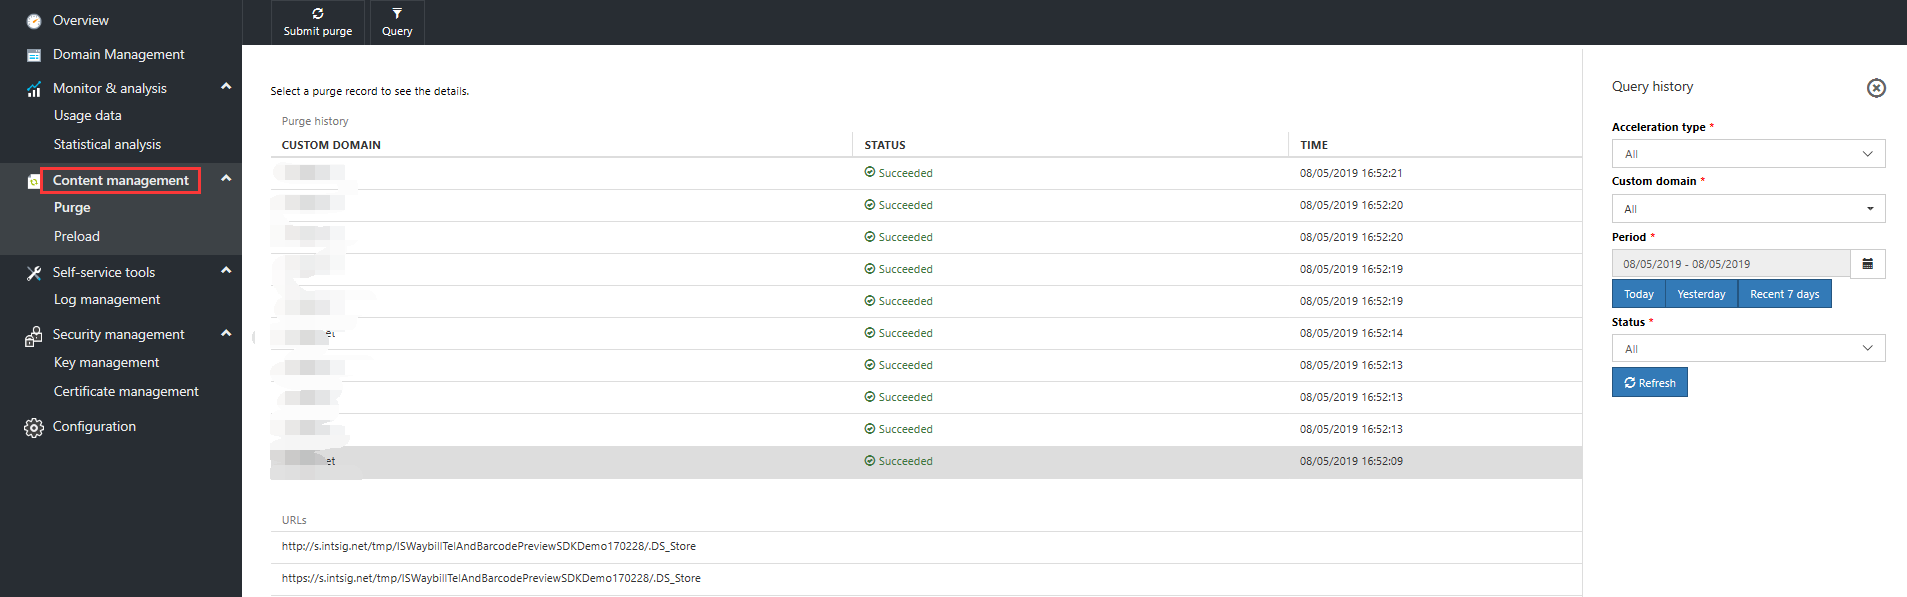
The cache-refresh list view includes:
- Custom domain names, the URLs that you use to access Content Delivery Network cache content
- Status (common statuses: successful, failed, or refreshing)
- Submission time
If you successfully submitted the cache-refresh rules, the status bar shows the word Successful. If you did not successfully submit them, check to ensure that the cache-refresh rules were correct. If there are any problems, re-create and re-submit the cache-refresh rules.
Submit cache refresh
Select Submit cache refresh button to configure cache-refresh rules for individual files or for all files within a directory.
Submit file refresh
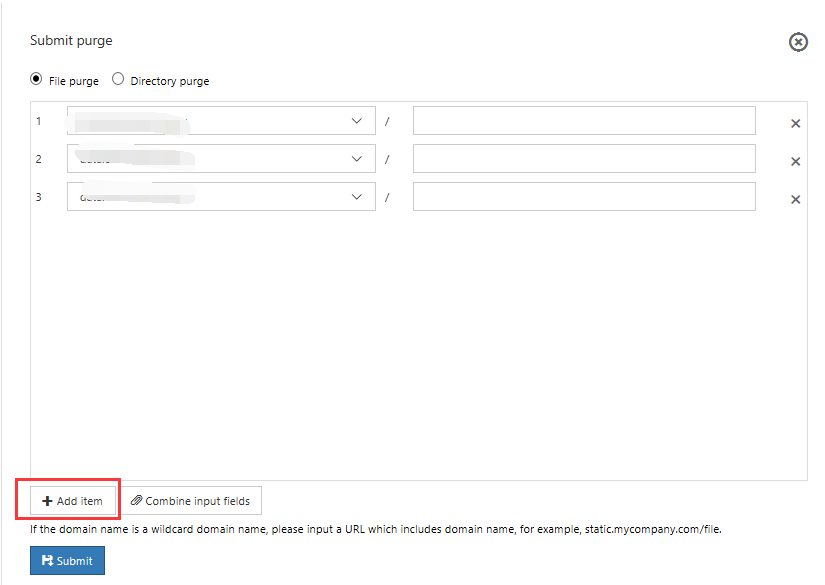
This task includes the following steps:
- Select File refresh.
- Select Add.
- Select the domain name that you want to configure from the list of domain names. Then enter the corresponding file path.
- Select Add to continue adding new rules, or select x to delete the corresponding file.
- Select "Submit".
The newly created file-cache rules are displayed in the cache-refresh list view.
Note
Until the accelerated domain name has passed the ICP verification process, it is not possible to perform a file refresh operation, and the accelerated domain name drop-down list appears as empty. Wait until it has passed back-end verification.
Submit directory refresh
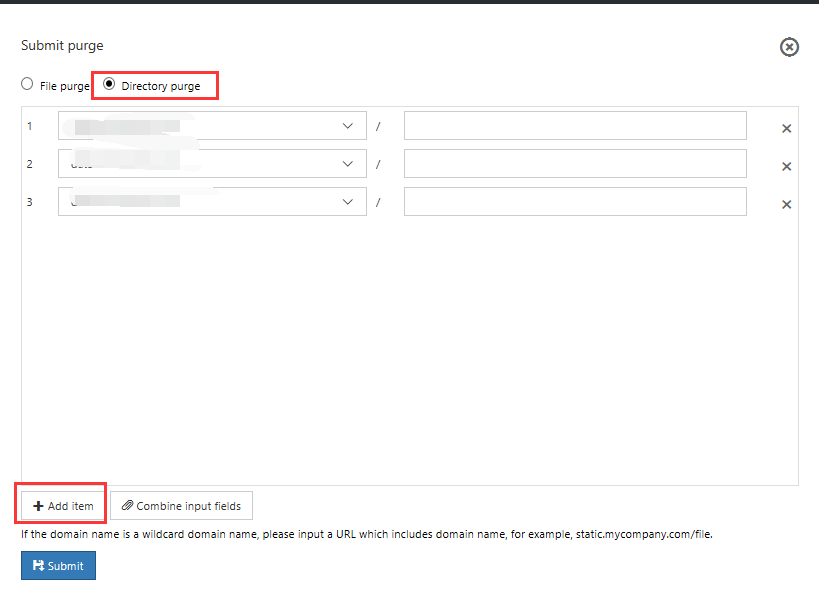
This task includes the following steps:
- Select Directory refresh.
- Select Add.
- Select the domain name that you want to configure from the list of domain names. Then enter the corresponding file path.
- Select "Add" to continue adding new rules, or select "x" to delete the corresponding directory path.
- Select "Submit".
The newly created directory cache rules then appear in the Cache refresh list view.
Preloading
Preloading means caching the content of a designated URL from the source station to the network nodes. It eliminates the waiting time when you access the resource for the first time. Preloading is generally used in scenarios that involve the delivery of large files, where it can effectively improve your access experience.
Preload list view
In the "Query Previous Data" view on the right side of the Preload view, select the domain name, time range, and status that you want to check. Select Refresh. The interface displays preload records that match the conditions you entered.
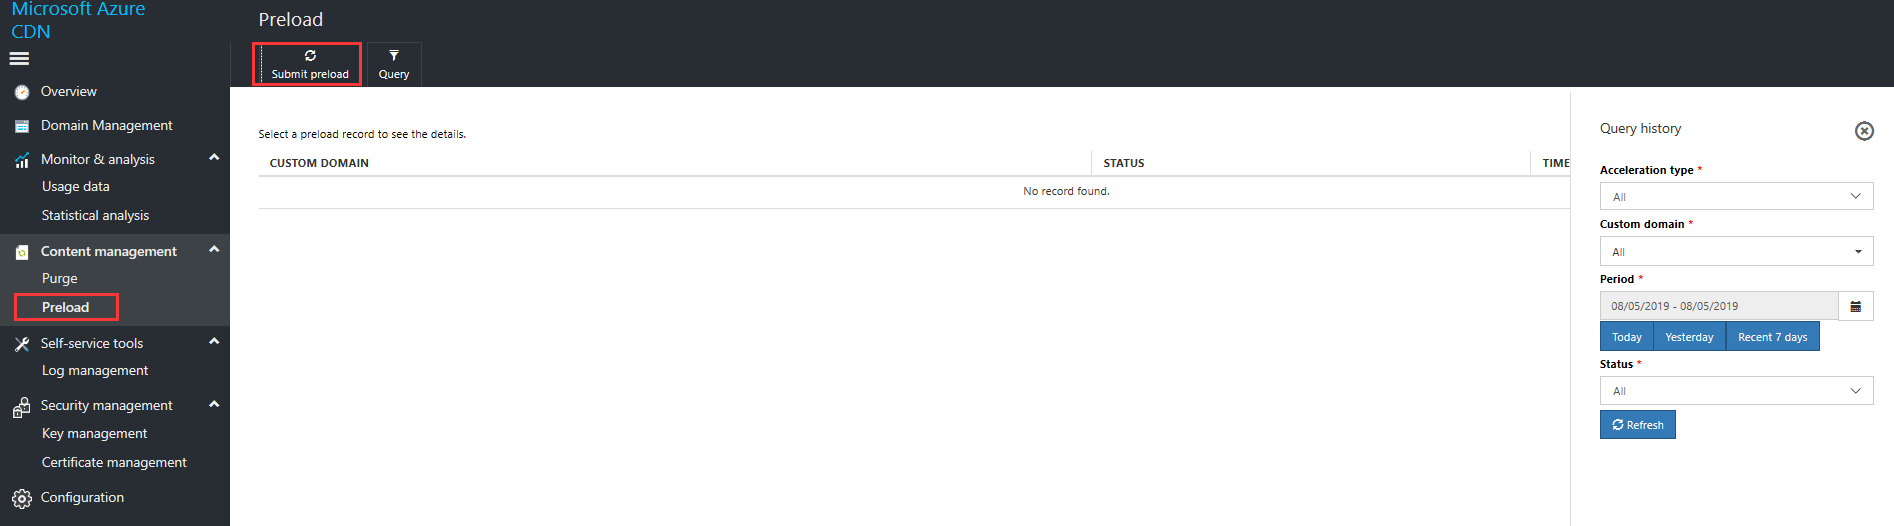 The content preload list view includes:
- Custom domain names, the URLs that you use to access Content Delivery Network cache content
- Status (common statuses: successful, failed, or in progress)
- Submission time
If you successfully submitted the pr-cache rules, the status bar shows the word Successful. If you did not successfully submit the rules, check to ensure that the pre-cache rules are correct. If there are any problems, re-create and re-submit the pre-cache rules.
Submit preloading
Select Submit Cache Refresh to configure pre-caching for individual or multiple files.

This task includes the following steps:
- In the Submit Preload view, select Add.
- Select the domain name that you want to configure from the list of custom domain names. Then enter the corresponding file path.
- Select Add to continue adding new rules, or select x to delete the corresponding directory path.
- Select Submit.
The newly created precache loading rules are displayed in the precache loading list view.
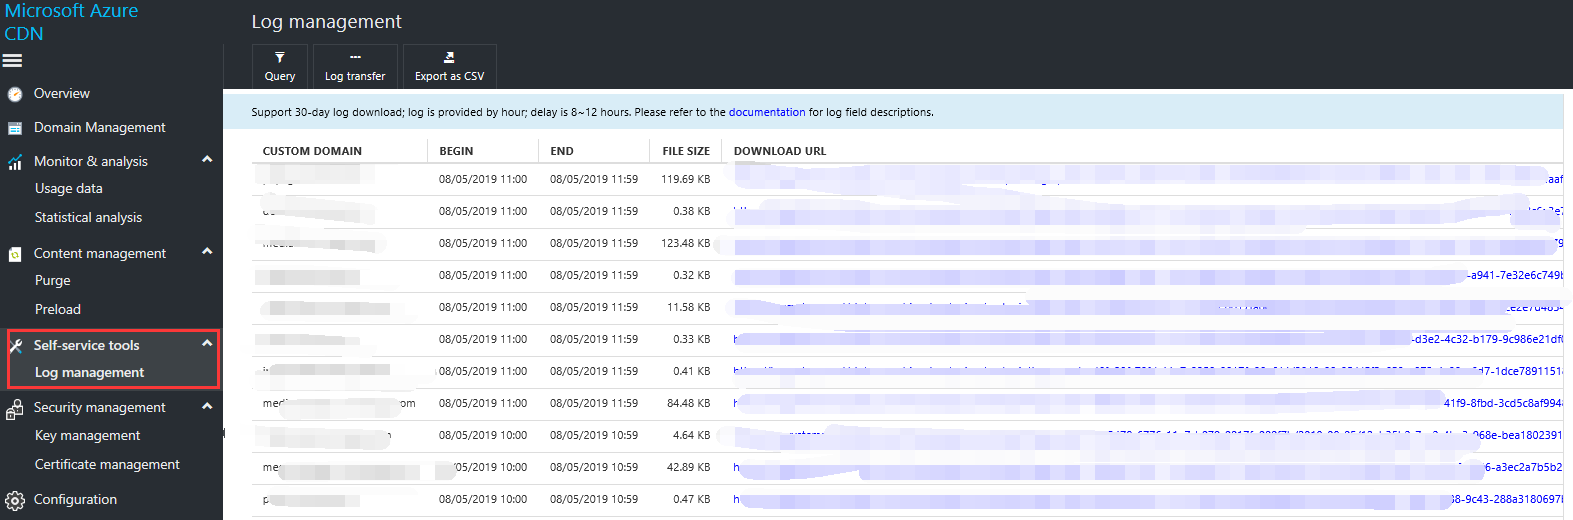
Self-service tools
Log management
Users can download the CDN log to analyze the access status of the access domain, or use the log dump function for long-term log storage.
Usage description
- Log latency is 8-12 hours
- Logs are provided on an hourly basis
- Nearly 30 days of log data is provided
Feature descriptions
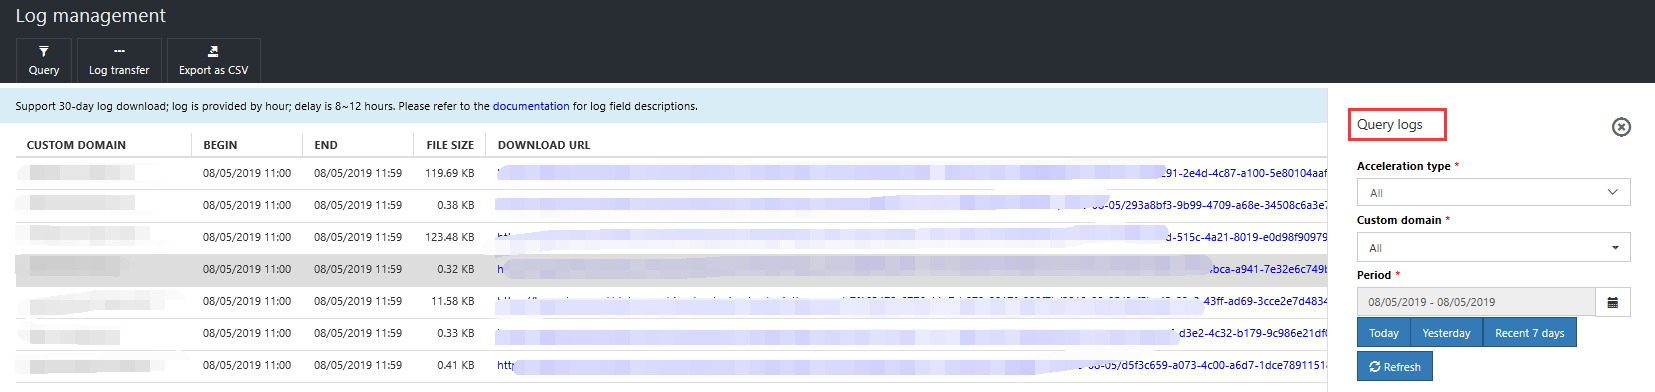
- Log download: Provides log storage and downloads for the past 30 days. Go to the log management view, click the "Query" function, select the domain name and time, then click Refresh.
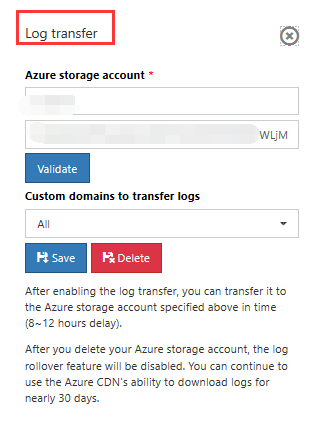
Log dump: Log download only provides 30 days of storage by default. If you need longer storage, you can use the log dump function to store logs to your configured Azure Storage account, to facilitate your log storage and analysis.
- Click the Log dump function, enter the Azure Storage account and the custom domain name that requires the log dump function, then click Save.
- The logs are stored as a blob in a container named "cdn-domain-logs". Every blob consists of a .csv file that is compressed with GZip. The naming format is azurecdntest-CST-2019-05-31-0900-0959.csv.gz.
Field format description
Log field meaning
- c-ip: Client IP address
- timestamp: Access time
- cs-method: HTTP request actions, such as GET/HEAD
- cs-uri-stem: Requested URI
- http-ver: HTTP protocol version number
- sc-status: HTTP status code
- sc-bytes: Number of bytes sent to the client by the server
- c-referer: Client-side referrer URI
- c-user-agent: Client user agent identification
- rs-duration (ms): Time taken to complete the request (in milliseconds)
- hit-miss: Content Delivery Network cache hit and miss identification
- s-ip: IP address of the Content Delivery Network edge node that generated the log
Log content sample
12.22.25.27,5/20/2019 7:00:28 PM +00:00,GET,"/mytest/2.png",HTTP/1.1,200,48721,"/mytest/referer","Apache-HttpClient/4.5.6 (Java/1.8.0_201)",7,HIT,110.110.54.110
Security Management
Key management
Select Key Management in the left navigation pane to generate, create, or delete access keys that are required by the Azure Content Delivery Network API interface.
Existing key list view
This view displays all of your keys.
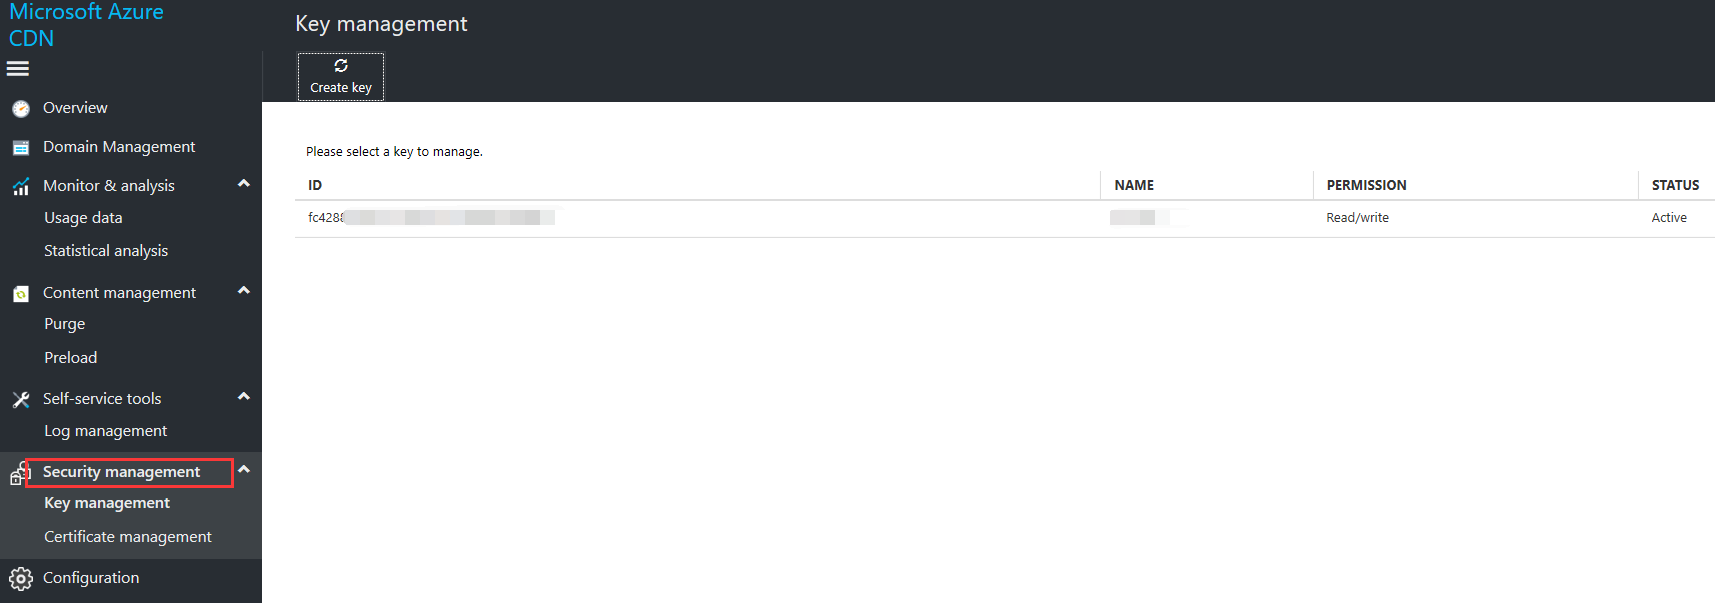
The key list view includes:
- ID: the ID of the key
- Name: the user-friendly name for the key
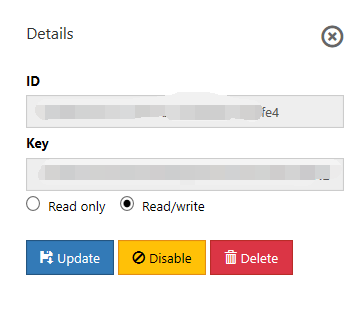
- Permissions. Read-only or read-write.
- Status: including active, canceled, deleting, deleted, and creating
Key details
Select a key to view details of the key. You can also make changes to the key (for example, to update, disable, enable, or delete the key).
Create a key
Create a new key.
- Name: the user-friendly name for the key
- Read-only or read-write permissions
Certificate management
Certificate Management is for customers who have enabled HTTPS services and have customer-supplied certificates. From Certificate Management, you can upload and delete certificates. You can also bind a domain name to a certificate.
Upload a certificate: Select "Certificate management," and select "Add SSL certificate". Then enter the certificate name so you can identify the certificate. You need to enable the HTTPS service's domain name certificate to upload. The certificate must be in PEM format and only the RSA PKCS8 encoding format is currently supported for private keys. See the preceding section on "Certificates" for specifics concerning certificate format conversion.
Note
After you have uploaded the certificate, you need to go to the "Domain Name Management" interface or directly to "Certificate Management". Bind the certificate to the domain name before the certificate can be deployed.
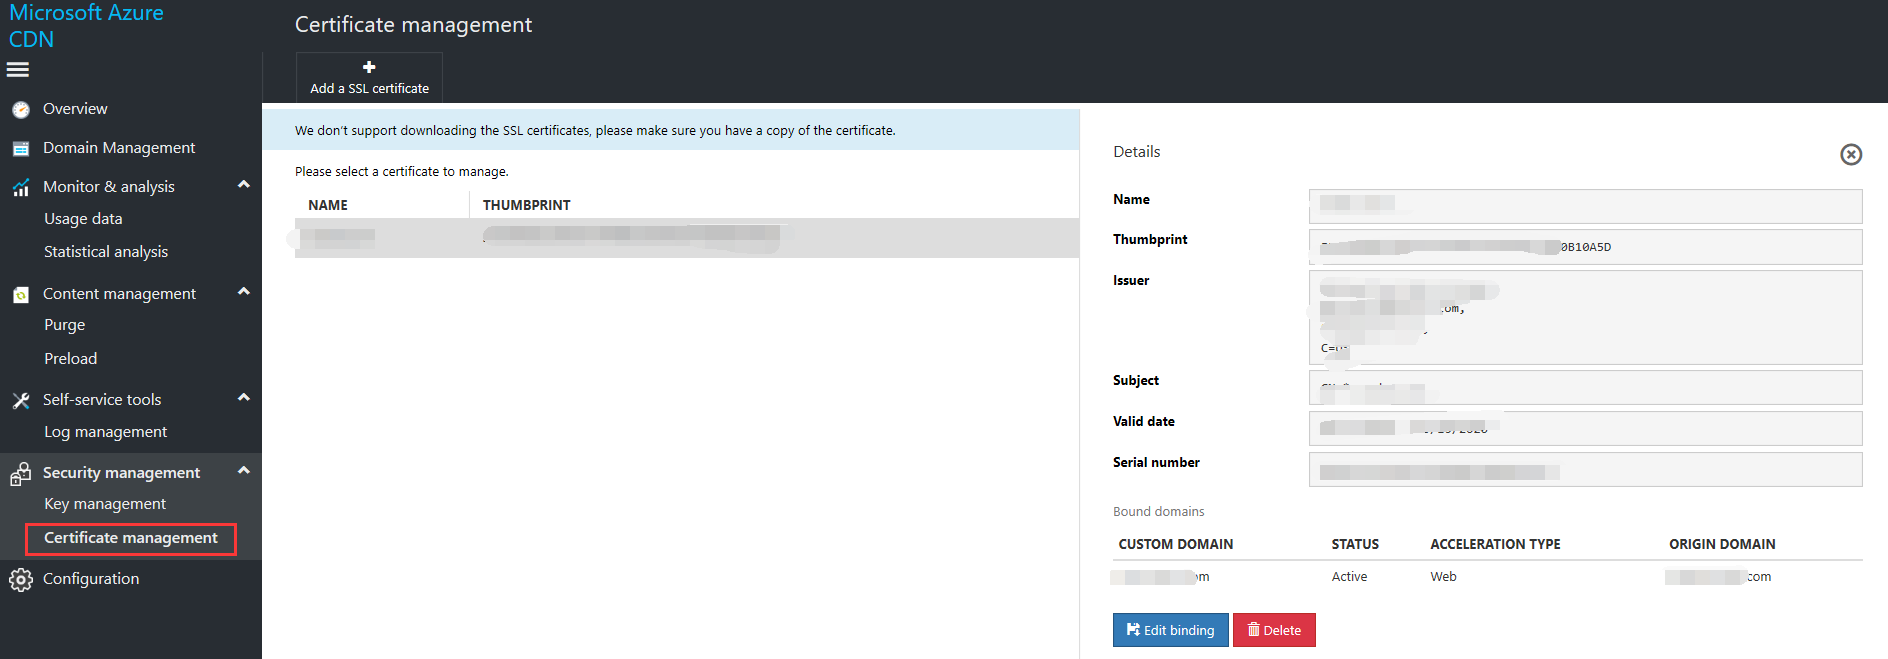
Bind a domain name to a certificate: You can bind the domain name and certificate in either "Certificate Management" or "Domain Name Management."
- You can directly select the domain name you want to bind when you upload the certificate in "Certificate Management."
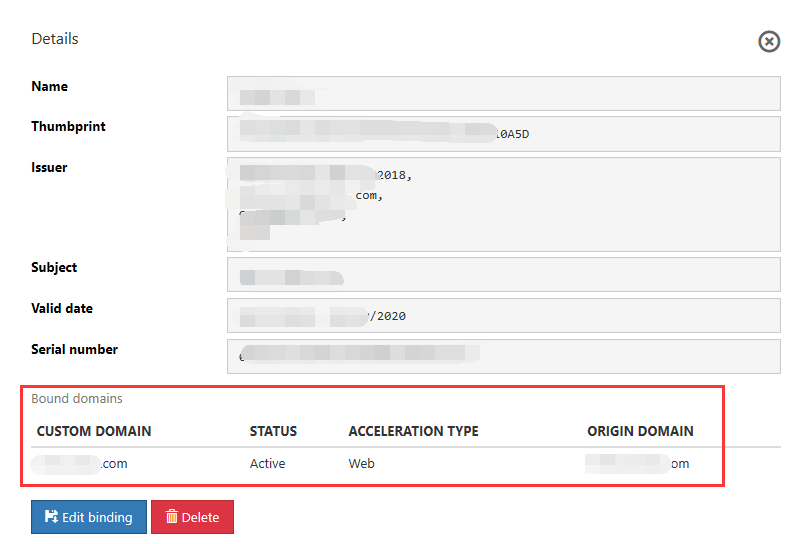
- You can also bind the domain name after you have uploaded the certificate by selecting the certificate on the management page and selecting "Edit bindings" -> "Add bound domain name."
- You can directly select the domain name you want to bind when you upload the certificate in "Certificate Management."
Delete a certificate: You can delete a certificate by deleting it from Certificate Management. Select the certificate you want to delete and then press Delete in the window on the right.

Note
If a certificate has a bound domain name, you must unbind the certificate and the domain name before you can delete the certificate. Otherwise, you will be notified that this step must be performed first. You can unbind the certificate and domain name either by replacing the certificate for the domain name or by directly deleting the domain name. See the section on replacing certificates for details on how to replace a certificate.