Note
Access to this page requires authorization. You can try signing in or changing directories.
Access to this page requires authorization. You can try changing directories.
Role-based access control refers to a method to manage access to resources in Azure. This method is based on specific identities being assigned roles that manage what level of access they have to one or more resources. Role-based access control provides a flexible system of fine-grained access management to ensure that identities have only the least privileged level of access that they need to perform their task.
For more information, see Role-based access control.
Prerequisites
- Use an Azure account with an active subscription. Create an account.
- Use an existing Azure Cosmos DB for Gremlin account.
- Use one or more existing identities in Microsoft Entra ID.
If you prefer to run CLI reference commands locally, install the Azure CLI. If you're running on Windows or macOS, consider running Azure CLI in a Docker container. For more information, see How to run the Azure CLI in a Docker container.
If you're using a local installation, sign in to the Azure CLI by using the az login command. To finish the authentication process, follow the steps displayed in your terminal. For other sign-in options, see Sign in with the Azure CLI.
When you're prompted, install the Azure CLI extension on first use. For more information about extensions, see Use extensions with the Azure CLI.
Run az version to find the version and dependent libraries that are installed. To upgrade to the latest version, run az upgrade.
- If you choose to use Azure PowerShell locally:
- Install the latest version of the Az PowerShell module.
- Connect to your Azure account using the Connect-AzAccount cmdlet.
Disable key-based authentication
Disabling key-based authorization prevents your account from being used without the more secure Microsoft Entra ID authentication method. You should perform the steps in this procedure on new accounts in secure workloads. Alternatively, perform this procedure on existing accounts being migrated to a secure workload pattern.
Disable key-based authentication to your existing account so that applications are required to use Microsoft Entra ID authentication. Use az resource update to modify properties.disableLocalAuth of the existing account.
az resource update \
    --resource-group "<name-of-existing-resource-group>" \
    --name "<name-of-existing-account>" \
    --resource-type "Microsoft.DocumentDB/databaseAccounts" \
    --set properties.disableLocalAuth=true
Create a new account with key-based authentication disabled so that applications are required to use Microsoft Entra authentication.
Create a new Bicep file to deploy your new account with key-based authentication disabled. Name the file
deploy-new-account.bicep.metadata description = 'Deploys a new Azure Cosmos DB account with key-based auth disabled.' @description('Name of the Azure Cosmos DB account.') param name string = 'csms-${uniqueString(resourceGroup().id)}' @description('Primary location for the Azure Cosmos DB account.') param location string = resourceGroup().location resource account 'Microsoft.DocumentDB/databaseAccounts@2024-05-15' = { name: name location: location kind: 'GlobalDocumentDB' properties: { databaseAccountOfferType: 'Standard' locations: [ { locationName: location } ] disableLocalAuth: true } }Use
az deployment group createto deploy the Bicep file with the new account.az deployment group create \ --resource-group "<name-of-existing-resource-group>" \ --template-file deploy-new-account.bicep
Disable key-based authentication to your existing account so that applications are required to use Microsoft Entra authentication. Use Get-AzResource to read the existing account. Use Set-AzResource to update the account.
$parameters = @{
    ResourceGroupName = "<name-of-existing-resource-group>"
    ResourceName = "<name-of-existing-account>"
    ResourceType = "Microsoft.DocumentDB/databaseAccounts"
}
$resource = Get-AzResource @parameters

$resource.Properties.DisableLocalAuth = $true

$resource | Set-AzResource -Force
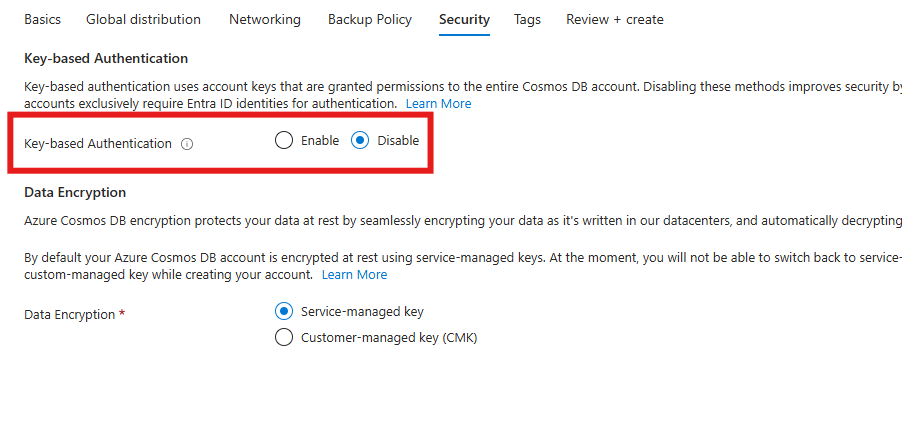
Follow these steps to create a new Azure Cosmos DB for NoSQL account with key-based authentication disabled so that applications are required to use only Microsoft Entra authentication.
When you set up a new Azure Cosmos DB for NoSQL account, go to the Security section of the account-creation process.
For the Key-based authentication option, select Disable.
Important
Modifying an Azure Cosmos DB account requires an Azure role with at least the Microsoft.DocumentDb/databaseAccounts/*/write permission. For more information, see Permissions for Azure Cosmos DB.
Validate that key-based authentication is disabled
To validate that key-based access is disabled, attempt to use the Azure SDK to connect to Azure Cosmos DB for Gremlin by using a resource-owner password credential. This attempt should fail. If necessary, code samples for common programming languages are provided here.
using Azure.Data.Tables;
using Azure.Core;

string connectionString = "AccountEndpoint=<table-endpoint>;AccountKey=<key>;";

TableServiceClient client = new(connectionString);
const { TableServiceClient } = require('@azure/data-tables');

const connectionString = 'AccountEndpoint=<table-endpoint>;AccountKey=<key>;';

const client = new TableServiceClient(connectionString);
from azure.data.tables import TableServiceClient

connection_string = "AccountEndpoint=<table-endpoint>;AccountKey=<key>;"

client = TableServiceClient(endpoint, connection_string)
Grant control plane role-based access
Control plane access refers to the ability to manage resources for an Azure service without managing data. For example, Azure Cosmos DB control plane access could include the ability to:
- Read all account and resource metadata.
- Read and regenerate account keys and connection strings.
- Perform account backups and restore.
- Start and track data transfer jobs.
- Manage databases and containers.
- Modify account properties.
Important
In Azure Cosmos DB, you need control plane access to manage native data-plane role-based access control definitions and assignments. Because the Azure Cosmos DB data plane role-based access control mechanism is native, you need control plane access to create definitions and assignments and store them as resources within an Azure Cosmos DB account.
First, you must prepare a role definition with a list of actions to grant access to manage account resources in Azure Cosmos DB. In this article, you prepare a built-in and custom role. Then, you assign the newly defined role or roles to an identity so that your applications can access resources in Azure Cosmos DB.
List all the role definitions associated with your Azure Cosmos DB account by using
az role definition list.az role definition list \ --name "Cosmos DB Operator"Review the output and locate the role definition named Cosmos DB Operator. The output contains the unique identifier of the role definition in the
idproperty. Record this value because you must use it in the assignment step later in this article.[ { "assignableScopes": [ "/" ], "description": "Lets you manage Azure Cosmos DB accounts, but not access data in them. Prevents access to account keys and connection strings.", "id": "/subscriptions/aaaa0a0a-bb1b-cc2c-dd3d-eeeeee4e4e4e/providers/Microsoft.Authorization/roleDefinitions/230815da-be43-4aae-9cb4-875f7bd000aa", "name": "230815da-be43-4aae-9cb4-875f7bd000aa", "permissions": [ { "actions": [ "Microsoft.DocumentDb/databaseAccounts/*", "Microsoft.Insights/alertRules/*", "Microsoft.Authorization/*/read", "Microsoft.ResourceHealth/availabilityStatuses/read", "Microsoft.Resources/deployments/*", "Microsoft.Resources/subscriptions/resourceGroups/read", "Microsoft.Support/*", "Microsoft.Network/virtualNetworks/subnets/joinViaServiceEndpoint/action" ], "condition": null, "conditionVersion": null, "dataActions": [], "notActions": [ "Microsoft.DocumentDB/databaseAccounts/dataTransferJobs/*", "Microsoft.DocumentDB/databaseAccounts/readonlyKeys/*", "Microsoft.DocumentDB/databaseAccounts/regenerateKey/*", "Microsoft.DocumentDB/databaseAccounts/listKeys/*", "Microsoft.DocumentDB/databaseAccounts/listConnectionStrings/*", "Microsoft.DocumentDB/databaseAccounts/sqlRoleDefinitions/write", "Microsoft.DocumentDB/databaseAccounts/sqlRoleDefinitions/delete", "Microsoft.DocumentDB/databaseAccounts/sqlRoleAssignments/write", "Microsoft.DocumentDB/databaseAccounts/sqlRoleAssignments/delete", "Microsoft.DocumentDB/databaseAccounts/mongodbRoleDefinitions/write", "Microsoft.DocumentDB/databaseAccounts/mongodbRoleDefinitions/delete", "Microsoft.DocumentDB/databaseAccounts/mongodbUserDefinitions/write", "Microsoft.DocumentDB/databaseAccounts/mongodbUserDefinitions/delete" ], "notDataActions": [] } ], "roleName": "Cosmos DB Operator", "roleType": "BuiltInRole", "type": "Microsoft.Authorization/roleDefinitions", } ]In this example, the
idvalue is/subscriptions/aaaa0a0a-bb1b-cc2c-dd3d-eeeeee4e4e4e/providers/Microsoft.Authorization/roleDefinitions/230815da-be43-4aae-9cb4-875f7bd000aa. This example uses fictitious data, and your identifier is distinct from this example. However, the identifier (230815da-be43-4aae-9cb4-875f7bd000aa) is globally unique across all role definitions in Azure.Use
az group showto get the metadata for your current resource group.az group show \ --name "<name-of-existing-resource-group>"Observe the output of the previous command. Record the value of the
idproperty for this resource group because you must use it in the next step.{ "id": "/subscriptions/aaaa0a0a-bb1b-cc2c-dd3d-eeeeee4e4e4e/resourcegroups/msdocs-identity-example", "location": "chinanorth3", "name": "msdocs-identity-example", "type": "Microsoft.Resources/resourceGroups" }In this example, the
idvalue is/subscriptions/aaaa0a0a-bb1b-cc2c-dd3d-eeeeee4e4e4e/resourcegroups/msdocs-identity-example. This example uses fictitious data, and your identifier is distinct from this example. This string is a truncated example of the output.Create a new JSON file named
role-definition.json. In the file, create this resource definition that specifies the values listed here. For theAssignableScopeslist, add theidproperty of the resource group recorded in the previous step.{ "Name": "Azure Cosmos DB Control Plane Owner", "IsCustom": true, "Description": "Can perform all control plane actions for an Azure Cosmos DB account.", "Actions": [ "Microsoft.DocumentDb/*" ], "AssignableScopes": [ "/subscriptions/aaaa0a0a-bb1b-cc2c-dd3d-eeeeee4e4e4e/resourcegroups/msdocs-identity-example" ] }This example uses the
/subscriptions/aaaa0a0a-bb1b-cc2c-dd3d-eeeeee4e4e4e/resourcegroups/msdocs-identity-examplevalue recorded from the previous step. Your actual resource identifier could be different.Create a new role definition by using
az role definition create. Userole-definition.jsonas the input for the--role-definitionargument.az role definition create \ --role-definition role-definition.jsonReview the output from the definition creation command. The output contains the unique identifier of the role definition in the
idproperty. Record this value because you must use it in the assignment step later in this article.{ "assignableScopes": [ "/subscriptions/aaaa0a0a-bb1b-cc2c-dd3d-eeeeee4e4e4e/resourcegroups/msdocs-identity-example" ], "description": "Can perform all control plane actions for an Azure Cosmos DB account.", "id": "/subscriptions/aaaa0a0a-bb1b-cc2c-dd3d-eeeeee4e4e4e/resourcegroups/msdocs-identity-example/providers/Microsoft.Authorization/roleDefinitions/a0a0a0a0-bbbb-cccc-dddd-e1e1e1e1e1e1", "name": "e4e4e4e4-ffff-aaaa-bbbb-c5c5c5c5c5c5", "permissions": [ { "actions": [ "Microsoft.DocumentDb/*" ] } ], "roleName": "Azure Cosmos DB Control Plane Owner", "roleType": "CustomRole" }In this example, the
idvalue is/subscriptions/aaaa0a0a-bb1b-cc2c-dd3d-eeeeee4e4e4e/resourcegroups/msdocs-identity-example/providers/Microsoft.Authorization/roleDefinitions/a0a0a0a0-bbbb-cccc-dddd-e1e1e1e1e1e1. This example uses fictitious data, and your identifier is distinct from this example. This example is a subset of the typical JSON outputted from the deployment for clarity.Use
az group showto get the metadata for your current resource group again.az group show \ --name "<name-of-existing-resource-group>"Observe the output of the previous command. Record the value of the
idproperty for this resource group because you must use it in the next step.{ "id": "/subscriptions/aaaa0a0a-bb1b-cc2c-dd3d-eeeeee4e4e4e/resourcegroups/msdocs-identity-example", "location": "westus", "name": "msdocs-identity-example", "type": "Microsoft.Resources/resourceGroups" }In this example, the
idvalue is/subscriptions/aaaa0a0a-bb1b-cc2c-dd3d-eeeeee4e4e4e/resourcegroups/msdocs-identity-example. This example uses fictitious data, and your identifier is distinct from this example. This string is a truncated example of the output.Assign the new role by using
az role assignment create. Use your resource group's identifier for the--scopeargument, the role's identifier for the-roleargument, and the unique identifier for your identity to the--assigneeargument.az role assignment create \ --assignee "<your-principal-identifier>" \ --role "subscriptions/aaaa0a0a-bb1b-cc2c-dd3d-eeeeee4e4e4e/resourcegroups/msdocs-identity-example/providers/Microsoft.Authorization/roleDefinitions/a0a0a0a0-bbbb-cccc-dddd-e1e1e1e1e1e1" \ --scope "/subscriptions/aaaa0a0a-bb1b-cc2c-dd3d-eeeeee4e4e4e/resourcegroups/msdocs-identity-example"In this example command, the
scopeproperty was set to the fictitious example/subscriptions/aaaa0a0a-bb1b-cc2c-dd3d-eeeeee4e4e4e/resourcegroups/msdocs-identity-examplefrom the previous step's example. Your resource group's identifier is distinct from this example. Therolevalue was also set to the fictitious/subscriptions/aaaa0a0a-bb1b-cc2c-dd3d-eeeeee4e4e4e/resourcegroups/msdocs-identity-example/providers/Microsoft.Authorization/roleDefinitions/a0a0a0a0-bbbb-cccc-dddd-e1e1e1e1e1e1. Again, your role identifier is distinct.Observe the output from the command. The output includes a unique identifier for the assignment in the
idproperty.{ "id": "/subscriptions/aaaa0a0a-bb1b-cc2c-dd3d-eeeeee4e4e4e/resourcegroups/msdocs-identity-example/providers/Microsoft.Authorization/roleAssignments/a0a0a0a0-bbbb-cccc-dddd-e1e1e1e1e1e1", "name": "ffffffff-5555-6666-7777-aaaaaaaaaaaa", "principalId": "aaaaaaaa-bbbb-cccc-1111-222222222222", "resourceGroup": "msdocs-identity-example", "roleDefinitionId": "/subscriptions/aaaa0a0a-bb1b-cc2c-dd3d-eeeeee4e4e4e/resourcegroups/msdocs-identity-example/providers/Microsoft.Authorization/roleDefinitions/a0a0a0a0-bbbb-cccc-dddd-e1e1e1e1e1e1", "scope": "/subscriptions/aaaa0a0a-bb1b-cc2c-dd3d-eeeeee4e4e4e/resourcegroups/msdocs-identity-example", "type": "Microsoft.Authorization/roleAssignments" }In this example, the
idproperty is/subscriptions/aaaa0a0a-bb1b-cc2c-dd3d-eeeeee4e4e4e/resourcegroups/msdocs-identity-example/providers/Microsoft.Authorization/roleAssignments/a0a0a0a0-bbbb-cccc-dddd-e1e1e1e1e1e1, which is another fictitious example.Repeat these steps to grant access to the account from any other identities that you want to use.
You can repeat these steps for as many identities as you want. Typically, these steps are at least repeated to allow developers access to an account by using their human identity and to allow applications access to the data by using a managed identity.
List all the role definitions associated with your Azure Cosmos DB account by using
az role definition list.az role definition list \ --name "Cosmos DB Operator"Review the output and locate the role definition named Cosmos DB Operator. The output contains the unique identifier of the role definition in the
idproperty. Record this value because you must use it in the assignment step later in this article.[ { "assignableScopes": [ "/" ], "description": "Lets you manage Azure Cosmos DB accounts, but not access data in them. Prevents access to account keys and connection strings.", "id": "/subscriptions/aaaa0a0a-bb1b-cc2c-dd3d-eeeeee4e4e4e/providers/Microsoft.Authorization/roleDefinitions/230815da-be43-4aae-9cb4-875f7bd000aa", "name": "230815da-be43-4aae-9cb4-875f7bd000aa", "permissions": [ { "actions": [ "Microsoft.DocumentDb/databaseAccounts/*", "Microsoft.Insights/alertRules/*", "Microsoft.Authorization/*/read", "Microsoft.ResourceHealth/availabilityStatuses/read", "Microsoft.Resources/deployments/*", "Microsoft.Resources/subscriptions/resourceGroups/read", "Microsoft.Support/*", "Microsoft.Network/virtualNetworks/subnets/joinViaServiceEndpoint/action" ], "condition": null, "conditionVersion": null, "dataActions": [], "notActions": [ "Microsoft.DocumentDB/databaseAccounts/dataTransferJobs/*", "Microsoft.DocumentDB/databaseAccounts/readonlyKeys/*", "Microsoft.DocumentDB/databaseAccounts/regenerateKey/*", "Microsoft.DocumentDB/databaseAccounts/listKeys/*", "Microsoft.DocumentDB/databaseAccounts/listConnectionStrings/*", "Microsoft.DocumentDB/databaseAccounts/sqlRoleDefinitions/write", "Microsoft.DocumentDB/databaseAccounts/sqlRoleDefinitions/delete", "Microsoft.DocumentDB/databaseAccounts/sqlRoleAssignments/write", "Microsoft.DocumentDB/databaseAccounts/sqlRoleAssignments/delete", "Microsoft.DocumentDB/databaseAccounts/mongodbRoleDefinitions/write", "Microsoft.DocumentDB/databaseAccounts/mongodbRoleDefinitions/delete", "Microsoft.DocumentDB/databaseAccounts/mongodbUserDefinitions/write", "Microsoft.DocumentDB/databaseAccounts/mongodbUserDefinitions/delete" ], "notDataActions": [] } ], "roleName": "Cosmos DB Operator", "roleType": "BuiltInRole", "type": "Microsoft.Authorization/roleDefinitions", } ]In this example, the
idvalue is/subscriptions/aaaa0a0a-bb1b-cc2c-dd3d-eeeeee4e4e4e/providers/Microsoft.Authorization/roleDefinitions/230815da-be43-4aae-9cb4-875f7bd000aa. This example uses fictitious data, and your identifier is distinct from this example. However, the identifier (230815da-be43-4aae-9cb4-875f7bd000aa) is globally unique across all role definitions in Azure.Create a new Bicep file to define your role definition. Name the file
control-plane-role-definition.bicep. Add the following action to the definition:Action Description Microsoft.DocumentDb/*Enables all possible actions. metadata description = 'Create RBAC definition for control plane access to Azure Cosmos DB.' @description('Name of the role definition.') param roleDefinitionName string = 'Azure Cosmos DB Control Plane Owner' @description('Description of the role definition.') param roleDefinitionDescription string = 'Can perform all control plane actions for an Azure Cosmos DB account.' resource definition 'Microsoft.Authorization/roleDefinitions@2022-04-01' = { name: guid(subscription().id, resourceGroup().id, roleDefinitionName) scope: resourceGroup() properties: { roleName: roleDefinitionName description: roleDefinitionDescription type: 'CustomRole' permissions: [ { actions: [ 'Microsoft.DocumentDb/*' ] } ] assignableScopes: [ resourceGroup().id ] } } output definitionId string = definition.idDeploy the Bicep template by using
az deployment group create. Specify the name of the Bicep template and Azure resource group.az deployment group create \ --resource-group "<name-of-existing-resource-group>" \ --template-file control-plane-role-definition.bicepReview the output from the deployment. The output contains the unique identifier of the role definition in the
properties.outputs.definitionId.valueproperty. Record this value because you must use it in the assignment step later in this article.{ "properties": { "outputs": { "definitionId": { "type": "String", "value": "/subscriptions/aaaa0a0a-bb1b-cc2c-dd3d-eeeeee4e4e4e/resourcegroups/msdocs-identity-example/providers/Microsoft.Authorization/roleDefinitions/a0a0a0a0-bbbb-cccc-dddd-e1e1e1e1e1e1" } } } }In this example, the
idvalue is/subscriptions/aaaa0a0a-bb1b-cc2c-dd3d-eeeeee4e4e4e/resourcegroups/msdocs-identity-example/providers/Microsoft.Authorization/roleDefinitions/a0a0a0a0-bbbb-cccc-dddd-e1e1e1e1e1e1. This example uses fictitious data, and your identifier is distinct from this example. This example is a subset of the typical JSON outputted from the deployment for clarity.Create a new Bicep file to define your role assignment. Name the file
control-plane-role-assignment.bicep.metadata description = 'Assign RBAC role for control plane access to Azure Cosmos DB.' @description('Id of the role definition to assign to the targeted principal in the context of the account.') param roleDefinitionId string @description('Id of the identity/principal to assign this role in the context of the account.') param identityId string resource assignment 'Microsoft.Authorization/roleAssignments@2022-04-01' = { name: guid(subscription().id, resourceGroup().id, roleDefinitionId, identityId) scope: resourceGroup() properties: { roleDefinitionId: roleDefinitionId principalId: identityId } }Create a new Bicep parameters file named
control-plane-role-assignment.bicepparam. In this parameters file, assign the previously recorded role definition identifiers to theroleDefinitionIdparameter. Assign the unique identifier for your identity to theidentityIdparameter.using './control-plane-role-assignment.bicep' param roleDefinitionId = '<id-of-new-role-definition>' param identityId = '<id-of-existing-identity>'Deploy this Bicep template by using
az deployment group create.az deployment group create \ --resource-group "<name-of-existing-resource-group>" \ --parameters control-plane-role-assignment.bicepparam \ --template-file control-plane-role-assignment.bicepRepeat these steps to grant access to the account from any other identities that you want to use.
You can repeat these steps for as many identities as you want. Typically, these steps are at least repeated to allow developers access to an account by using their human identity and to allow applications access to the data by using a managed identity.
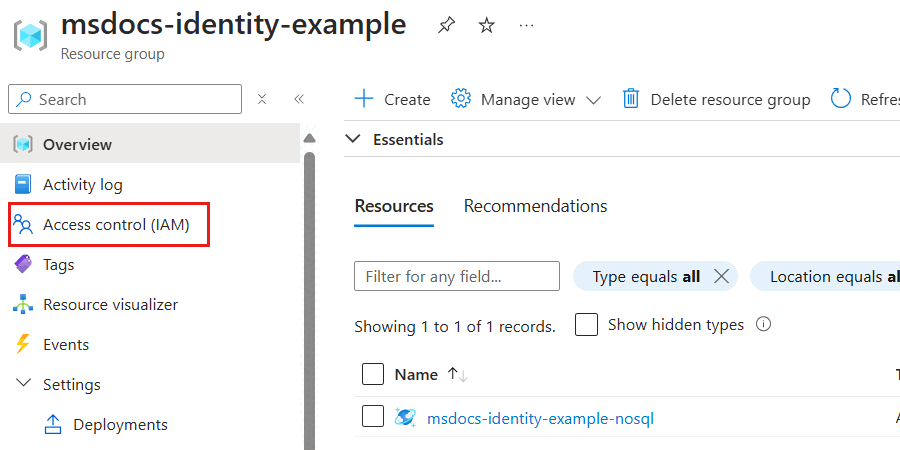
Sign in to the Azure portal.
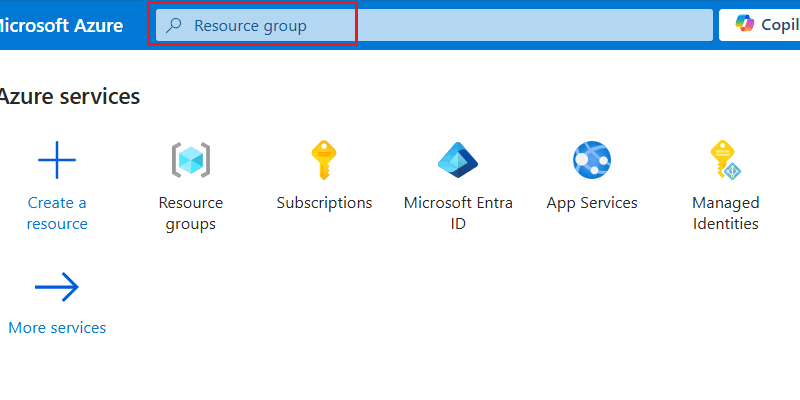
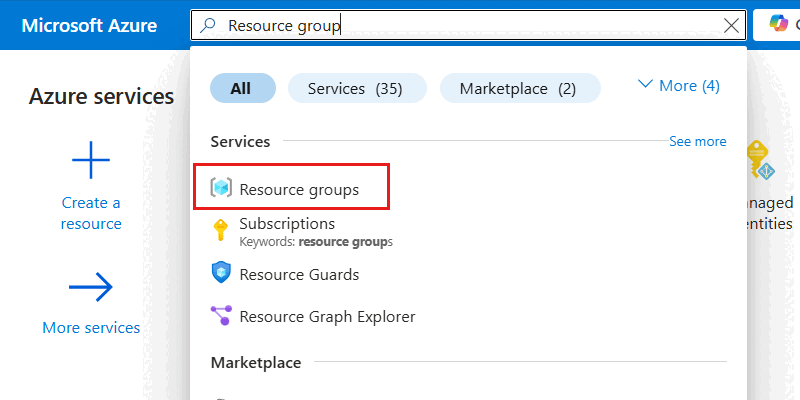
Enter Resource group in the global search bar.
Within Services, select Resource groups.
In the Resource groups pane, select your existing resource group.
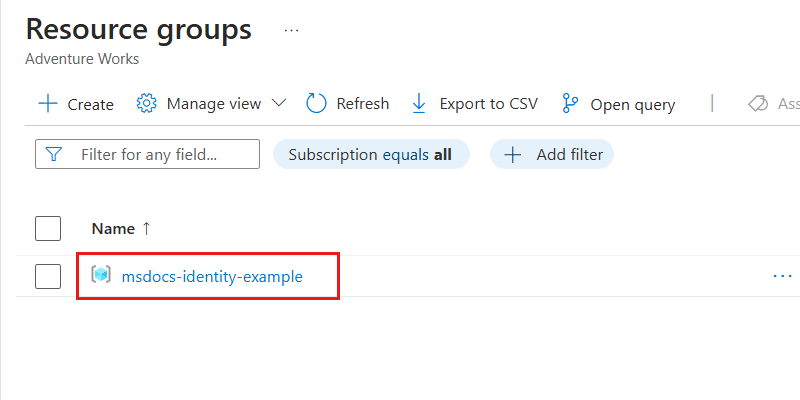
This example screenshot includes the
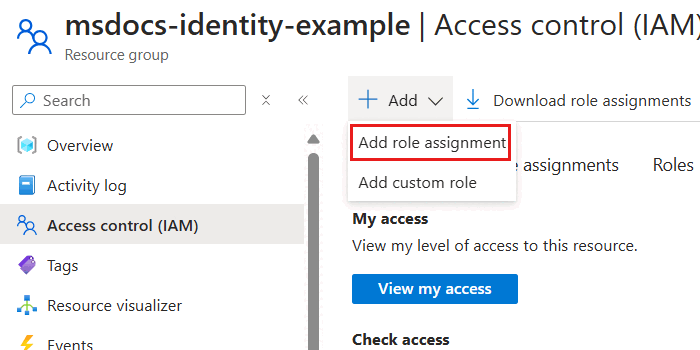
msdocs-identity-exampleresource group. Your actual resource group name could be different.Within the pane for the resource group, select Access control (IAM) on the service menu.
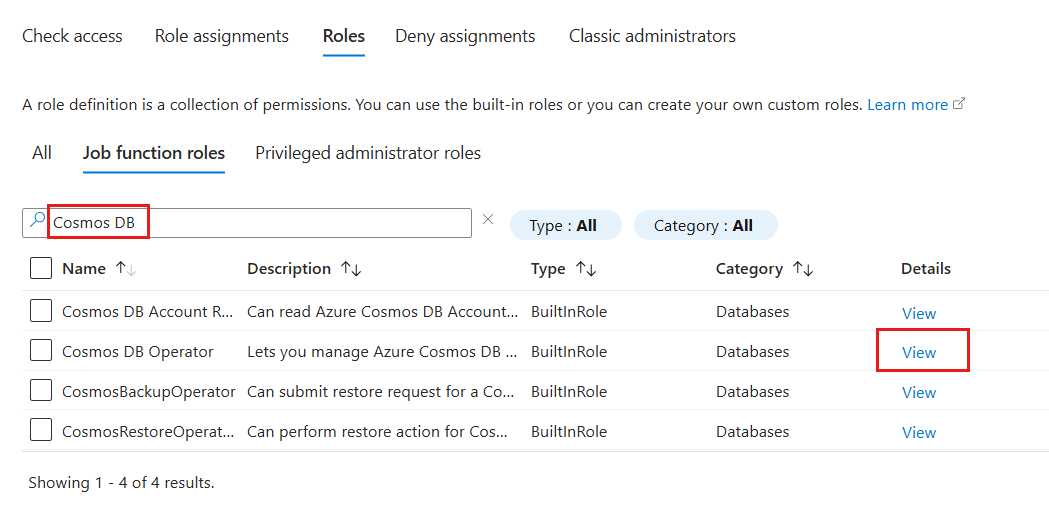
In the Access control (IAM) pane, select Roles.

In the Roles section, use the search phrase Cosmos DB and locate the Cosmos DB Operator role definition. Then, select the View option associated with that definition.
In the Cosmos DB Operator role definition dialog, observe the actions assigned as part of this role definition.
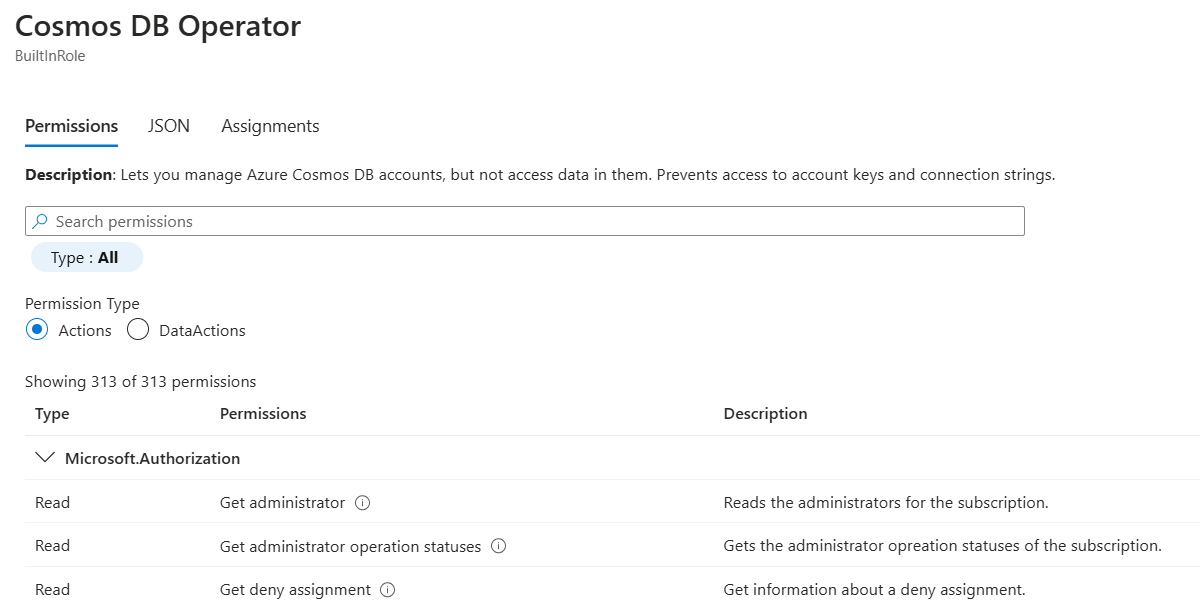
Close the Cosmos DB Operator role definition dialog.
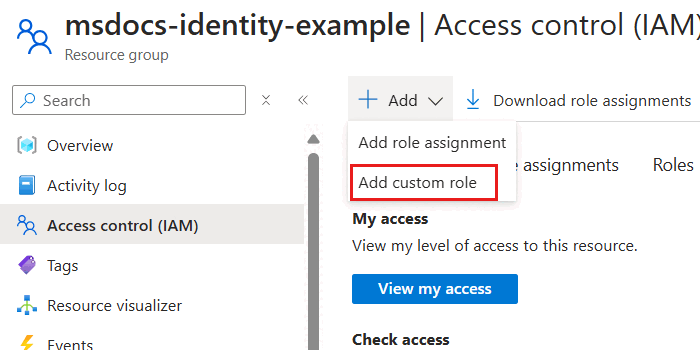
Back in the Access control (IAM) pane, select Add. Then select Add custom role.
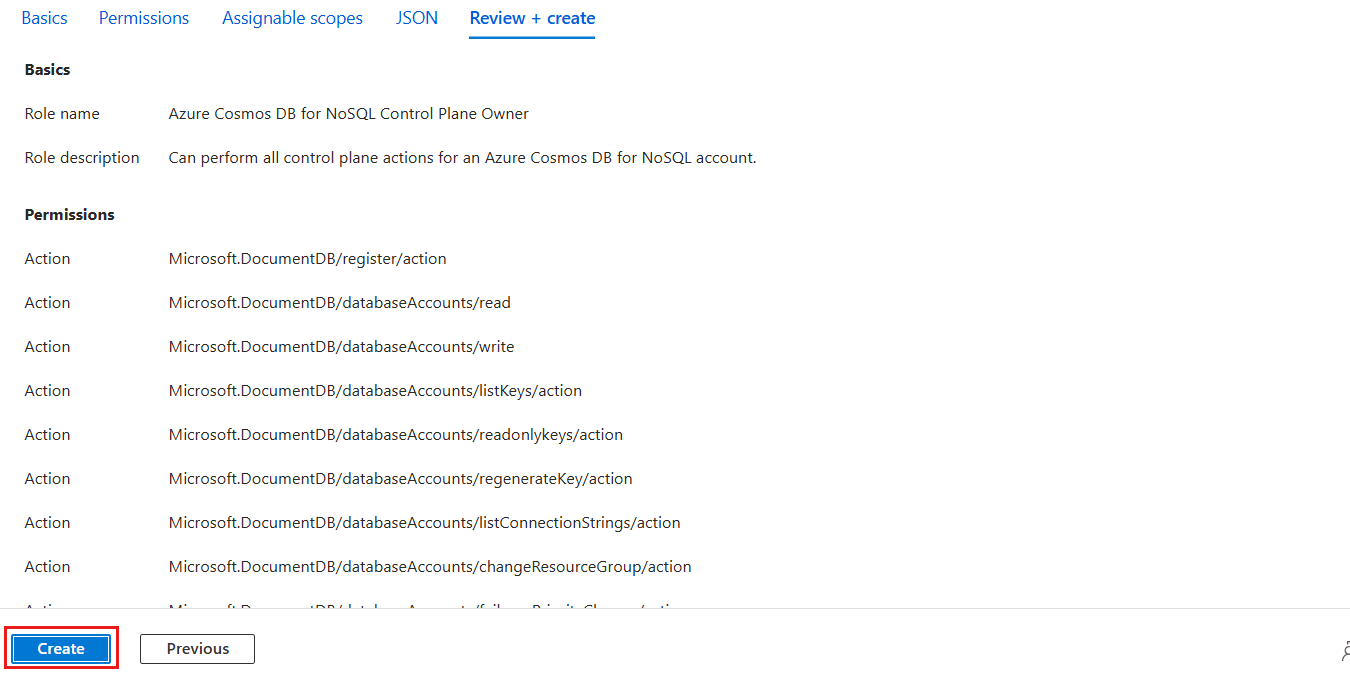
In the Basics pane, configure the following options, and then select Next.
Option Value Custom role name Azure Cosmos DB Control Plane Owner Description Can perform all control plane actions for an Azure Cosmos DB account. Baseline permissions Start from scratch 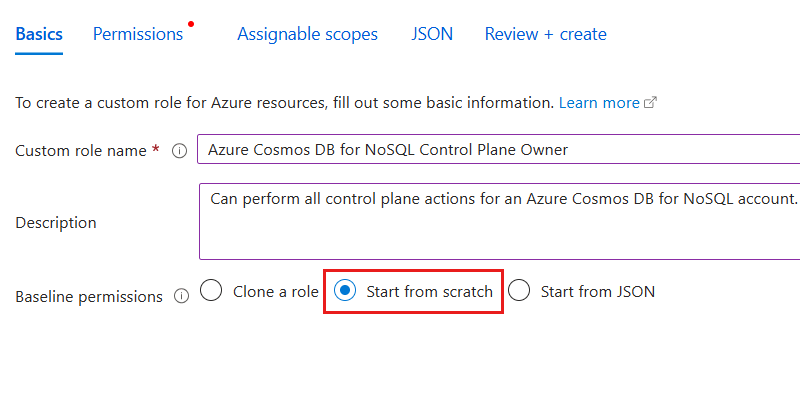
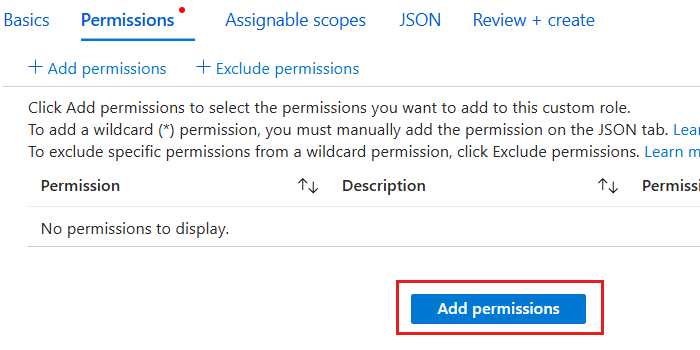
In the Permissions pane, select Add permissions. Then, search for DocumentDB in the Permissions dialog. Finally, select the Microsoft.DocumentDB option.

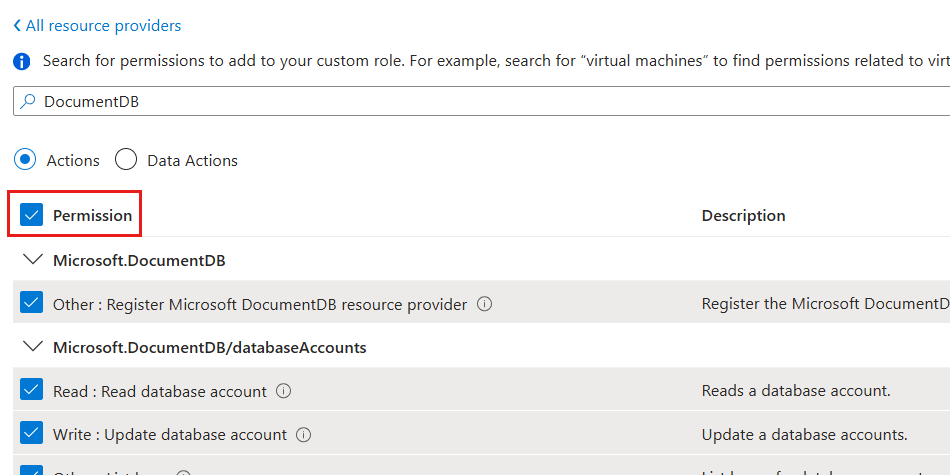
In the Permissions dialog, select all Actions for Microsoft.DocumentDB. Then, select Add to return to the Permissions pane.
Back in the Permissions pane, observe the list of permissions. Then, select Review + create.
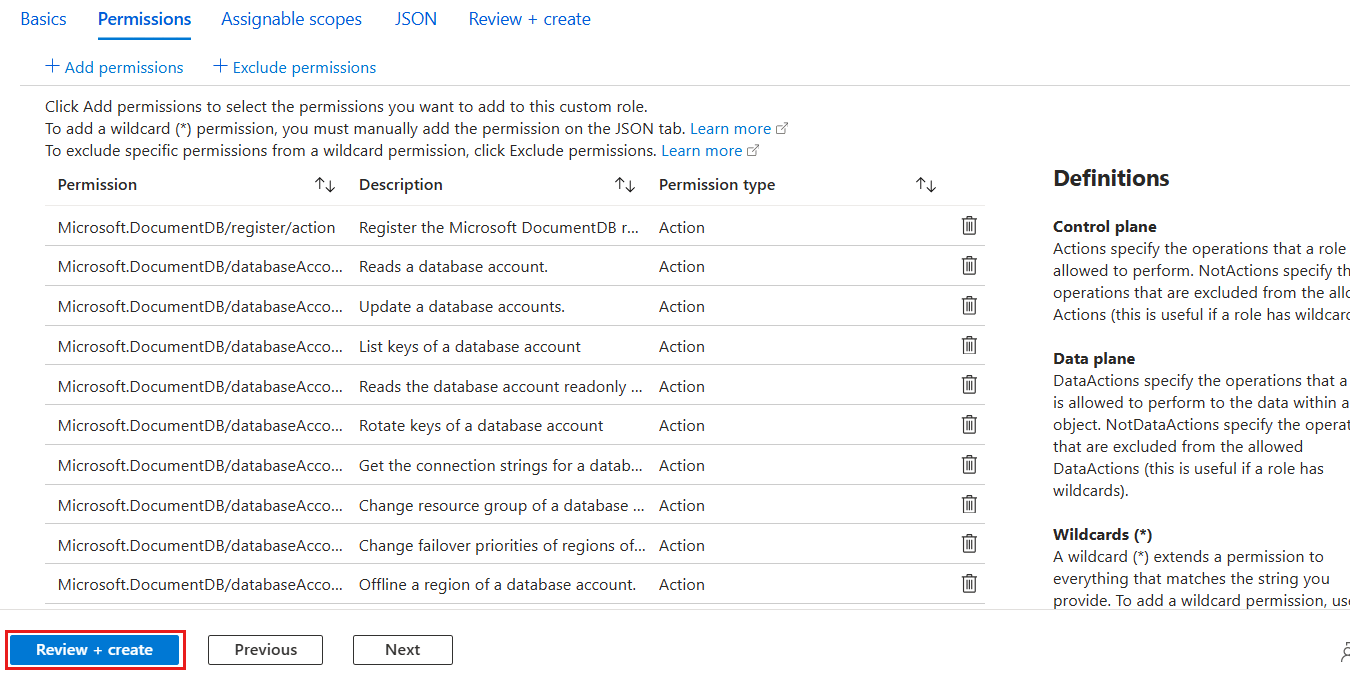
In the Review + create pane, review the specified options for the new role definition. Finally, select Create.
Wait for the portal to finish creating the role definition.
In the Access control (IAM) pane, select Add > Add role assignment.
In the Role pane, search for Azure Cosmos DB and then select the Azure Cosmos DB Control Plane Owner role that you created earlier in this article. Then select Next.
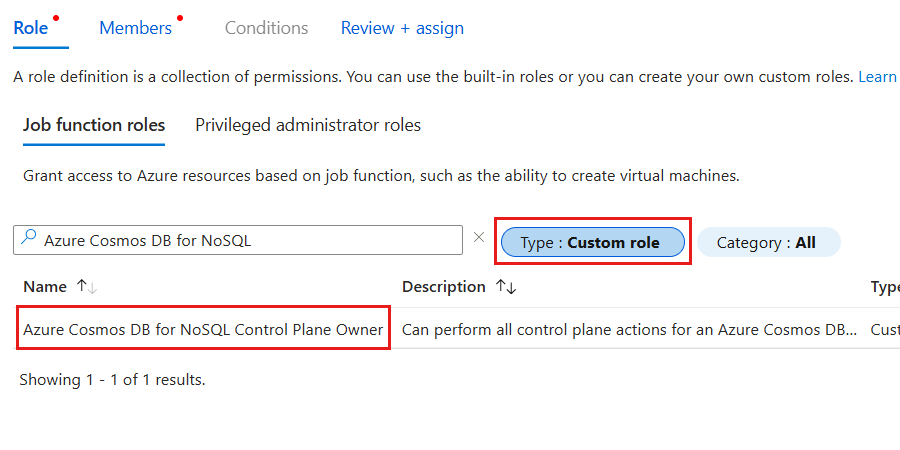
You can optionally filter the list of roles to include only custom roles.
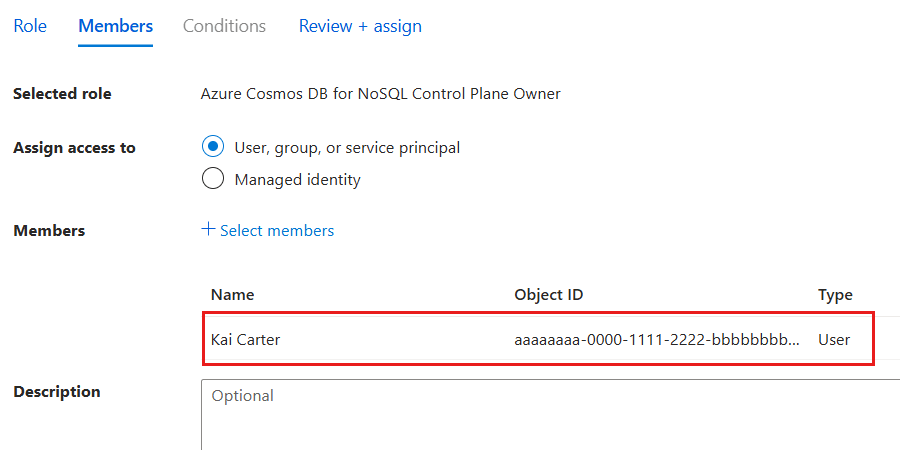
In the Members pane, select the Select members option. In the Members dialog, select the identity that you want to grant this level of access for your Azure Cosmos DB account. Then use the Select option to confirm your choice.
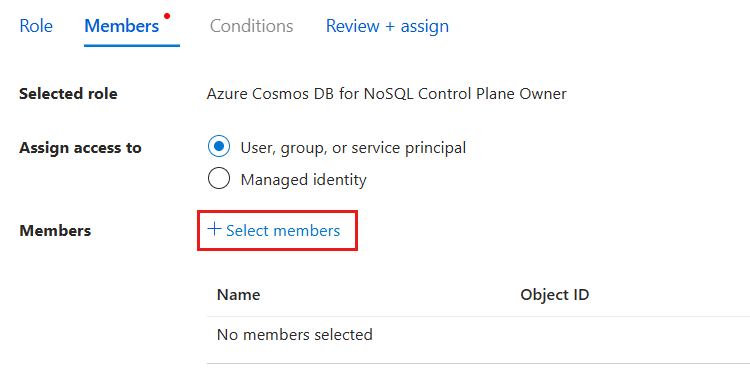
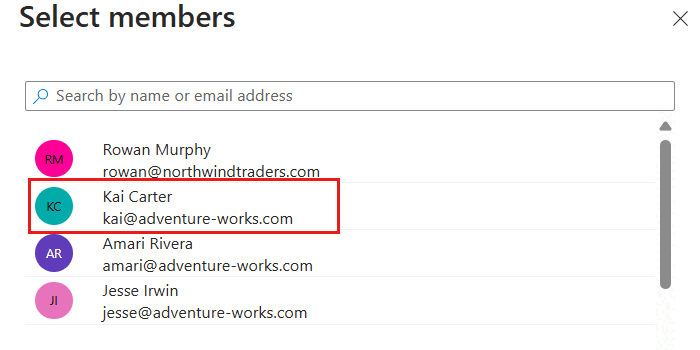
This screenshot illustrates an example user named Kai Carter with a principal of
kai@adventure-works.com.Back in the Members pane, review the selected members and then select Review + assign.
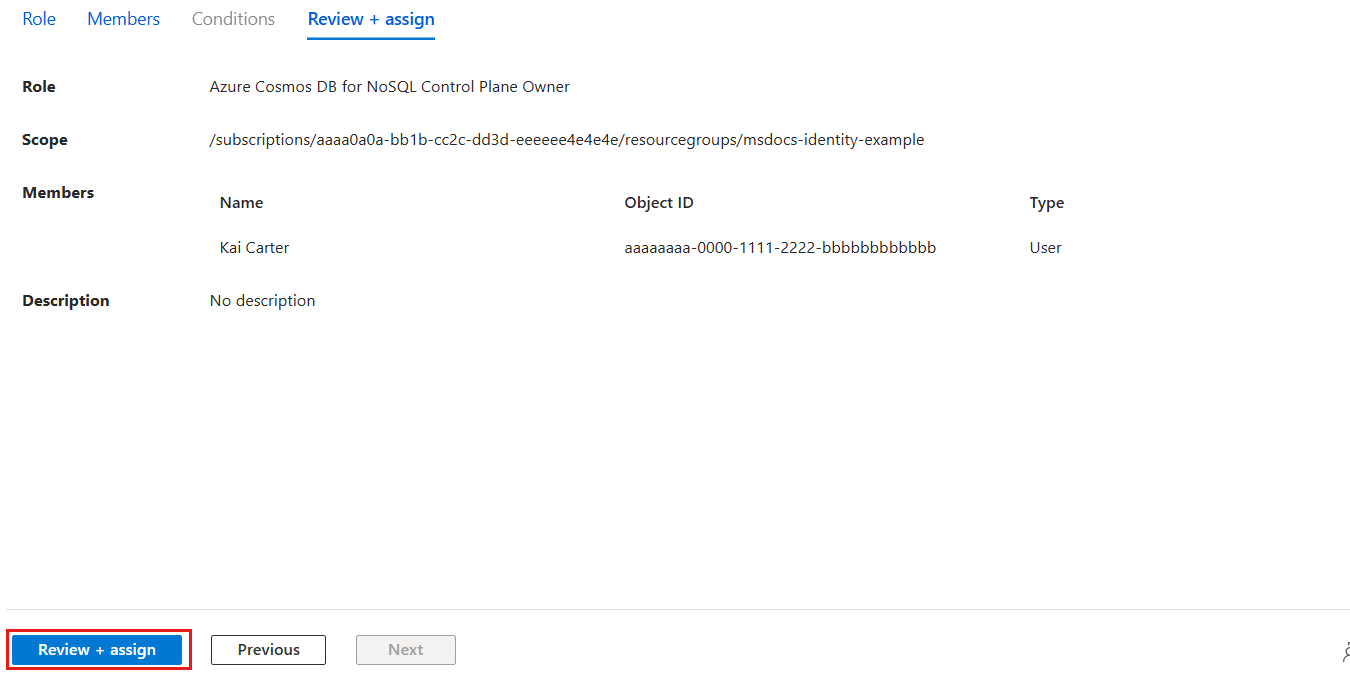
In the Review + assign pane, review the specified options for the new role assignment. Finally, select Review + assign.
Wait for the portal to finish creating the role assignment.

Use
Get-AzRoleDefinitionto list all the role definitions associated with your Azure Cosmos DB account.$parameters = @{ Name = "Cosmos DB Operator" } Get-AzRoleDefinition @parametersReview the output and locate the role definition named
Cosmos DB Built-in Data Contributor. The output contains the unique identifier of the role definition in theIdproperty. Record this value because you must use it in the assignment step later in this article.Name : Cosmos DB Operator Id : 230815da-be43-4aae-9cb4-875f7bd000aa IsCustom : False Description : Lets you manage Azure Cosmos DB accounts, but not access data in them. Prevents access to account keys and connection strings. Actions : {Microsoft.DocumentDb/databaseAccounts/*, Microsoft.Insights/alertRules/*, Microsoft.Authorization/*/read, Microsoft.ResourceHealth/availabilityStatuses/read…} NotActions : {Microsoft.DocumentDB/databaseAccounts/dataTransferJobs/*, Microsoft.DocumentDB/databaseAccounts/readonlyKeys/*, Microsoft.DocumentDB/databaseAccounts/regenerateKey/*, Microsoft.DocumentDB/databaseAccounts/listKeys/*…} DataActions : {} NotDataActions : {} AssignableScopes : {/}In this example, the
Idvalue is230815da-be43-4aae-9cb4-875f7bd000aa. The identifier is globally unique across all role definitions in Azure.Use
Get-AzResourceGroupto get the metadata for your current resource group.$parameters = @{ Name = "<name-of-existing-resource-group>" } Get-AzResourceGroup @parametersObserve the output of the previous command. Record the value of the
ResourceIdproperty for this resource group because you must use it in the next step.ResourceGroupName : msdocs-identity-example Location : westus ProvisioningState : Succeeded ResourceId : /subscriptions/a0a0a0a0-bbbb-cccc-dddd-e1e1e1e1e1e1/resourcegroups/msdocs-identity-exampleIn this example, the
ResourceIdvalue is/subscriptions/a0a0a0a0-bbbb-cccc-dddd-e1e1e1e1e1e1/resourcegroups/msdocs-identity-example. This example uses fictitious data, and your identifier is distinct from this example. This string is a truncated example of the typical output.First, import the
Az.Resourcesmodule. Then, create a newMicrosoft.Azure.Commands.Resources.Models.Authorization.PSRoleDefinitionobject. In the object, create this resource definition that specifies the values listed here. For theAssignableScopeslist, add theResourceIdproperty of the resource group recorded in the previous step. Finally, use the role definition object as the input for the-Roleparameter ofNew-AzRoleDefinition.Import-Module Az.Resources $parameters = @{ TypeName = "Microsoft.Azure.Commands.Resources.Models.Authorization.PSRoleDefinition" Property = @{ Name = "Azure Cosmos DB Control Plane Owner" Description = "Can perform all control plane actions for an Azure Cosmos DB account." IsCustom = $true Actions = @( "Microsoft.DocumentDb/*" ) AssignableScopes = @( "/subscriptions/aaaa0a0a-bb1b-cc2c-dd3d-eeeeee4e4e4e/resourcegroups/msdocs-identity-example" ) } } $role = New-Object @parameters New-AzRoleDefinition -Role $roleThis example uses the
/subscriptions/aaaa0a0a-bb1b-cc2c-dd3d-eeeeee4e4e4e/resourcegroups/msdocs-identity-examplevalue recorded from the previous step. Your actual resource identifier could be different.Review the output from the definition creation command. The output contains the unique identifier of the role definition in the
Nameproperty. Record this value because you must use it in the assignment step later in this article.Name : Azure Cosmos DB Control Plane Owner Id : e4e4e4e4-ffff-aaaa-bbbb-c5c5c5c5c5c5 IsCustom : True Description : Can perform all control plane actions for an Azure Cosmos DB account. Actions : {Microsoft.DocumentDb/*} AssignableScopes : {/subscriptions/aaaa0a0a-bb1b-cc2c-dd3d-eeeeee4e4e4e/resourcegroups/msdocs-identity-example}In this example, the
Namevalue isAzure Cosmos DB Control Plane Owner. This example is a subset of the typical output of the deployment for clarity.Assign the new role by using
New-AzRoleAssignment. Use the role's name for theRoleDefinitionNameparameter and the unique identifier for your identity to theObjectIdparameter.$parameters = @{ ResourceGroupName = "<name-of-existing-resource-group>" ObjectId = "<your-principal-identifier>" RoleDefinitionName = "Azure Cosmos DB Control Plane Owner" } New-AzRoleAssignment @parametersObserve the output from the command. The output includes a unique identifier for the assignment in the
RoleAssignmentIdproperty.RoleAssignmentName : ffffffff-5555-6666-7777-aaaaaaaaaaaa RoleAssignmentId : /subscriptions/aaaa0a0a-bb1b-cc2c-dd3d-eeeeee4e4e4e/resourcegroups/msdocs-identity-example/providers/Microsoft.Authorization/roleAssignments/a0a0a0a0-bbbb-cccc-dddd-e1e1e1e1e1e1 Scope : /subscriptions/aaaa0a0a-bb1b-cc2c-dd3d-eeeeee4e4e4e/resourcegroups/msdocs-identity-example DisplayName : Kai Carter SignInName : <kai@adventure-works.com> RoleDefinitionName : Azure Cosmos DB Control Plane Owner RoleDefinitionId : e4e4e4e4-ffff-aaaa-bbbb-c5c5c5c5c5c5In this example, the
RoleAssignmentIdproperty is/subscriptions/aaaa0a0a-bb1b-cc2c-dd3d-eeeeee4e4e4e/resourcegroups/msdocs-identity-example/providers/Microsoft.Authorization/roleAssignments/a0a0a0a0-bbbb-cccc-dddd-e1e1e1e1e1e1, which is another fictitious example. This example is a subset of the typical output of the deployment for clarity.Repeat these steps to grant access to the account from any other identities that you want to use.
You can repeat these steps for as many identities as you want. Typically, these steps are at least repeated to allow developers access to an account by using their human identity and to allow applications access to the data by using a managed identity.
Important
Assigning a role definition requires you to already have the unique identifier of any identity that you want to grant role-based access control permissions.
Validate control plane role-based access in code
Validate that you correctly granted access by using application code and the Azure Management SDK.
using Azure.Identity;
using Azure.ResourceManager;

DefaultAzureCredential credential = new();

ArmClient client = new(credential);
const { CosmosDBManagementClient } = require('@azure/arm-cosmosdb');
const { DefaultAzureCredential } = require('@azure/identity');

const subscriptionId = "<subscription-id>";

const credential = new DefaultAzureCredential();

const client = new CosmosDBManagementClient(credential, subscriptionId);
import { CosmosDBManagementClient } from '@azure/arm-cosmosdb';
import { TokenCredential, DefaultAzureCredential } from '@azure/identity';

let subscriptionId: string = "<subscription-id>";

let credential: TokenCredential = new DefaultAzureCredential();

const client: CosmosDBManagementClient = new CosmosDBManagementClient(credential, subscriptionId);
from azure.mgmt.cosmosdb import CosmosDBManagementClient
from azure.identity import DefaultAzureCredential

subscription_id = "<subscription-id>"

credential = DefaultAzureCredential()

client = CosmosDBManagementClient(credential=credential, subscription=subscription_id)
package main

import (
    "github.com/Azure/azure-sdk-for-go/sdk/azidentity"
    "github.com/Azure/azure-sdk-for-go/sdk/resourcemanager/cosmos/armcosmos"
)

const subscriptionId = "<subscription-id>"

func main() {
    credential, _ := azidentity.NewDefaultAzureCredential(nil)

    client, _ := armcosmos.NewDatabaseClient(subscriptionId, credential, nil)
}
package com.example;

import com.azure.core.management.profile.AzureProfile;
import com.azure.core.management.AzureEnvironment;
import com.azure.identity.DefaultAzureCredential;
import com.azure.identity.DefaultAzureCredentialBuilder;
import com.azure.resourcemanager.cosmos.CosmosManager;

public class CosmosDB {
    public static void main(String[] args) {
        AzureProfile profile = new AzureProfile(AzureEnvironment.AZURE);
        DefaultAzureCredential credential = new DefaultAzureCredentialBuilder()
          .build();

        CosmosManager manager = CosmosManager.authenticate(credential, profile);
    }
}
Grant data plane role-based access
Data plane access refers to the ability to read and write data within an Azure service without the ability to manage resources in the account. For example, Azure Cosmos DB data plane access could include the ability to:
- Read some account and resource metadata.
- Create, read, update, patch, and delete items.
- Run Gremlin queries.
- Read from a container's change feed.
- Run stored procedures.
- Manage conflicts in the conflict feed.
First, you must prepare a role definition with a list of data actions to grant access to read, query, and manage data in Azure Cosmos DB for Gremlin. In this article, you prepare a built-in and custom role. Then, assign the newly defined role to an identity so that your applications can access data in Azure Cosmos DB for Gremlin.
List all the role definitions associated with your Azure Cosmos DB for Gremlin account by using
az cosmosdb gremlin role definition list.az cosmosdb gremlin role definition list \ --account-name <account-name> \ --resource-group <resource-group>Review the output and locate the role definition named
Cosmos DB Built-in Data Contributor. The output contains the unique identifier of the role definition in theidproperty. Record this value because you need to use it in the assignment step later in this article.In this example, the
idvalue is/subscriptions/aaaa0a0a-bb1b-cc2c-dd3d-eeeeee4e4e4e/resourceGroups/msdocs-identity-example/providers/Microsoft.DocumentDB/databaseAccounts/msdocs-identity-example-gremlin/gremlinRoleDefinitions/00000000-0000-0000-0000-000000000004. This example uses fictitious data, and your identifier is distinct from this example.Create a new JSON file named
role-definition.json. In this file, create a resource definition that specifies the data actions that you want to allow.Use
az cosmosdb gremlin role definition createto create the role definition. Userole-definition.jsonas the input for the--bodyargument.az cosmosdb gremlin role definition create \ --account-name <account-name> \ --resource-group <resource-group> \ --body @role-definition.jsonList all the role definitions again and record the
idproperty of your new custom role.Assign the new role by using
az cosmosdb gremlin role assignment create. Use the previously recorded role definition identifier, the unique identifier for your identity, and the scope (account, database, or graph).az cosmosdb gremlin role assignment create \ --account-name <account-name> \ --resource-group <resource-group> \ --role-definition-id <role-definition-id> \ --principal-id <principal-id> \ --scope /Use
az cosmosdb gremlin role assignment listto list all role assignments for your account, and verify your assignment.az cosmosdb gremlin role assignment list \ --account-name <account-name> \ --resource-group <resource-group>
First, get the resource identifier of the existing Azure Cosmos DB for Gremlin account by using
az cosmsodb show, and store it in a variable.resourceId=$( \ az cosmosdb show \ --resource-group "<name-of-existing-resource-group>" \ --name "<name-of-existing-table-account>" \ --query "id" \ --output tsv \ ) az rest \ --method "GET" \ --url $resourceId/gremlinRoleDefinitions?api-version=2023-04-15Then, list all the role definitions associated with your Azure Cosmos DB for Gremlin account by using
az rest. Finally, review the output and locate the role definition namedCosmos DB Built-in Data Contributor. The output contains the unique identifier of the role definition in theidproperty. Record this value because you need to use it in the assignment step later in this article.[ ..., { "id": "/subscriptions/aaaa0a0a-bb1b-cc2c-dd3d-eeeeee4e4e4e/resourceGroups/msdocs-identity-example/providers/Microsoft.DocumentDB/databaseAccounts/msdocs-identity-example-gremlin/gremlinRoleDefinitions/00000000-0000-0000-0000-000000000004", "name": "00000000-0000-0000-0000-000000000004", "properties": { "assignableScopes": [ "/subscriptions/aaaa0a0a-bb1b-cc2c-dd3d-eeeeee4e4e4e/resourceGroups/msdocs-identity-example/providers/Microsoft.DocumentDB/databaseAccounts/msdocs-identity-example-gremlin" ], "permissions": [ { "dataActions": [ "Microsoft.DocumentDB/databaseAccounts/readMetadata", "Microsoft.DocumentDB/databaseAccounts/tables/*", "Microsoft.DocumentDB/databaseAccounts/tables/containers/entities/*" ], "notDataActions": [] } ], "roleName": "Cosmos DB Built-in Data Contributor", "type": "BuiltInRole" }, "type": "Microsoft.DocumentDB/databaseAccounts/gremlinRoleDefinitions" } ... ]In this example, the
idvalue is/subscriptions/aaaa0a0a-bb1b-cc2c-dd3d-eeeeee4e4e4e/resourceGroups/msdocs-identity-example/providers/Microsoft.DocumentDB/databaseAccounts/msdocs-identity-example-gremlin/gremlinRoleDefinitions/00000000-0000-0000-0000-000000000004. This example uses fictitious data, and your identifier is distinct from this example. This example output is truncated.Create a new Bicep file to define your role definition. Name the file
data-plane-role-definition.bicep. Add the following data actions to the definition:Data action Description Microsoft.DocumentDB/databaseAccounts/readMetadataMicrosoft.DocumentDB/databaseAccounts/tables/*Microsoft.DocumentDB/databaseAccounts/tables/containers/entities/*metadata description = 'Create RBAC definition for data plane access to Azure Cosmos DB for Gremlin.' @description('Name of the Azure Cosmos DB for Gremlin account.') param accountName string @description('Name of the role definition.') param roleDefinitionName string = 'API for Gremlin Data Plane Owner' resource account 'Microsoft.DocumentDB/databaseAccounts@2023-04-15' existing = { name: accountName } resource definition 'Microsoft.DocumentDB/databaseAccounts/gremlinRoleDefinitions@2023-04-15' = { name: guid('table-role-definition', account.id) parent: account properties: { roleName: roleDefinitionName type: 'CustomRole' assignableScopes: [ account.id ] permissions: [ { dataActions: [ 'Microsoft.DocumentDB/databaseAccounts/readMetadata' 'Microsoft.DocumentDB/databaseAccounts/tables/*' 'Microsoft.DocumentDB/databaseAccounts/tables/containers/entities/*' ] } ] } } output definitionId string = definition.idTip
In the Azure Cosmos DB native implementation of role-based access control, scope refers to the granularity of resources within an account for which you want permission applied. At the highest level, you can scope a data plane role-based access control assignment to the entire account by using the largest scope. This scope includes all databases and containers within the account:
/subscriptions/<subscription-id>/resourcegroups/<resource-group-name>/providers/Microsoft.DocumentDB/databaseAccounts/<account-name>/Or, you can scope your data plane role assignment to a specific database:
/subscriptions/<subscription-id>/resourcegroups/<resource-group-name>/providers/Microsoft.DocumentDB/databaseAccounts/<account-name>/dbs/<database-name>Finally, you can scope the assignment to a single container, the most granular scope:
/subscriptions/<subscription-id>/resourcegroups/<resource-group-name>/providers/Microsoft.DocumentDB/databaseAccounts/<account-name>/dbs/<database-name>/colls/<container-name>In many cases, you can use the relative scope instead of the fully qualified scope. For example, you can use this relative scope to grant data plane role-based access control permissions to a specific database and container from an Azure CLI command:
/dbs/<database-name>/colls/<container-name>You can also grant universal access to all databases and containers by using the relative scope:
/Create a new Bicep parameters file named
data-plane-role-definition.bicepparam. In this parameters file, assign the name of your existing Azure Cosmos DB for Gremlin account to theaccountNameparameter.using './data-plane-role-definition.bicep' param accountName = '<name-of-existing-table-account>'Deploy the Bicep template by using
az deployment group create. Specify the name of the Bicep template, parameters file, and Azure resource group.az deployment group create \ --resource-group "<name-of-existing-resource-group>" \ --parameters data-plane-role-definition.bicepparam \ --template-file data-plane-role-definition.bicepReview the output from the deployment. The output contains the unique identifier of the role definition in the
properties.outputs.definitionId.valueproperty. Record this value because you need to use it in the assignment step later in this article.{ "properties": { "outputs": { "definitionId": { "type": "String", "value": "/subscriptions/aaaa0a0a-bb1b-cc2c-dd3d-eeeeee4e4e4e/resourcegroups/msdocs-identity-example/providers/Microsoft.DocumentDB/databaseAccounts/msdocs-identity-example-table-account/gremlinRoleDefinitions/dddddddd-9999-0000-1111-eeeeeeeeeeee" } } } }In this example, the
idvalue is/subscriptions/aaaa0a0a-bb1b-cc2c-dd3d-eeeeee4e4e4e/resourcegroups/msdocs-identity-example/providers/Microsoft.DocumentDB/databaseAccounts/msdocs-identity-example-table-account/gremlinRoleDefinitions/dddddddd-9999-0000-1111-eeeeeeeeeeee. This example uses fictitious data, and your identifier is distinct from this example. This example is a subset of the typical JSON outputted from the deployment for clarity.Create another Bicep file to assign a role to an identity. Name this file
data-plane-role-assignment.bicep.metadata description = 'Assign RBAC role for data plane access to Azure Cosmos DB for Gremlin.' @description('Name of the Azure Cosmos DB for Gremlin account.') param accountName string @description('Id of the role definition to assign to the targeted principal in the context of the account.') param roleDefinitionId string @description('Id of the identity/principal to assign this role in the context of the account.') param identityId string resource account 'Microsoft.DocumentDB/databaseAccounts@2023-04-15' existing = { name: accountName } resource assignment 'Microsoft.DocumentDB/databaseAccounts/tableRoleAssignments@2023-04-15' = { name: guid(roleDefinitionId, identityId, account.id) parent: account properties: { principalId: identityId roleDefinitionId: roleDefinitionId scope: account.id } } output id string = assignment.idCreate a new Bicep parameters file named
data-plane-role-assignment.bicepparam. In this parameters file, assign the name of your existing Azure Cosmos DB for Gremlin account to theaccountNameparameter. Assign the previously recorded role definition identifiers to theroleDefinitionIdparameter. Also assign the unique identifier for your identity to theidentityIdparameter.using './data-plane-role-assignment.bicep' param accountName = '<name-of-existing-table-account>' param roleDefinitionId = '<id-of-new-role-definition>' param identityId = '<id-of-existing-identity>'Deploy this Bicep template by using
az deployment group create.az deployment group create \ --resource-group "<name-of-existing-resource-group>" \ --parameters data-plane-role-assignment.bicepparam \ --template-file data-plane-role-assignment.bicepRepeat these steps to grant access to the account from any other identities that you want to use.
You can repeat these steps for as many identities as you want. Typically, these steps are at least repeated to allow developers access to an account by using their human identity and to allow applications access to data by using a managed identity.
List all the role definitions associated with your Azure Cosmos DB for Gremlin account by using
Get-AzCosmosDBGremlinRoleDefinition.Get-AzCosmosDBGremlinRoleDefinition \ -AccountName <account-name> \ -ResourceGroupName <resource-group>Review the output and locate the role definition named
Cosmos DB Built-in Data Contributor. The output contains the unique identifier of the role definition in theIdproperty. Record this value because you need to use it in the assignment step later in this article.Create a new role definition by using
New-AzCosmosDBGremlinRoleDefinitionand a JSON file that describes the permissions that you want to allow.New-AzCosmosDBGremlinRoleDefinition \ -AccountName <account-name> \ -ResourceGroupName <resource-group> \ -InputObject (Get-Content -Raw -Path ./role-definition.json | ConvertFrom-Json)List all the role definitions again, and record the
Idvalue of your new custom role.Assign the new role by using
New-AzCosmosDBGremlinRoleAssignment. Use the previously recorded role definition identifier, the unique identifier for your identity, and the scope (account, database, or graph).New-AzCosmosDBGremlinRoleAssignment \ -AccountName <account-name> \ -ResourceGroupName <resource-group> \ -RoleDefinitionId <role-definition-id> \ -PrincipalId <principal-id> \ -Scope /List all role assignments for your account, and verify your assignment.
Get-AzCosmosDBGremlinRoleAssignment \
  -AccountName <account-name> \
  -ResourceGroupName <resource-group>
Warning
Managing data plane role-based access control isn't supported in the Azure portal.
Validate data plane role-based access in code
Validate that you correctly granted access by using application code and the Azure SDK.
using Azure.Identity;
using Azure.Core;
using Azure.Identity;
using Microsoft.Azure.Cosmos.Gremlin;

ManagedIdentityCredential defaultCredential = new ManagedIdentityCredential();
var scopes = new string[] { $"https://cosmos.azure.cn/.default" };
CancellationTokenSource cts = new CancellationTokenSource();

var accessToken = await defaultCredential.GetTokenAsync(new TokenRequestContext(scopes), cts.Token);
var credentialString = accessToken.Token;

var server = new GremlinServer(
    hostname: "<account-name>.gremlin.cosmos.azure.cn",
    port: 443,
    username: "/dbs/<database-name>/colls/<graph-name>",
    password: credentialString,
    enableSsl: true
);

var client = new GremlinClient(
    gremlinServer: server,
    graphSONReader: new GraphSON3Reader(),
    graphSONWriter: new GraphSON2Writer(),
    GremlinClient.GraphSON2MimeType
);
const { DefaultAzureCredential } = require('@azure/identity');
const gremlin = require('gremlin');

const credential = new DefaultAzureCredential();
const tokenResponse = await credential.getToken('https://cosmos.azure.cn/.default');
const accessToken = tokenResponse.token;

const credentials = new gremlin.driver.auth.PlainTextSaslAuthenticator(
  `/dbs/<database-name>/colls/<graph-name>`,
  accessToken
);

const client = new gremlin.driver.Client(
  `https://<account-name>.gremlin.cosmos.azure.cn:443/`,
  {
    authenticator: credentials,
    traversalSource: 'g',
    mimeType: 'application/vnd.gremlin-v2.0+json',
  }
);
from azure.identity import ManagedIdentityCredential
from gremlin_python.driver import client, serializer

credential = ManagedIdentityCredential()
access_token = credential.get_token(SCOPE)
credential_string = access_token.token

gremlin_client = client.Client(
    url="wss://<account-name>.gremlin.cosmos.azure.cn",
    traversal_source="g",
    username="/dbs/<database-name>/colls/<graph-name>}",
    password=f"{credential_string}",
    message_serializer=serializer.GraphSONSerializersV2d0(),
)
import com.azure.identity.DefaultAzureCredentialBuilder;
import com.azure.core.credential.TokenRequestContext;
import com.azure.core.credential.AccessToken;
import org.apache.tinkerpop.gremlin.driver.Cluster;
import org.apache.tinkerpop.gremlin.driver.Client;
import org.apache.tinkerpop.gremlin.driver.ser.GraphSONMessageSerializerV2d0;

TokenCredential credential = new DefaultAzureCredentialBuilder().build();
TokenRequestContext requestContext = new TokenRequestContext().addScopes(scope);
AccessToken accessToken = credential.getToken(requestContext).block();
String credentialString = accessToken.getToken();

String resourcePath = "/dbs/" + "<database-name>" + "/colls/" + "<graph-name>";
Cluster cluster = Cluster.build()
        .addContactPoint("<account-endpoint>")
        .port(443)
        .credentials(resourcePath, credentialString)
        .enableSsl(true)
        .maxWaitForConnection(100000)
        .serializer(new GraphSONMessageSerializerV2d0())
        .create();

Client client = cluster.connect();