Enable data encryption with customer-managed keys in Azure Cosmos DB for PostgreSQL
APPLIES TO:
Azure Cosmos DB for PostgreSQL (powered by the Citus database
extension to PostgreSQL)
Prerequisites
- An existing Azure Cosmos DB for PostgreSQL account.
- If you have an Azure subscription, create a new account.
- If you don't have an Azure subscription, create a trial subscription before you begin.
Enable data encryption with customer-managed keys
Important
Create all the following resources in the same region where your Azure Cosmos DB for PostgreSQL cluster will be deployed.
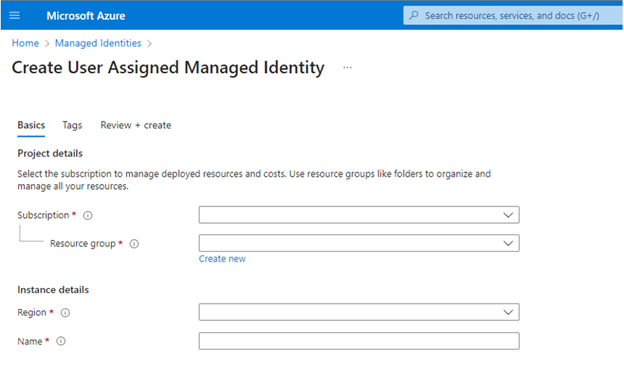
Create a user-assigned managed identity. Currently, Azure Cosmos DB for PostgreSQL only supports user-assigned managed identities.
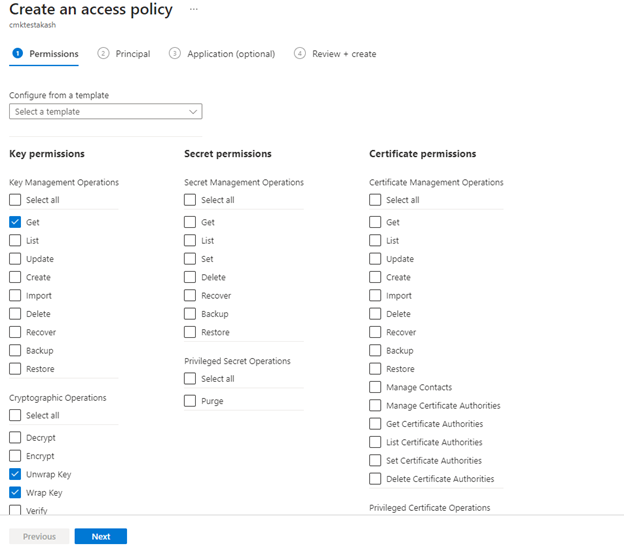
Create an Azure Key Vault and add an access policy to the created User-Assigned Managed Identity with the following key permissions: Get, Unwrap Key, and Wrap Key.
Generate a key in the key vault (supported key types: RSA 2048, 3071, 4096).
Select the customer-managed key encryption option during the creation of the Azure Cosmos DB for PostgreSQL cluster and select the appropriate user-assigned managed identity, key vault, and key created in steps 1, 2, and 3.
Detailed steps
User-assigned managed identity
Search for Managed identities in the global search bar.
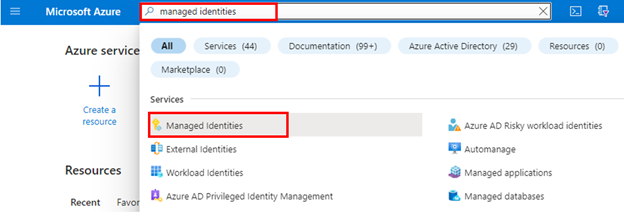
Create a new user assigned managed identity in the same region as your Azure Cosmos DB for PostgreSQL cluster.
Learn more about user-assigned managed identity.
Key Vault
Using customer-managed keys with Azure Cosmos DB for PostgreSQL requires you to set two properties on the Azure Key Vault instance that you plan to use to host your encryption keys: Soft Delete and Purge Protection.
If you create a new Azure Key Vault instance, enable these properties during creation:
If you're using an existing Azure Key Vault instance, you can verify that these properties are enabled by looking at the Properties section on the Azure portal. If any of these properties aren�t enabled, see the "Enabling soft delete" and "Enabling Purge Protection" sections in one of the following articles.
- How to use soft-delete with PowerShell.
- How to use soft-delete with Azure CLI.
The key Vault must be set with 90 days for Days to retain deleted vaults. If the existing key Vault is configured with a lower number, you'll need to create a new key vault as this setting can't be modified after creation.
Important
Your Azure Key Vault instance must allow public access from all networks.
Add an Access Policy to the Key Vault
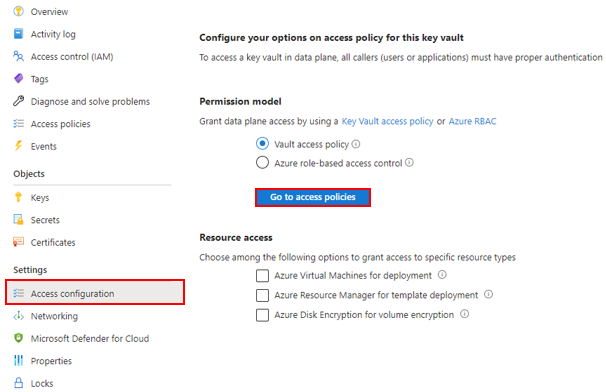
From the Azure portal, go to the Azure Key Vault instance that you plan to use to host your encryption keys. Select Access configuration from the left menu. Make sure Vault access policy is selected under Permission model and then select Go to access policies.
Select + Create.
In the Permissions Tab under the Key permissions drop-down menu, select Get, Unwrap Key, and Wrap Key permissions.
In the Principal Tab, select the User Assigned Managed Identity you created in prerequisite step.
Navigate to Review + create select Create.
Create / Import Key
From the Azure portal, go to the Azure Key Vault instance that you plan to use to host your encryption keys.
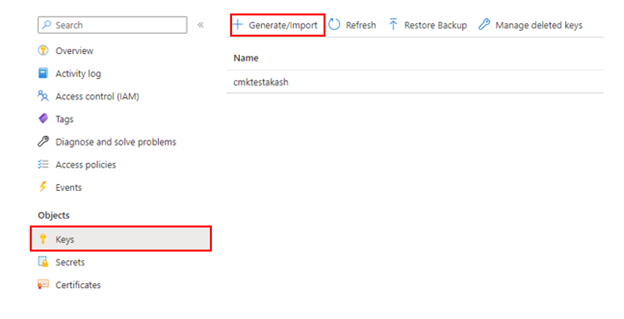
Select Keys from the left menu and then select +Generate/Import.
The customer-managed key to be used for encrypting the DEK can only be asymmetric RSA Key type. All RSA Key sizes 2048, 3072 and 4096 are supported.
The key activation date (if set) must be a date and time in the past. The expiration date (if set) must be a future date and time.
The key must be in the Enabled state.
If you're importing an existing key into the key vault, make sure to provide it in the supported file formats (
.pfx,.byok,.backup).If you're manually rotating the key, the old key version shouldn't be deleted for at least 24 hours.
Enable CMK encryption during the provisioning of a new cluster
During the provisioning of a new Azure Cosmos DB for PostgreSQL cluster, after providing the necessary information under Basics and Networking tabs, navigate to the Encryption tab.
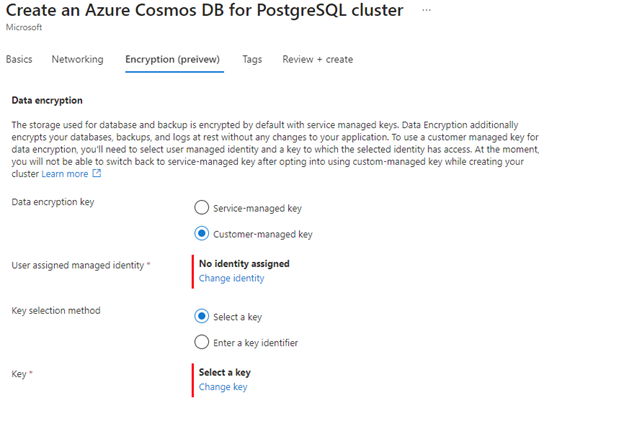
Select Customer-managed key under Data encryption key option.
Select the user assigned managed identity created in the previous section.
Select the key vault created in the previous step, which has the access policy to the user managed identity selected in the previous step.
Select the key created in the previous step, and then select Review + create.
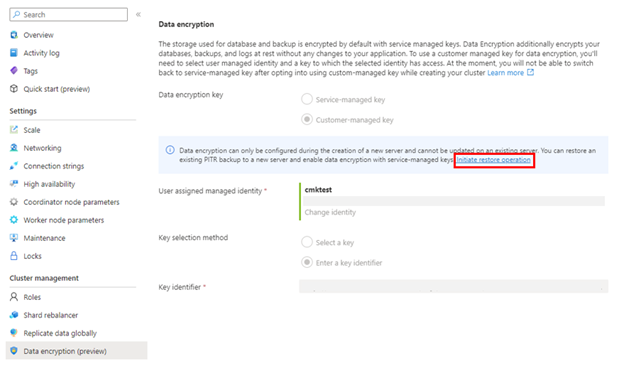
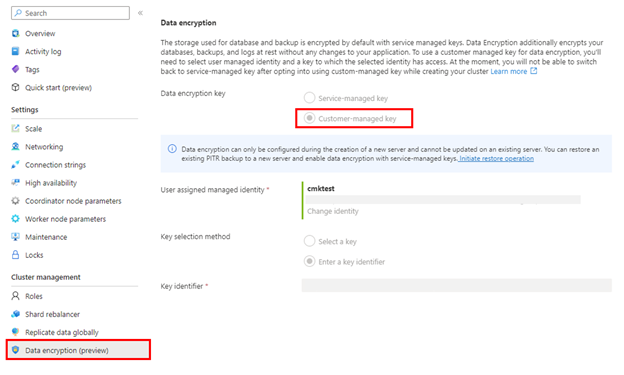
Once the cluster is created, verify that CMK encryption is enabled by navigating to the Data Encryption blade of the Azure Cosmos DB for PostgreSQL cluster in the Azure portal.
Note
Data encryption can only be configured during the creation of a new cluster and can't be updated on an existing cluster. A workaround for updating the encryption configuration on an existing cluster is to perform a cluster restore and configure the data encryption during the creation of the newly restored cluster.
High availability
When CMK encryption is enabled on the primary cluster, all HA standby nodes are automatically encrypted by the primary cluster’s key.
Changing encryption configuration by performing a PITR
Encryption configuration can be changed from service-managed encryption to customer-managed encryption or vice versa while performing a cluster restore operation (PITR - point-in-time restore).
Monitor the customer-managed key in Key Vault
To monitor the database state, and to enable alerting for the loss of transparent data encryption protector access, configure the following Azure features:
Azure Resource Health: An inaccessible database that has lost access to the Customer Key shows as "Inaccessible" after the first connection to the database has been denied.
Activity log: When access to the Customer Key in the customer-managed Key Vault fails, entries are added to the activity log. You can reinstate access as soon as possible, if you create alerts for these events.
Action groups: Define these groups to send you notifications and alerts based on your preference.
Next steps
- Learn about data encryption with customer-managed keys
- Check out CMK limits and limitations in Azure Cosmos DB for PostgreSQL

