Note
Access to this page requires authorization. You can try signing in or changing directories.
Access to this page requires authorization. You can try changing directories.
Azure Data Explorer is a fast and highly scalable data exploration service for log and telemetry data. To use Azure Data Explorer, you first create a cluster and then create one or more databases in that cluster. This article covers how to create a full cluster and a database.
In this article, you create the full cluster in the Azure portal. You can also create a full cluster and database by using C#, Python, Go, the Azure CLI, PowerShell, or an Azure Resource Manager (ARM) template. For more information, see Create a cluster and database.
For information on cluster subscription limits, see Azure Data Explorer limits.
Prerequisites
The prerequisites vary depending on whether you're creating a full cluster. Select the relevant tab.
- An Azure subscription. Create a Azure account.
- Sign in to the Azure portal.
Create a cluster
Select the relevant tab to learn how to create a full cluster.
Create an Azure Data Explorer cluster with a defined set of compute and storage resources in an Azure resource group.
Select the + Create a resource button in the upper-left corner of the portal.

Search for Azure Data Explorer.
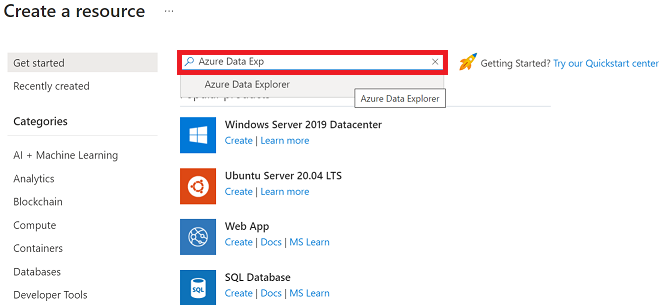
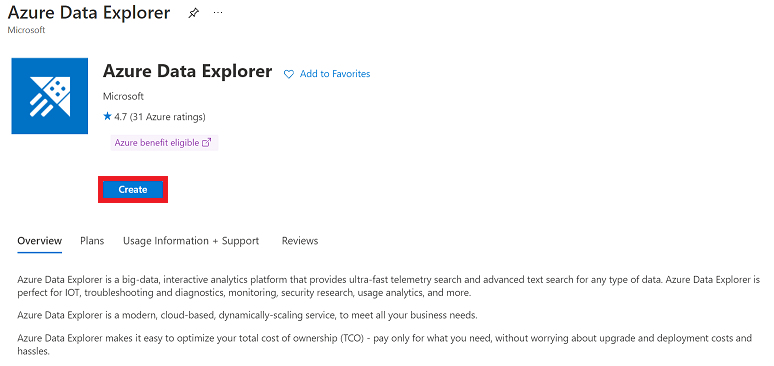
Under Azure Data Explorer, select Create.
Fill out the basic cluster details with the following information.
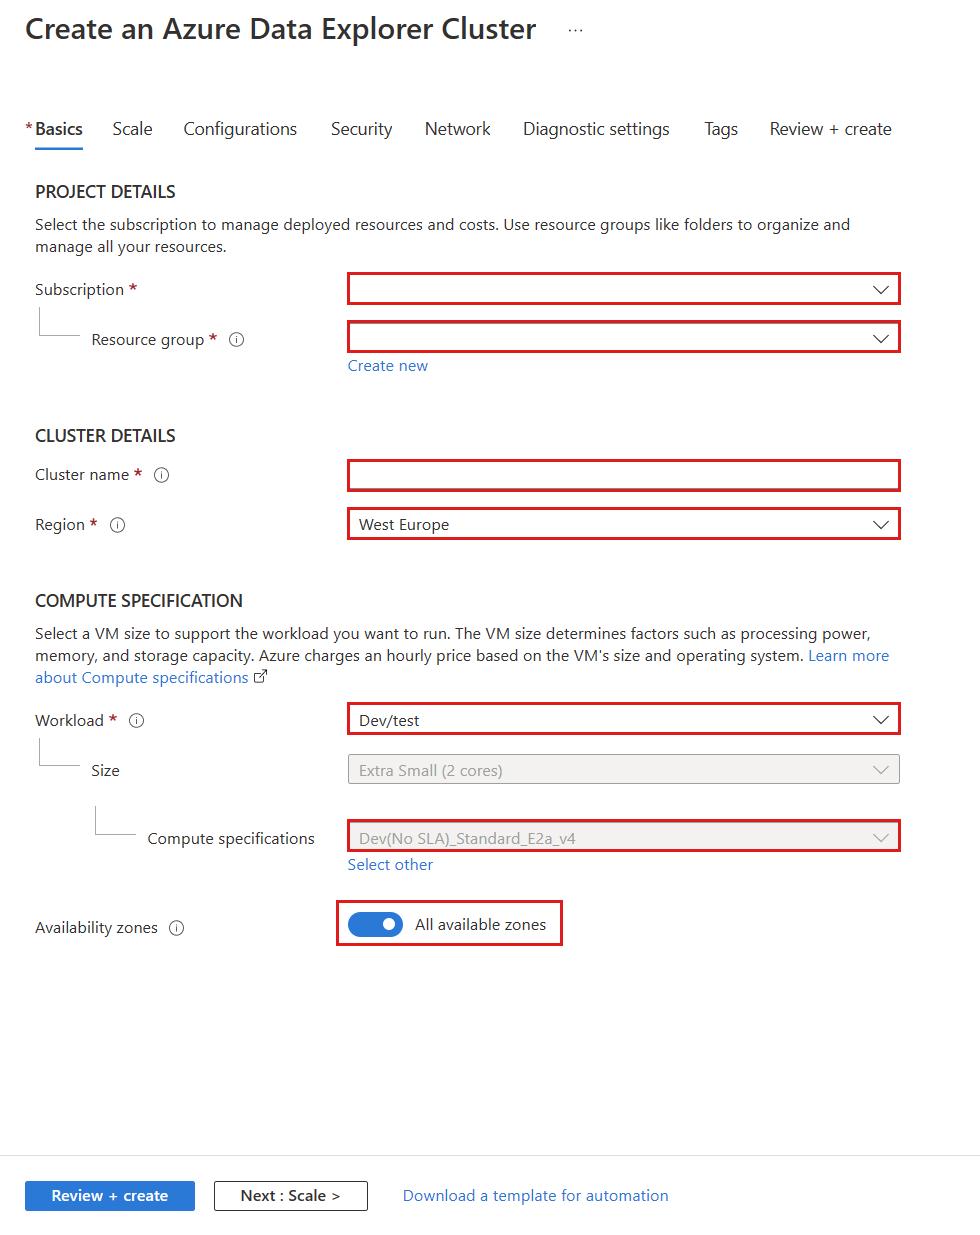
Setting Suggested value Field description Subscription Your subscription Select the Azure subscription that you want to use for your cluster. Resource group Your resource group Use an existing resource group or create a new resource group. Cluster name A unique cluster name Choose a unique name that identifies your cluster. The domain name [region].kusto.chinacloudapi.cn is appended to the cluster name you provide. The name can contain only lowercase letters and numbers. It must contain from 4 to 22 characters. Region For a production system, select the region that best meets your needs. Workload Dev/Test Select Dev/Test for this quickstart. For a production system, select the specification that best meets your needs. Compute specifications Dev(No SLA)_Standard_E2a_v4 Select Dev(No SLA)_Standard_E2a_v4 for this quickstart. For a production system, select the specification that best meets your needs. Availability zones On Turning on this feature distributes the cluster storage and compute resources across multiple physical zones within a region for added protection and availability. By default, this feature is turned on if zones are supported in the region. If fewer than three zones are available for the compute instances, the portal displays the number of supported zones. Deployment to availability zones is possible when creating the cluster or can be migrated later. Read more about Azure Availability Zones. Select Review + create to review your cluster details, and on the next screen select Create to provision the cluster. Provisioning typically takes about 10 minutes.
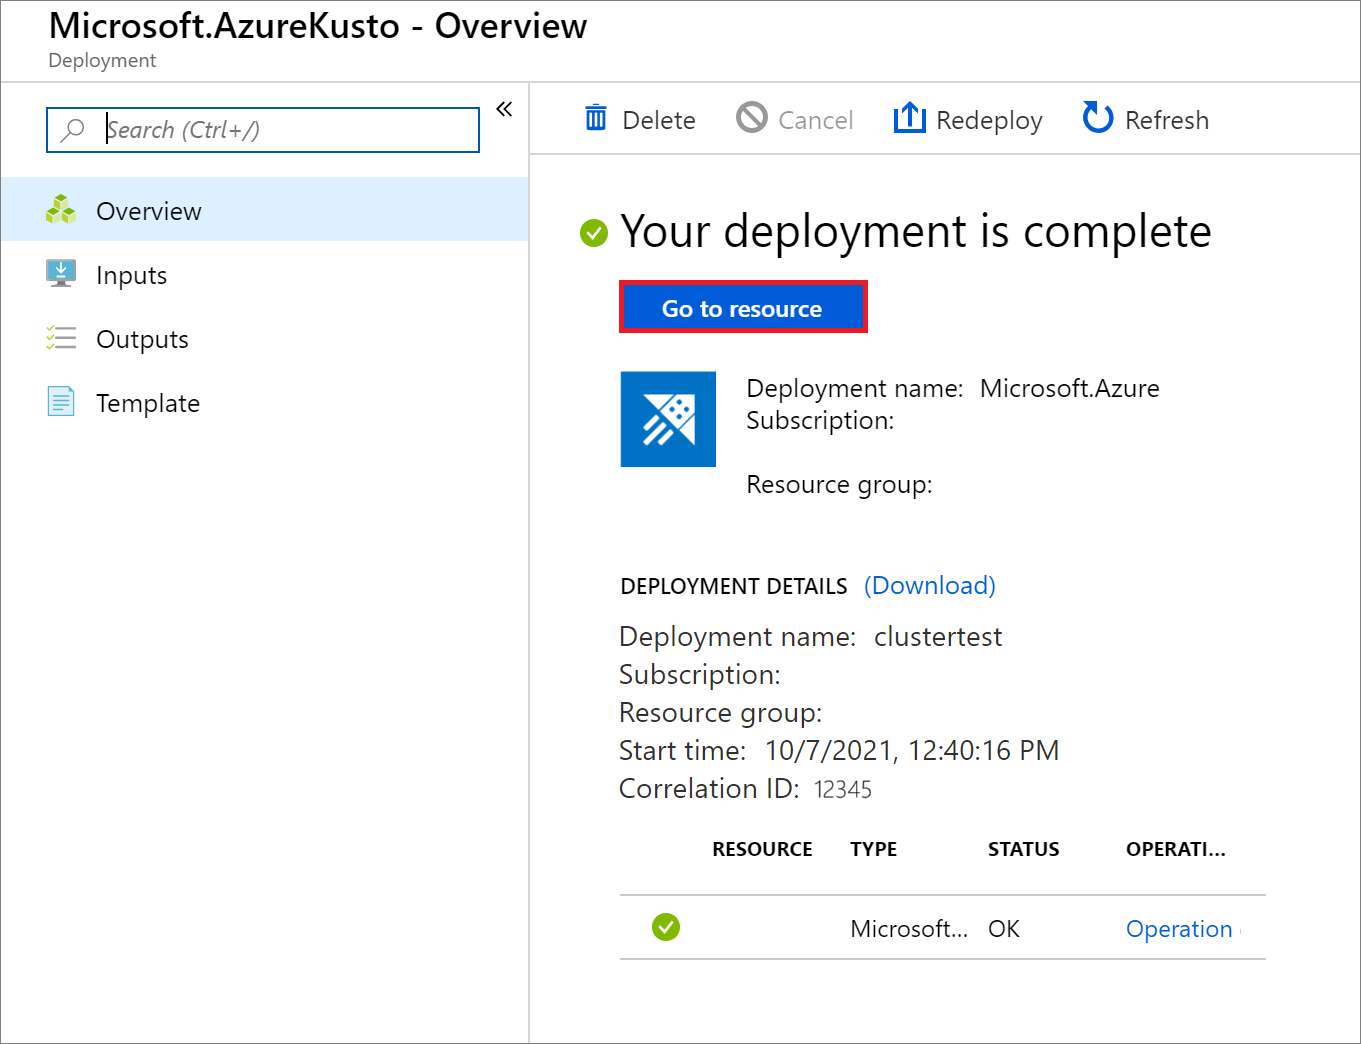
When the deployment completes, select Go to resource.


Note
If the deployment fails with the error "SubscriptionNotRegistered", retry the operation.
Deployment fails when the Kusto resource provider isn't registered on the subscription described in Azure resource providers and types. When the deployment fails, the Kusto resource provider registers itself on the subscription, and the retry can then succeed.
Create a database
Select the relevant tab to learn how to create a database within your cluster.
To create a database in your full cluster:
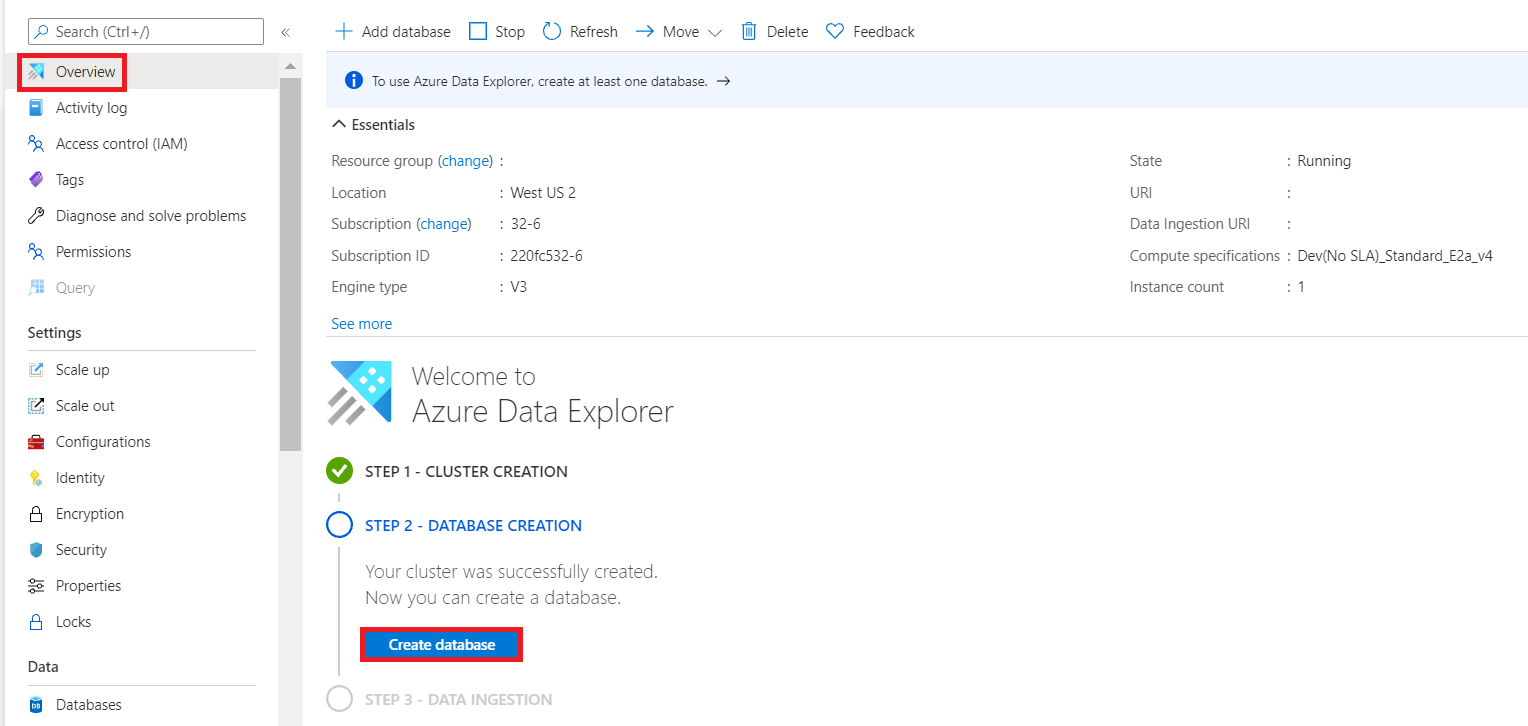
Go to your cluster in the Azure portal.
On the Overview tab, select Create database.
Fill out the form with the following information.
Setting Suggested value Field description Admin Default selected The admin field is disabled. Add new admins after database creation. Database name TestDatabase The name of database to create. The name must be unique within the cluster. Retention period 365 The number of days that data is available for querying. The period is measured from the time the data is ingested. Cache period 31 The number of days to keep frequently queried data available in SSD storage or RAM to optimize querying. 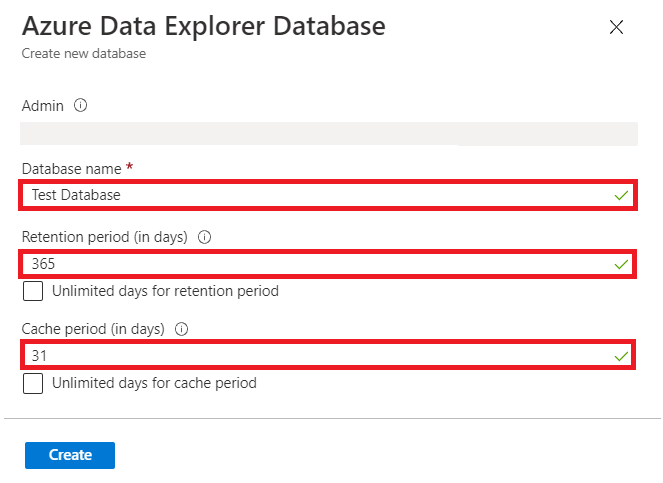
Select Create to create the database. Creation typically takes less than a minute. When the process finishes, you're back on the cluster Overview tab.


Run commands in the database
After you create the cluster and database, you can run queries and commands. The database doesn't have data yet, but you can still see how the tools work.
Under your cluster, select Query. Paste the command
.show databasesinto the query window, and select Run.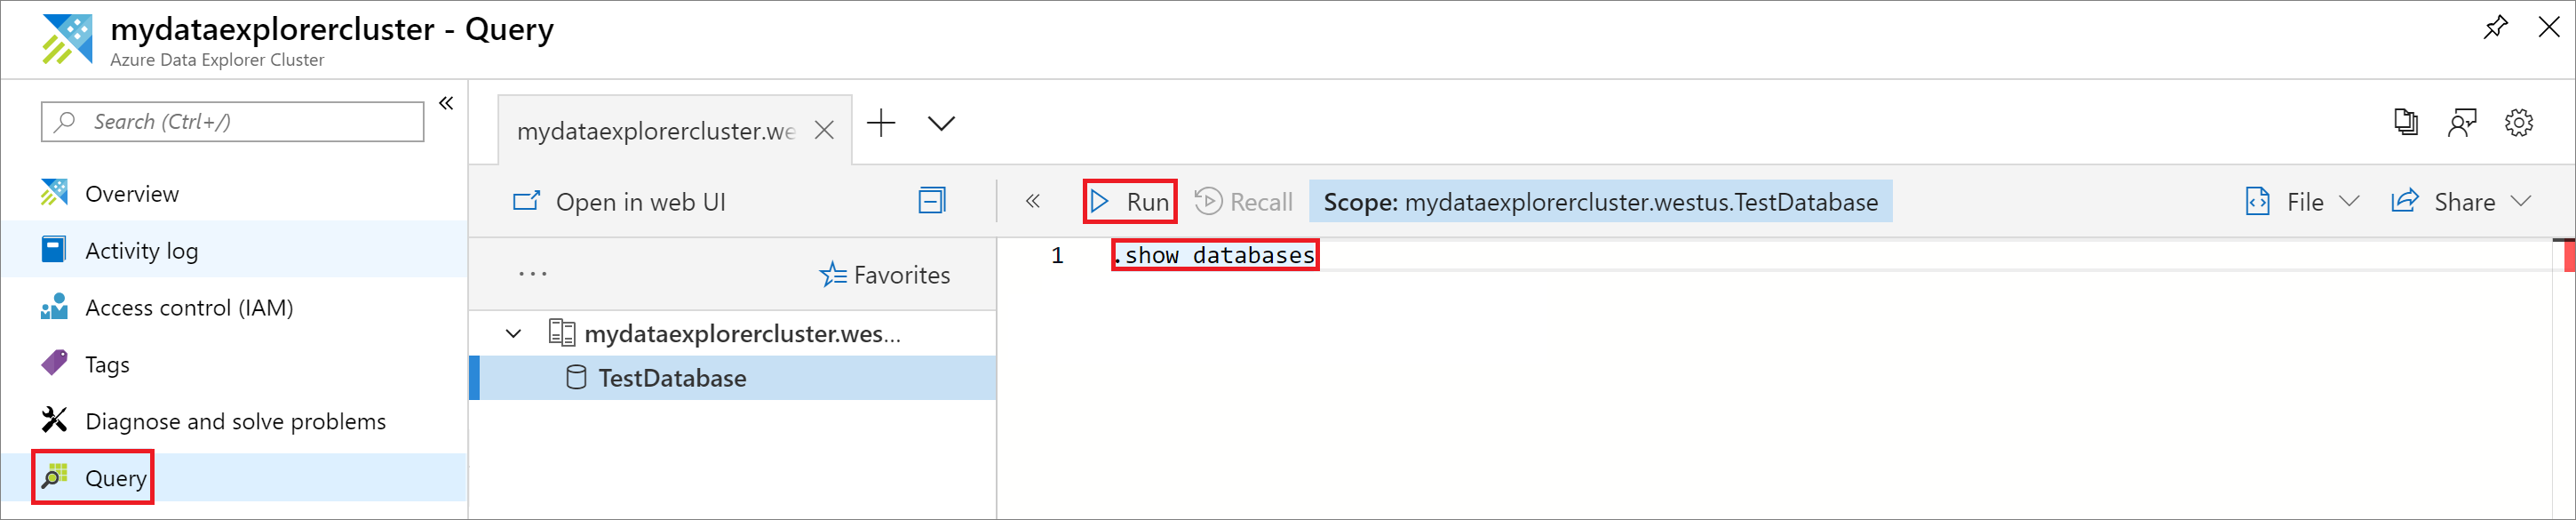
The result set shows TestDatabase, the only database in the cluster.
Paste the command
.show tablesinto the query window and select Run.This command returns an empty result set because you don't have any tables yet. You add a table in the next article in this series.

Stop and restart the cluster
You can stop and restart a cluster depending on your business needs. Stopping the cluster significantly reduces cost as it releases the compute resources, which are the bulk of the overall cluster cost, without deleting the database.
To stop the cluster, select Stop at the top of the Overview tab.

Note
When the cluster is stopped, data isn't available for queries, and you can't ingest new data.
To restart the cluster, select Start at the top of the Overview tab.
When the cluster restarts, it takes about 10 minutes for it to become available (like when it was originally provisioned). It takes more time for data to load into the hot cache.

Clean up resources
If you plan to follow other quickstarts and tutorials, keep the resources you created. Otherwise, clean up your resource group to avoid incurring costs.
In the Azure portal, select Resource groups on the far left, and then select the resource group that contains your Data Explorer cluster.
Select Delete resource group to delete the entire resource group. If you use an existing resource group, you can choose to only delete the Data Explorer cluster.