Ingest data from IoT Hub into Azure Data Explorer
Azure Data Explorer is a fast and highly scalable data exploration service for log and telemetry data. Azure Data Explorer offers ingestion (data loading) from event hubs, IoT hubs, and blobs written to blob containers.
This article shows you how to ingest data into Azure Data Explorer from IoT Hub, a big data streaming platform and IoT ingestion service.
For general information about ingesting into Azure Data Explorer from IoT Hub, see Connect to IoT Hub.
Prerequisites
- An Azure subscription. Create a Azure account.
- Create a cluster and database.
- A sample app and documentation for simulating a device.
- .NET SDK to compile and run the sample app.
Create an Iot Hub
This section describes how to create an IoT hub using the Azure portal.
Sign in to the Azure portal.
From the Azure homepage, select the + Create a resource button, and then enter IoT Hub in the Search the Marketplace field.
Select IoT Hub from the search results, and then select Create.
On the Basics tab, complete the fields as follows:
Subscription: Select the subscription to use for your hub.
Resource Group: Select a resource group or create a new one. To create a new one, select Create new and fill in the name you want to use. To use an existing resource group, select that resource group. For more information, see Manage Azure Resource Manager resource groups.
Region: Select the region in which you want your hub to be located. Select the location closest to you. Some features, such as IoT Hub device streams, are only available in specific regions. For these limited features, you must select one of the supported regions.
IoT Hub Name: Enter a name for your hub. This name must be globally unique. If the name you enter is available, a green check mark appears.
Important
Because the IoT hub will be publicly discoverable as a DNS endpoint, be sure to avoid entering any sensitive or personally identifiable information when you name it.
Select Next: Size and scale to continue creating your hub.
You can accept the default settings here. If desired, you can modify any of the following fields:
Pricing and scale tier: Your selected tier. You can choose from several tiers, depending on how many features you want and how many messages you send through your solution per day. The free tier is intended for testing and evaluation. It allows 500 devices to be connected to the hub and up to 8,000 messages per day. Each Azure subscription can create one IoT hub in the free tier.
If you are working through a Quickstart for IoT Hub device streams, select the free tier.
IoT Hub units: The number of messages allowed per unit per day depends on your hub's pricing tier. For example, if you want the hub to support ingress of 700,000 messages, you choose two S1 tier units. For details about the other tier options, see Choosing the right IoT Hub tier.
Microsoft Defender for IoT: Turn this on to add an extra layer of threat protection to IoT and your devices. This option is not available for hubs in the free tier.
Advanced Settings > Device-to-cloud partitions: This property relates the device-to-cloud messages to the number of simultaneous readers of the messages. Most hubs need only four partitions.
Select Next: Tags to continue to the next screen.
Tags are name/value pairs. You can assign the same tag to multiple resources and resource groups to categorize resources and consolidate billing. for more information, see Use tags to organize your Azure resources.
Select Next: Review + create to review your choices. You see something similar to this screen, but with the values you selected when creating the hub.
Select Create to create your new hub. Creating the hub takes a few minutes.
Register a device to the IoT Hub
In this section, you use the Azure CLI to create a device identity for this article. Device IDs are case sensitive.
In Azure CLI, run the following command to install the Azure IoT Extension for Azure CLI:
az extension add --name azure-iot
Create a new device identity called
myDeviceId
and retrieve the device connection string with these commands:az iot hub device-identity create --device-id myDeviceId --hub-name {Your IoT Hub name} az iot hub device-identity connection-string show --device-id myDeviceId --hub-name {Your IoT Hub name} -o table
Important
The device ID may be visible in the logs collected for customer support and troubleshooting, so make sure to avoid any sensitive information while naming it.
Make a note of the device connection string from the result. This device connection string is used by the device app to connect to your IoT Hub as a device.
Create a target table in Azure Data Explorer
Now you create a table in Azure Data Explorer to which IoT Hubs will send data. You create the table in the cluster and database provisioned in Prerequisites.
In the Azure portal, navigate to your cluster and select Query.
Copy the following command into the window and select Run to create the table (TestTable) which will receive the ingested data.
.create table TestTable (temperature: real, humidity: real)
Copy the following command into the window and select Run to map the incoming JSON data to the column names and data types of the table (TestTable).
.create table TestTable ingestion json mapping 'TestMapping' '[{"column":"humidity","path":"$.humidity","datatype":"real"},{"column":"temperature","path":"$.temperature","datatype":"real"}]'
Connect Azure Data Explorer table to IoT hub
Now you connect to the IoT Hub from Azure Data Explorer. When this connection is complete, data that flows into the iot hub streams to the target table you created.
Select Notifications on the toolbar to verify that the IoT Hub deployment was successful.
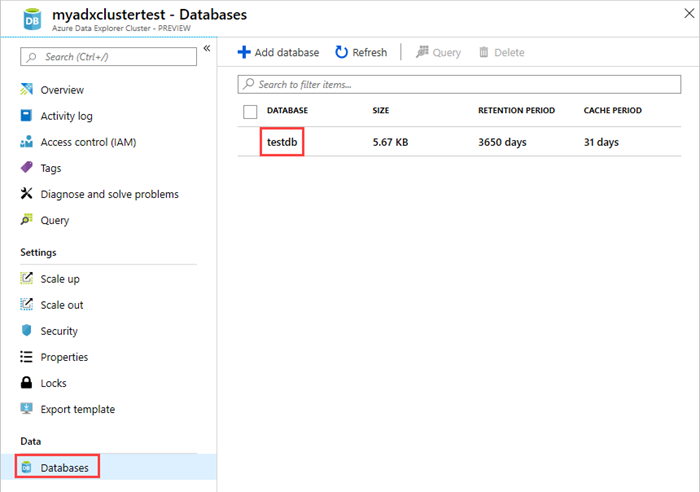
Under the cluster you created, select Databases then select the database that you created testdb.
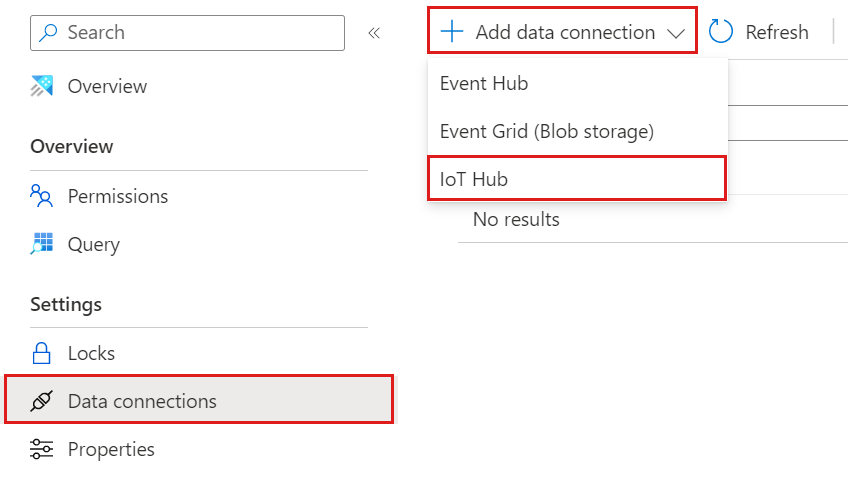
Select Data ingestion and Add data connection.
Create a data connection
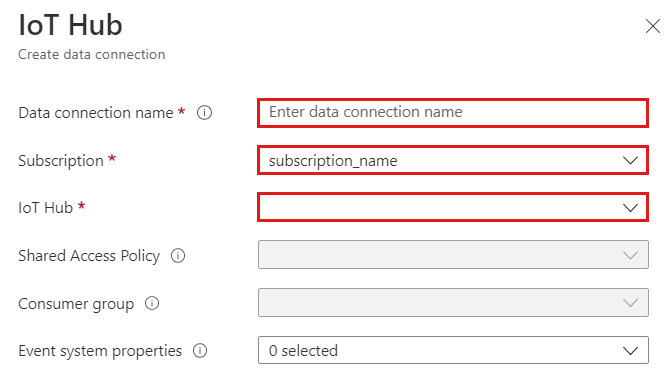
Fill out the form with the following information.
Setting Field description Data connection name The name of the connection you want to create in Azure Data Explorer Subscription The subscription ID where the Event Hub resource is located. IoT Hub IoT Hub name Shared access policy The name of the shared access policy. Must have read permissions Consumer group The consumer group defined in the IoT Hub built-in endpoint Event system properties The IoT Hub event system properties. When adding system properties, create or update table schema and mapping to include the selected properties.
Target database (multi-database data connection)
Specifying a target database allows you to override the default associated with the data connection. For more information about database routing, see Events routing.
Before you can set an alternate target database, you must first allow routing the data to multiple databases. Use the following steps to allow routing the data to alternate databases:
In the Azure portal, browse to your cluster.
Select Databases > Data connections.
Create or edit a data connection and in the Data connection pane, under Data routing settings, turn on the allow routing data to other database (multi-database data connection) option.
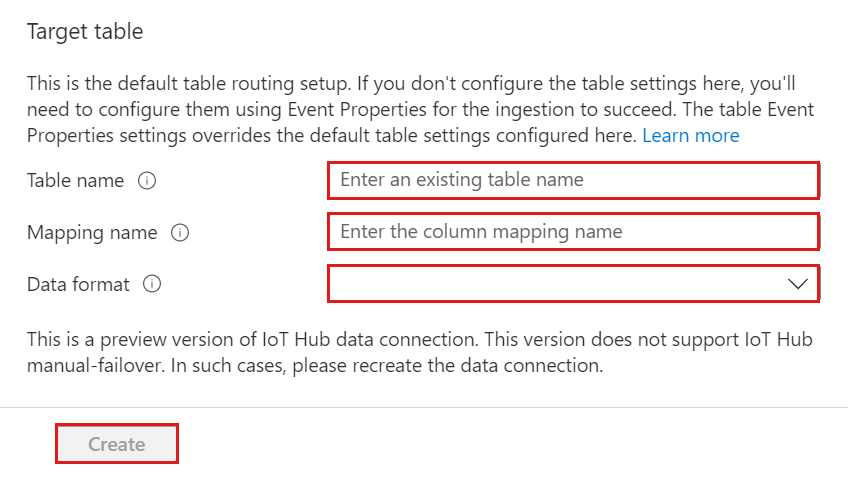
Target table
There are two options for routing the ingested data: static and dynamic. For this article, you use static routing, where you specify the table name, data format, and mapping. If the Event Hub message includes data routing information, this routing information will override the default settings.
Fill out the following routing settings:
Setting Suggested value Field description Table name TestTable The table you created in testdb. Data format JSON Supported formats are Avro, CSV, JSON, MULTILINE JSON, ORC, PARQUET, PSV, SCSV, SOHSV, TSV, TXT, TSVE, APACHEAVRO, and W3CLOG. Mapping TestMapping The mapping you created in testdb, which maps incoming data to the column names and data types of testdb. Required for JSON, MULTILINE JSON, and AVRO, and optional for other formats. Warning
In case of a manual failover, you must recreate the data connection.
Note
- You don't have to specify all Default routing settings. Partial settings are also accepted.
- Only events enqueued after you create the data connection are ingested.
Select Create.
Event system properties mapping
Note
- System properties are supported for single-record events.
- For
csv
mapping, properties are added at the beginning of the record. Forjson
mapping, properties are added according to the name that appears in the drop-down list.
If you selected Event system properties in the Data Source section of the table, you must include system properties in the table schema and mapping.
Generate sample data for testing
The simulated device application connects to a device-specific endpoint on your IoT hub and sends simulated temperature and humidity telemetry.
Download the sample C# project from https://github.com/Azure-Samples/azure-iot-samples-csharp/archive/refs/heads/main.zip and extract the ZIP archive.
In a local terminal window, navigate to the root folder of the sample C# project. Then navigate to the iot-hub\Quickstarts\SimulatedDevice folder.
Open the Program.cs file in a text editor of your choice.
Replace the value of the
s_connectionString
variable with the device connection string from Register a device to the IoT Hub. Then save your changes to Program.cs file.In the local terminal window, run the following commands to install the required packages for simulated device application:
dotnet restore
In the local terminal window, run the following command to build and run the simulated device application:
dotnet run
The following screenshot shows the output as the simulated device application sends telemetry to your IoT hub:
Review the data flow
With the app generating data, you can now see the data flow from the IoT hub to the table in your cluster.
In the Azure portal, under your IoT hub, you see the spike in activity while the app is running.
To check how many messages have made it to the database so far, run the following query in your test database.
TestTable | count
To see the content of the messages, run the following query:
TestTable
The result set:
Note
- Azure Data Explorer has an aggregation (batching) policy for data ingestion, designed to optimize the ingestion process. The policy is configured to 5 minutes, 1000 items or 1 GB of data by default, so you may experience a latency. See batching policy for aggregation options.
- Configure your table to support streaming and remove the lag in response time. See streaming policy.
Clean up resources
If you don't plan to use your IoT Hub again, clean up your resource group to avoid incurring costs.
In the Azure portal, select Resource groups on the far left, and then select the resource group you created.
If the left menu is collapsed, select
to expand it.
Under test-resource-group, select Delete resource group.
In the new window, type the name of the resource group to delete it, and then select Delete.