Note
Access to this page requires authorization. You can try signing in or changing directories.
Access to this page requires authorization. You can try changing directories.
Use Azure Private Link to create a secure classic compute plane Private Link connection for your Azure Databricks workspace. This connection secures traffic between clusters on the classic compute plane and core services on the Azure Databricks control plane.
- To enable hybrid access, inbound connectivity to Azure Databricks, see Configure Inbound Private Link.
- To connect from the serverless compute plane to Azure resources, see Configure private connectivity to Azure resources .
Why choose a classic compute plane Private Link connection only?
Configuring a classic compute plane Private Link connection provides critical security and compliance benefits for your data processing environment:
- Enhanced security: Prevents Azure Databricks clusters from communicating with the control plane over the public internet.
- Compliance requirements: Helps meet strict regulatory and corporate compliance mandates that require all internal cloud traffic to remain on a private network.
- Data exfiltration control: Securing the compute plane connection reduces the risk of data exfiltration.
- Eliminate public IP addresses: Works with secure cluster connectivity to enable a fully private compute environment with no public IP addresses on your clusters.
Architecture overview
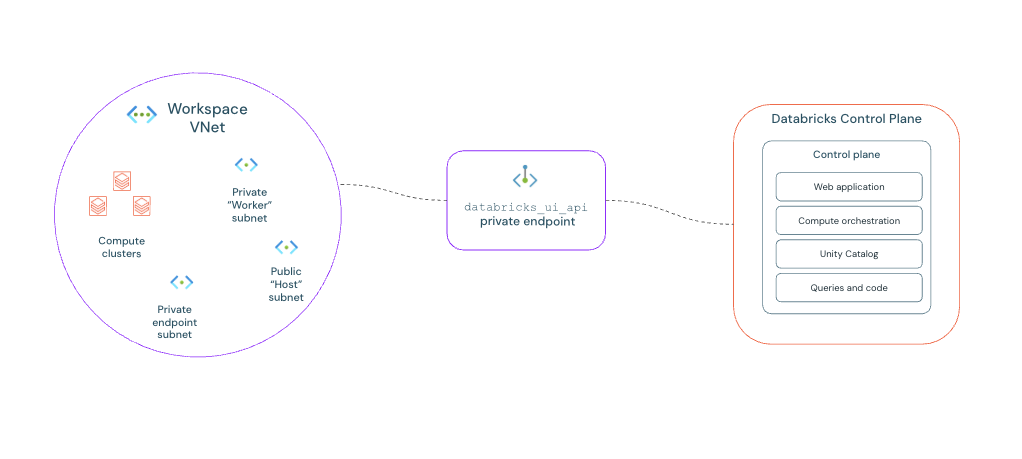
In a classic compute plane Private Link setup, you deploy a private endpoint directly in your workspace VNet (virtual network). This endpoint gives Azure Databricks clusters a private path to control plane services like the secure cluster connectivity relay. All traffic flows over the Microsoft Azure backbone network, and never touches the public internet.
Requirements
- The workspace must be on the Premium plan.
- You have an Azure Databricks workspace deployed with VNet injection.
- You must have Azure permissions to create private endpoints and manage DNS records.
Networking configuration
- A transit VNet configured for the following:
- It acts as the primary transit point for all user/client traffic connecting to your Azure network.
- It provides centralized connectivity for on-premises or other external networks.
- It manages shared services and contains the primary route for outbound internet traffic (egress).
- A dedicated subnet must exist in your workspace VNet specifically for private endpoints. If one doesn't exist, create it.
- Your private DNS zones are managed by Azure DNS.
Best practices
Azure Databricks recommends the following for a resilient and manageable setup:
- Architecture: Your network must follow the Microsoft-recommended hub-spoke architecture. See Hub-spoke network topology in Azure.
- Isolated authentication workspace: For improved resilience, create a separate browser authentication workspace inside your transit VNet. This dedicated workspace hosts the
browser_authenticationprivate endpoint and prevents a single point of failure if other workspaces are deleted.
Configuration paths
Choose the path that matches your scenario:
Option 1: Configure for a new workspace
Option 1: Configure for a new workspace
Follow these steps to deploy a new Azure Databricks workspace with a classic compute plane Private Link connection.
Step 1: Create a resource group
- In the Azure portal, select Resource groups and click Create.
- Name the resource group. Verify the Region matches the region where your VNet is deployed.
Step 2: Create a VNet
Create a customer-managed VNet, or workspace VNet, in your own Azure subscription. When you choose VNet injection, Azure Databricks deploys its compute resources directly inside this private, secure network that you own. You need this VNet in Step 3.
- Go to Virtual networks and click Create.
- Assign it to the resource group you just created and provide a descriptive name.
- Select the region where you want to host your Azure Databricks workspace.
- Define the IP address space for the VNet, such as
10.10.0.0/16. You are prompted to create an initial subnet with its own range, such as10.10.1.0/24. - Select Review + Create then Create.
Step 3: Create a new workspace
- In the Azure portal, search for and select Azure Databricks. Click Create.
- Choose the resource group you just created. Verify the Region matches the resource group and VNet.
- Azure Databricks recommends adding "managed" as a prefix in the Managed resource group name.
- On the Networking tab, configure the following:
- Deploy Azure Databricks workspace with Secure Cluster Connectivity (No Public IP): Select Yes.
- Deploy Azure Databricks workspace in your own Virtual Network (VNet): Select Yes.
- Select the workspace VNet you created previously.
- Create two subnets for the workspace. Azure Databricks recommends naming each subnet something easily identifiable, such as
private-worker-subnetorpublic-host-subnet. - Allow Public Network Access: Select Enabled.
- Required NSG Rules: Select No Azure Databricks Rules.
- Deploy Azure Databricks workspace with NAT Gateway: Select No.
Note
Select No Azure Databricks Rules for a classic compute plane Private Link connection only.
Step 4: Create a private endpoint
- Go to Private endpoints.
- Under Private endpoints, click Add.
- Configure the endpoint for
databricks_ui_api:- Name: Enter a descriptive name, such as
private-endpoint-front-end-ui. - Target sub-resource: Select
databricks_ui_api. - Virtual network: Select your workspace VNet.
- The workspace VNet and its dedicated private endpoint subnet provide a secure, direct network path, allowing your workspace to access its classic compute plane services privately.
- Region: Verify the region matches your Azure Databricks workspace.
- Name: Enter a descriptive name, such as
After deployment, proceed to the Shared Steps.
Option 2: Configure an existing workspace
Option 2: Configure an existing workspace
Important
Before you begin, stop all compute resources, such as clusters and SQL warehouses, in the workspace. The update fails if any compute resources are running.
Step 1: Update workspace networking settings
- Go to your Azure Databricks workspace in the Azure portal.
- Under Settings, click Networking.
- Confirm that Secure cluster connectivity (No Public IP) is set to Yes.
- Change Required NSG rules to NoAzureDatabricksRules.
- Click Save. The network update can take over 15 minutes to complete.
Step 2: Create a private endpoint on the workspace VNet
- From your workspace's Networking tab, select Private endpoint connections.
- Click
 Private endpoint.
 - Select the resource group for the endpoint, provide a name such as
my-workspace-fe-pe, and verify that the region matches your workspace. - On the Resources tab, set Target sub-resource to
databricks_ui_api. - Select the VNet associated with your workspace.
- Select your private endpoint subnet.
- Verify that Integrate with private DNS zone is set to Yes. Azure automatically selects the
privatelink.databricks.azure.cnzone. If one doesn't already exist, Azure shows a newprivatelink.databricks.azure.cnzone.
Shared steps
Step 1: Verify DNS
If you use the built-in Azure private DNS integration, Azure automatically creates a DNS address record for your workspace.
- Verify private DNS zone records:
- In the Azure portal, search for and navigate to the Private DNS zone named
privatelink.databricks.azure.cn. - Verify the following
Arecords exist and point to the private IP addresses of your endpoints:- Workspace UI/API record:
- Name: Your unique workspace ID, like
adb-xxxxxxxxxxxxxxxx.x - Value: The private IP address of your
databricks_ui_apiprivate endpoint.
- Name: Your unique workspace ID, like
- Browser authentication record:
- Name: Choose a descriptive name like
pl-auth.<your_region>. - Value: The private IP address of your
browser_authenticationprivate endpoint.
- Name: Choose a descriptive name like
- Workspace UI/API record:
- In the Azure portal, search for and navigate to the Private DNS zone named
Note
Compute resources in your workspace VNet must resolve the workspace URL to the private endpoint IP, not a public IP. Link the privatelink.databricks.azure.cn private DNS zone to your workspace VNet, or configure DNS forwarding if you use a hub-and-spoke architecture.
Step 2: Verify the classic compute plane Private Link connection
Verify the classic compute plane Private Link connection by launching a cluster.
- Log in to your Azure Databricks workspace.
- Go to Compute in the sidebar.
- Click Create compute, give it a name, and click Create.
The cluster launch can take several minutes. A successful cluster start is a good first check, but you must run a simple query or notebook command to fully confirm that the connection works.
- If the cluster fails to start after 10-15 minutes and the cluster event log shows an error like
Cluster terminated. Reason: Control Plane Request Failure, your Private Link setup is misconfigured. Review the steps on this page to troubleshoot the issue.