Note
Access to this page requires authorization. You can try signing in or changing directories.
Access to this page requires authorization. You can try changing directories.
Important
This feature is in Public Preview. You can confirm preview enrollment on the Previews page. See Manage Azure Databricks previews.
This page describes how embedding for external users works, how to configure your Azure Databricks workspace for secure sharing of embedded dashboards, and how to use sample applications to get started. Embedding for external users uses a service principal and scoped access tokens to authenticate and authorize access to embedded dashboards. This approach lets you share dashboards with viewers outside of your organization, such as partners and customers, without provisioning Azure Databricks accounts for those users.
To learn about other embedding options, including embedding dashboards for users within your organization, see Embed a dashboard.
How embedding for external users works
The diagram and numbered steps that follow explain how users are authenticated and dashboards are populated with user-scoped results when you embed a dashboard for external users.
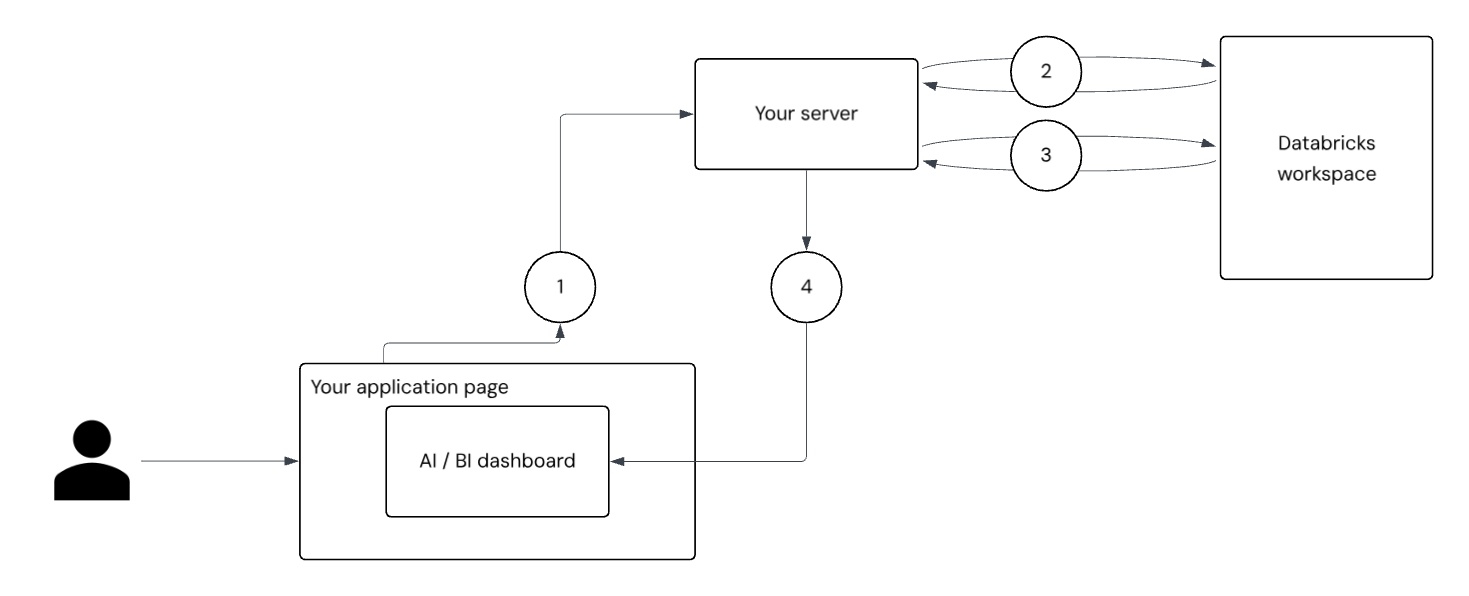
User authentication and request: The user signs in to your application. Your application's frontend sends an authenticated request to your server for a dashboard access token.
Service principal authentication: Your server uses the service principal secret to request and receive an OAuth token from the Databricks server. This is a broadly scoped token that can call all dashboard APIs that Azure Databricks has access to on behalf of the service principal. Your server calls the
/tokeninfoendpoint using this token, passing in basic user information, such asexternal_viewer_idandexternal_value. See Securely present dashboards to individual users.User-scoped token generation: Using the response from the
/tokeninfoendpoint and the Databricks OpenID Connect (OIDC) endpoint, your server generates a new tightly-scoped token that encodes the user information you have passed in.Dashboard rendering and data filtering: The application page instantiates
DatabricksDashboardfrom@databricks/aibi-clientand passes the user-scoped token during construction. The dashboard renders with the user's context. This token authorizes access, supports auditing withexternal_viewer_id, and carriesexternal_valuefor data filtering. Queries in dashboard datasets can reference__aibi_external_valueto apply per-user filters, ensuring each viewer only sees data they are allowed to view.
Securely present dashboards to individual users
Configure your application server to generate a unique user-scoped token for each user based on their external_viewer_id. This enables you to track dashboard views and usage through audit logs. The external_viewer_id is paired with an external_value, which acts as a global variable that can be inserted into SQL queries used in dashboard datasets. This enables you to filter the data displayed on the dashboard for each user.
external_viewer_id is passed to your dashboard audit logs and must not include personally identifiable information. This value should also be unique per user.
external_value is used in query processing and can include personally identifiable information.
The following example demonstrates how to use the external value as a filter in dataset queries:
SELECT *
FROM sales
WHERE region = __aibi_external_value
Setup overview
This section includes a high-level conceptual overview of the steps you need to perform to set up for embedding a dashboard in an external location.
To embed a dashboard in an external application, you first create a service principal in Azure Databricks and generate a secret. The service principal must be granted read access to the dashboard and its underlying data. Your server uses the service principal secret to retrieve a token that can access dashboard APIs on behalf of the service principal. With this token, the server calls the /tokeninfo API endpoint, an OpenID Connect (OIDC) endpoint that returns basic user profile information, including the external_value and external_viewer_id values. These values let you associate requests with individual users.
Using the token obtained from the service principal, your server generates a new token scoped to the specific user who is accessing the dashboard. This user-scoped token is passed to the application page, where the application instantiates the DatabricksDashboard object from the @databricks/aibi-client library. The token carries user-specific information that supports auditing and enforces filtering so that each user only sees the data they are authorized to access. From the user's perspective, logging in to the application automatically provides access to the embedded dashboard with the correct data visibility.
Rate limits and performance considerations
External embedding has a rate limit of 20 dashboard loads per second. You can open more than 20 dashboards at once, but no more than 20 can start loading simultaneously.
Prerequisites
To implement external embedding, ensure you meet the following prerequisites:
- You must have at least CAN MANAGE permissions on a published dashboard. See Tutorial: Use sample dashboards to quickly create and publish an example dashboard, if necessary.
- You must have Databricks CLI version 0.205 or above installed. See Install or update the Databricks CLI for instructions. To configure and use OAuth authentication, see OAuth user-to-machine (U2M) authentication.
- A workspace admin must define a list of approved domains that can host the embedded dashboard. See Manage dashboard embedding for instructions.
- An external application to host your embedded dashboard. You can use your own application or use the provided sample applications.
Step 1: Create a service principal
Create a service principal to act as the identity for your external application within Azure Databricks. This service principal authenticates requests on behalf of your application.
To create a service principal:
As a workspace admin, log in to the Azure Databricks workspace.
Click your username in the top bar of the Azure Databricks workspace and select Settings.
Click Identity and access in the left pane.
Next to Service principals, click Manage.
Click Add service principal.
Click Add new.
Enter a descriptive name for the service principal.
Click Add.
Open the service principal you just created from the Service principals listing page. Use the Filter text entry field to search for it by name, if necessary.
On the Service principal details page, record the Application Id. Verify that the Databricks SQL access and Workspace access checkboxes are selected.
Step 2: Create an OAuth secret
Generate a secret for the service principal and collect the following configuration values, which you'll need for your external application:
- Service principal (client) ID
- Client secret
The service principal uses an OAuth secret to verify its identity when requesting an access token from your external application.
To generate a secret:
Click Secrets on the Service principal details page.
Click Generate secret.
Enter a lifetime value for the new secret in days (e.g., between 1 and 730 days).
Copy the secret immediately. You cannot view this secret again after you leave this screen.
Step 3: Assign permissions to your service principal
The service principal you created acts as the identity that provides dashboard access through your application. Its permissions apply only if the dashboard is not published with shared data permissions. If shared data permissions are used, the publisher's credentials access data. For more details and recommendations, see Embedding authentication approaches.
Click Dashboards in the workspace sidebar to open the dashboard listing page.
Click the name of the dashboard you want to embed. The published dashboard opens.
Click Share.
Use the text entry field in the Sharing dialog to find your service principal and then click on it. Set the permission level to CAN RUN. Then, click Add.
Record the dashboard ID. You can find the dashboard ID in the dashboard's URL (e.g.,
https://<your-workspace-url>/dashboards/<dashboard-id>). See Databricks workspace details.
Note
If you publish a dashboard with individual data permissions, you must grant your service principal access to the data used in the dashboard. Compute access always uses the publisher's credentials, so you do not need to grant compute permissions to the service principal.
To read and display data, the service principal must have at least SELECT privileges on the tables and views referenced in the dashboard. See Who can manage privileges?.
Step 4: Use the example app to authenticate and generate tokens
Use an example application to practice externally embedding your dashboard. The applications include instructions and code that initiates the necessary token exchange to generate scoped tokens. The following code blocks have no dependencies. Copy and save one of the following applications.
Python
Copy and save this in a file named example.py.
#!/usr/bin/env python3

import os
import sys
import json
import base64
import urllib.request
import urllib.parse
from http.server import HTTPServer, BaseHTTPRequestHandler

# -----------------------------------------------------------------------------
# Config
# -----------------------------------------------------------------------------
CONFIG = {
    "instance_url": os.environ.get("INSTANCE_URL"),
    "dashboard_id": os.environ.get("DASHBOARD_ID"),
    "service_principal_id": os.environ.get("SERVICE_PRINCIPAL_ID"),
    "service_principal_secret": os.environ.get("SERVICE_PRINCIPAL_SECRET"),
    "external_viewer_id": os.environ.get("EXTERNAL_VIEWER_ID"),
    "external_value": os.environ.get("EXTERNAL_VALUE"),
    "workspace_id": os.environ.get("WORKSPACE_ID"),
    "port": int(os.environ.get("PORT", 3000)),
}

basic_auth = base64.b64encode(
    f"{CONFIG['service_principal_id']}:{CONFIG['service_principal_secret']}".encode()
).decode()

# -----------------------------------------------------------------------------
# HTTP Request Helper
# -----------------------------------------------------------------------------
def http_request(url, method="GET", headers=None, body=None):
    headers = headers or {}
    if body is not None and not isinstance(body, (bytes, str)):
        raise ValueError("Body must be bytes or str")

    req = urllib.request.Request(url, method=method, headers=headers)
    if body is not None:
        if isinstance(body, str):
            body = body.encode()
        req.data = body

    try:
        with urllib.request.urlopen(req) as resp:
            data = resp.read().decode()
            try:
                return {"data": json.loads(data)}
            except json.JSONDecodeError:
                return {"data": data}
    except urllib.error.HTTPError as e:
        raise RuntimeError(f"HTTP {e.code}: {e.read().decode()}") from None

# -----------------------------------------------------------------------------
# Token logic
# -----------------------------------------------------------------------------
def get_scoped_token():
    # 1. Get all-api token
    oidc_res = http_request(
        f"{CONFIG['instance_url']}/oidc/v1/token",
        method="POST",
        headers={
            "Content-Type": "application/x-www-form-urlencoded",
            "Authorization": f"Basic {basic_auth}",
        },
        body=urllib.parse.urlencode({
            "grant_type": "client_credentials",
            "scope": "all-apis"
        })
    )
    oidc_token = oidc_res["data"]["access_token"]

    # 2. Get token info
    token_info_url = (
        f"{CONFIG['instance_url']}/api/2.0/lakeview/dashboards/"
        f"{CONFIG['dashboard_id']}/published/tokeninfo"
        f"?external_viewer_id={urllib.parse.quote(CONFIG['external_viewer_id'])}"
        f"&external_value={urllib.parse.quote(CONFIG['external_value'])}"
    )
    token_info = http_request(
        token_info_url,
        headers={"Authorization": f"Bearer {oidc_token}"}
    )["data"]

    # 3. Generate scoped token
    params = token_info.copy()
    authorization_details = params.pop("authorization_details", None)
    params.update({
        "grant_type": "client_credentials",
        "authorization_details": json.dumps(authorization_details)
    })

    scoped_res = http_request(
        f"{CONFIG['instance_url']}/oidc/v1/token",
        method="POST",
        headers={
            "Content-Type": "application/x-www-form-urlencoded",
            "Authorization": f"Basic {basic_auth}",
        },
        body=urllib.parse.urlencode(params)
    )
    return scoped_res["data"]["access_token"]

# -----------------------------------------------------------------------------
# HTML generator
# -----------------------------------------------------------------------------
def generate_html(token):
    return f"""<!DOCTYPE html>
<html>
<head>
    <meta charset="UTF-8">
    <meta name="viewport" content="width=device-width, initial-scale=1.0">
    <title>Dashboard Demo</title>
    <style>
        body {{ font-family: system-ui; margin: 0; padding: 20px; background: #f5f5f5; }}
        .container {{ max-width: 1200px; margin: 0 auto; height:calc(100vh - 40px) }}
    </style>
</head>
<body>
    <div id="dashboard-content" class="container"></div>
    <script type="module">
        import {{ DatabricksDashboard }} from "https://cdn.jsdelivr.net/npm/@databricks/aibi-client@0.0.0-alpha.7/+esm";
        const dashboard = new DatabricksDashboard({{
            instanceUrl: "{CONFIG['instance_url']}",
            workspaceId: "{CONFIG['workspace_id']}",
            dashboardId: "{CONFIG['dashboard_id']}",
            token: "{token}",
            container: document.getElementById("dashboard-content")
        }});
        dashboard.initialize();
    </script>
</body>
</html>"""

# -----------------------------------------------------------------------------
# HTTP server
# -----------------------------------------------------------------------------
class RequestHandler(BaseHTTPRequestHandler):
    def do_GET(self):
        if self.path != "/":
            self.send_response(404)
            self.send_header("Content-Type", "text/plain")
            self.end_headers()
            self.wfile.write(b"Not Found")
            return

        try:
            token = get_scoped_token()
            html = generate_html(token)
            status = 200
        except Exception as e:
            html = f"<h1>Error</h1><p>{e}</p>"
            status = 500

        self.send_response(status)
        self.send_header("Content-Type", "text/html")
        self.end_headers()
        self.wfile.write(html.encode())

def start_server():
    missing = [k for k, v in CONFIG.items() if not v]
    if missing:
        print(f"Missing: {', '.join(missing)}", file=sys.stderr)
        sys.exit(1)

    server = HTTPServer(("localhost", CONFIG["port"]), RequestHandler)
    print(f":rocket: Server running on http://localhost:{CONFIG['port']}")
    try:
        server.serve_forever()
    except KeyboardInterrupt:
        sys.exit(0)

if __name__ == "__main__":
    start_server()
JavaScript
Copy and save this in a file named example.js.
#!/usr/bin/env node

const http = require('http');
const https = require('https');
const { URL, URLSearchParams } = require('url');

// This constant is just a mapping of environment variables to their respective
// values.
const CONFIG = {
  instanceUrl: process.env.INSTANCE_URL,
  dashboardId: process.env.DASHBOARD_ID,
  servicePrincipalId: process.env.SERVICE_PRINCIPAL_ID,
  servicePrincipalSecret: process.env.SERVICE_PRINCIPAL_SECRET,
  externalViewerId: process.env.EXTERNAL_VIEWER_ID,
  externalValue: process.env.EXTERNAL_VALUE,
  workspaceId: process.env.WORKSPACE_ID,
  port: process.env.PORT || 3000,
};

const basicAuth = Buffer.from(`${CONFIG.servicePrincipalId}:${CONFIG.servicePrincipalSecret}`).toString('base64');

// ------------------------------------------------------------------------------------------------
// Main
// ------------------------------------------------------------------------------------------------

function startServer() {
  const missing = Object.keys(CONFIG).filter((key) => !CONFIG[key]);
  if (missing.length > 0) throw new Error(`Missing: ${missing.join(', ')}`);

  const server = http.createServer(async (req, res) => {
    // This is a demo server, we only support GET requests to the root URL.
    if (req.method !== 'GET' || req.url !== '/') {
      res.writeHead(404, { 'Content-Type': 'text/plain' });
      res.end('Not Found');
      return;
    }

    let html = '';
    let status = 200;

    try {
      const token = await getScopedToken();
      html = generateHTML(token);
    } catch (error) {
      html = `<h1>Error</h1><p>${error.message}</p>`;
      status = 500;
    } finally {
      res.writeHead(status, { 'Content-Type': 'text/html' });
      res.end(html);
    }
  });

  server.listen(CONFIG.port, () => {
    console.log(`🚀 Server running on http://localhost:${CONFIG.port}`);
  });

  process.on('SIGINT', () => process.exit(0));
  process.on('SIGTERM', () => process.exit(0));
}

async function getScopedToken() {
  // 1. Get all-api token. This will allow you to access the /tokeninfo
  // endpoint, which contains the information required to generate a scoped token
  const {
    data: { access_token: oidcToken },
  } = await httpRequest(`${CONFIG.instanceUrl}/oidc/v1/token`, {
    method: 'POST',
    headers: {
      'Content-Type': 'application/x-www-form-urlencoded',
      Authorization: `Basic ${basicAuth}`,
    },
    body: new URLSearchParams({
      grant_type: 'client_credentials',
      scope: 'all-apis',
    }),
  });

  // 2. Get token info. This information is **required** for generating a token that is correctly downscoped.
  // A correctly downscoped token will only have access to a handful of APIs, and within those APIs, only
  // a the specific resources required to render the dashboard.
  //
  // This is essential to prevent leaking a privileged token.
  //
  // At the time of writing, OAuth tokens in Databricks are valid for 1 hour.
  const tokenInfoUrl = new URL(
    `${CONFIG.instanceUrl}/api/2.0/lakeview/dashboards/${CONFIG.dashboardId}/published/tokeninfo`,
  );
  tokenInfoUrl.searchParams.set('external_viewer_id', CONFIG.externalViewerId);
  tokenInfoUrl.searchParams.set('external_value', CONFIG.externalValue);

  const { data: tokenInfo } = await httpRequest(tokenInfoUrl.toString(), {
    headers: { Authorization: `Bearer ${oidcToken}` },
  });

  // 3. Generate scoped token. This call is very similar to what was issued before, but now we are providing the scoping to make the generated token
  // safe to pass to a browser.
  const { authorization_details, ...params } = tokenInfo;
  const {
    data: { access_token },
  } = await httpRequest(`${CONFIG.instanceUrl}/oidc/v1/token`, {
    method: 'POST',
    headers: {
      'Content-Type': 'application/x-www-form-urlencoded',
      Authorization: `Basic ${basicAuth}`,
    },
    body: new URLSearchParams({
      grant_type: 'client_credentials',
      ...params,
      authorization_details: JSON.stringify(authorization_details),
    }),
  });

  return access_token;
}

startServer();

// ------------------------------------------------------------------------------------------------
// Helper functions
// ------------------------------------------------------------------------------------------------

/**
 * Helper function to create HTTP requests.
 * @param {string} url - The URL to make the request to.
 * @param {Object} options - The options for the request.
 * @param {string} options.method - The HTTP method to use.
 * @param {Object} options.headers - The headers to include in the request.
 * @param {Object} options.body - The body to include in the request.
 * @returns {Promise<Object>} A promise that resolves to the response data.
 */
function httpRequest(url, { method = 'GET', headers = {}, body } = {}) {
  return new Promise((resolve, reject) => {
    const isHttps = url.startsWith('https://');
    const lib = isHttps ? https : http;
    const options = new URL(url);
    options.method = method;
    options.headers = headers;

    const req = lib.request(options, (res) => {
      let data = '';
      res.on('data', (chunk) => (data += chunk));
      res.on('end', () => {
        if (res.statusCode >= 200 && res.statusCode < 300) {
          try {
            resolve({ data: JSON.parse(data) });
          } catch {
            resolve({ data });
          }
        } else {
          reject(new Error(`HTTP ${res.statusCode}: ${data}`));
        }
      });
    });

    req.on('error', reject);

    if (body) {
      if (typeof body === 'string' || Buffer.isBuffer(body)) {
        req.write(body);
      } else if (body instanceof URLSearchParams) {
        req.write(body.toString());
      } else {
        req.write(JSON.stringify(body));
      }
    }
    req.end();
  });
}

function generateHTML(token) {
  return `<!DOCTYPE html>
<html>
<head>
    <meta charset="UTF-8">
    <meta name="viewport" content="width=device-width, initial-scale=1.0">
    <title>Dashboard Demo</title>
    <style>
        body { font-family: system-ui; margin: 0; padding: 20px; background: #f5f5f5; }
        .container { max-width: 1200px; margin: 0 auto; height:calc(100vh - 40px) }
    </style>
</head>
<body>
    <div id="dashboard-content" class="container"></div>
    <script type="module">
        /**
         * We recommend bundling the dependency instead of using a CDN. However, for demonstration purposes,
         * we are just using a CDN.
         *
         * We do not recommend one CDN over another and encourage decoupling the dependency from third-party code.
         */
        import { DatabricksDashboard } from "https://cdn.jsdelivr.net/npm/@databricks/aibi-client@0.0.0-alpha.7/+esm";

        const dashboard = new DatabricksDashboard({
            instanceUrl: "${CONFIG.instanceUrl}",
            workspaceId: "${CONFIG.workspaceId}",
            dashboardId: "${CONFIG.dashboardId}",
            token: "${token}",
            container: document.getElementById("dashboard-content")
        });

        dashboard.initialize();
    </script>
</body>
</html>`;
}
Step 5: Run the example application
Replace the following values and then run the code block from your terminal. Your values should not be surrounded by angle brackets (< >):
- Use the workspace URL to find and replace the following values:
<your-instance><workspace_id><dashboard_id>
- Replace the following values with the values you created when creating the service principal (step 2):
<service_principal_id><service_principal_secret>(client secret)
- Replace the following values with identifiers associated with users of the external application:
<some-external-viewer><some-external-value>
- Replace
</path/to/example>with the path to the.pyor.jsfile you created in the previous step. Include the file extension.
Note
Do not include any personally-identifiable information (PII) in the EXTERNAL_VIEWER_ID value.
INSTANCE_URL='https://<your-instance>.databricks.com' \
WORKSPACE_ID='<workspace_id>' \
DASHBOARD_ID='<dashboard_id>' \
SERVICE_PRINCIPAL_ID='<service-principal-id>' \
SERVICE_PRINCIPAL_SECRET='<service-principal_secret>' \
EXTERNAL_VIEWER_ID='<some-external-viewer>' \
EXTERNAL_VALUE='<some-external-value>' \
~</path/to/example>

# Terminal will output: :rocket: Server running on http://localhost:3000