Note
Access to this page requires authorization. You can try signing in or changing directories.
Access to this page requires authorization. You can try changing directories.
This page provides instructions for configuring inbound private connectivity, which secures the connection between users and their Azure Databricks workspaces.
- To enable classic compute plane private connectivity to Azure Databricks, see Configure classic compute plane private connectivity to Azure Databricks.
- To connect from the serverless compute plane to Azure resources, see Configure private connectivity to Azure resources.
Why choose an inbound connection?
Whether you use serverless or classic compute, users must connect to Azure Databricks. Organizations choose to connect to Azure Databricks for several reasons, including the following:
- Enhanced security: By restricting all access to private endpoints and disabling public access, you minimize the attack surface and verify all user interactions with Azure Databricks occur over a secure, private network.
- Compliance requirements: Many organizations have strict compliance mandates that require all data and management plane traffic to remain in their private network boundaries, even for SaaS services like Azure Databricks.
- Simplified network architecture (for specific use cases): If you are only using serverless compute, or your primary interaction with Azure Databricks is through the web UI or REST APIs, and you have no immediate need for private connectivity to data sources from Azure Databricks (which requires a classic compute plane Private Link connection), an inbound-only setup simplifies the overall network design.
- Data exfiltration prevention: By preventing public access and forcing all traffic through private endpoints, you reduce the risk of data exfiltration, ensuring traffic can only be accessed from authenticated network environments.
Connectivity model
You can configure private connectivity in one of two ways:
- No public access: This configuration disables all public access to the workspace. All user traffic must originate from a VNet connected through a private endpoint. This model is required for full traffic privatization. For full traffic privatization you also need a classic compute plane Private Link connection. See Azure Private Link concepts.
- Hybrid access: Private Link is active, but public access remains enabled with context-based ingress controls and IP access lists. Context-based ingress controls let you restrict access based on identity, request type, and network source. This allow you to safely permit access from trusted public sources (for example, static corporate IPs), while still using Private Link for private connectivity.
This guide explains how to implement the hybrid access model. We achieve this using a standard hub-and-spoke network topology.
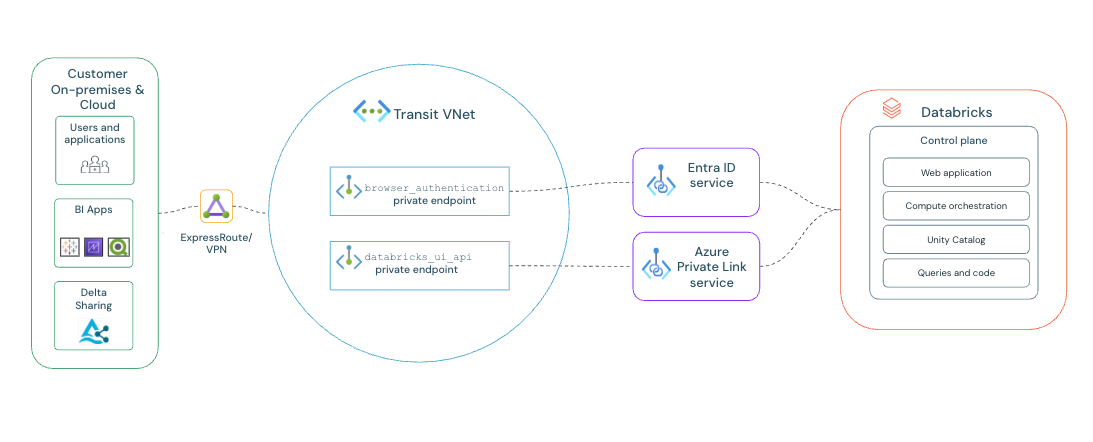
Architecture overview
This model uses the transit VNet:
- Transit VNet: This is your central virtual network containing all the private endpoints needed for client access to workspaces and browser authentication. Your browser authentication workspace also connects to this VNet.
Before you begin
Review the following prerequisites and recommendations:
Requirements
- The workspace is on the Premium plan.
- Your workspace uses VNet injection. See Deploy Azure Databricks in your Azure virtual network (VNet injection)
- You must have Azure permissions to create private endpoints and manage DNS records.
Networking configuration
- A transit VNet configured for the following:
- It acts as the primary transit point for all user/client traffic connecting to your Azure network.
- It provides centralized connectivity for on-premises or other external networks.
- It manages shared services and contains the primary route for outbound internet traffic (egress).
- Your private DNS zones are managed by Azure DNS.
Best practices
Azure Databricks recommends the following for a resilient and manageable setup:
- Architecture: Your network must follow the Microsoft-recommended hub-spoke architecture. See Hub-spoke network topology in Azure.
- Isolated authentication workspace: For improved resilience, create a separate browser authentication workspace inside your transit VNet. This dedicated workspace should host the browser-authentication private endpoint, preventing a single point of failure if other workspaces are deleted. See Step 3: Create a
browser_authenticationworkspace.
Configure private connectivity for an existing workspace
Before you begin, you must stop all compute resources like clusters, pools, or classic SQL warehouses. No workspace compute resources can be running, or the upgrade attempt fails. Azure Databricks recommends planning the timing of the upgrade for downtime.
On the Workspaces page, select Compute.
Select each active compute cluster and in the top-right, click Terminate.
Step 1: Verify VNet-injected workspace with public access enabled
- Go to your Azure Databricks workspace in the Azure portal.
- In the workspace overview section, verify your Azure Databricks workspace uses your own virtual network:
- Under Settings, select the Networking tab. Confirm the following settings:
- Secure cluster connectivity (No Public IP) is enabled.
- Allow Public Network Access is Enabled.
- Under Settings, select the Networking tab. Confirm the following settings:
Step 2: Create databricks_ui_api private endpoint
- From your workspace's Networking tab, select Private endpoint connections.
- Click
 Private endpoint.
 - Select the resource group for the endpoint, provide a name like
my-workspace-fe-pe. Verify the region matches your workspace. - Click Next: Resource.
- Set Target sub-resource to
databricks_ui_api. - Click Next: Virtual Network.
- Select your transit VNet. Your transit VNet is a separate, pre-existing VNet in your network architecture that manages and secures egress traffic, often containing a central firewall.
- Select the subnet that hosts the private endpoints.
- Click Next and verify Integrate with private DNS zone is set to Yes. It should automatically select the
privatelink.databricks.azure.cnzone.
Note
Link the private DNS zone to your transit VNet and, for better organization, place it in a separate resource group with your other private DNS zones.
Step 3: Create a browser_authentication workspace
Create a private endpoint for browser authentication to support SSO over your private network path. Azure Databricks recommends hosting this endpoint on a dedicated private web auth workspace.
Create a resource group
- In the Azure portal, navigate to and select Resource groups.
- Click + Create.
- Provide a Name for the resource group, such as
web-auth-rg-chinaeast2. - For Region, select the same Azure region where your production Databricks workspaces are deployed.
- Click Review + create, then Create.
Create a VNet
- In the Azure portal, search for and select Virtual networks.
- Click + Create.
- On the Basics tab, select the Resource group you just created and give the VNet a descriptive Name, like
web-auth-vnet-chinaeast2. - Verify the Region matches your resource group.
- On the IP Addresses tab, define an IP address space for the VNet, for example,
10.20.0.0/16. You are also prompted to create an initial subnet. - Select Review + create, then Create.
Create and secure the private web auth workspace
- In the Azure portal, search for and select Azure Databricks. Click + Create.
- On the Basics tab, configure the following:
- Select the Resource group you just created.
- Give the workspace a descriptive name, like
WEB_AUTH_DO_NOT_DELETE_<region>. - Select the same region as your resource group and VNet.
- Click Next:Networking and configure the following:
- Deploy Azure Databricks workspace with Secure Cluster Connectivity (No Public IP): Select Yes.
- Deploy Azure Databricks workspace in your own Virtual Network (VNet): Select Yes.
- Virtual Network: Select the VNet you just created. You are prompted to define subnet ranges.
- Public Network Access: Select Disabled.
- Required NSG Rules: Select NoAzureDatabricksRules.
- Click Review + create, then Create.
After you create the workspace, protect it from accidental deletion.
- In the Azure portal, navigate to the workspace you just created.
- Go to Settings and select Locks.
- Click + Add.
- Set the Lock type to Delete and provide a descriptive Lock name.
- Click OK.
Note
- Do not run any Databricks workloads, such as clusters, jobs, in this workspace.
- Do not add any private endpoints other than
browser_authentication. Specifically, do not create adatabricks_ui_apiendpoint for this workspace.
Create the browser_authentication private endpoint
After creating the workspace, you must create the browser_authentication private endpoint to connect it to your transit VNet.
- From the web auth workspace's Networking tab, select Private endpoint connections.
- Click Private endpoint.
- Select the resource group for the endpoint, provide a name like
web-auth-browser-auth-pe. Verify the region matches your workspace. - Click Next: Resource.
- Set Target sub-resource to
browser_authentication. - Click Next: Virtual Network.
- Select your transit VNet (the same VNet used in Step 2 for the
databricks_ui_apiendpoint). - Select the subnet that hosts the private endpoints.
- Click Next and verify Integrate with private DNS zone is set to Yes. It should automatically select the
privatelink.databricks.azure.cnzone. - Complete the endpoint creation.
Step 4: Configure and verify DNS
After you deploy the private endpoints, you must verify that DNS correctly resolves Azure Databricks URLs to their new private IP addresses.
Verify private DNS zone records:
- In the Azure portal, search for and navigate to the Private DNS zone named
privatelink.databricks.azure.cn. - Verify the following
Arecords exist and point to the private IP addresses of your endpoints:- Workspace UI/API record:
- Name: Your unique workspace ID, like
adb-xxxxxxxxxxxxxxxx.x - Value: The private IP address of your
databricks_ui_apiprivate endpoint.
- Name: Your unique workspace ID, like
- Browser authentication record:
- Name: Choose a descriptive name like
pl-auth.<your_region>. - Value: The private IP address of your
browser_authenticationprivate endpoint.
- Name: Choose a descriptive name like
- Workspace UI/API record:
- In the Azure portal, search for and navigate to the Private DNS zone named
Step 5: Verify private network access
Confirm that you can access the workspace through your private network connection.
From a connected network
If your on-premises network already connects to your Azure VNet by VPN or ExpressRoute, the test is simple:
- From your computer, open a web browser and go directly to your Azure Databricks workspace URL to log in. A successful login confirms that your private connection works.
Using a test VM
If you cannot access the workspace VNet from your current location, create a temporary virtual machine (a "jump box") to test from:
- Create a VM: In the Azure portal, create a Windows virtual machine. Place it in a subnet using the same transit VNet where you configured your inbound private endpoint.
- Connect to the VM: Use a Remote Desktop client to connect to your new VM.
- Test from the VM: After you connect to the VM, open a web browser, go to the Azure portal, and find your Azure Databricks workspace.
- Launch Workspace: Click Launch Workspace. A successful login confirms that access from within your private VNet works correctly.
Verify DNS with nslookup
Connect to a virtual machine inside your configured VNet or to your on-premises network via VPN or Azure ExpressRoute. Your machine must be able to use Azure's private DNS.
Open a command prompt or terminal and use
nslookupto verify DNS resolution.# Verify the workspace URL resolves to a private IP nslookup adb-xxxxxxxxxxxxxxxx.x.databricks.azure.cn # Expected output: # Server: <your-dns-server> # Address: <your-dns-server-ip> # # Name: adb-xxxxxxxxxxxxxxxx.x.privatelink.databricks.azure.cn # Address: 10.10.1.4 <-- This should be the private IP of your 'databricks_ui_api' endpoint # Aliases: adb-xxxxxxxxxxxxxxxx.x.databricks.azure.cn
Custom DNS configuration
When using a private inbound endpoint with your own custom DNS, you must verify that both the workspace URL and the SSO (single sign-on) authentication URLs resolve correctly to the private endpoint's IP address.
Recommended: Conditional forwarding
The most reliable method is to configure your DNS server to forward queries for all Databricks domains to Azure's internal DNS.
- Set up conditional forwarding for the following domains to your Azure DNS server:
*.databricks.azure.cn*.privatelink.databricks.azure.cn*.databricksapps.com
- Verify that your VNet links to the Azure Private DNS Zone.
This allows Azure to automatically resolve all necessary hostnames, including SSO and workspace URLs, to your private endpoint's IP address.
Alternative: Manual A Records
If conditional forwarding is not an option, you must manually create DNS A records.
- Workspace URL: Create an
Arecord mapping your per-workspace URL, such asadb-1111111111111.15.databricks.azure.cn, to the private endpoint IP address. - SSO Authentication URL: Create an
Arecord mapping the regional SSO URL, such aschinaeast2.pl-auth.databricks.azure.cn, to the same private endpoint IP address.
Some Azure regions use multiple control plane instances for SSO. You might need to create several A records for authentication. Contact your Azure Databricks account team for the complete list of domains for your region.