Note
Access to this page requires authorization. You can try signing in or changing directories.
Access to this page requires authorization. You can try changing directories.
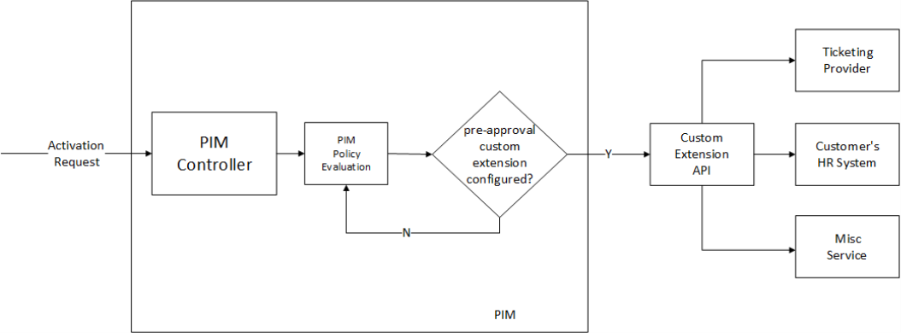
Custom extensions in Microsoft Entra Privileged Identity Management (PIM) enable organizations to integrate custom business logic into the role activation process. These extensions are implemented as REST APIs that PIM calls during policy evaluation. The custom extension evaluates the activation request and returns a decision to PIM indicating whether the activation should be allowed or denied.
Use custom extensions to:
- Validate ticket numbers against internal systems.
- Enforce HR-based access rules, such as employment status or role eligibility.
- Integrate compliance workflows or audit systems.
- Apply dynamic approval logic based on business context.
Custom extensions support PIM for Groups, PIM for Microsoft Entra roles, and PIM for Azure resources.
Important
Custom extensions for PIM are in preview. See the Supplemental Terms of Use for Microsoft Azure Previews for legal terms that apply to Azure features that are in beta, preview, or otherwise not yet released into general availability.
License Requirements
Using Custom Extensions with PIM requires an active Microsoft Entra ID Governance (EIG) or Entra Suite license. For more information on licensing, see: Microsoft Entra ID Governance licensing fundamentals.
Prerequisites
An assignment of at least the Privileged Role Administrator role.
A REST API endpoint that accepts HTTP POST requests and returns evaluation responses in the format PIM expects. The API can be built in any language and hosted on any platform.
A Microsoft Entra ID application registration to secure communication between PIM and your custom extension endpoint.
The Microsoft Graph API
betaendpoint is required because this feature is in preview.The following delegated Microsoft Graph permissions, depending on the operation:
Operation Permission (least privileged) Create or update a custom extension PrivilegedAccess-CustomExt.ReadWrite.AllGet or list custom extensions PrivilegedAccess-CustomExt.Read.All
Build your custom extension endpoint
Build a REST API that accepts HTTP POST requests from PIM. During role activation, PIM sends a request payload to your endpoint with the information needed to evaluate the activation. Your API evaluates the request and returns a response indicating whether the activation should be approved, auto-approved, or denied.
The request model PIM sends depends on the resource type: Microsoft Entra group, Microsoft Entra role, or Azure resource. The following sections provide examples based on which resource type is being used.
Request model for PIM for Groups
In the request model for PIM for groups, PIM sends a privilegedAccessGroupAssignmentScheduleRequest object. For the full schema, see Create assignmentScheduleRequest.
{
  "@odata.type": "#microsoft.graph.privilegedAccessGroupAssignmentScheduleRequest",
  "id": "String (identifier)",
  "status": "String",
  "action": "String",
  "justification": "String",
  "principalId": "String",
  "accessId": "String",
  "groupId": "String",
  "scheduleInfo": {
    "@odata.type": "microsoft.graph.requestSchedule"
  },
  "ticketInfo": {
    "@odata.type": "microsoft.graph.ticketInfo"
  }
}
Request model for PIM for Microsoft Entra roles
In the request model for PIM for Microsoft Entra roles, PIM sends a unifiedRoleAssignmentScheduleRequest object. For the full schema, see Create roleAssignmentScheduleRequests.
{
  "@odata.type": "#microsoft.graph.unifiedRoleAssignmentScheduleRequest",
  "id": "String (identifier)",
  "status": "String",
  "action": "String",
  "principalId": "String",
  "roleDefinitionId": "String",
  "directoryScopeId": "String",
  "justification": "String",
  "scheduleInfo": {
    "@odata.type": "microsoft.graph.requestSchedule"
  },
  "ticketInfo": {
    "@odata.type": "microsoft.graph.ticketInfo"
  }
}
Request model for PIM for Azure resources
In the request model for PIM for Azure resources, PIM sends a role assignment schedule request object. For the full schema, see Role Assignment Schedule Requests - Create.
{
  "properties": {
    "principalId": "aaaaaaaa-bbbb-cccc-1111-222222222222",
    "principalType": "User",
    "requestType": "SelfActivate",
    "roleDefinitionId": "/subscriptions/{subscriptionId}/providers/Microsoft.Authorization/roleDefinitions/{roleDefinitionId}",
    "scope": "/subscriptions/{subscriptionId}",
    "justification": "String",
    "scheduleInfo": {
      "startDateTime": "2020-09-09T21:35:27.91Z",
      "expiration": {
        "type": "AfterDuration",
        "duration": "PT8H"
      }
    },
    "ticketInfo": {
      "ticketNumber": "String",
      "ticketSystem": "String"
    }
  }
}
Response model
After your custom extension evaluates the activation request, it must return a response to PIM that includes the evaluation result and supporting details.
| Field | Type | Description |
|---|---|---|
evaluationId |
String | A unique identifier generated by the custom extension for the evaluation. This value is logged in PIM audits for traceability. |
evaluationOutcome |
String | The result of the evaluation. Supported values: Approved, AutoApproved, Denied. |
reason |
List<String> | Messages that explain the evaluation outcome. These messages appear in the UI when a request is denied. |
The following examples show valid response payloads for each outcome:
Approved: All validation checks passed, and the activation proceeds through normal PIM workflow:
{
  "evaluationId": "aaaa0000-bb11-2222-33cc-444444dddddd",
  "evaluationOutcome": "Approved",
  "reason": ["Valid request"]
}
AutoApproved: The request meets criteria for automatic approval, and the activation continues without requiring manual PIM approval:
{
  "evaluationId": "bbbb1111-cc22-3333-44dd-555555eeeeee",
  "evaluationOutcome": "AutoApproved",
  "reason": ["High severity incident for on-call engineer, bypass manual approval"]
}
Denied: One or more validation checks failed, and PIM blocks the activation:
{
  "evaluationId": "cccc2222-dd33-4444-55ee-666666ffffff",
  "evaluationOutcome": "Denied",
  "reason": ["Requestor has not cleared Cloud Screening"]
}
Secure your custom extension service
Secure communication between PIM and your custom extension REST API by registering a Microsoft Entra ID application and configuring token validation.
Register a Microsoft Entra ID application
Your custom extension service must be backed by a Microsoft Entra ID application. PIM uses this app registration to authenticate to your custom extension endpoint and to request an access token for the API. To register a Microsoft Entra ID application, do the following steps:
- Sign in to the Microsoft Entra admin center as at least an Application Developer.
- Go to Identity > Applications > App registrations.
- Select New registration.
- Enter a descriptive application name, for example,
Contoso PIM Custom Extension API. - For Supported account types, select Accounts in this organizational directory only.
- A redirect URI isn't required for this service-to-service registration.
- Select Register.
Configure the Application ID URI
After the app is created, configure an Application ID URI. The host name in the Application ID URI must match the host name of your custom extension endpoint URL.
Open the app registration and go to Expose an API.
Select Set next to Application ID URI.
Enter a value that represents your API. The URI must end with the Application (client) ID of the app registration. For example, if your custom extension endpoint is
https://api.contoso.com/webhooks/entra-role-assignmentsand the Application (client) ID is00001111-aaaa-2222-bbbb-3333cccc4444, set the Application ID URI to:api://api.contoso.com/00001111-aaaa-2222-bbbb-3333cccc4444Select Save.
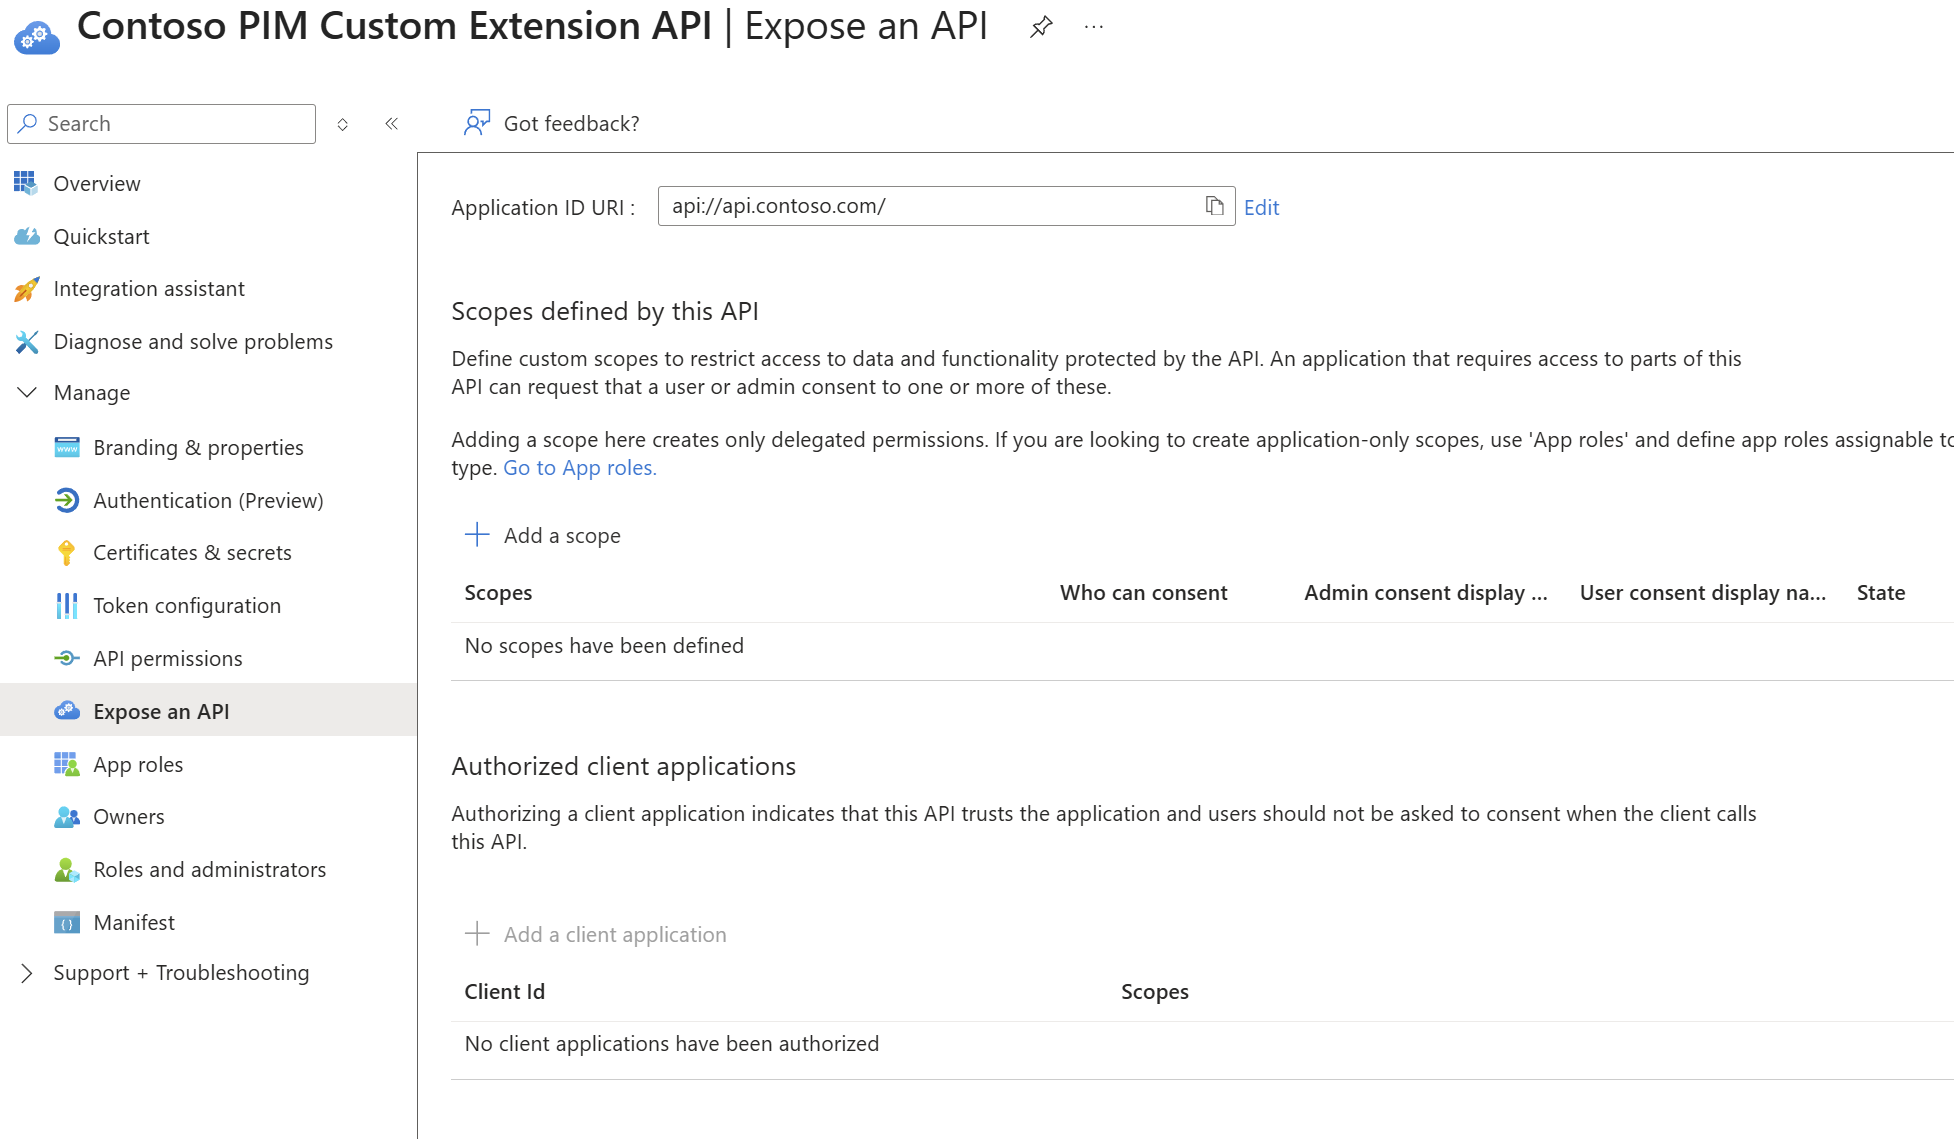
Save the Application ID URI. You provide this value as the resourceId when you configure the custom extension in PIM.
Validate bearer tokens in your API
When PIM calls your custom extension REST API, it sends an HTTP Authorization header with a bearer token issued by Microsoft Entra ID. Implement the following token validation checks in your API:
- Calling application claim - Validate that the
appidclaim (for V1 tokens) orazpclaim (for V2 tokens) contains the value00001111-aaaa-2222-bbbb-3333cccc4444. This value identifies Microsoft Entra Privileged Identity Management as the caller. - Audience claim - Validate that the
audclaim contains the Application ID URI you configured for your app registration. - Issuer claim - Validate that the
issclaim contains the Microsoft Entra issuer URL for your tenant:https://login.partner.microsoftonline.cn/{tenantId}/v2.0.
Onboard a custom extension to PIM
Create a custom extension in your tenant so that PIM can call your endpoint during role activation requests. When you create the extension, you define the endpoint PIM calls, the Microsoft Entra ID resource used to secure that endpoint, and the PIM resource type the extension applies to.
Send a POST request to the Microsoft Graph API beta endpoint to create the custom extension:
POST https://microsoftgraph.chinacloudapi.cn/beta/identityGovernance/privilegedAccess/customExtensions
Content-Type: application/json
The following example creates a custom extension for PIM for Groups:
{
  "@odata.type": "#microsoft.graph.roleManagementCustomCalloutExtension",
  "displayName": "Role Assignment Ticket Validation",
  "description": "Validates ticket info provided by requestor against ServiceNow",
  "endpointConfiguration": {
    "@odata.type": "#microsoft.graph.httpRequestEndpoint",
    "targetUrl": "https://api.contoso.com/webhooks/entra-role-assignments"
  },
  "clientConfiguration": {
    "@odata.type": "#microsoft.graph.customExtensionClientConfiguration",
    "timeoutInMilliseconds": 10000,
    "maximumRetries": 3
  },
  "authenticationConfiguration": {
    "@odata.type": "#microsoft.graph.azureAdTokenAuthentication",
    "resourceId": "api://api.contoso.com/a0a0a0a0-bbbb-cccc-dddd-e1e1e1e1e1e1"
  },
  "resourceType": "entraGroups",
  "customAttributes": []
}
Note
For resource ID in that code snippet, enter in your own ID to be used.
The following table describes the key fields in the custom extension API model:
| Field | Type | Description |
|---|---|---|
displayName |
String | Friendly name shown for the custom extension in management experiences. |
description |
String | Description of what the custom extension does. |
endpointConfiguration.targetUrl |
String | HTTPS endpoint that receives the custom extension call. |
clientConfiguration.timeoutInMilliseconds |
Integer | Maximum time PIM waits for the endpoint to respond. |
clientConfiguration.maximumRetries |
Integer | Maximum number of retry attempts if the call fails. |
authenticationConfiguration.resourceId |
String | Application ID URI of the Microsoft Entra app that secures the endpoint. |
resourceType |
String | Identifies the PIM provider the extension applies to. |
A successful response returns an HTTP 201 Created status code with the created custom extension object.
Create a custom extension in the portal
You can also create a custom extension by using the Microsoft Entra admin center:
Sign in to the Microsoft Entra admin center as at least a Privileged Role Administrator.
Go to Identity governance > Privileged Identity Management > Custom Extensions.
Select Create a custom extension.
On the Basics tab, enter a name, description, and resource type for the custom extension.
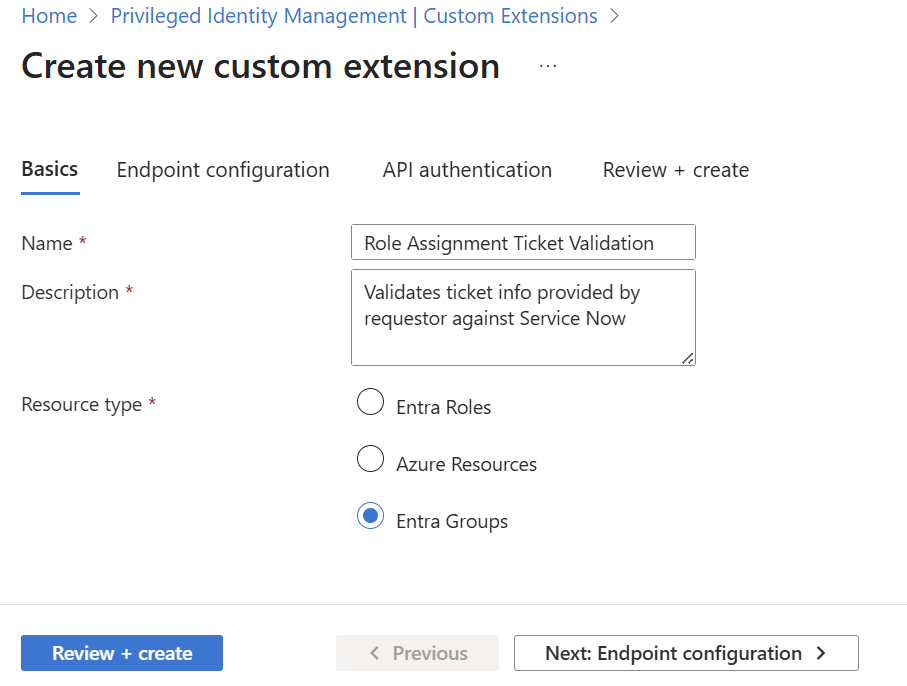
On the Endpoint configuration tab, enter the target URL, timeout, and maximum retries for your custom extension endpoint.
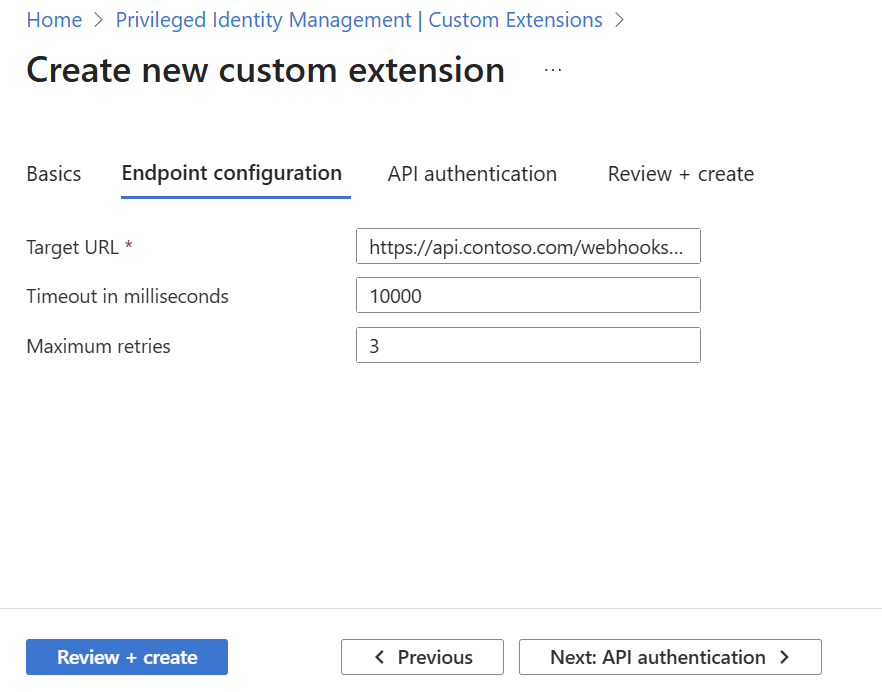
On the API authentication tab, select the application registration that secures your custom extension endpoint.
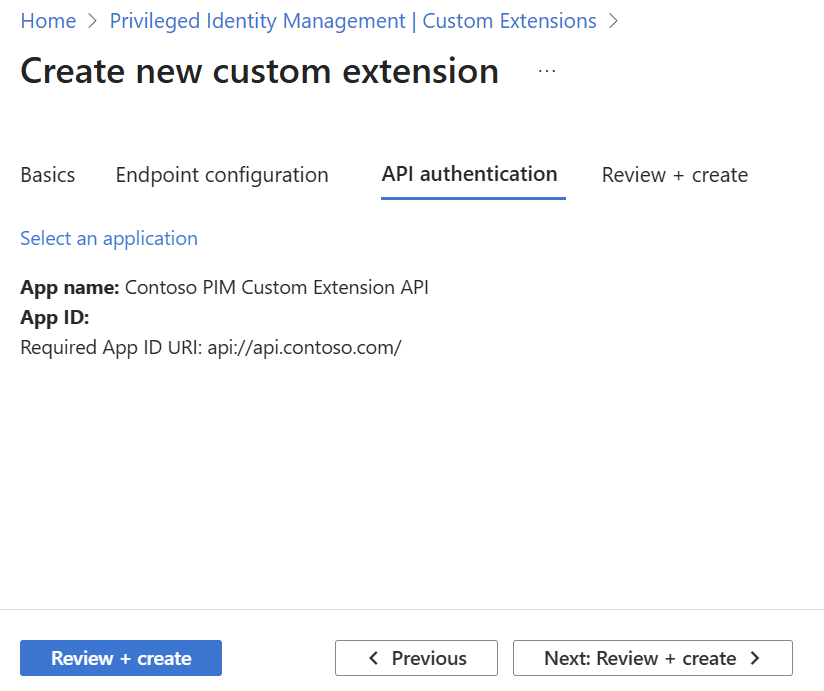
On the Review + create tab, review the configuration, and select Create.
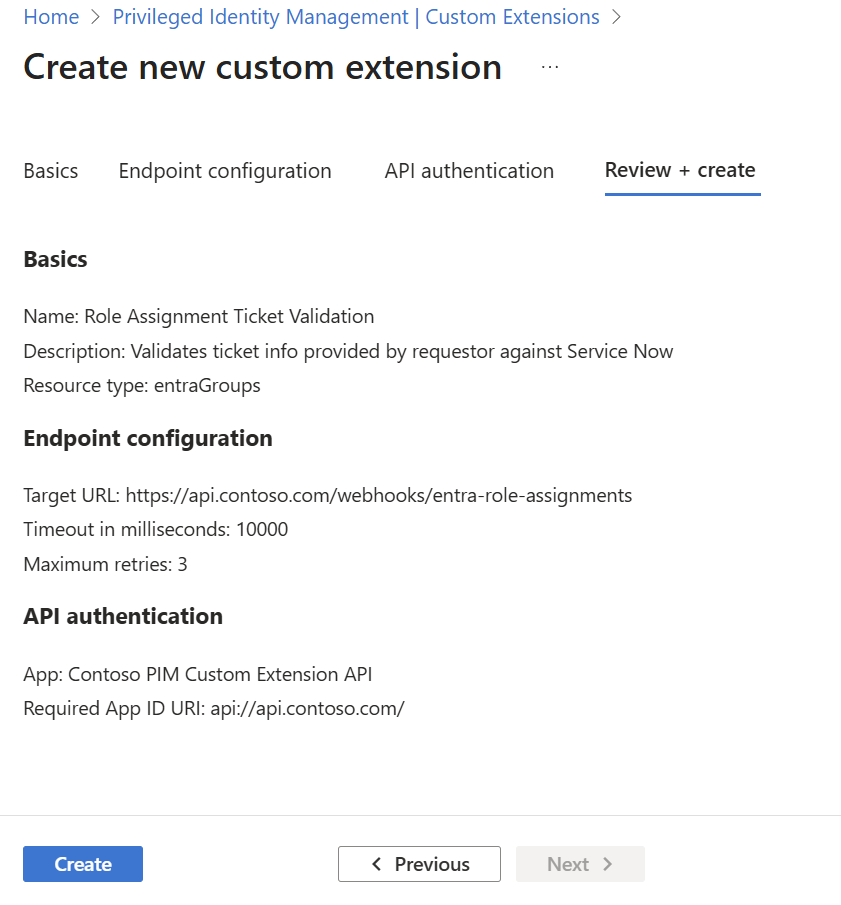
After the custom extension is created, it appears in the Custom Extensions list.
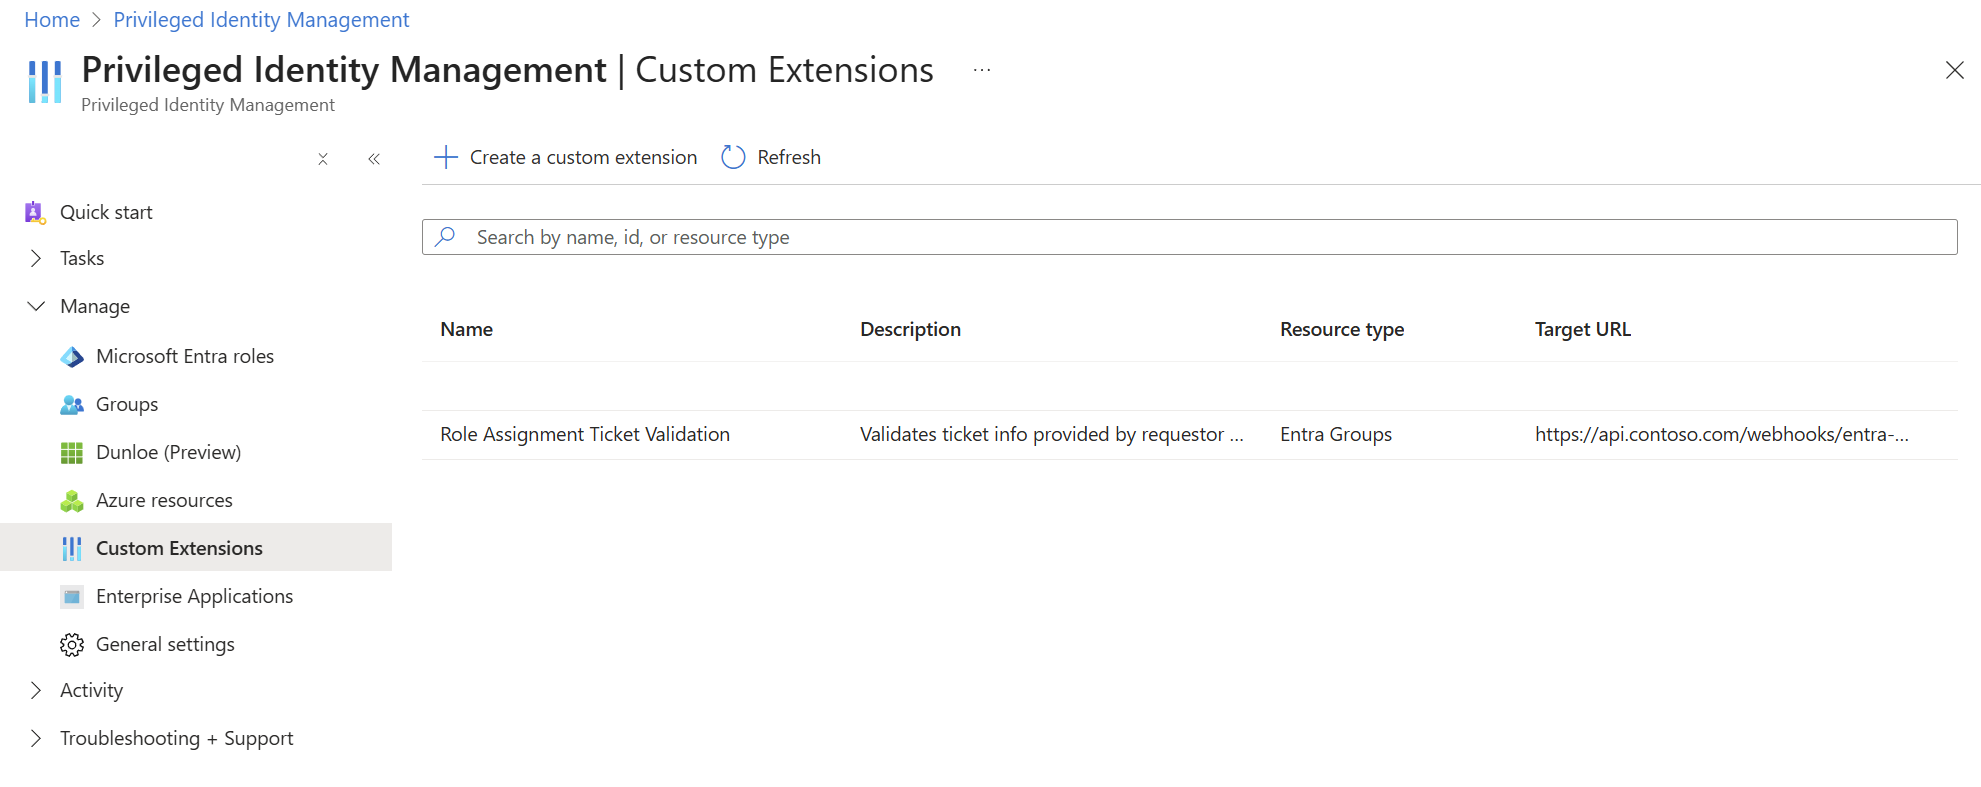
Link a custom extension to PIM role settings
After you onboard a custom extension, link it to the role settings for each role where you want PIM to call the extension during activation. To update role settings for a group, you need the Owner role for that group.
Link to PIM for Groups role settings
To link a custom extension to a group role, follow these steps:
Sign in to the Microsoft Entra admin center.
Go to Identity governance > Privileged Identity Management.
Select Groups.
Select the target group and open its role management experience.
Select Settings to view the available roles for the group.
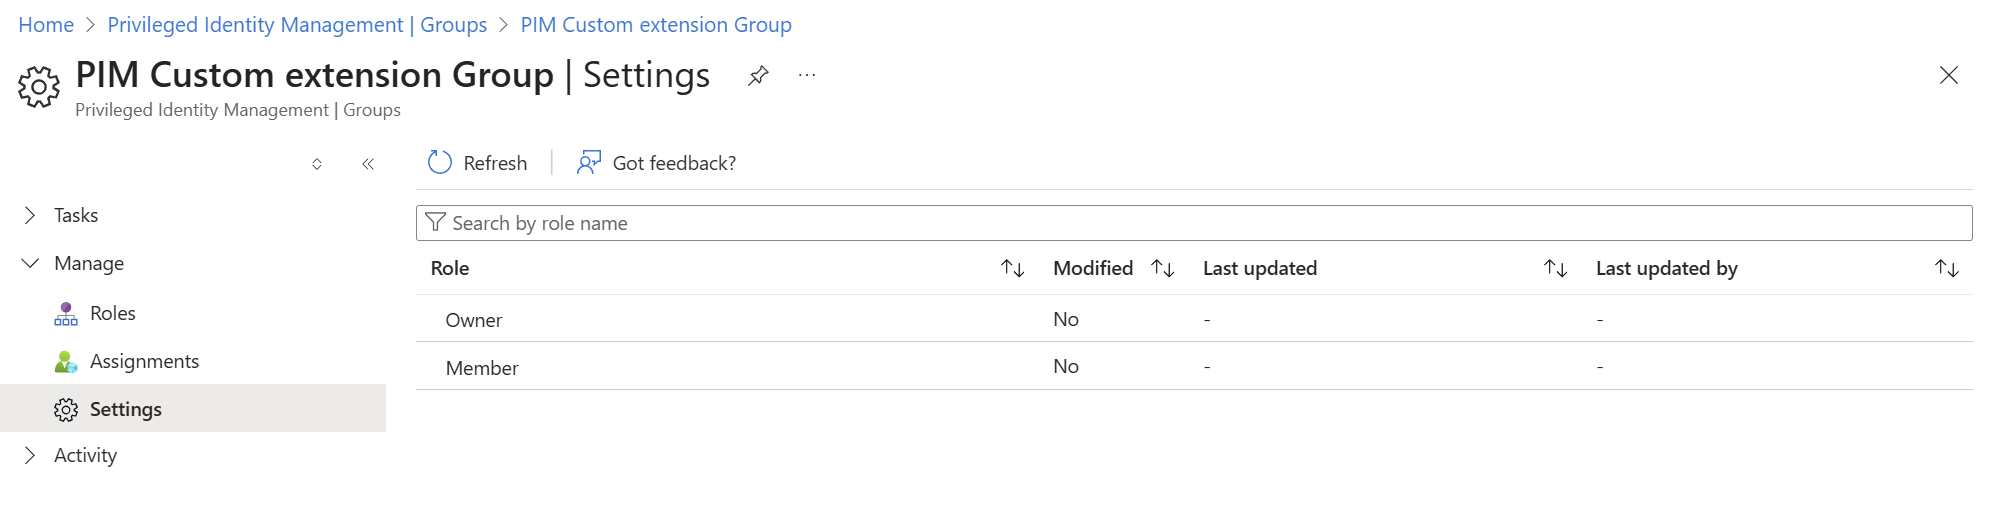
Select the role you want to configure, such as Owner or Member, and open the role settings.
Select Edit.
Select the checkbox for Require pre-approval custom extension to activate.
Select the custom extension you want to link to this role.
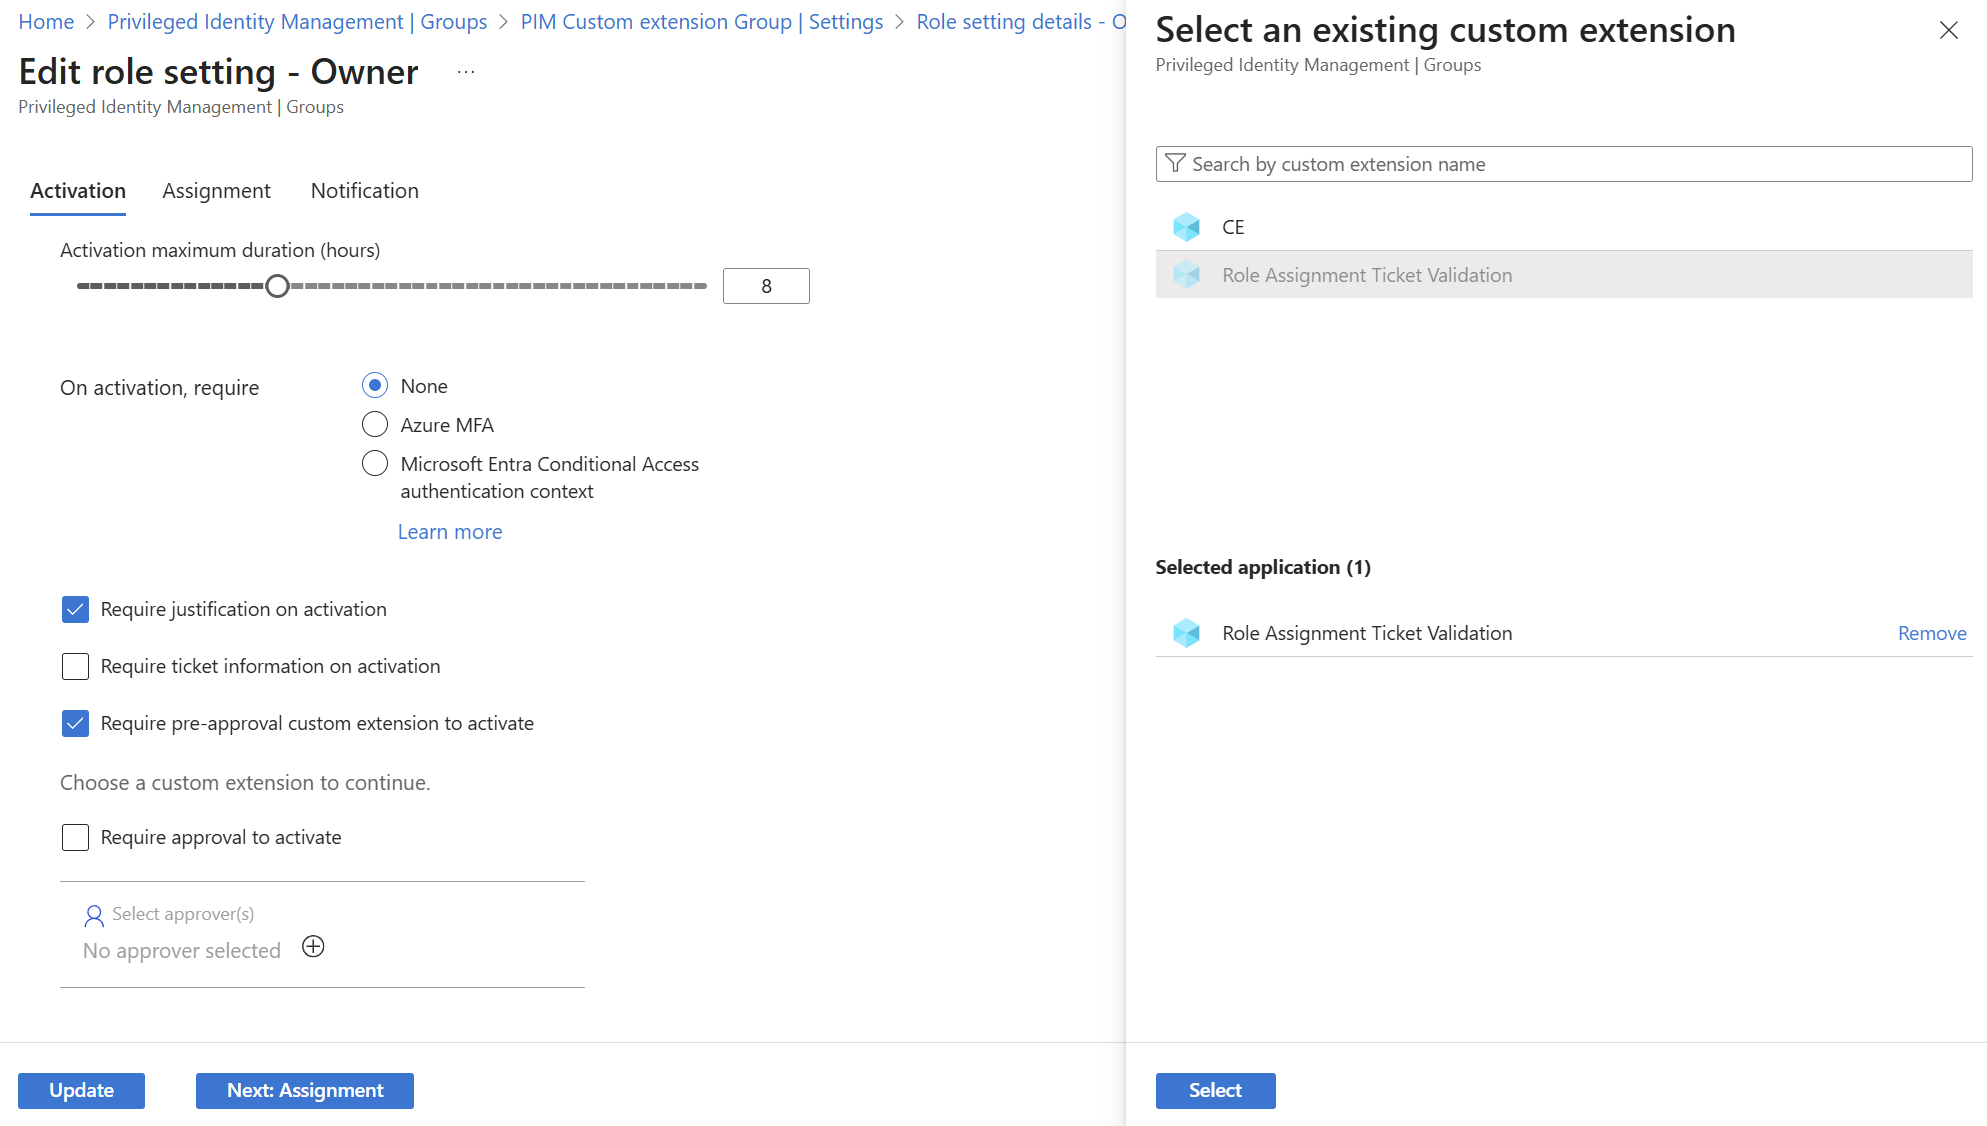
Select Save to apply the updated role settings.
After you save, the role setting details page confirms the custom extension is linked.
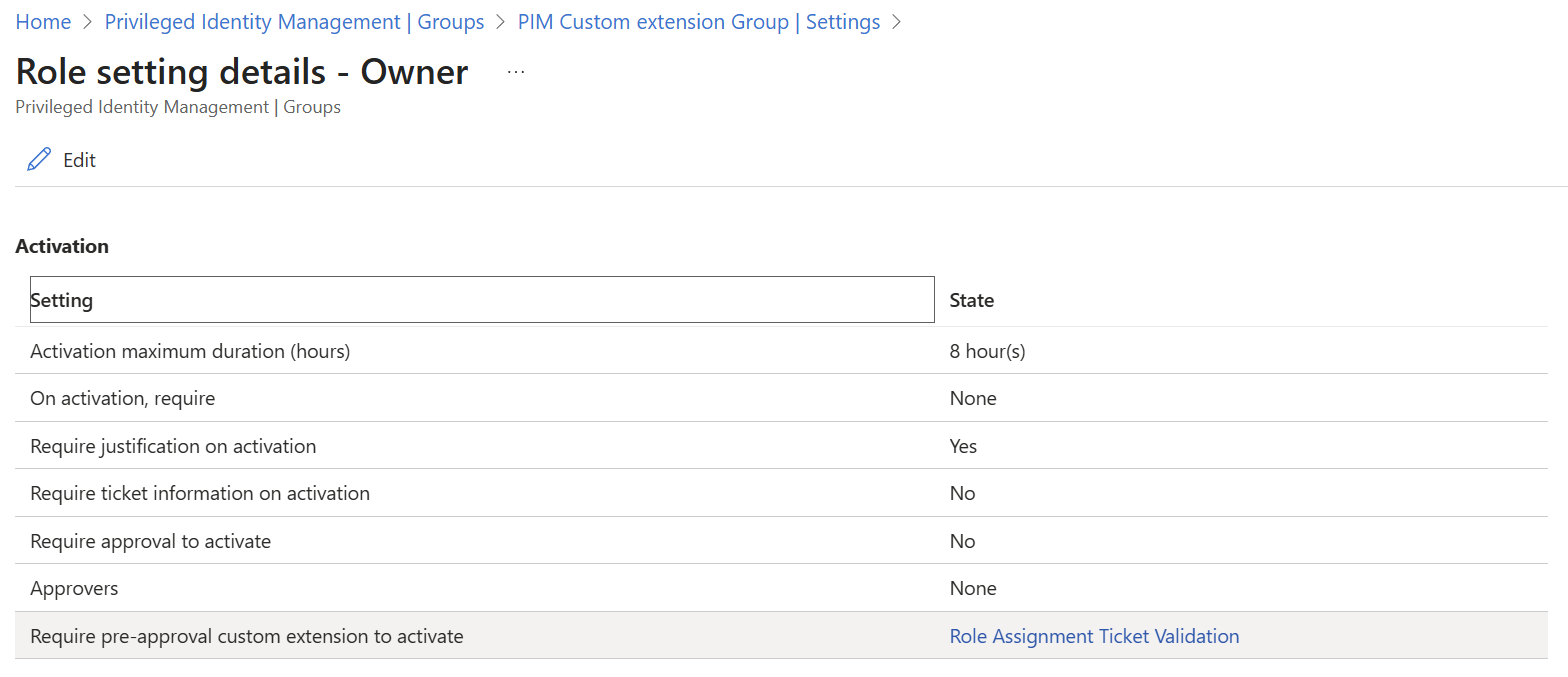
You can follow a similar process to link custom extensions to Azure resource roles and Microsoft Entra directory roles.
Verify the role activation flow
After you complete the configuration, verify that the custom extension works as expected by activating a role and confirming that PIM sends the request to your API and enforces the decision.
Sign in to the Microsoft Entra admin center as a user who is eligible for the role.
Go to Privileged Identity Management and activate the role that has the custom extension configured.
Provide the required justification and ticket information.
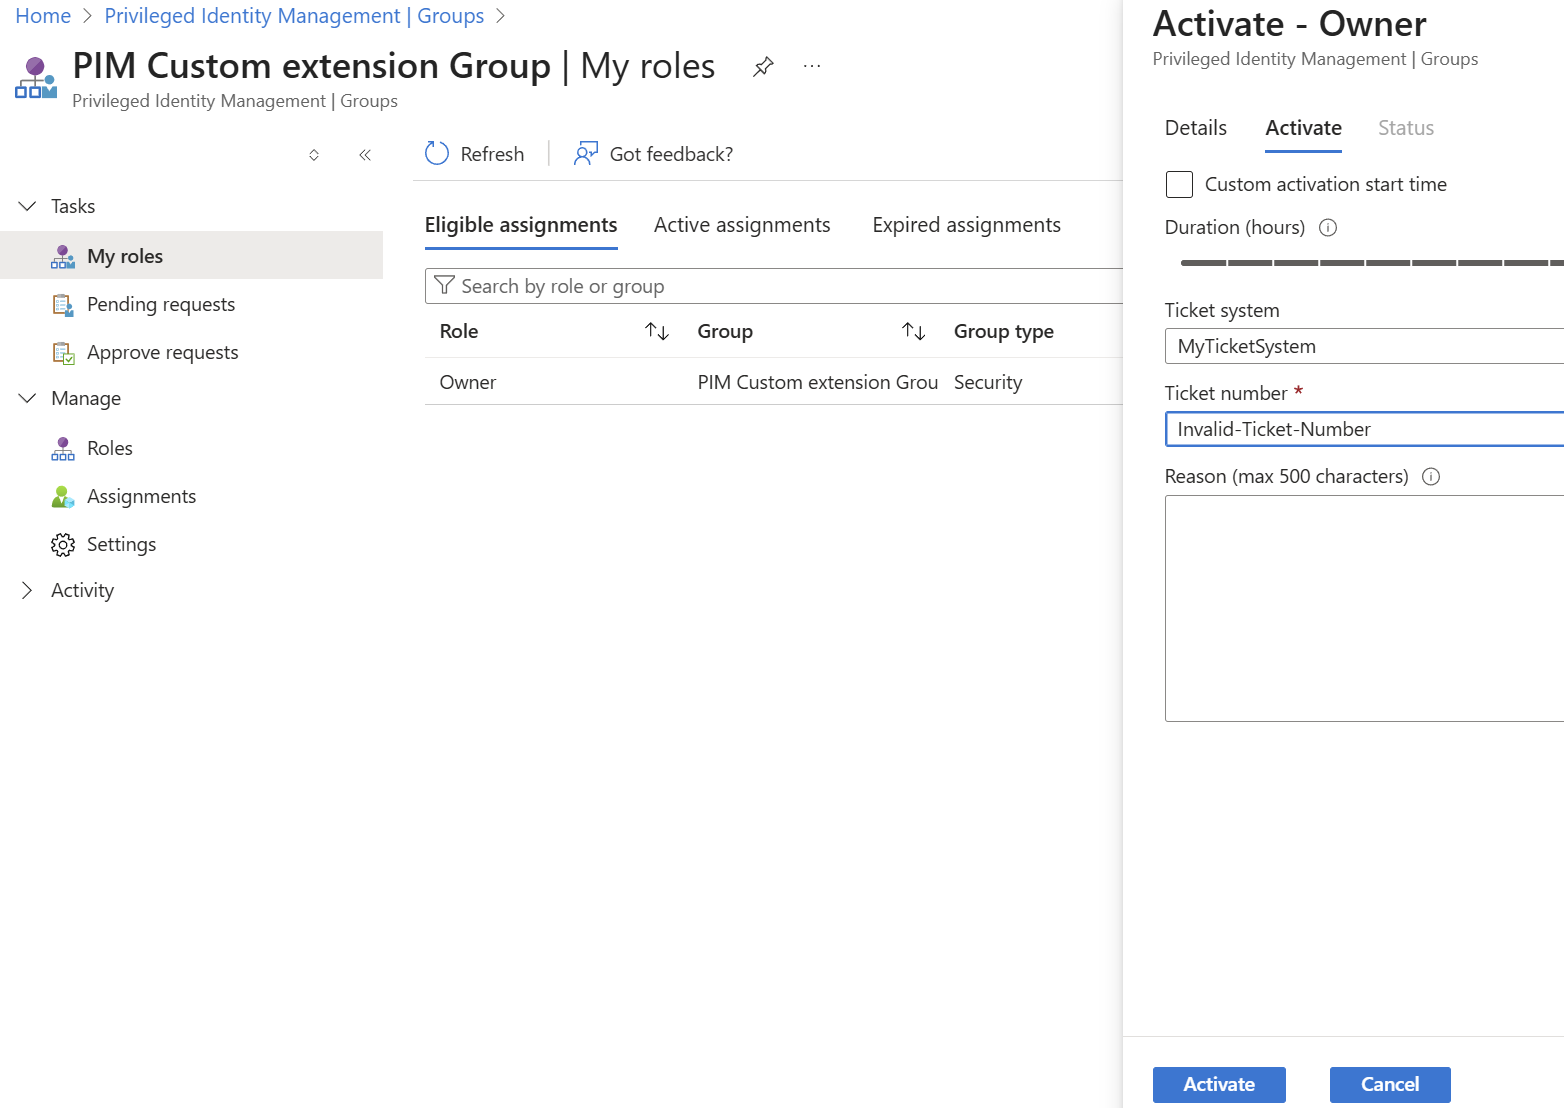
Submit the activation request.
Verify that your API endpoint receives the POST request from PIM.
Confirm that PIM enforces the decision returned by your custom extension:
- Approved: The activation proceeds through the normal PIM workflow, including any other approval steps.
- AutoApproved: The activation proceeds without requiring manual PIM approval.
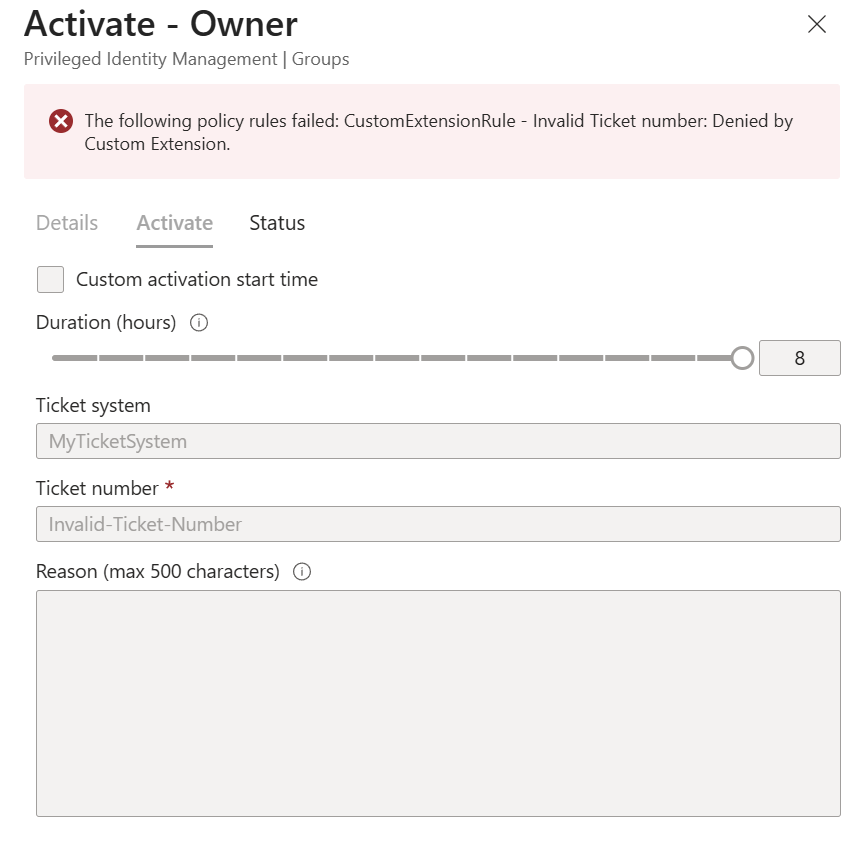
- Denied: The activation is blocked, and the reason messages from your API response appear in the PIM UI.
The following example shows an activation denied by a custom extension that validated ticket information: