Note
Access to this page requires authorization. You can try signing in or changing directories.
Access to this page requires authorization. You can try changing directories.
A workforce tenant configuration is for your employees, internal apps, and other organizational resources.
In this quickstart, you download and run a code sample that demonstrates how an Android application can sign in users and get an access token to call the Microsoft Graph API.
Applications must be represented by an app object in Microsoft Entra ID so that the Microsoft identity platform can provide tokens to your application.
Prerequisites
- An Azure account with an active subscription. If you don't already have one, Create an account.
- This Azure account must have permissions to manage applications. Any of the following Microsoft Entra roles include the required permissions:
- Application Administrator
- Application Developer
- A workforce tenant. You can use your Default Directory or set up a new tenant.
- Register a new app in the Microsoft Entra admin center, configured for Accounts in any organizational directory. Refer to Register an application for more details. Record the following values from the application Overview page for later use:
- Application (client) ID
- Directory (tenant) ID
- Android Studio
- Android 16+
Add a redirect URI
You must configure specific redirect URIs in your app registration to ensure compatibility with the downloaded code sample. These URIs are essential for redirecting users back to the app after they successfully sign in.
Under Manage, select Authentication > Add a platform > Android.
Enter your project's Package Name based on the sample type you downloaded above.
- Java sample -
com.azuresamples.msalandroidapp - Kotlin sample -
com.azuresamples.msalandroidkotlinapp
- Java sample -
In the Signature hash section of the Configure your Android app pane, select Generating a development Signature Hash. and copy the KeyTool command to your command line.
- KeyTool.exe is installed as part of the Java Development Kit (JDK). You must also install the OpenSSL tool to execute the KeyTool command. For more information, see Android documentation on generating a key for more information.
Enter the Signature hash generated by KeyTool.
Select Configure and save the MSAL Configuration that appears in the Android configuration pane so you can enter it when you configure your app later.
Select Done.
Download the sample app
- Java: Download the code.
- Kotlin: Download the code.
Configure the sample application
In Android Studio's project pane, navigate to app\src\main\res.
Right-click res and choose New > Directory. Enter
rawas the new directory name and select OK.In app > src > main > res > raw, go to JSON file called
auth_config_single_account.jsonand paste the MSAL Configuration that you saved earlier.Below the redirect URI, paste:
"account_mode" : "SINGLE",Your config file should resemble this example:
{
  "client_id": "00001111-aaaa-bbbb-3333-cccc4444",
  "authorization_user_agent": "WEBVIEW",
  "redirect_uri": "msauth://com.azuresamples.msalandroidapp/00001111%cccc4444%3D",
  "broker_redirect_uri_registered": false,
  "account_mode": "SINGLE",
  "authorities": [
    {
      "type": "AAD",
      "audience": {
        "type": "AzureADMultipleOrgs",
        "tenant_id": "common"
      }
    }
  ]
}
Open /app/src/main/AndroidManifest.xml file.
Find the placeholder:
enter_the_signature_hashand replace it with the Signature Hash that you generated earlier when you added the platform redirect URL.
As this tutorial only demonstrates how to configure an app in Single Account mode, see single vs. multiple account mode and configuring your app for more information
Run the sample app
Select your emulator, or physical device, from Android Studio's available devices dropdown and run the app.
The sample app starts on the Single Account Mode screen. A default scope, user.read, is provided by default, which is used when reading your own profile data during the Microsoft Graph API call. The URL for the Microsoft Graph API call is provided by default. You can change both of these if you wish.
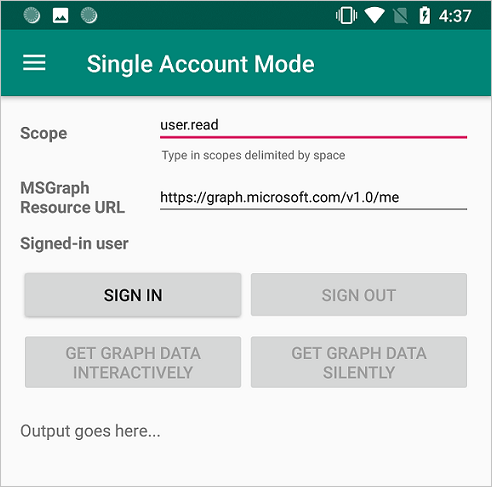
Use the app menu to change between single and multiple account modes.
In single account mode, sign in using a work or home account:
- Select Get graph data interactively to prompt the user for their credentials. You'll see the output from the call to the Microsoft Graph API in the bottom of the screen.
- Once signed in, select Get graph data silently to make a call to the Microsoft Graph API without prompting the user for credentials again. You'll see the output from the call to the Microsoft Graph API in the bottom of the screen.
In multiple account mode, you can repeat the same steps. Additionally, you can remove the signed-in account, which also removes the cached tokens for that account.
How the sample works

The code is organized into fragments that show how to write a single and multiple accounts MSAL app. The code files are organized as follows:
| File | Demonstrates |
|---|---|
| MainActivity | Manages the UI |
| MSGraphRequestWrapper | Calls the Microsoft Graph API using the token provided by MSAL |
| MultipleAccountModeFragment | Initializes a multi-account application, loads a user account, and gets a token to call the Microsoft Graph API |
| SingleAccountModeFragment | Initializes a single-account application, loads a user account, and gets a token to call the Microsoft Graph API |
| res/auth_config_multiple_account.json | The multiple account configuration file |
| res/auth_config_single_account.json | The single account configuration file |
| Gradle Scripts/build.grade (Module:app) | The MSAL library dependencies are added here |
We'll now look at these files in more detail and call out the MSAL-specific code in each.

Next steps
Move on to the Android tutorial in which you build an Android app that gets an access token from the Microsoft identity platform and uses it to call the Microsoft Graph API.