Note
Access to this page requires authorization. You can try signing in or changing directories.
Access to this page requires authorization. You can try changing directories.
This is the second tutorial in the tutorial series that demonstrates how to add Microsoft Authentication Library (MSAL) for iOS and macOS to your iOS Swift app.
A workforce tenant configuration is for your employees, internal apps, and other organizational resources.
In this tutorial, you:
- Add the MSAL framework to an iOS (Swift) app.
- Create SDK instance.
- Configure Xcode project settings.
Prerequisites
- Register a new client web app in the Microsoft Entra admin center, configured for Accounts in any organizational directory. Refer to Register an application for more details. Record the following values from the application Overview page for later use:
- Application (client) ID
- Directory (tenant) ID
- Xcode.
- iOS (Swift) project.
Add a platform redirect URL
To specify your app type to your app registration, follow these steps:
- Under Manage, select Authentication > Add a platform > iOS/macOS.
- Enter your project's Bundle ID. If downloaded the code sample, the Bundle ID is
com.microsoft.identitysample.MSALiOS. If you're creating your own project, select your project in Xcode and open the General tab. The bundle identifier appears in the Identity section. - Select Configure and save the MSAL Configuration that appears in the MSAL configuration page so you can enter it when you configure your app later.
- Select Done.
Add the MSAL framework to an iOS (Swift) app
Choose one of the following ways to install the MSAL library in your app:
CocoaPods
If you're using CocoaPods, install
MSALby first creating an empty file called podfile in the same folder as your project's .xcodeproj file. Add the following to podfile:use_frameworks! target '<your-target-here>' do pod 'MSAL' endReplace
<your-target-here>with the name of your project.In a terminal window, navigate to the folder that contains the podfile you created and run
pod installto install the MSAL library.Close Xcode and open
<your project name>.xcworkspaceto reload the project in Xcode.
Carthage
If you're using Carthage, install MSAL by adding it to your Cartfile:
github "AzureAD/microsoft-authentication-library-for-objc" "master"
From a terminal window, in the same directory as the updated Cartfile, run the following command to have Carthage update the dependencies in your project.
iOS:
carthage update --platform iOS
macOS:
carthage update --platform macOS
Manually
You can also use Git Submodule, or check out the latest release to use as a framework in your application.
Add the app registration
Next, we add your app registration to your code.
First, add the following import statement to the top of the ViewController.swift file and either AppDelegate.swift or SceneDelegate.swift:
import MSAL
Next, add the following code to ViewController.swift before to viewDidLoad():
// Update the below to your client ID. The below is for running the demo only
let kClientID = "Your_Application_Id_Here"
let kGraphEndpoint = "https://microsoftgraph.chinacloudapi.cn/" // the Microsoft Graph endpoint
let kAuthority = "https://login.partner.microsoftonline.cn/common" // this authority allows a work or school account in any organization's Azure AD tenant to sign in

let kScopes: [String] = ["https://microsoftgraph.chinacloudapi.cn/user.read"] // request permission to read the profile of the signed-in user

var accessToken = String()
var applicationContext : MSALPublicClientApplication?
var webViewParameters : MSALWebviewParameters?
var currentAccount: MSALAccount?
The only value you modify is the value assigned to kClientID to be your Application ID. This value is part of the MSAL Configuration data that you saved during the step at the beginning of this tutorial to register the application.
Create SDK instance
To create MSAL instance in your project, follow these steps:
To the ViewController class, add the initMSAL method:
    func initMSAL() throws {

        guard let authorityURL = URL(string: kAuthority) else {
            self.updateLogging(text: "Unable to create authority URL")
            return
        }

        let authority = try MSALAADAuthority(url: authorityURL)

        let msalConfiguration = MSALPublicClientApplicationConfig(clientId: kClientID, redirectUri: nil, authority: authority)
        self.applicationContext = try MSALPublicClientApplication(configuration: msalConfiguration)
        self.initWebViewParams()
    }
Still in the ViewController class and after the initMSAL method, add the initWebViewParams method:
iOS code:
func initWebViewParams() {
        self.webViewParameters = MSALWebviewParameters(authPresentationViewController: self)
    }
macOS code:
func initWebViewParams() {
        self.webViewParameters = MSALWebviewParameters()
    }
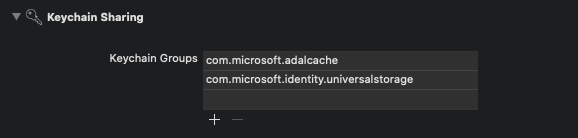
Configure Xcode project settings
Add a new keychain group to your project Signing & Capabilities. The keychain group should be com.microsoft.adalcache on iOS and com.microsoft.identity.universalstorage on macOS.
For iOS only, configure URL schemes
In this step, you'll register CFBundleURLSchemes so that the user can be redirected back to the app after sign in. By the way, LSApplicationQueriesSchemes also allows your app to make use of Microsoft Authenticator.
In Xcode, open Info.plist as a source code file, and add the following inside of the <dict> section. Replace [BUNDLE_ID] with the value you previously used. If you downloaded the code, the bundle identifier is com.microsoft.identitysample.MSALiOS. If you're creating your own project, select your project in Xcode and open the General tab. The bundle identifier appears in the Identity section.
<key>CFBundleURLTypes</key>
<array>
    <dict>
        <key>CFBundleURLSchemes</key>
        <array>
            <string>msauth.[BUNDLE_ID]</string>
        </array>
    </dict>
</array>
<key>LSApplicationQueriesSchemes</key>
<array>
    <string>msauthv2</string>
    <string>msauthv3</string>
</array>
For macOS only, configure App Sandbox
- Go to your Xcode Project Settings > Capabilities tab > App Sandbox
- Select Outgoing Connections (Client) checkbox.