Note
Access to this page requires authorization. You can try signing in or changing directories.
Access to this page requires authorization. You can try changing directories.
Applies to: ✔️ Front Door Standard ✔️ Front Door Premium
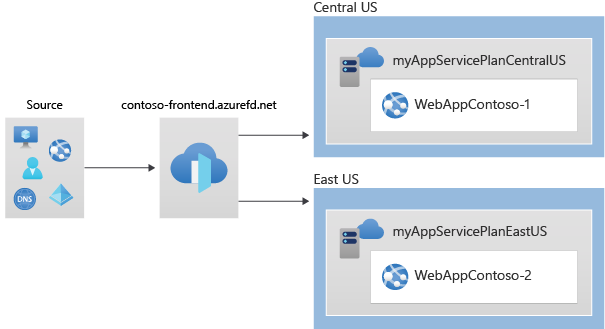
In this quickstart, you learn how to create an Azure Front Door profile using Azure PowerShell. You use two Web Apps as your origin and verify connectivity through the Azure Front Door endpoint hostname.
Note
For web workloads, we highly recommend utilizing Azure DDoS protection and a web application firewall to safeguard against emerging DDoS attacks. Another option is to employ Azure Front Door along with a web application firewall. Azure Front Door offers platform-level protection against network-level DDoS attacks. For more information, see security baseline for Azure services.
Prerequisites
- An Azure account with an active subscription. Create an account.
- Azure PowerShell installed locally.
Note
We recommend that you use the Azure Az PowerShell module to interact with Azure. See Install Azure PowerShell to get started. To learn how to migrate to the Az PowerShell module, see Migrate Azure PowerShell from AzureRM to Az.
Create a resource group
Create a resource group with New-AzResourceGroup:
New-AzResourceGroup -Name myRGFD -Location chinanorth2
Create two web app instances
Create two web app instances in different Azure regions using New-AzWebApp:
# Create first web app in China North 3 region.
$webapp1 = New-AzWebApp `
    -Name "WebAppContoso-01" `
    -Location chinanorth3 `
    -ResourceGroupName myRGFD `
    -AppServicePlan myAppServicePlanchinanorth3

# Create second web app in China East 2 region.
$webapp2 = New-AzWebApp `
    -Name "WebAppContoso-02" `
    -Location ChinaEast2 `
    -ResourceGroupName myRGFD `
    -AppServicePlan myAppServicePlanChinaEast2
Create an Azure Front Door
Create an Azure Front Door profile
Run New-AzFrontDoorCdnProfile to create an Azure Front Door profile:
$fdprofile = New-AzFrontDoorCdnProfile `
    -ResourceGroupName myRGFD `
    -Name contosoAFD `
    -SkuName Premium_AzureFrontDoor `
    -Location Global
Add an endpoint
Run New-AzFrontDoorCdnEndpoint to create an endpoint in your profile:
$FDendpoint = New-AzFrontDoorCdnEndpoint `
    -EndpointName contosofrontend `
    -ProfileName contosoAFD `
    -ResourceGroupName myRGFD `
    -Location Global
Create an origin group
Create health probe and load balancing settings, then create an origin group using New-AzFrontDoorCdnOriginGroup:
# Create health probe settings
$HealthProbeSetting = New-AzFrontDoorCdnOriginGroupHealthProbeSettingObject `
    -ProbeIntervalInSecond 60 `
    -ProbePath "/" `
    -ProbeRequestType GET `
    -ProbeProtocol Http

# Create load balancing settings
$LoadBalancingSetting = New-AzFrontDoorCdnOriginGroupLoadBalancingSettingObject `
    -AdditionalLatencyInMillisecond 50 `
    -SampleSize 4 `
    -SuccessfulSamplesRequired 3

# Create origin group
$originpool = New-AzFrontDoorCdnOriginGroup `
    -OriginGroupName og `
    -ProfileName contosoAFD `
    -ResourceGroupName myRGFD `
    -HealthProbeSetting $HealthProbeSetting `
    -LoadBalancingSetting $LoadBalancingSetting
Add origins to the group
Add your Web App origins to the origin group using New-AzFrontDoorCdnOrigin:
# Add first web app origin to origin group.
$origin1 = New-AzFrontDoorCdnOrigin `
    -OriginGroupName og `
    -OriginName contoso1 `
    -ProfileName contosoAFD `
    -ResourceGroupName myRGFD `
    -HostName webappcontoso-01.chinacloudsites.cn `
    -OriginHostHeader webappcontoso-01.chinacloudsites.cn `
    -HttpPort 80 `
    -HttpsPort 443 `
    -Priority 1 `
    -Weight 1000

# Add second web app origin to origin group.
$origin2 = New-AzFrontDoorCdnOrigin `
    -OriginGroupName og `
    -OriginName contoso2 `
    -ProfileName contosoAFD `
    -ResourceGroupName myRGFD `
    -HostName webappcontoso-02.chinacloudsites.cn `
    -OriginHostHeader webappcontoso-02.chinacloudsites.cn `
    -HttpPort 80 `
    -HttpsPort 443 `
    -Priority 1 `
    -Weight 1000
Add a route
Map your endpoint to the origin group using New-AzFrontDoorCdnRoute:
$Route = New-AzFrontDoorCdnRoute `
    -EndpointName contosofrontend `
    -Name defaultroute `
    -ProfileName contosoAFD `
    -ResourceGroupName myRGFD `
    -ForwardingProtocol MatchRequest `
    -HttpsRedirect Enabled `
    -LinkToDefaultDomain Enabled `
    -OriginGroupId $originpool.Id `
    -SupportedProtocol Http,Https
Test the Azure Front Door
After you create the Azure Front Door profile, it takes a few minutes for the configuration to be deployed globally. Once completed, access the frontend host you created.
Run Get-AzFrontDoorCdnEndpoint to get the hostname of the Azure Front Door endpoint:
$fd = Get-AzFrontDoorCdnEndpoint `
    -EndpointName contosofrontend `
    -ProfileName contosoafd `
    -ResourceGroupName myRGFD

$fd.hostname
In a browser, go to the endpoint hostname: contosofrontend-<hash>.z01.azurefd.net. Your request is routed to the web app with the lowest latency in the origin group.

To test instant global failover:
Open a browser and go to the endpoint hostname:
contosofrontend-<hash>.z01.azurefd.net.Stop one of the Web Apps by running Stop-AzWebApp:
Stop-AzWebApp -ResourceGroupName myRGFD -Name "WebAppContoso-01"Refresh your browser. You should see the same information page.
Stop the other web app:
Stop-AzWebApp -ResourceGroupName myRGFD -Name "WebAppContoso-02"Refresh your browser. This time, you should see an error message.

Restart one of the Web Apps by running Start-AzWebApp. Refresh your browser and the page go back to normal:
Start-AzWebApp -ResourceGroupName myRGFD -Name "WebAppContoso-01"
Clean up resources
When you no longer need the resources created with the Azure Front Door, delete the resource group. This action deletes the Azure Front Door and all its related resources. Run Remove-AzResourceGroup:
Remove-AzResourceGroup -Name myRGFD