Note
Access to this page requires authorization. You can try signing in or changing directories.
Access to this page requires authorization. You can try changing directories.
HDInsight Spark clusters include Apache Zeppelin notebooks. Use the notebooks to run Apache Spark jobs. In this article, you learn how to use the Zeppelin notebook on an HDInsight cluster.
Prerequisites
- An Apache Spark cluster on HDInsight. For instructions, see Create Apache Spark clusters in Azure HDInsight.
- The URI scheme for your clusters primary storage. The scheme would be
wasb://for Azure Blob Storage,abfs://for Azure Data Lake Storage Gen2 . If secure transfer is enabled for Blob Storage, the URI would bewasbs://. For more information, see Require secure transfer in Azure Storage .
Launch an Apache Zeppelin notebook
From the Spark cluster Overview, select Zeppelin notebook from Cluster dashboards. Enter the admin credentials for the cluster.
Note
You may also reach the Zeppelin Notebook for your cluster by opening the following URL in your browser. Replace CLUSTERNAME with the name of your cluster:
https://CLUSTERNAME.azurehdinsight.cn/zeppelinCreate a new notebook. From the header pane, navigate to Notebook > Create new note.

Enter a name for the notebook, then select Create Note.
Ensure the notebook header shows a connected status. It's denoted by a green dot in the top-right corner.

Load sample data into a temporary table. When you create a Spark cluster in HDInsight, the sample data file,
hvac.csv, is copied to the associated storage account under\HdiSamples\SensorSampleData\hvac.In the empty paragraph that is created by default in the new notebook, paste the following snippet.
%livy2.spark
//The above magic instructs Zeppelin to use the Livy Scala interpreter

// Create an RDD using the default Spark context, sc
val hvacText = sc.textFile("wasbs:///HdiSamples/HdiSamples/SensorSampleData/hvac/HVAC.csv")

// Define a schema
case class Hvac(date: String, time: String, targettemp: Integer, actualtemp: Integer, buildingID: String)

// Map the values in the .csv file to the schema
val hvac = hvacText.map(s => s.split(",")).filter(s => s(0) != "Date").map(
    s => Hvac(s(0),
            s(1),
            s(2).toInt,
            s(3).toInt,
            s(6)
    )
).toDF()

// Register as a temporary table called "hvac"
hvac.registerTempTable("hvac")
Press SHIFT + ENTER or select the Play button for the paragraph to run the snippet. The status on the right-corner of the paragraph should progress from READY, PENDING, RUNNING to FINISHED. The output shows up at the bottom of the same paragraph. The screenshot looks like the following image:
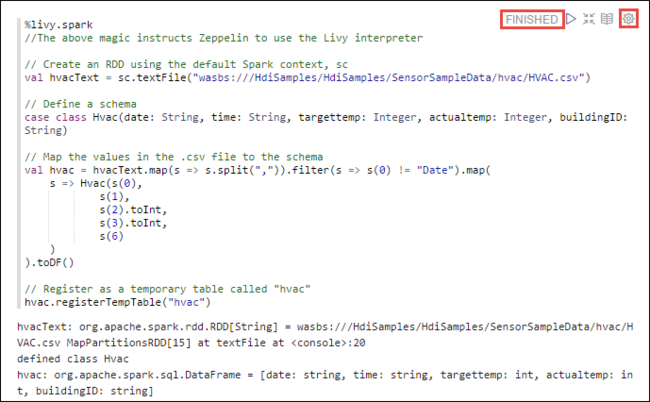
You can also provide a title to each paragraph. From the right-hand corner of the paragraph, select the Settings icon (sprocket), and then select Show title.
Note
%spark2 interpreter isn't supported in Zeppelin notebooks across all HDInsight versions, and %sh interpreter not supported from HDInsight 4.0 onwards.
You can now run Spark SQL statements on the
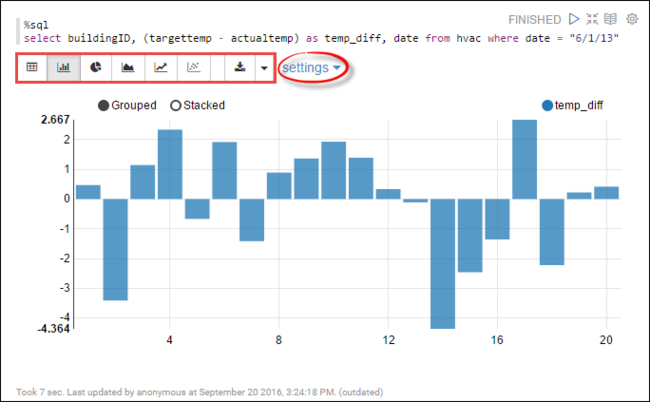
hvactable. Paste the following query in a new paragraph. The query retrieves the building ID. Also the difference between the target and actual temperatures for each building on a given date. Press SHIFT + ENTER.%sql select buildingID, (targettemp - actualtemp) as temp_diff, date from hvac where date = "6/1/13"The %sql statement at the beginning tells the notebook to use the Livy Scala interpreter.
Select the Bar Chart icon to change the display. settings appear after you selected Bar Chart, allows you to choose Keys, and Values. The following screenshot shows the output.
You can also run Spark SQL statements using variables in the query. The next snippet shows how to define a variable,
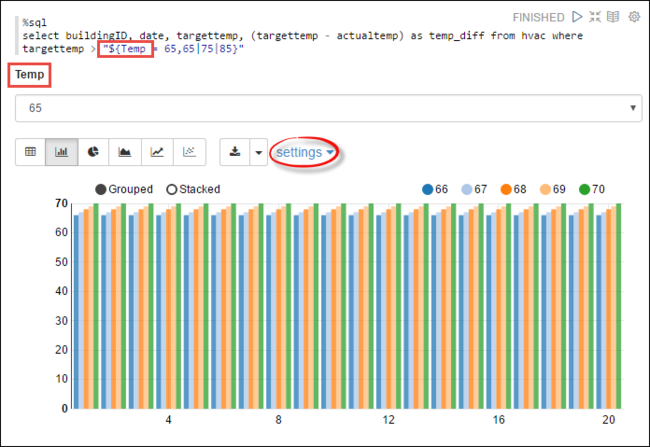
Temp, in the query with the possible values you want to query with. When you first run the query, a drop-down is automatically populated with the values you specified for the variable.%sql select buildingID, date, targettemp, (targettemp - actualtemp) as temp_diff from hvac where targettemp > "${Temp = 65,65|75|85}"Paste this snippet in a new paragraph and press SHIFT + ENTER. Then select 65 from the Temp drop-down list.
Select the Bar Chart icon to change the display. Then select settings and make the following changes:
Groups: Add targettemp.
Values: 1. Remove date. 2. Add temp_diff. 3. Change the aggregator from SUM to AVG.
The following screenshot shows the output.
How do I use external packages with the notebook?
Zeppelin notebook in Apache Spark cluster on HDInsight can use external, community-contributed packages that aren't included in the cluster. Search the Maven repository for the complete list of packages that are available. You can also get a list of available packages from other sources. For example, a complete list of community-contributed packages is available at Spark Packages.
In this article, you see how to use the spark-csv package with the Jupyter Notebook.
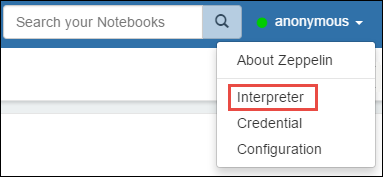
Open interpreter settings. From the top-right corner, select the logged in user name, then select Interpreter.
Scroll to livy2, then select edit.

Navigate to key
livy.spark.jars.packages, and set its value in the formatgroup:id:version. So, if you want to use the spark-csv package, you must set the value of the key tocom.databricks:spark-csv_2.10:1.4.0.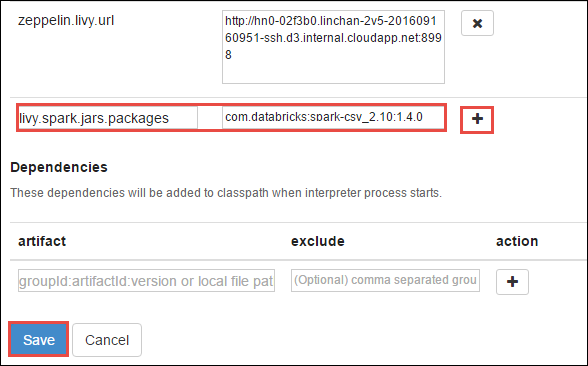
Select Save and then OK to restart the Livy interpreter.
If you want to understand how to arrive at the value of the key entered, here's how.
a. Locate the package in the Maven Repository. For this article, we used spark-csv.
b. From the repository, gather the values for GroupId, ArtifactId, and Version.
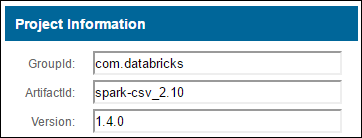
c. Concatenate the three values, separated by a colon (:).
com.databricks:spark-csv_2.10:1.4.0
Where are the Zeppelin notebooks saved?
The Zeppelin notebooks saved to the cluster headnodes. So, if you delete the cluster, the notebooks will be deleted as well. If you want to preserve your notebooks for later use on other clusters, you must export them after you finished running the jobs. To export a notebook, select the Export icon as shown in the image as follows.

This action saves the notebook as a JSON file in your download location.
Note
In HDI 4.0, the zeppelin notebook directory path is,
/usr/hdp/<version>/zeppelin/notebook/<notebook_session_id>/Eg. /usr/hdp/4.1.17.10/zeppelin/2JMC9BZ8X/
Whereas in HDI 5.0 and this path is different
/usr/hdp/<version>/zeppelin/notebook/<Kernel_name>/Eg. /usr/hdp/5.1.4.5/zeppelin/notebook/Scala/
The file name stored is different in HDI 5.0. It's stored as
<notebook_name>_<sessionid>.zplnEg. testzeppelin_2JJK53XQA.zpln
In HDI 4.0, the file name is just note.json stored under session_id directory.
Eg. /2JMC9BZ8X/note.json
HDI Zeppelin always saves the notebook in the path
/usr/hdp/<version>/zeppelin/notebook/in hn0 local disk.If you want the notebook to be available even after cluster deletion, you can try to use Azure file storage (Using SMB protocol) and link it to local path. For more information, see Mount SMB Azure file share on Linux
After mounting it, you can modify the zeppelin configuration zeppelin.notebook.dir to the mounted path in Ambari UI.
- The SMB fileshare as GitNotebookRepo storage isn't recommended for zeppelin version 0.10.1
Use Shiro to Configure Access to Zeppelin Interpreters in Enterprise Security Package (ESP) Clusters
As noted above, the %sh interpreter isn't supported from HDInsight 4.0 onwards. Furthermore, since %sh interpreter introduces potential security issues, such as access keytabs using shell commands, it has been removed from HDInsight 3.6 ESP clusters as well. It means %sh interpreter isn't available when clicking Create new note or in the Interpreter UI by default.
Privileged domain users can use the Shiro.ini file to control access to the Interpreter UI. Only these users can create new %sh interpreters and set permissions on each new %sh interpreter. To control access using the shiro.ini file, use the following steps:
Define a new role using an existing domain group name. In the following example,
adminGroupNameis a group of privileged users in Microsoft Entra ID. Don't use special characters or white spaces in the group name. The characters after=give the permissions for this role.*means the group has full permissions.[roles] adminGroupName = *Add the new role for access to Zeppelin interpreters. In the following example, all users in
adminGroupNameare given access to Zeppelin interpreters and can create new interpreters. You can put multiple roles between the brackets inroles[], separated by commas. Then, users that have the necessary permissions, can access Zeppelin interpreters.[urls] /api/interpreter/** = authc, roles[adminGroupName]
Example shiro.ini for multiple domain groups:
[main]
anyofrolesuser = org.apache.zeppelin.utils.AnyOfRolesUserAuthorizationFilter

[roles]
group1 = *
group2 = *
group3 = *

[urls]
/api/interpreter/** = authc, anyofrolesuser[group1, group2, group3]
Livy session management
The first code paragraph in your Zeppelin notebook creates a new Livy session in your cluster. This session is shared across all Zeppelin notebooks that you later create. If the Livy session is killed for any reason, jobs won't run from the Zeppelin notebook.
In such a case, you must do the following steps before you can start running jobs from a Zeppelin notebook.
Restart the Livy interpreter from the Zeppelin notebook. To do so, open interpreter settings by selecting the logged in user name from the top-right corner, then select Interpreter.

Scroll to livy2, then select restart.

Run a code cell from an existing Zeppelin notebook. This code creates a new Livy session in the HDInsight cluster.
General information
Validate service
To validate the service from Ambari, navigate to https://CLUSTERNAME.azurehdinsight.cn/#/main/services/ZEPPELIN/summary where CLUSTERNAME is the name of your cluster.
To validate the service from a command line, SSH to the head node. Switch user to zeppelin using command sudo su zeppelin. Status commands:
| Command | Description |
|---|---|
/usr/hdp/current/zeppelin-server/bin/zeppelin-daemon.sh status |
Service status. |
/usr/hdp/current/zeppelin-server/bin/zeppelin-daemon.sh --version |
Service version. |
ps -aux | grep zeppelin |
Identify PID. |
Log locations
| Service | Path |
|---|---|
| zeppelin-server | /usr/hdp/current/zeppelin-server/ |
| Server Logs | /var/log/zeppelin |
Configuration Interpreter, Shiro, site.xml, log4j |
/usr/hdp/current/zeppelin-server/conf or /etc/zeppelin/conf |
| PID directory | /var/run/zeppelin |
Enable debug logging
Navigate to
https://CLUSTERNAME.azurehdinsight.cn/#/main/services/ZEPPELIN/summarywhere CLUSTERNAME is the name of your cluster.Navigate to CONFIGS > Advanced zeppelin-log4j-properties > log4j_properties_content.
Modify
log4j.appender.dailyfile.Threshold = INFOtolog4j.appender.dailyfile.Threshold = DEBUG.Add
log4j.logger.org.apache.zeppelin.realm=DEBUG.Save changes and restart service.