Note
Access to this page requires authorization. You can try signing in or changing directories.
Access to this page requires authorization. You can try changing directories.
In this quickstart, you will learn how to provision a Windows development machine as a device to an IoT hub using C#. This device will use a symmetric key and an individual enrollment to authenticate with a Device Provisioning Service (DPS) instance in order to be assigned to an IoT hub. Sample code from the Azure IoT Samples for C# will be used to provision the device.
Although this article demonstrates provisioning with an individual enrollment, you can also use enrollment groups. There are some differences when using enrollment groups. For example, you must use a derived device key with a unique registration ID for the device. Provision devices with symmetric keys provides an enrollment group example. For more information on enrollment groups, see Group Enrollments for Symmetric Key Attestation.
If you're unfamiliar with the process of autoprovisioning, review the provisioning overview.
Also, make sure you've completed the steps in Set up IoT Hub Device Provisioning Service with the Azure portal before continuing with this quickstart. This quickstart requires you to have already created your Device Provisioning Service instance.
This article is oriented toward a Windows-based workstation. However, you can perform the procedures on Linux. For a Linux example, see Provision for multitenancy.
If you don't have an Azure subscription, create a trial account before you begin.
Prerequisites
Make sure you have .NET Core 2.1 SDK or later installed on your Windows-based machine.
Latest version of Git installed.
Create a device enrollment
Sign in to the Azure portal, select the All resources button on the left-hand menu and open your Device Provisioning service (DPS) instance.
Select the Manage enrollments tab, and then select the Add individual enrollment button at the top.
In the Add Enrollment panel, enter the following information, and press the Save button.
Mechanism: Select Symmetric Key as the identity attestation Mechanism.
Auto-generate keys: Check this box.
Registration ID: Enter a registration ID to identify the enrollment. Use only lowercase alphanumeric and dash ('-') characters. For example, symm-key-csharp-device-01.
IoT Hub Device ID: Enter a device identifier. For example, csharp-device-01.

Once you have saved your enrollment, the Primary Key and Secondary Key will be generated and added to the enrollment entry. Your symmetric key device enrollment appears as symm-key-csharp-device-01 under the Registration ID column in the Individual Enrollments tab.
Open the enrollment and copy the value of your generated Primary Key. You will use this key value and the Registration ID later when you run the device provisioning sample code.
Prepare the C# environment
Open a Git CMD or Git Bash command line environment. Clone the Azure IoT Samples for C# GitHub repository using the following command:
git clone https://github.com/Azure-Samples/azure-iot-samples-csharp.git
Run the device provisioning code
In this section, you will run the device provisioning sample using three parameters that will authenticate the device provisioning sample code as the symmetric key device for the enrollment in your DPS resource. These three parameters are:
- ID Scope
- Registration ID for an individual enrollment.
- Primary symmetric key for an individual enrollment.
The provisioning code will contact the DPS resource using these parameters in order to authenticate your device. The device will then be assigned to an IoT hub already linked to the DPS instance based on the individual enrollment configuration. Once provisioned, the sample code will send a test telemetry message to the IoT hub.
In the Azure portal, on your Device Provisioning Service menu, select Overview and copy your ID Scope value. You will use this value for the
IdScopeparameter when running the sample code.Open a command prompt and navigate to the SymmetricKeySample in the cloned samples repository:
cd azure-iot-samples-csharp\provisioning\Samples\device\SymmetricKeySampleIn the SymmetricKeySample folder, open Parameters.cs in a text editor. This file shows the parameters supported by the sample. Only the first three required parameters will be used in this article when running the sample. Review the code in this file. No changes are needed.
Parameter Required Description --sor--IdScopeTrue The ID Scope of the DPS instance --ior--IdTrue The registration ID when using individual enrollment, or the desired device ID when using group enrollment. --por--PrimaryKeyTrue The primary key of the individual or group enrollment. --eor--EnrollmentTypeFalse The type of enrollment: IndividualorGroup. Defaults toIndividual--gor--GlobalDeviceEndpointFalse The global endpoint for devices to connect to. Defaults to global.azure-devices-provisioning.cn--tor--TransportTypeFalse The transport to use to communicate with the device provisioning instance. Defaults to Mqtt. Possible values includeMqtt,Mqtt_WebSocket_Only,Mqtt_Tcp_Only,Amqp,Amqp_WebSocket_Only,Amqp_Tcp_only, andHttp1.In the SymmetricKeySample folder, open ProvisioningDeviceClientSample.cs in a text editor. This file shows how the SecurityProviderSymmetricKey class is used along with the ProvisioningDeviceClient class to provision your symmetric key device. Review the code in this file. No changes are needed.
Build and run the sample code using the following command after replacing the three example parameters. Use your correct values for ID Scope, enrollment registration ID, and enrollment primary key.
dotnet run --s 0ne00000A0A --i symm-key-csharp-device-01 --p sbDDeEzRuEuGKag+kQKV+T1QGakRtHpsERLP0yPjwR93TrpEgEh/Y07CXstfha6dhIPWvdD1nRxK5T0KGKA+nQ==The expected output should look similar to the following output that shows the linked IoT hub that the device was assigned to based on the individual enrollment settings. An example "TestMessage" string is sent to the hub as a test:
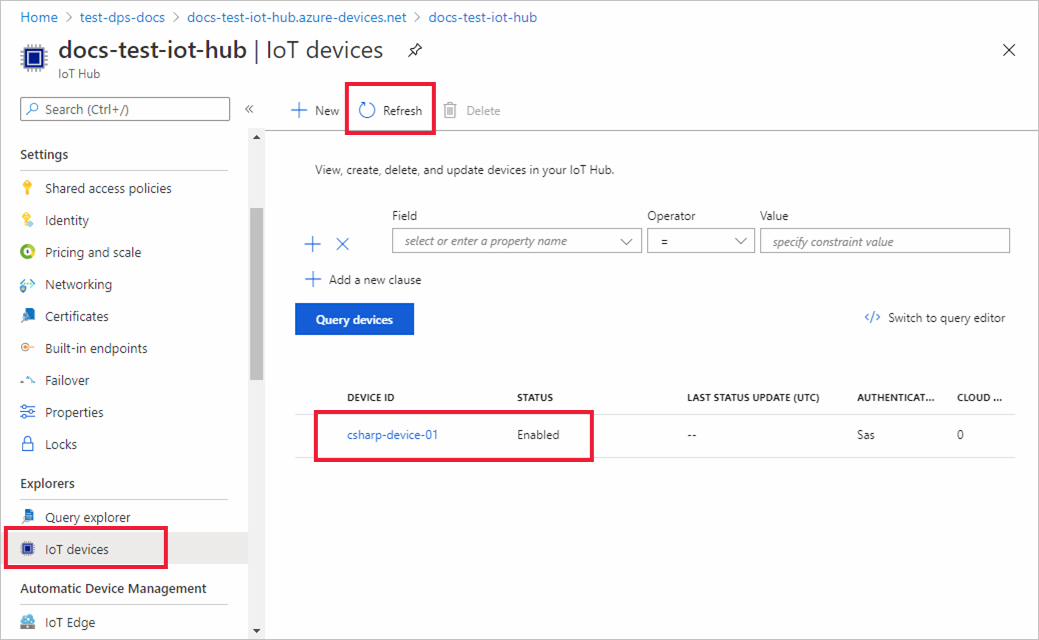
D:\azure-iot-samples-csharp\provisioning\Samples\device\SymmetricKeySample>dotnet run --s 0ne00000A0A --i symm-key-csharp-device-01 --p sbDDeEzRuEuGKag+kQKV+T1QGakRtHpsERLP0yPjwR93TrpEgEh/Y07CXstfha6dhIPWvdD1nRxK5T0KGKA+nQ==

Initializing the device provisioning client...
Initialized for registration Id symm-key-csharp-device-01.
Registering with the device provisioning service...
Registration status: Assigned.
Device csharp-device-01 registered to ExampleIoTHub.azure-devices.net.
Creating symmetric key authentication for IoT Hub...
Testing the provisioned device with IoT Hub...
Sending a telemetry message...
Finished.
Enter any key to exit.
In the Azure portal, navigate to the IoT hub linked to your provisioning service and open the IoT devices blade. After successfully provisioning the symmetric key device to the hub, the device ID is shown with STATUS as enabled. You might need to press the Refresh button at the top if you already opened the blade prior to running the device sample code.
Note
If you changed the initial device twin state from the default value in the enrollment entry for your device, it can pull the desired twin state from the hub and act accordingly. For more information, see Understand and use device twins in IoT Hub.
Clean up resources
If you plan to continue working on and exploring the device client sample, do not clean up the resources created in this quickstart. If you do not plan to continue, use the following steps to delete all resources created by this quickstart.
- From the left-hand menu in the Azure portal, select All resources and then select your Device Provisioning service. Open Manage Enrollments for your service, and then select the Individual Enrollments tab. Select the check box next to the REGISTRATION ID of the device you enrolled in this quickstart, and press the Delete button at the top of the pane.
- From the left-hand menu in the Azure portal, select All resources and then select your IoT hub. Open IoT devices for your hub, select the check box next to the DEVICE ID of the device you registered in this quickstart, and then press the Delete button at the top of the pane.
Next steps
In this quickstart, you provisioned a Windows-based symmetric key device to your IoT hub using the IoT Hub Device Provisioning Service. To learn how to provision X.509 certificate devices using C#, continue with the quickstart below for X.509 devices.