Note
Access to this page requires authorization. You can try signing in or changing directories.
Access to this page requires authorization. You can try changing directories.
Applies to:
![]() IoT Edge 1.5
IoT Edge 1.5
Important
IoT Edge 1.5 LTS is the supported release. IoT Edge 1.4 LTS is end of life as of November 12, 2024. If you are on an earlier release, see Update IoT Edge.
Create an IoT Edge automatic deployment in the Azure portal to manage ongoing deployments for many devices at once. Automatic deployments for IoT Edge are part of the device management feature of IoT Hub. Deployments are dynamic processes that enable you to deploy multiple modules to multiple devices, track the status and health of the modules, and make changes when necessary.
For more information, see Understand IoT Edge automatic deployments for single devices or at scale.
Identify devices using tags
Before you can create a deployment, you have to be able to specify which devices you want to affect. Azure IoT Edge identifies devices using tags in the device twin. Each device can have multiple tags that you define in any way that makes sense for your solution.
For example, if you manage a campus of smart buildings, you might add location, room type, and environment tags to a device:
"tags":{
  "location":{
    "building": "20",
    "floor": "2"
  },
  "roomtype": "conference",
  "environment": "prod"
}
For more information about device twins and tags, see Understand and use device twins in IoT Hub.
Create a deployment
IoT Edge provides two different types of automatic deployments that you can use to customize your scenario. You can create a standard deployment, which includes that system runtime modules and any other modules and routes. Each device can only apply one deployment. Or you can create a layered deployment, which only includes custom modules and routes, not the system runtime. Many layered deployments can be combined on a device, on top of a standard deployment. For more information about how the two types of automatic deployments work together, see Understand IoT Edge automatic deployments for single devices or at scale.
The steps for creating a deployment and a layered deployment are similar. Any differences are called out in the following steps.
- In the Azure portal, go to your IoT hub.
- On the resource menu in the left pane, select Configurations + Deployments under Device Management.
- On the command bar, select Add > Deployment or Layered Deployment.
There are five steps to create a deployment. The following sections walk through each one.
Note
The steps in this article reflect the latest schema version of the IoT Edge agent and hub.
If you're deploying to a device running version 1.0.9 or earlier, edit the Runtime Settings in the Modules step of the wizard to use schema version 1.0.
Step 1: Name and label
- Give your deployment a unique name that is up to 128 lowercase letters. Avoid spaces and the following invalid characters:
& ^ [ ] { } \ | " < > /. - You can add labels as key-value pairs to help track your deployments. For example, HostPlatform and Linux, or Version and 3.0.1.
- Select Next: Modules to move to step two.
Step 2: Modules
You can add up to 50 modules to a deployment. If you create a deployment with no modules, it removes any current modules from the target devices.
In deployments, you can manage the settings for the IoT Edge agent and IoT Edge hub modules. Select Runtime Settings to configure the two runtime modules. In layered deployment, the runtime modules aren't included so can't be configured.
To add custom code as a module, or to manually add an Azure service module, follow these steps:
In the Container Registry Credentials section of the page, provide the credentials to access any private container registries that contain your module images.
In the IoT Edge Modules section of the page, select Add.
Choose one of the types of modules from the drop-down menu:
- IoT Edge Module - You provide the module name and container image URI. For example, the image URI for the sample SimulatedTemperatureSensor module is
mcr.microsoft.com/azureiotedge-simulated-temperature-sensor:1.5. For a list of Azure IoT Edge module images, see the Microsoft Artifact Registry. - Azure Stream Analytics Module - Modules generated from an Azure Stream Analytics workload.
- IoT Edge Module - You provide the module name and container image URI. For example, the image URI for the sample SimulatedTemperatureSensor module is
If needed, repeat steps 2 and 3 to add more modules to your deployment.
After you add a module to a deployment, you can select its name to open the Update IoT Edge Module page. On this page, you can edit the module settings, environment variables, create options, startup order, and module twin. If you added a module from the marketplace, it might already have some of these parameters filled in. For more information about the available module settings, see Module configuration and management.
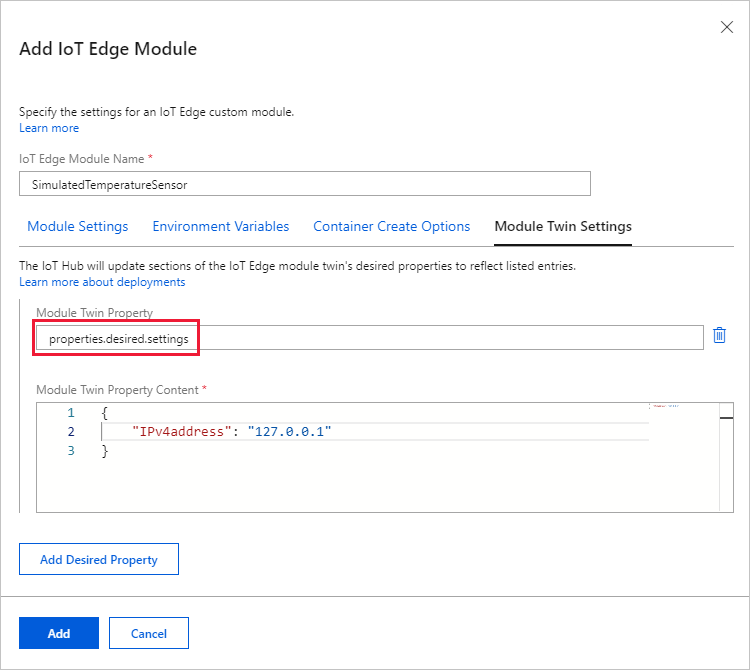
If you're creating a layered deployment, you might be configuring a module that exists in other deployments targeting the same devices. To update the module twin without overwriting other versions, open the Module Twin Settings tab. Create a new Module Twin Property with a unique name for a subsection within the module twin's desired properties, for example properties.desired.settings. If you define properties within just the properties.desired field, it overwrites the desired properties for the module defined in any lower priority deployments.

For more information about module twin configuration in layered deployments, see Layered deployment.
Once you have all the modules for a deployment configured, select Next: Routes to move to step three.
Step 3: Routes
On the Routes tab, you define how messages are passed between modules and the IoT hub. Messages are constructed using name/value pairs.
For example, a route with a name route and a value FROM /messages/* INTO $upstream would take any messages output by any modules and send them to your IoT hub.
The Priority and Time to live parameters are optional parameters that you can include in a route definition. The priority parameter allows you to choose which routes should have their messages processed first, or which routes should be processed last. Priority is determined by setting a number 0-9, where 0 is top priority. The time to live parameter allows you to declare how long messages in that route should be held until they're either processed or removed from the queue.
For more information about how to create routes, see Declare routes.
Select Next: Target Devices.
Step 4: Target devices
To target the specific devices that should receive this deployment, use the tags property from your devices.
Since multiple deployments may target the same device, you should give each deployment a priority number. If there's ever a conflict, the deployment with the highest priority (larger values indicate higher priority) wins. If two deployments have the same priority number, the one that was created most recently wins.
If multiple deployments target the same device, then only the one with the higher priority is applied. If multiple layered deployments target the same device, then they're all applied. However, if any properties are duplicated, like if there are two routes with the same name, then the one from the higher priority layered deployment overwrites the rest.
Any layered deployment targeting a device must have a higher priority than the base deployment in order to be applied.
- Enter a positive integer for the deployment Priority.
- Enter a Target condition to determine which devices are targeted with this deployment. The condition is based on device twin tags or device twin reported properties and should match the expression format. For example,
tags.environment='test'orproperties.reported.devicemodel='4000x'.
Select Next: Metrics.
Step 5: Metrics
Metrics provide summary counts of the various states that a device might report back as a result of applying configuration content.
Enter a name for Metric Name.
Enter a query for Metric Criteria. The query is based on IoT Edge hub module twin reported properties. The metric represents the number of rows returned by the query.
For example:
SELECT deviceId FROM devices
  WHERE properties.reported.lastDesiredStatus.code = 200
Select Next: Review + create to move on to the final step.
Step 6: Review and create
Review your deployment information, then select Create.
To monitor your deployment, see Monitor IoT Edge deployments.
Note
When a new IoT Edge deployment is created, sometimes it can take up to 5 minutes for the IoT hub to process the new configuration and propagate the new desired properties to the targeted devices.
Modify a deployment
When you modify a deployment, the changes immediately replicate to all targeted devices. You can modify the following settings and features for an existing deployment:
- Target conditions
- Custom metrics
- Labels
- Tags
- Desired properties
Modify target conditions, custom metrics, and labels
In your IoT hub, select Configurations + Deployments under **Device management ** from the resource menu.
Select the deployment you want to configure.
Select the Target Devices tab. Change the Target Condition to target the intended devices. You can also adjust the Priority.
If you update the target condition, the following updates occur:
- If a device didn't meet the old target condition, but meets the new target condition and this deployment is the highest priority for that device, then this deployment is applied to the device.
- If a device currently running this deployment no longer meets the target condition, it uninstalls this deployment and takes on the next highest priority deployment.
- If a device currently running this deployment no longer meets the target condition and doesn't meet the target condition of any other deployments, then no change occurs on the device. The device continues running its current modules in their current state, but isn't managed as part of this deployment anymore. Once it meets the target condition of any other deployment, it uninstalls this deployment and takes on the new one.
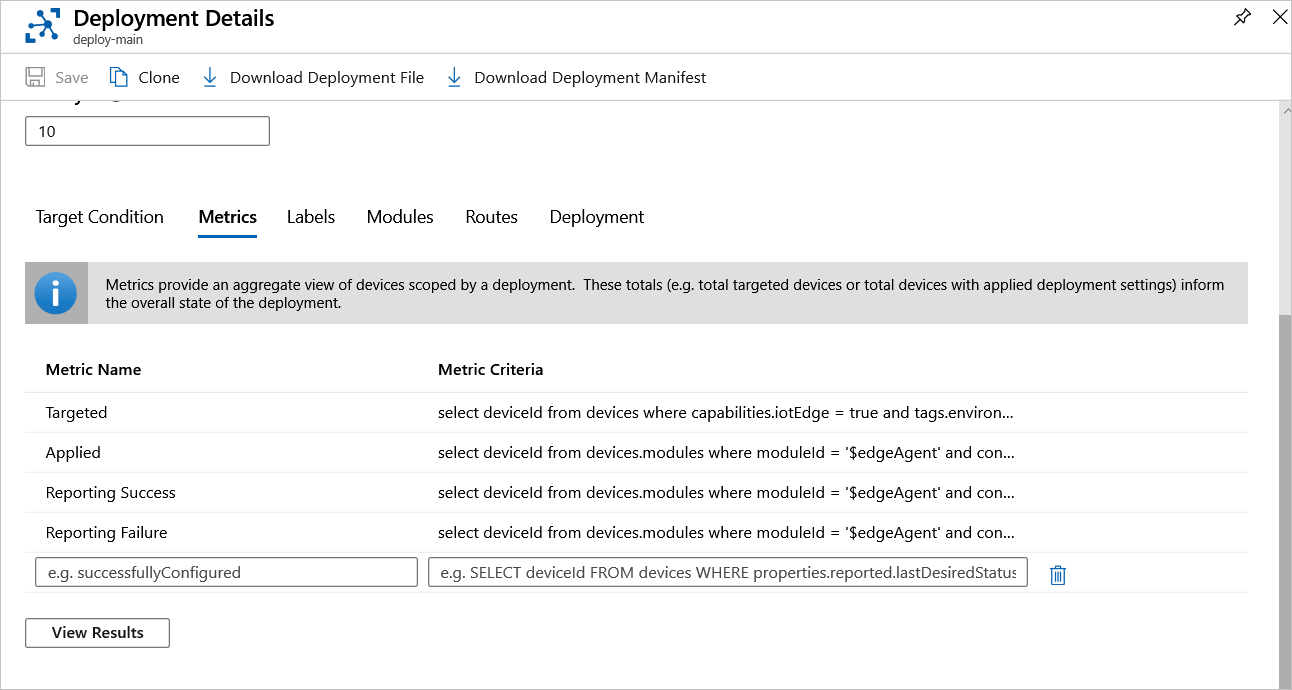
Select the Metrics tab and add or modify custom metrics, using the example syntax as a guide. Select Save.

Select the Labels tab and make any desired changes and select Save.
Delete a deployment
When you delete a deployment, any deployed devices take on their next highest priority deployment. If your devices don't meet the target condition of any other deployment, then the modules aren't removed when the deployment is deleted.
- Sign in to the Azure portal and navigate to your IoT hub.
- In the resource menu, select Configurations + Deployments under Device management.
- Use the checkbox to select the deployment that you want to delete.
- Select Delete from the command bar.
- A prompt informs you that this action deletes this deployment and revert to the previous state for all devices. A deployment with a lower priority applies. If no other deployment is targeted, no modules are removed. If you want to remove all modules from your device, create a deployment with zero modules and deploy it to the same devices. Select Yes to continue.
Next steps
To learn more about deploying modules to IoT Edge devices, see Understand IoT Edge automatic deployments for single devices or at scale.