Note
Access to this page requires authorization. You can try signing in or changing directories.
Access to this page requires authorization. You can try changing directories.
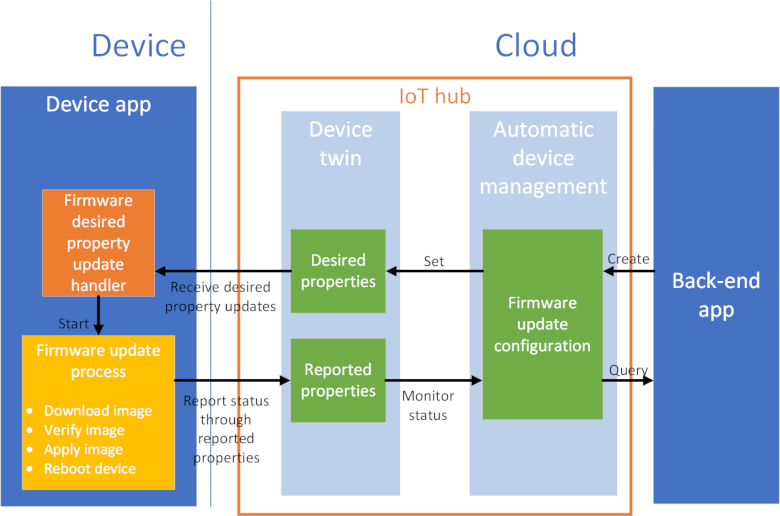
You may need to update the firmware on the devices connected to your IoT hub. For example, you might want to add new features to the firmware or apply security patches. In many IoT scenarios, it's impractical to physically visit and then manually apply firmware updates to your devices. This tutorial shows how you can start and monitor the firmware update process remotely through a back-end application connected to your hub.
To create and monitor the firmware update process, the back-end application in this tutorial creates a configuration in your IoT hub. IoT Hub automatic device management uses this configuration to update a set of device twin desired properties on all your chiller devices. The desired properties specify the details of the firmware update that's required. While the chiller devices are running the firmware update process, they report their status to the back-end application using device twin reported properties. The back-end application can use the configuration to monitor the reported properties sent from the device and track the firmware update process to completion:
In this tutorial, you complete the following tasks:
- Create an IoT hub and add a test device to the device identity registry.
- Create a configuration to define the firmware update.
- Simulate the firmware update process on a device.
- Receive status updates from the device as the firmware update progresses.
If you don’t have an Azure subscription, create a trial account before you begin.
Prerequisites
You can use the local Azure CLI.
If you prefer, install the Azure CLI to run CLI reference commands.
Local Azure CLI, see how to install the Azure CLI. If you're running on Windows or macOS, consider running Azure CLI in a Docker container. For more information, see How to run the Azure CLI in a Docker container.
Sign in to the Azure CLI by using the az login command. To finish the authentication process, follow the steps displayed in your terminal. For other sign-in options, see Sign in with the Azure CLI.
When you're prompted, install the Azure CLI extension on first use. For more information about extensions, see Use extensions with the Azure CLI.
Run az version to find the version and dependent libraries that are installed. To upgrade to the latest version, run az upgrade.
The two sample applications you run in this quickstart are written using Node.js. You need Node.js v10.x.x or later on your development machine.
You can download Node.js for multiple platforms from nodejs.org.
You can verify the current version of Node.js on your development machine using the following command:
node --version
Download the sample Node.js project from https://github.com/Azure-Samples/azure-iot-samples-node/archive/master.zip and extract the ZIP archive.
Make sure that port 8883 is open in your firewall. The device sample in this tutorial uses MQTT protocol, which communicates over port 8883. This port may be blocked in some corporate and educational network environments. For more information and ways to work around this issue, see Connecting to IoT Hub (MQTT).
Set up Azure resources
To complete this tutorial, your Azure subscription must have an IoT hub with a device added to the device identity registry. The entry in the device identity registry enables the simulated device you run in this tutorial to connect to your hub.
If you don't already have an IoT hub set up in your subscription, you can set one up with following CLI script. This script uses the name tutorial-iot-hub for the IoT hub, you should replace this name with your own unique name when you run it. The script creates the resource group and hub in the China East region, which you can change to a region closer to you. The script retrieves your IoT hub service connection string, which you use in the back-end sample application to connect to your IoT hub:
hubname=tutorial-iot-hub
location=chinaeast

# Install the IoT extension if it's not already installed
az extension add --name azure-iot

# Create a resource group
az group create --name tutorial-iot-hub-rg --location $location

# Create a free-tier IoT Hub. You can have only one free IoT Hub per subscription. Free tier hubs can have only 2 partitions.
az iot hub create --name $hubname --location $location --resource-group tutorial-iot-hub-rg --partition-count 2 --sku F1

# Make a note of the service connection string, you need it later
az iot hub connection-string show --name $hubname --policy-name service -o table
This tutorial uses a simulated device called MyFirmwareUpdateDevice. The following script adds this device to your device identity registry, sets a tag value, and retrieves its connection string:
# Set the name of your IoT hub
hubname=tutorial-iot-hub

# Create the device in the identity registry
az iot hub device-identity create --device-id MyFirmwareUpdateDevice --hub-name $hubname --resource-group tutorial-iot-hub-rg

# Add a device type tag
az iot hub device-twin update --device-id MyFirmwareUpdateDevice --hub-name $hubname --set tags='{"devicetype":"chiller"}'

# Retrieve the device connection string, you need this later
az iot hub device-identity connection-string show --device-id MyFirmwareUpdateDevice --hub-name $hubname --resource-group tutorial-iot-hub-rg -o table
Tip
If you run these commands at a Windows command prompt or Powershell prompt, see the azure-iot-cli-extension tips page for information about how to quote JSON strings.
Start the firmware update
You create an automatic device management configuration in the back-end application to begin the firmware update process on all devices tagged with a devicetype of chiller. In this section, you see how to:
- Create a configuration from a back-end application.
- Monitor the job to completion.
Use desired properties to start the firmware upgrade from the back-end application
To view the back-end application code that creates the configuration, navigate to the iot-hub/Tutorials/FirmwareUpdate folder in the sample Node.js project you downloaded. Then open the ServiceClient.js file in a text editor.
The back-end application creates the following configuration:
var firmwareConfig = {
  id: sampleConfigId,
  content: {
    deviceContent: {
      'properties.desired.firmware': {
        fwVersion: fwVersion,
        fwPackageURI: fwPackageURI,
        fwPackageCheckValue: fwPackageCheckValue
      }
    }
  },

  // Maximum of 5 metrics per configuration
  metrics: {
    queries: {
      current: 'SELECT deviceId FROM devices WHERE configurations.[[firmware285]].status=\'Applied\' AND properties.reported.firmware.fwUpdateStatus=\'current\'',
      applying: 'SELECT deviceId FROM devices WHERE configurations.[[firmware285]].status=\'Applied\' AND ( properties.reported.firmware.fwUpdateStatus=\'downloading\' OR properties.reported.firmware.fwUpdateStatus=\'verifying\' OR properties.reported.firmware.fwUpdateStatus=\'applying\')',
      rebooting: 'SELECT deviceId FROM devices WHERE configurations.[[firmware285]].status=\'Applied\' AND properties.reported.firmware.fwUpdateStatus=\'rebooting\'',
      error: 'SELECT deviceId FROM devices WHERE configurations.[[firmware285]].status=\'Applied\' AND properties.reported.firmware.fwUpdateStatus=\'error\'',
      rolledback: 'SELECT deviceId FROM devices WHERE configurations.[[firmware285]].status=\'Applied\' AND properties.reported.firmware.fwUpdateStatus=\'rolledback\''
    }
  },

  // Specify the devices the firmware update applies to
  targetCondition: 'tags.devicetype = \'chiller\'',
  priority: 20
};
The configuration includes the following sections:
contentspecifies the firmware desired properties sent to the selected devices.metricsspecifies the queries to run that report the status of the firmware update.targetConditionselects the devices to receive the firmware update.priortysets the relative priority of this configuration to other configurations.
The back-end application uses the following code to create the configuration to set the desired properties:
var createConfiguration = function(done) {
  console.log();
  console.log('Add new configuration with id ' + firmwareConfig.id + ' and priority ' + firmwareConfig.priority);

  registry.addConfiguration(firmwareConfig, function(err) {
    if (err) {
      console.log('Add configuration failed: ' + err);
      done();
    } else {
      console.log('Add configuration succeeded');
      done();
    }
  });
};
After it creates the configuration, the application monitors the firmware update:
var monitorConfiguration = function(done) {
  console.log('Monitor metrics for configuration: ' + sampleConfigId);
  setInterval(function(){
    registry.getConfiguration(sampleConfigId, function(err, config) {
      if (err) {
        console.log('getConfiguration failed: ' + err);
      } else {
        console.log('System metrics:');
        console.log(JSON.stringify(config.systemMetrics.results, null, '  '));
        console.log('Custom metrics:');
        console.log(JSON.stringify(config.metrics.results, null, '  '));
      }
    });
  }, 20000);
  done();
};
A configuration reports two types of metrics:
- System metrics that report how many devices are targeted and how many devices have the update applied.
- Custom metrics generated by the queries you add to the configuration. In this tutorial, the queries report how many devices are at each stage of the update process.
Respond to the firmware upgrade request on the device
To view the simulated device code that handles the firmware desired properties sent from the back-end application, navigate to the iot-hub/Tutorials/FirmwareUpdate folder in the sample Node.js project you downloaded. Then open the SimulatedDevice.js file in a text editor.
The simulated device application creates a handler for updates to the properties.desired.firmware desired properties in the device twin. In the handler, it carries out some basic checks on the desired properties before launching the update process:
// Handle firmware desired property updates - this triggers the firmware update flow
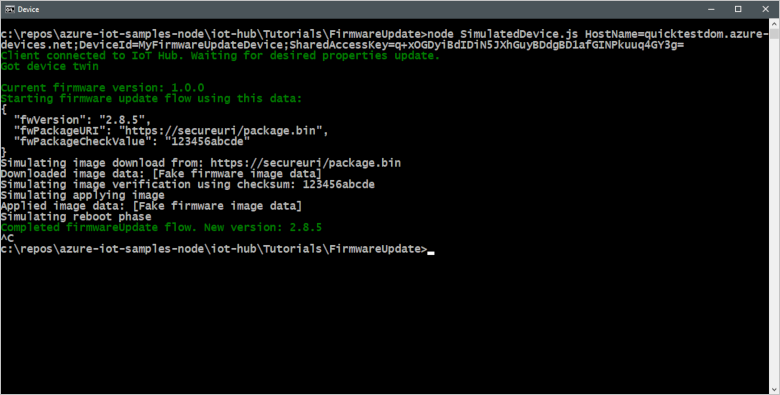
twin.on('properties.desired.firmware', function(fwUpdateDesiredProperties) {
console.log(chalk.green('\nCurrent firmware version: ' + twin.properties.reported.firmware.currentFwVersion));
console.log(chalk.green('Starting firmware update flow using this data:'));
console.log(JSON.stringify(fwUpdateDesiredProperties, null, 2));
desiredFirmwareProperties = twin.properties.desired.firmware;
if (fwUpdateDesiredProperties.fwVersion == twin.properties.reported.firmware.currentFwVersion) {
sendStatusUpdate('current', 'Firmware already up to date', function (err) {
if (err) {
console.error(chalk.red('Error occured sending status update : ' + err.message));
}
return;
});
}
if (fwUpdateInProgress) {
sendStatusUpdate('current', 'Firmware update already running', function (err) {
if (err) {
console.error(chalk.red('Error occured sending status update : ' + err.message));
}
return;
});
}
if (!fwUpdateDesiredProperties.fwPackageURI.startsWith('https')) {
sendStatusUpdate('error', 'Insecure package URI', function (err) {
if (err) {
console.error(chalk.red('Error occured sending status update : ' + err.message));
}
return;
});
}
fwUpdateInProgress = true;
sendStartingUpdate(fwUpdateDesiredProperties.fwVersion, function (err) {
if (err) {
console.error(chalk.red('Error occured sending starting update : ' + err.message));
}
return;
});
initiateFirmwareUpdateFlow(function(err, result) {
fwUpdateInProgress = false;
if (!err) {
console.log(chalk.green('Completed firmwareUpdate flow. New version: ' + result));
sendFinishedUpdate(result, function (err) {
if (err) {
console.error(chalk.red('Error occured sending finished update : ' + err.message));
}
return;
});
}
}, twin.properties.reported.firmware.currentFwVersion);
});
Update the firmware
The initiateFirmwareUpdateFlow function runs the update. This function uses the waterfall function to run the phases of the update process in sequence. In this example, the firmware update has four phases. The first phase downloads the image, the second phase verifies the image using a checksum, the third phase applies the image, and the last phase reboots the device:
// Implementation of firmwareUpdate flow
function initiateFirmwareUpdateFlow(callback, currentVersion) {

  async.waterfall([
    downloadImage,
    verifyImage,
    applyImage,
    reboot
  ], function(err, result) {
    if (err) {
      console.error(chalk.red('Error occured firmwareUpdate flow : ' + err.message));
      sendStatusUpdate('error', err.message, function (err) {
        if (err) {
          console.error(chalk.red('Error occured sending status update : ' + err.message));
        }
      });
      setTimeout(function() {
        console.log('Simulate rolling back update due to error');
        sendStatusUpdate('rolledback', 'Rolled back to: ' + currentVersion, function (err) {
          if (err) {
            console.error(chalk.red('Error occured sending status update : ' + err.message));
          }
        });
        callback(err, result);
      }, 5000);
    } else {
      callback(null, result);
    }
  });
}
During the update process, the simulated device reports on progress using reported properties:
// Firmware update patch
//  currentFwVersion: The firmware version currently running on the device.
//  pendingFwVersion: The next version to update to, should match what's
//                    specified in the desired properties. Blank if there
//                    is no pending update (fwUpdateStatus is 'current').
//  fwUpdateStatus:   Defines the progress of the update so that it can be
//                    categorized from a summary view. One of:
//     - current:     There is no pending firmware update. currentFwVersion should
//                    match fwVersion from desired properties.
//     - downloading: Firmware update image is downloading.
//     - verifying:   Verifying image file checksum and any other validations.
//     - applying:    Update to the new image file is in progress.
//     - rebooting:   Device is rebooting as part of update process.
//     - error:       An error occurred during the update process. Additional details
//                    should be specified in fwUpdateSubstatus.
//     - rolledback:  Update rolled back to the previous version due to an error.
//  fwUpdateSubstatus: Any additional detail for the fwUpdateStatus . May include
//                     reasons for error or rollback states, or download %.
//
// var twinPatchFirmwareUpdate = {
//   firmware: {
//     currentFwVersion: '1.0.0',
//     pendingFwVersion: '',
//     fwUpdateStatus: 'current',
//     fwUpdateSubstatus: '',
//     lastFwUpdateStartTime: '',
//     lastFwUpdateEndTime: ''
//   }
// };
The following snippet shows the implementation of the download phase. During the download phase, the simulated device uses reported properties to send status information to the back-end application:
// Simulate downloading an image
function downloadImage(callback) {
  console.log('Simulating image download from: ' + desiredFirmwareProperties.fwPackageURI);

  async.waterfall([
    function(callback) {
      sendStatusUpdate('downloading', 'Start downloading', function (err) {
        if (err) {
          console.error(chalk.red('Error occured sending status update : ' + err.message));
        }
      });
      callback(null);
    },
    function(callback) {
      // Simulate a delay downloading the image.
      setTimeout(function() {
        // Simulate some firmware image data
        var imageData = '[Fake firmware image data]';
        callback(null, imageData);
      }, 30000);
    },
    function(imageData, callback) {
      console.log('Downloaded image data: ' + imageData);
      sendStatusUpdate('downloading', 'Finished downloading', function (err) {
        if (err) {
          console.error(chalk.red('Error occured sending status update : ' + err.message));
        }
      });
      callback(null, imageData);
    }
  ], function (err, result) {
    callback(err, result);
  });
}
Run the sample
In this section, you run two sample applications to observe as a back-end application creates the configuration to manage the firmware update process on the simulated device.
To run the simulated device and back-end applications, you need the device and service connection strings. You made a note of the connection strings when you created the resources at the start of this tutorial.
To run the simulated device application, open a shell or command prompt window and navigate to the iot-hub/Tutorials/FirmwareUpdate folder in the Node.js project you downloaded. Then run the following commands:
npm install
node SimulatedDevice.js "{your device connection string}"
To run the back-end application, open another shell or command prompt window. Then navigate to the iot-hub/Tutorials/FirmwareUpdate folder in the Node.js project you downloaded. Then run the following commands:
npm install
node ServiceClient.js "{your service connection string}"
The following screenshot shows the output from the simulated device application and shows how it responds to the firmware desired properties update from the back-end application:
The following screenshot shows the output from the back-end application and highlights how it creates the configuration to update the firmware desired properties:
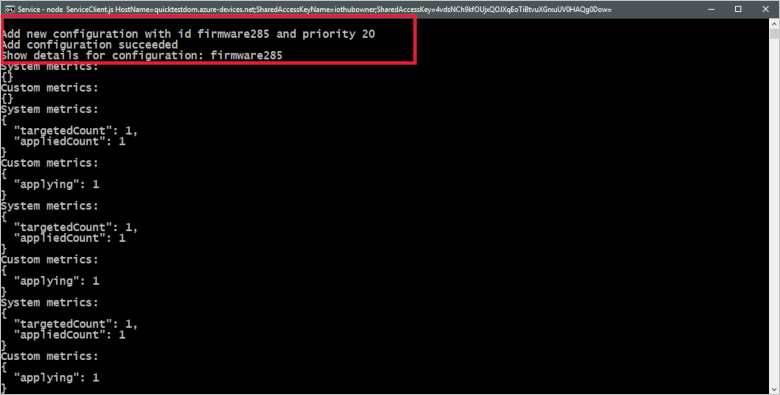
The following screenshot shows the output from the back-end application and highlights how it monitors the firmware update metrics from the simulated device:

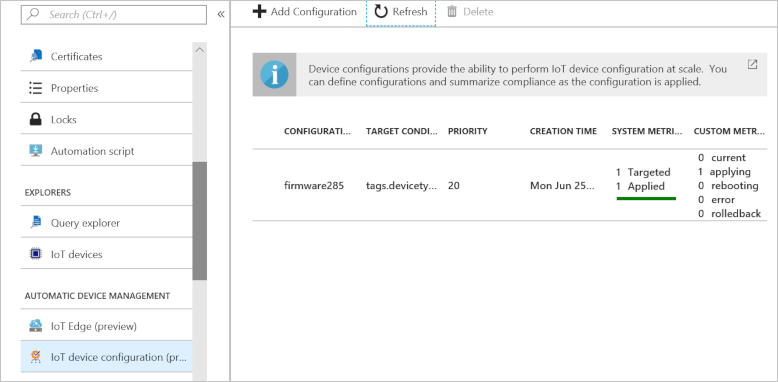
Because automatic device configurations run at creation time and then every five minutes, you may not see every status update sent to the back-end application. You can also view the metrics in the portal in the Automatic device management -> IoT device configuration section of your IoT hub:
Clean up resources
If you plan to complete the next tutorial, leave the resource group and IoT hub and reuse them later.
If you don't need the IoT hub any longer, delete it and the resource group in the portal. To do so, select the tutorial-iot-hub-rg resource group that contains your IoT hub and click Delete.
Alternatively, use the CLI:
# Delete your resource group and its contents
az group delete --name tutorial-iot-hub-rg
Next steps
In this tutorial, you learned how to implement a firmware update process for your connected devices. Advance to the next tutorial to learn how to use Azure IoT Hub portal tools and Azure CLI commands to test device connectivity.