Note
Access to this page requires authorization. You can try signing in or changing directories.
Access to this page requires authorization. You can try changing directories.
Message routing enables sending telemetry data from your IoT devices to built-in Event Hub-compatible endpoints or custom endpoints such as blob storage, Service Bus Queues, Service Bus Topics, and Event Hubs. To configure custom message routing, you create routing queries to customize the route that matches a certain condition. Once set up, the incoming data is automatically routed to the endpoints by the IoT Hub. If a message doesn't match any of the defined routing queries, it is routed to the default endpoint.
In this 2-part tutorial, you learn how to set up and use these custom routing queries with IoT Hub. You route messages from an IoT device to one of multiple endpoints, including blob storage and a Service Bus queue. Messages to the Service Bus queue are picked up by a Logic App and sent via e-mail. Messages that do not have custom message routing defined are sent to the default endpoint, then picked up by Azure Stream Analytics and viewed in a Power BI visualization.
To complete Parts 1 and 2 of this tutorial, you perform the following tasks:
Part I: Create resources, set up message routing
- Create the resources -- an IoT hub, a storage account, a Service Bus queue, and a simulated device. This can be done using the Azure portal, an Azure Resource Manager template, the Azure CLI, or Azure PowerShell.
- Configure the endpoints and message routes in IoT Hub for the storage account and Service Bus queue.
Part II: Send messages to the hub, view routed results
- Create a Logic App that is triggered and sends e-mail when a message is added to the Service Bus queue.
- Download and run an app that simulates an IoT Device sending messages to the hub for the different routing options.
- Create a Power BI visualization for data sent to the default endpoint.
- View the results ...
- ...in the Service Bus queue and e-mails.
- ...in the storage account.
- ...in the Power BI visualization.
Prerequisites
For Part 1 of this tutorial:
- You must have an Azure subscription. If you don't have an Azure subscription, create a trial subscription before you begin.
For Part 2 of this tutorial:
You must have completed Part 1 of this tutorial, and have the resources still available.
Install Visual Studio.
Have access to a Power BI account to analyze the default endpoint's stream analytics. (Try Power BI for free.)
Have a work or school account for sending notification e-mails.
Make sure that port 8883 is open in your firewall. The sample in this tutorial uses MQTT protocol, which communicates over port 8883. This port may be blocked in some corporate and educational network environments. For more information and ways to work around this issue, see Connecting to IoT Hub (MQTT).
Create base resources
Before you can configure the message routing, you need to create an IoT hub, a storage account, and a Service Bus queue. These resources can be created using one of the four articles that are available for Part 1 of this tutorial: the Azure portal, an Azure Resource Manager template, the Azure CLI, or Azure PowerShell.
Use the same resource group and location for all of the resources. Then at the end, you can remove all of the resources in one step by deleting the resource group.
Below is a summary of the steps to be performed in the following sections:
Create a resource group.
Create an IoT hub in the S1 tier. Add a consumer group to your IoT hub. The consumer group is used by the Azure Stream Analytics when retrieving data.
Note
You must use an Iot hub in a paid tier to complete this tutorial. The free tier only allows you to set up one endpoint, and this tutorial requires multiple endpoints.
Create a standard V1 storage account with Standard_LRS replication.
Create a Service Bus namespace and queue.
Create a device identity for the simulated device that sends messages to your hub. Save the key for the testing phase. (If creating a Resource Manager template, this is done after deploying the template.)
Message routing
You are going to route messages to different resources based on properties attached to the message by the simulated device. Messages that are not custom routed are sent to the default endpoint (messages/events). In the next tutorial, you send messages to the IoT Hub and see them routed to the different destinations.
| Value | Result |
|---|---|
| level="storage" | Write to Azure Storage. |
| level="critical" | Write to a Service Bus queue. A Logic App retrieves the message from the queue and uses Office 365 to e-mail the message. |
| default | Display this data using Power BI. |
The first step is to set up the endpoint to which the data will be routed. The second step is to set up the message route that uses that endpoint. After setting up the routing, you can view the endpoints and message routes in the portal.
Download the template and parameters file
For the second part of this tutorial, you download and run a Visual Studio application to send messages to the IoT Hub. There is a folder in that download that contains the Azure Resource Manager template and parameters file, as well as the Azure CLI and PowerShell scripts.
Go ahead and download the Azure IoT C# Samples now. Unzip the master.zip file. The Resource Manager template and the parameters file are in /iot-hub/Tutorials/Routing/SimulatedDevice/resources/ as template_iothub.json and template_iothub_parameters.json.
Create your resources
You're going to use an Azure Resource Manager (RM) template to create all of your resources. The Azure CLI and PowerShell scripts can be run a few lines at a time. An RM template is deployed in one step. This article shows you the sections separately to help you understand each one. Then it will show you how to deploy the template, and create the virtual device for testing. After the template is deployed, you can view the message routing configuration in the portal.
There are several resource names that must be globally unique, such as the IoT Hub name and the storage account name. To make naming the resources easier, those resource names are set up to append a random alphanumeric value generated from the current date/time.
If you look at the template, you'll see where variables are set up for these resources that take the parameter passed in and concatenate randomValue to the parameter.
The following section explains the parameters used.
Parameters
Most of these parameters have default values. The ones ending with _in are concatenated with randomValue to make them globally unique.
randomValue: This value is generated from the current date/time when you deploy the template. This field is not in the parameters file, as it is generated in the template itself.
subscriptionId: This field is set for you to the subscription into which you are deploying the template. This field is not in the parameters file since it is set for you.
IoTHubName_in: This field is the base IoT Hub name, which is concatenated with the randomValue so it is globally unique.
location: This field is the Azure region into which you are deploying, such as "chinaeast".
consumer_group: This field is the consumer group set for messages coming through the routing endpoint. It is used to filter results in Azure Stream Analytics. For example, there is the whole stream where you get everything, or if you have data coming through with consumer_group set to Contoso, then you can set up an Azure Stream Analytics stream (and Power BI report) to show only those entries. This field is used in part 2 of this tutorial.
sku_name: This field is the scaling for the IoT Hub. This value must be S1 or above; a free tier does not work for this tutorial because it does not allow multiple endpoints.
sku_units: This field goes with the sku_name, and is the number of IoT Hub units that can be used.
d2c_partitions: This field is the number of partitions used for the event stream.
storageAccountName_in: This field is the name of the storage account to be created. Messages are routed to a container in the storage account. This field is concatenated with the randomValue to make it globally unique.
storageContainerName: This field is the name of the container in which the messages routed to the storage account are stored.
storage_endpoint: This field is the name for the storage account endpoint used by the message routing.
service_bus_namespace_in: This field is the name of the Service Bus namespace to be created. This value is concatenated with the randomValue to make it globally unique.
service_bus_queue_in: This field is the name of the Service Bus queue used for routing messages. This value is concatenated with the randomValue to make it globally unique.
AuthRules_sb_queue: This field is the authorization rules for the service bus queue, used to retrieve the connection string for the queue.
Variables
These values are used in the template, and are mostly derived from parameters.
queueAuthorizationRuleResourceId: This field is the ResourceId for the authorization rule for the Service Bus queue. ResourceId is in turn used to retrieve the connection string for the queue.
iotHubName: This field is the name of the IoT Hub after having randomValue concatenated.
storageAccountName: This field is the name of the storage account after having randomValue concatenated.
service_bus_namespace: This field is the namespace after having randomValue concatenated.
service_bus_queue: This field is the Service Bus queue name after having randomValue concatenated.
sbVersion: THe version of the Service Bus API to use. In this case, it is "2017-04-01".
Resources: Storage account and container
The first resource created is the storage account, along with the container to which messages are routed. The container is a resource under the storage account. It has a dependsOn clause for the storage account, requiring the storage account be created before the container.
Here's what this section looks like:
{
    "type": "Microsoft.Storage/storageAccounts",
    "name": "[variables('storageAccountName')]",
    "apiVersion": "2018-07-01",
    "location": "[parameters('location')]",
    "sku": {
        "name": "Standard_LRS",
        "tier": "Standard"
    },
    "kind": "Storage",
    "properties": {},
    "resources": [
        {
        "type": "blobServices/containers",
        "apiVersion": "2018-07-01",
        "name": "[concat('default/', parameters('storageContainerName'))]",
        "properties": {
            "publicAccess": "None"
            } ,
        "dependsOn": [
            "[resourceId('Microsoft.Storage/storageAccounts', variables('storageAccountName'))]"
            ]
        }
    ]
}
Resources: Service Bus namespace and queue
The second resource created is the Service Bus namespace, along with the Service Bus queue to which messages are routed. The SKU is set to standard. The API version is retrieved from the variables. It is also set to activate the Service Bus namespace when it deploys this section (status:Active).
{
    "type": "Microsoft.ServiceBus/namespaces",
    "comments": "The Sku should be 'Standard' for this tutorial.",
    "sku": {
        "name": "Standard",
        "tier": "Standard"
    },
    "name": "[variables('service_bus_namespace')]",
    "apiVersion": "[variables('sbVersion')]",
    "location": "[parameters('location')]",
    "properties": {
        "provisioningState": "Succeeded",
        "metricId": "[concat('a4295411-5eff-4f81-b77e-276ab1ccda12:', variables('service_bus_namespace'))]",
        "serviceBusEndpoint": "[concat('https://', variables('service_bus_namespace'),'.servicebus.windows.net:443/')]",
        "status": "Active"
    },
    "dependsOn": []
}
This section creates the Service Bus queue. This part of the script has a dependsOn clause that ensures the namespace is created before the queue.
{
    "type": "Microsoft.ServiceBus/namespaces/queues",
    "name": "[concat(variables('service_bus_namespace'), '/', variables('service_bus_queue'))]",
    "apiVersion": "[variables('sbVersion')]",
    "location": "[parameters('location')]",
    "scale": null,
    "properties": {},
    "dependsOn": [
        "[resourceId('Microsoft.ServiceBus/namespaces', variables('service_bus_namespace'))]"
    ]
}
Resources: Iot Hub and message routing
Now that the storage account and Service Bus queue have been created, you create the IoT Hub that routes messages to them. The RM template uses dependsOn clauses so it doesn't try to create the hub before the Service Bus resources and the storage account have been created.
Here's the first part of the IoT Hub section. This part of the template sets up the dependencies and starts with the properties.
{
    "apiVersion": "2018-04-01",
    "type": "Microsoft.Devices/IotHubs",
    "name": "[variables('IoTHubName')]",
    "location": "[parameters('location')]",
    "dependsOn": [
        "[resourceId('Microsoft.Storage/storageAccounts', variables('storageAccountName'))]",
        "[resourceId('Microsoft.ServiceBus/namespaces', variables('service_bus_namespace'))]",
        "[resourceId('Microsoft.ServiceBus/namespaces/queues', variables('service_bus_namespace'), variables('service_bus_queue'))]"
    ],
    "properties": {
        "eventHubEndpoints": {}
            "events": {
                "retentionTimeInDays": 1,
                "partitionCount": "[parameters('d2c_partitions')]"
                }
            },
The next section is the section for the message routing configuration for the Iot Hub. First is the section for the endpoints. This part of the template sets up the routing endpoints for the Service Bus queue and the storage account, including the connection strings.
To create the connection string for the queue, you need the queueAuthorizationRulesResourcedId, which is retrieved inline. To create the connection string for the storage account, you retrieve the primary storage key and then use it in the format for the connection string.
The endpoint configuration is also where you set the blob format to AVRO or JSON.
Note
The data can be written to blob storage in either the Apache Avro format, which is the default, or JSON.
The encoding format can be only set at the time the blob storage endpoint is configured. The format can't be changed for a previously configured endpoint. When using JSON encoding, you must set the contentType to JSON and the contentEncoding to UTF-8 in the message system properties.
For more detailed information about using a blob storage endpoint, see Azure Storage as a routing endpoint.
"routing": {
   "endpoints": {
       "serviceBusQueues": [
       {
           "connectionString": "[Concat('Endpoint=sb://',variables('service_bus_namespace'),'.servicebus.windows.net/;SharedAccessKeyName=',parameters('AuthRules_sb_queue'),';SharedAccessKey=',listkeys(variables('queueAuthorizationRuleResourceId'),variables('sbVersion')).primaryKey,';EntityPath=',variables('service_bus_queue'))]",
           "name": "[parameters('service_bus_queue_endpoint')]",
           "subscriptionId": "[parameters('subscriptionId')]",
           "resourceGroup": "[resourceGroup().Name]"
       }
       ],
       "serviceBusTopics": [],
       "eventHubs": [],
       "storageContainers": [
           {
               "connectionString":
               "[Concat('DefaultEndpointsProtocol=https;AccountName=',variables('storageAccountName'),';AccountKey=',listKeys(resourceId('Microsoft.Storage/storageAccounts', variables('storageAccountName')), providers('Microsoft.Storage', 'storageAccounts').apiVersions[0]).keys[0].value)]",
               "containerName": "[parameters('storageContainerName')]",
               "fileNameFormat": "{iothub}/{partition}/{YYYY}/{MM}/{DD}/{HH}/{mm}",
               "batchFrequencyInSeconds": 100,
               "maxChunkSizeInBytes": 104857600,
               "encoding": "avro",
               "name": "[parameters('storage_endpoint')]",
               "subscriptionId": "[parameters('subscriptionId')]",
               "resourceGroup": "[resourceGroup().Name]"
           }
       ]
   },
This next section is for the message routes to the endpoints. There is one set up for each endpoint, so there is one for the Service Bus queue and one for the storage account container.
Remember that the query condition for the messages being routed to storage is level="storage", and the query condition for the messages being routed to the Service Bus queue is level="critical".
"routes": [
    {
        "name": "contosoStorageRoute",
        "source": "DeviceMessages",
        "condition": "level=\"storage\"",
        "endpointNames": [
            "[parameters('storage_endpoint')]"
            ],
        "isEnabled": true
    },
    {
        "name": "contosoSBQueueRoute",
        "source": "DeviceMessages",
        "condition": "level=\"critical\"",
        "endpointNames": [
            "[parameters('service_bus_queue_endpoint')]"
            ],
        "isEnabled": true
    }
],
This json shows the rest of the IoT Hub section, which contains default information and the SKU for the hub.
            "fallbackRoute": {
                "name": "$fallback",
                "source": "DeviceMessages",
                "condition": "true",
                "endpointNames": [
                    "events"
                ],
                "isEnabled": true
            }
        },
        "storageEndpoints": {
            "$default": {
                "sasTtlAsIso8601": "PT1H",
                "connectionString": "",
                "containerName": ""
            }
        },
        "messagingEndpoints": {
            "fileNotifications": {
                "lockDurationAsIso8601": "PT1M",
                "ttlAsIso8601": "PT1H",
                "maxDeliveryCount": 10
            }
        },
        "enableFileUploadNotifications": false,
        "cloudToDevice": {
            "maxDeliveryCount": 10,
            "defaultTtlAsIso8601": "PT1H",
            "feedback": {
                "lockDurationAsIso8601": "PT1M",
                "ttlAsIso8601": "PT1H",
                "maxDeliveryCount": 10
            }
        }
    },
    "sku": {
        "name": "[parameters('sku_name')]",
        "capacity": "[parameters('sku_units')]"
    }
}
Resources: Service Bus queue authorization rules
The Service Bus queue authorization rule is used to retrieve the connection string for the Service Bus queue. It uses a dependsOn clause to ensure it is not created before the Service Bus namespace and the Service Bus queue.
{
    "type": "Microsoft.ServiceBus/namespaces/queues/authorizationRules",
    "name": "[concat(variables('service_bus_namespace'), '/', variables('service_bus_queue'), '/', parameters('AuthRules_sb_queue'))]",
    "apiVersion": "[variables('sbVersion')]",
    "location": "[parameters('location')]",
    "scale": null,
    "properties": {
        "rights": [
            "Send"
        ]
    },
    "dependsOn": [
        "[resourceId('Microsoft.ServiceBus/namespaces', variables('service_bus_namespace'))]",
        "[resourceId('Microsoft.ServiceBus/namespaces/queues', variables('service_bus_namespace'), variables('service_bus_queue'))]"
    ]
},
Resources: Consumer group
In this section, you create a Consumer Group for the IoT Hub data to be used by the Azure Stream Analytics in the second part of this tutorial.
{
    "type": "Microsoft.Devices/IotHubs/eventHubEndpoints/ConsumerGroups",
    "name": "[concat(variables('iotHubName'), '/events/',parameters('consumer_group'))]",
    "apiVersion": "2018-04-01",
    "dependsOn": [
        "[concat('Microsoft.Devices/IotHubs/', variables('iotHubName'))]"
    ]
}
Resources: Outputs
If you want to send a value back to the deployment script to be displayed, you use an output section. This part of the template returns the connection string for the Service Bus queue. Returning a value isn't required, it's included as an example of how to return results to the calling script.
"outputs": {
    "sbq_connectionString": {
      "type": "string",
      "value": "[Concat('Endpoint=sb://',variables('service_bus_namespace'),'.servicebus.windows.net/;SharedAccessKeyName=',parameters('AuthRules_sb_queue'),';SharedAccessKey=',listkeys(variables('queueAuthorizationRuleResourceId'),variables('sbVersion')).primaryKey,';EntityPath=',variables('service_bus_queue'))]"
    }
  }
Deploy the RM template
To deploy the template to Azure, upload the template and the parameters file to Azure Cloud Shell, and then execute a script to deploy the template. Open Azure Cloud Shell and sign in. This example uses PowerShell.
To upload the files, select the Upload/Download files icon in the menu bar, then choose Upload.
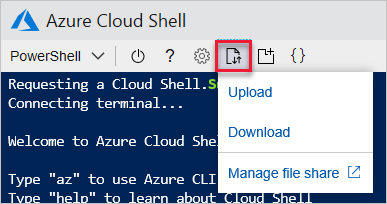
Use the File Explorer that pops up to find the files on your local disk and select them, then choose Open.
After the files are uploaded, a results dialog shows something like the following image.

The files are uploaded to the share used by your Cloud Shell instance.
Run the script to perform the deployment. The last line of this script retrieves the variable that was set up to be returned -- the Service Bus queue connection string.
The script sets and uses these variables:
$RGName is the resource group name to which to deploy the template. This field is created before deploying the template.
$location is the Azure location to be used for the template, such as "chinaeast".
deploymentname is a name you assign to the deployment to retrieve the returning variable value.
Here's the PowerShell script. Copy this PowerShell script and paste it into the Cloud Shell window, then hit Enter to run it.
$RGName="ContosoResources"
$location = "chinaeast"
$deploymentname="contoso-routing"

# Remove the resource group if it already exists.
#Remove-AzResourceGroup -name $RGName
# Create the resource group.
New-AzResourceGroup -name $RGName -Location $location

# Set a path to the parameter file.
$parameterFile = "$HOME/template_iothub_parameters.json"
$templateFile = "$HOME/template_iothub.json"

# Deploy the template.
New-AzResourceGroupDeployment `
    -Name $deploymentname `
    -ResourceGroupName $RGName `
    -TemplateParameterFile $parameterFile `
    -TemplateFile $templateFile `
    -verbose

# Get the returning value of the connection string.
(Get-AzResourceGroupDeployment -ResourceGroupName $RGName -Name $deploymentname).Outputs.sbq_connectionString.value
If you have script errors, you can edit the script locally, upload it again to the Cloud Shell, and run the script again. After the script finishes running successfully, continue to the next step.
Create simulated device
Next, create a device identity and save its key for later use. This device identity is used by the simulation application to send messages to the IoT hub. This capability is not available in PowerShell or when using an Azure Resource Manager template. The following steps tell you how to create the simulated device using the Azure portal.
Open the Azure portal and log into your Azure account.
Select Resource groups and then choose your resource group. This tutorial uses ContosoResources.
In the list of resources, select your IoT hub. This tutorial uses ContosoTestHub. Select IoT Devices from the Hub pane.
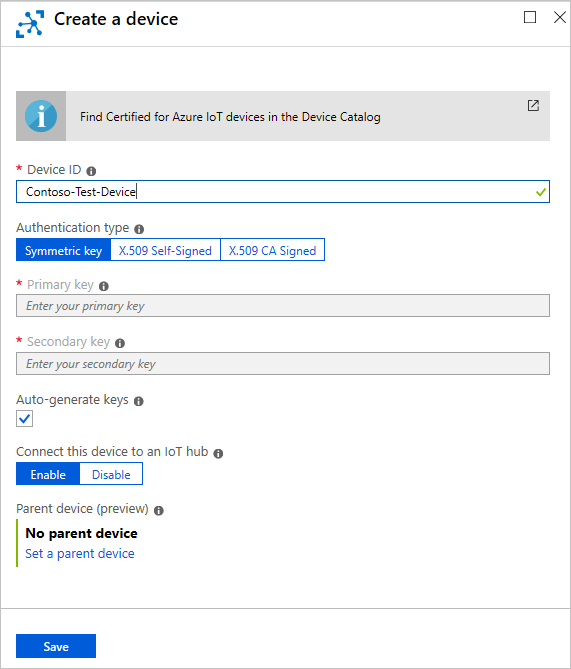
Select +Add Device on the IoT Devices pane. On the Add Device pane, fill in the device ID. This tutorial uses Contoso-Test-Device. Leave the keys empty, and check Auto Generate Keys. Make sure Connect device to IoT hub is enabled. Select Save.
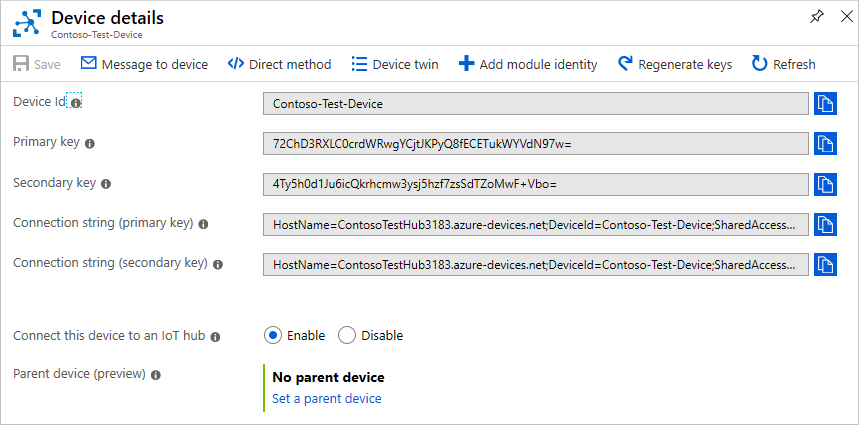
Now that it's been created, select the device to see the generated keys. Select the Copy icon on the Primary key and save it somewhere such as Notepad for the testing phase of this tutorial.
View message routing in the portal
Now that your endpoints and message routes are set up, you can view their configuration in the portal. Sign in to the Azure portal and go to Resource Groups. Next, select your resource group, then select your hub (the hub name starts with ContosoTestHub in this tutorial). You see the IoT Hub pane.

In the options for the IoT Hub, select Message Routing. The routes you have set up successfully are displayed.

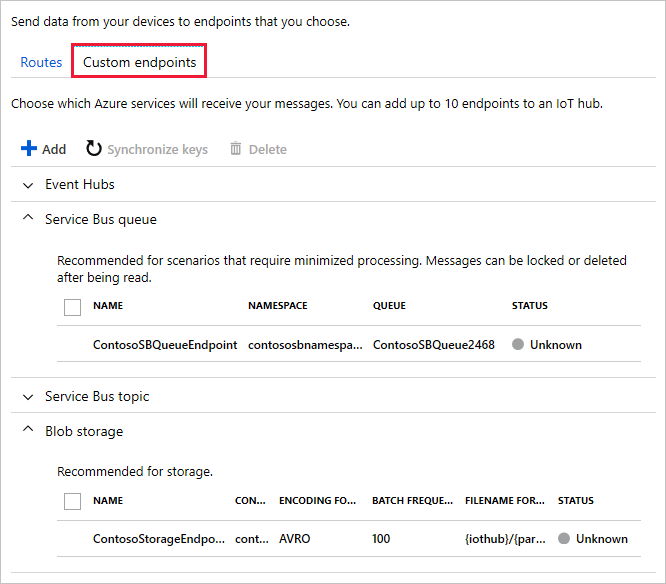
On the Message routing screen, select Custom Endpoints to see the endpoints you have defined for the routes.
Next steps
Now that you have all of the resources set up and the message routes are configured, advance to the next tutorial to learn how to process and display the information about the routed messages.