Note
Access to this page requires authorization. You can try signing in or changing directories.
Access to this page requires authorization. You can try changing directories.
Applies to: ✔️ Fleet Manager with hub cluster
Azure Kubernetes Fleet Manager placement staged rollout runs provide a controlled approach to deploying Kubernetes workloads across multiple member clusters using a stage-by-stage process. To minimize risk, this approach deploys to targeted clusters sequentially, with optional wait times and approval gates between stages.
This article shows you how to create and execute staged update runs to deploy workloads progressively and roll back to previous versions when needed.
Azure Kubernetes Fleet Manager supports two scopes for staged updates:
- Cluster-scoped: Use
ClusterStagedUpdateRunwithClusterResourcePlacementfor fleet administrators managing infrastructure-level changes. - Namespace-scoped: Use
StagedUpdateRunwithResourcePlacementfor application teams managing rollouts within their specific namespaces.
The example in this article demonstrates using a rollout run with cluster-scoped resources. Namespace-scoped behaves exactly the same with intra-namespace resources.
Before you begin
-
If you don't have an Azure trail subscription, create a trial subscription before you begin.
To understand the concepts and terminology used in this article, read the conceptual overview of staged rollout strategies.
Set the following environment variables:
export SUBSCRIPTION_ID=<subscription>
export GROUP=<resource-group>
export FLEET=<fleet-name>
export MEMBER_CLUSTER_1=aks-member-1
export MEMBER_CLUSTER_2=aks-member-2
You need Azure CLI installed to complete this article. To install or upgrade, see Install the Azure CLI.
You need the
fleetAzure CLI extension. You can install it by running the following command:az extension add --name fleetRun the
az extension updatecommand to update to the latest version of the extension:az extension update --name fleetIf you don't have the Kubernetes CLI (kubectl) already, you can install it by using this command:
az aks install-cli
Configure the environment
This article uses a Fleet Manager with a hub cluster and two member clusters. If you don't have a Fleet Manager, follow the quickstart to create a Fleet Manager with a hub cluster. Then, join Azure Kubernetes Service (AKS) or Azure Arc-enabled Kubernetes clusters as members.
Make sure that the member clusters have the following labels so that there's a cluster in each stage of the rollout.
| member name | labels |
|---|---|
| aks-member-1 | environment=canary |
| aks-member-2 | environment=staging |
Apply labels to the member clusters by using the following command.
az fleet member update \
    --resource-group ${GROUP} \
    --fleet-name ${FLEET} \
    --name ${MEMBER_CLUSTER_1} \
    --labels environment=canary
az fleet member update \
    --resource-group ${GROUP} \
    --fleet-name ${FLEET} \
    --name ${MEMBER_CLUSTER_2} \
    --labels environment=staging
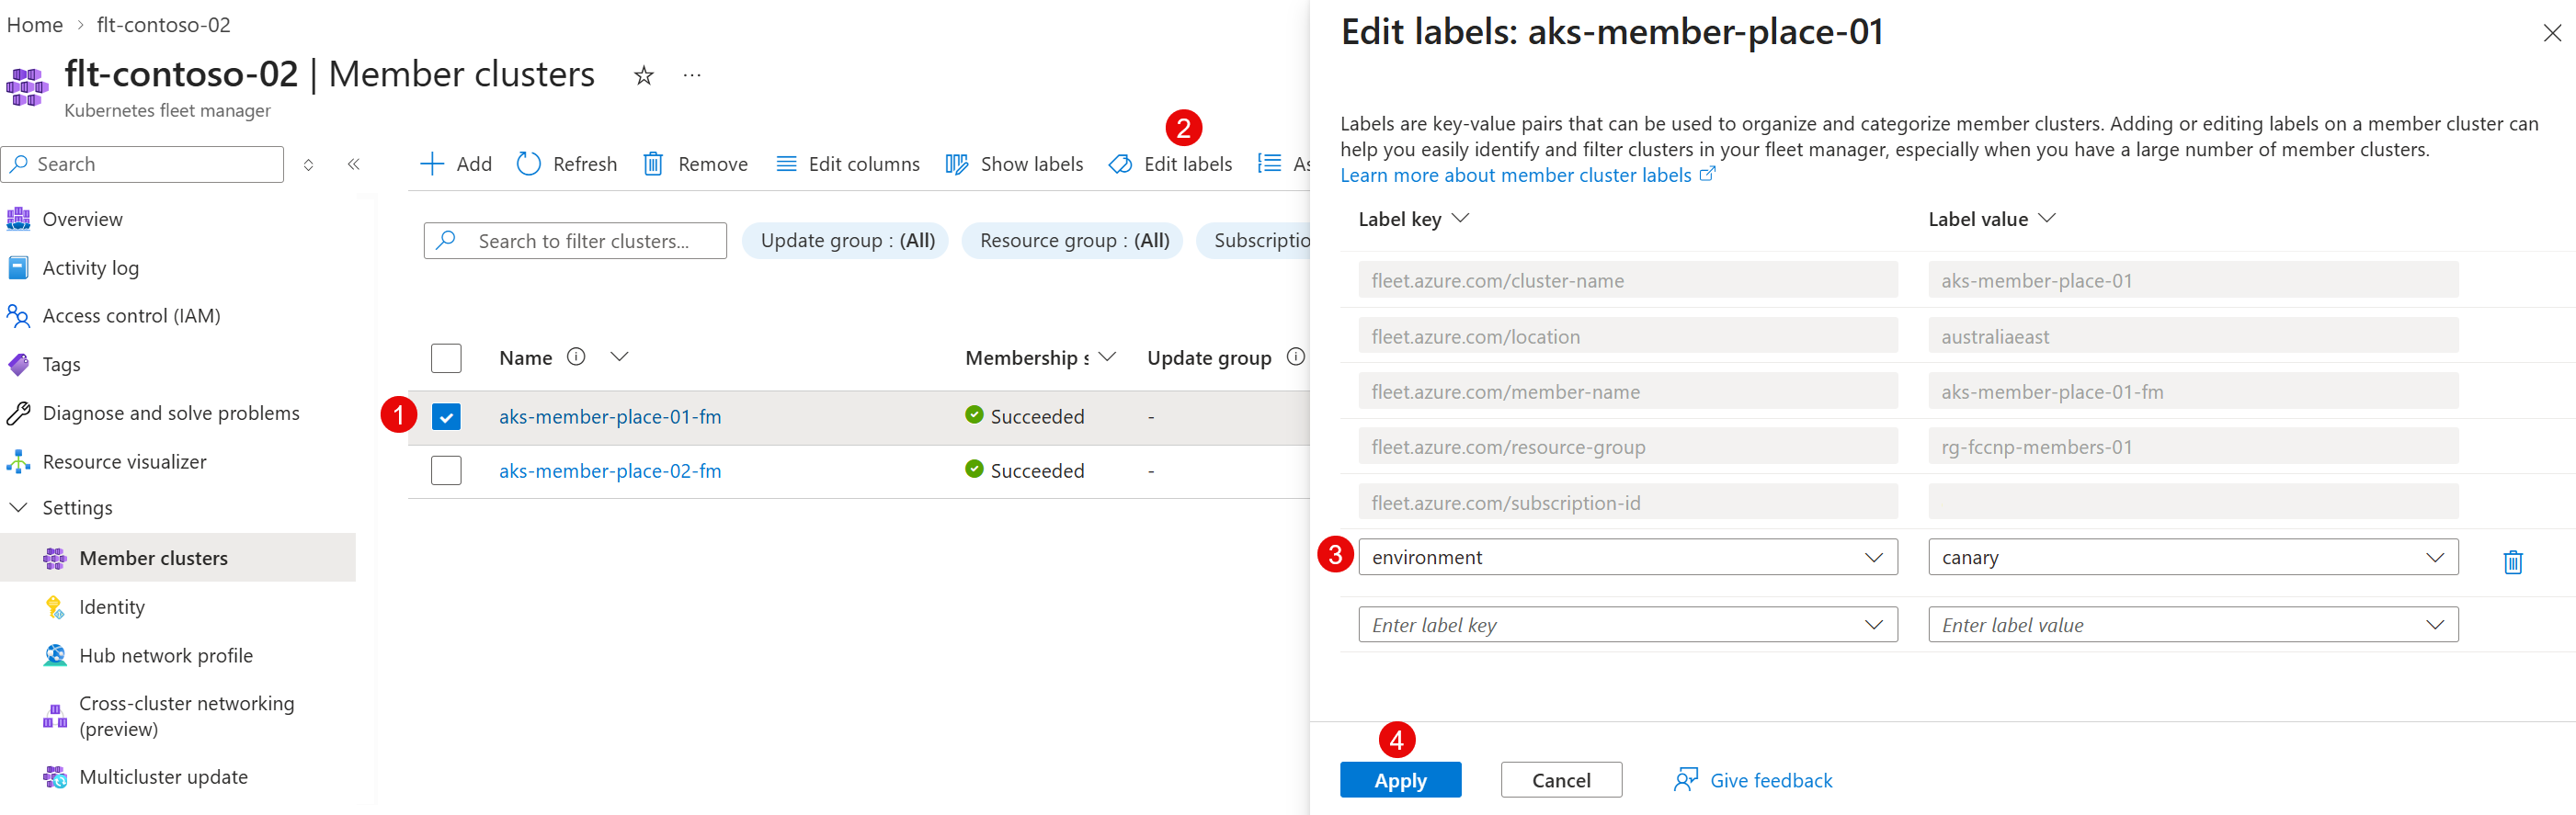
In the Azure portal, go to your Fleet Manager.
On the service menu, under Settings, select Member clusters.
In the member cluster list, select a cluster. Then, choose Edit labels in the action menu.
Add the appropriate label to the member cluster, and then select Apply.
Repeat for each member cluster.
Prepare Kubernetes workload for placement
In this step, you stage a Kubernetes workload on the Fleet Manager hub cluster so you can distribute it through a staged rollout onto member clusters.
Get the kubeconfig file of the Kubernetes Fleet hub cluster by using the
az fleet get-credentialscommand:az fleet get-credentials \ --resource-group ${GROUP} \ --name ${FLEET}Your output should look similar to the following.
Merged "hub" as current context in /home/fleet/.kube/configNote
If you receive an error of type
InvalidHubOperationwith the message indicating the fleet is hubless, add a hub cluster. For further information, see upgrade hub cluster type.Create a namespace on the Fleet Manager hub cluster.
kubectl create namespace test-appSave the following YAML as
test-workload.yaml.apiVersion: apps/v1 kind: Deployment metadata: name: nginx-deployment namespace: test-app spec: selector: matchLabels: app: nginx replicas: 2 template: metadata: labels: app: nginx spec: containers: - name: nginx image: mcr.microsoft.com/azurelinux/base/nginx:1.28@sha256:3352a36cbcab4708883a3e77b64f64159e11e1aab358c010e1c4e465dbfb4f57 ports: - containerPort: 80 --- apiVersion: v1 kind: Service metadata: name: nginx-service namespace: test-app spec: selector: app: nginx ports: - protocol: TCP port: 80 targetPort: 80 type: LoadBalancerStage the test workload onto the Fleet Manager hub cluster by using
kubectl.kubectl apply -f test-workload.yaml
In the Azure portal, go to your Fleet Manager.
On the service menu, under Fleet Resources, select Namespaces > + Create.
Note
If you don't see Fleet Resources, your Fleet Manager doesn't have a hub cluster. For further information on how to add one, see upgrade hub cluster type.
In the menu, select Namespace, enter a Name, and then select Create.
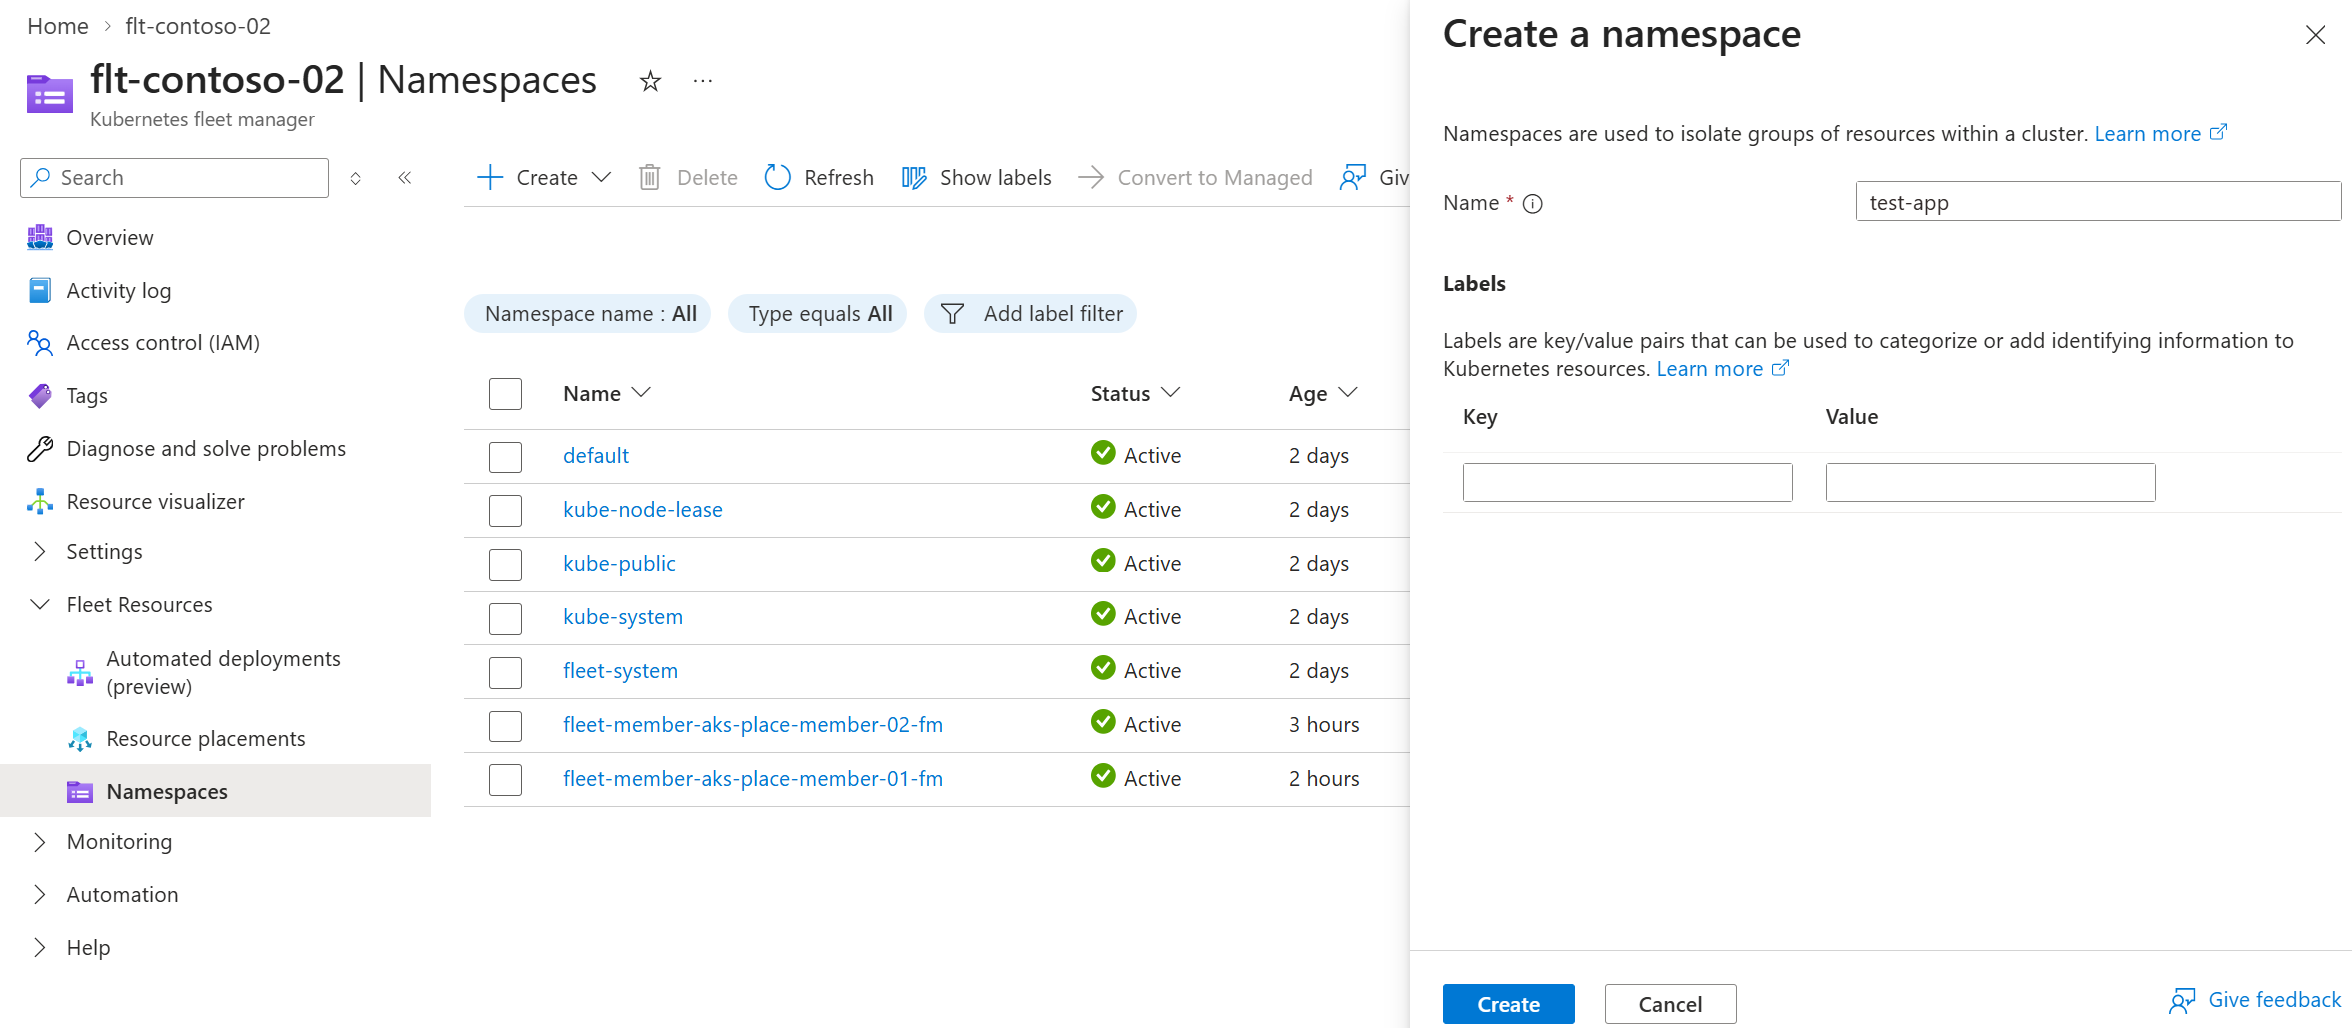
After a few moments, the page refreshes and the namespace appears in the list of namespaces on the Fleet Manager hub cluster. It's now ready to host any resources you want to distribute across member clusters.
At the top of the namespace list, select + Create > Apply a YAML, and use the following samples.
apiVersion: apps/v1
kind: Deployment
metadata:
  name: nginx-deployment
  namespace: test-app
spec:
  selector:
    matchLabels:
      app: nginx
  replicas: 2
  template:
    metadata:
      labels:
        app: nginx
    spec:
      containers:
      - name: nginx
        image: mcr.microsoft.com/azurelinux/base/nginx:1.28@sha256:3352a36cbcab4708883a3e77b64f64159e11e1aab358c010e1c4e465dbfb4f57
        ports:
        - containerPort: 80
apiVersion: v1 kind: Service metadata: name: nginx-service namespace: test-app spec: selector: app: nginx ports: - protocol: TCP port: 80 targetPort: 80 type: LoadBalancerCopy and paste the samples and apply them one at a time as shown in the following image.
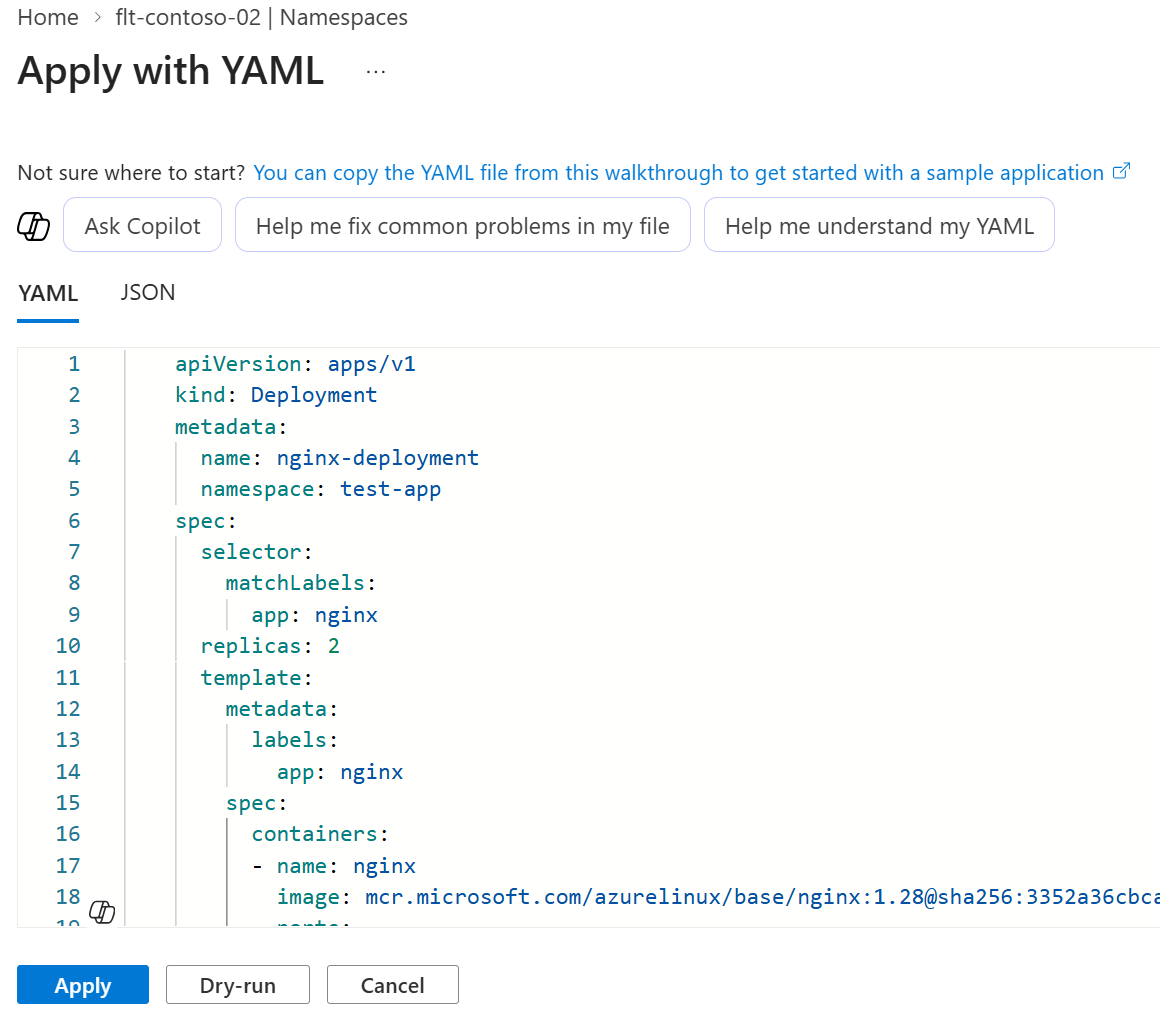
The namespace and its workloads are now ready to be distributed to member clusters. The Deployment and Service aren't scheduled on the Fleet Manager hub cluster.
Define cluster ordering using a rollout strategy
Create a rollout strategy to define the order in which clusters receive the resources. You can also add more controls such as soak times and approvals before or after each stage. For further information see Define reusable Azure Kubernetes Fleet Manager resource placement rollout strategies.
Save the following YAML as
crp-two-stages-strategy.yaml.apiVersion: placement.kubernetes-fleet.io/v1 kind: ClusterStagedUpdateStrategy metadata: name: two-stages-strategy spec: stages: - name: staging labelSelector: matchLabels: environment: staging afterStageTasks: - type: TimedWait waitTime: 4m - name: canary labelSelector: matchLabels: environment: canary beforeStageTasks: - type: ApprovalApply the strategy manifest to the Fleet Manager hub cluster.
kubectl apply -f crp-two-stages-strategy.yamlCheck the status of the strategy resource.
kubectl get clusterstagedupdatestrategy two-stages-strategyYour output should look similar to the following.
NAME                  AGE
two-stages-strategy   47m
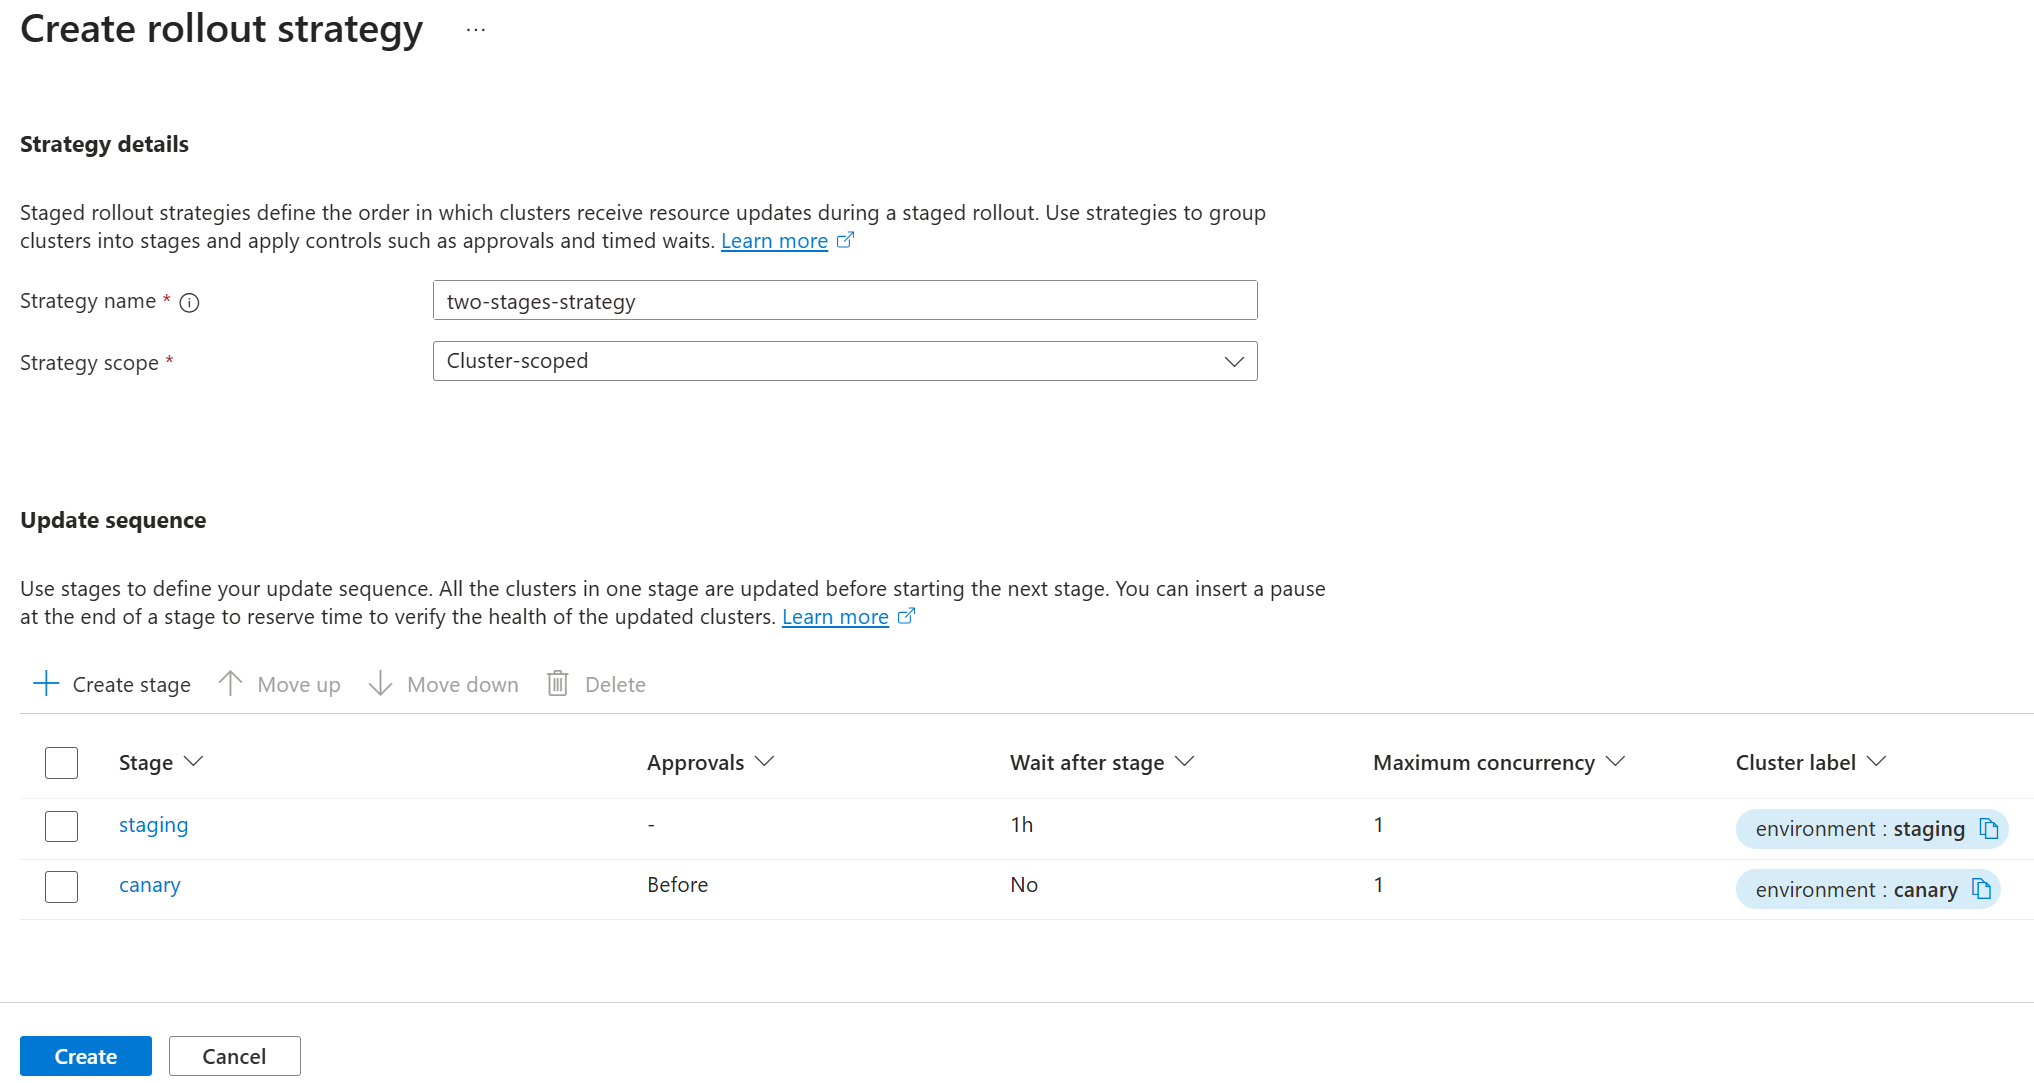
Use the following process to create a strategy containing the two stages Staging and Canary with a 4 minute wait time and a pre-stage approval for the Canary stage.
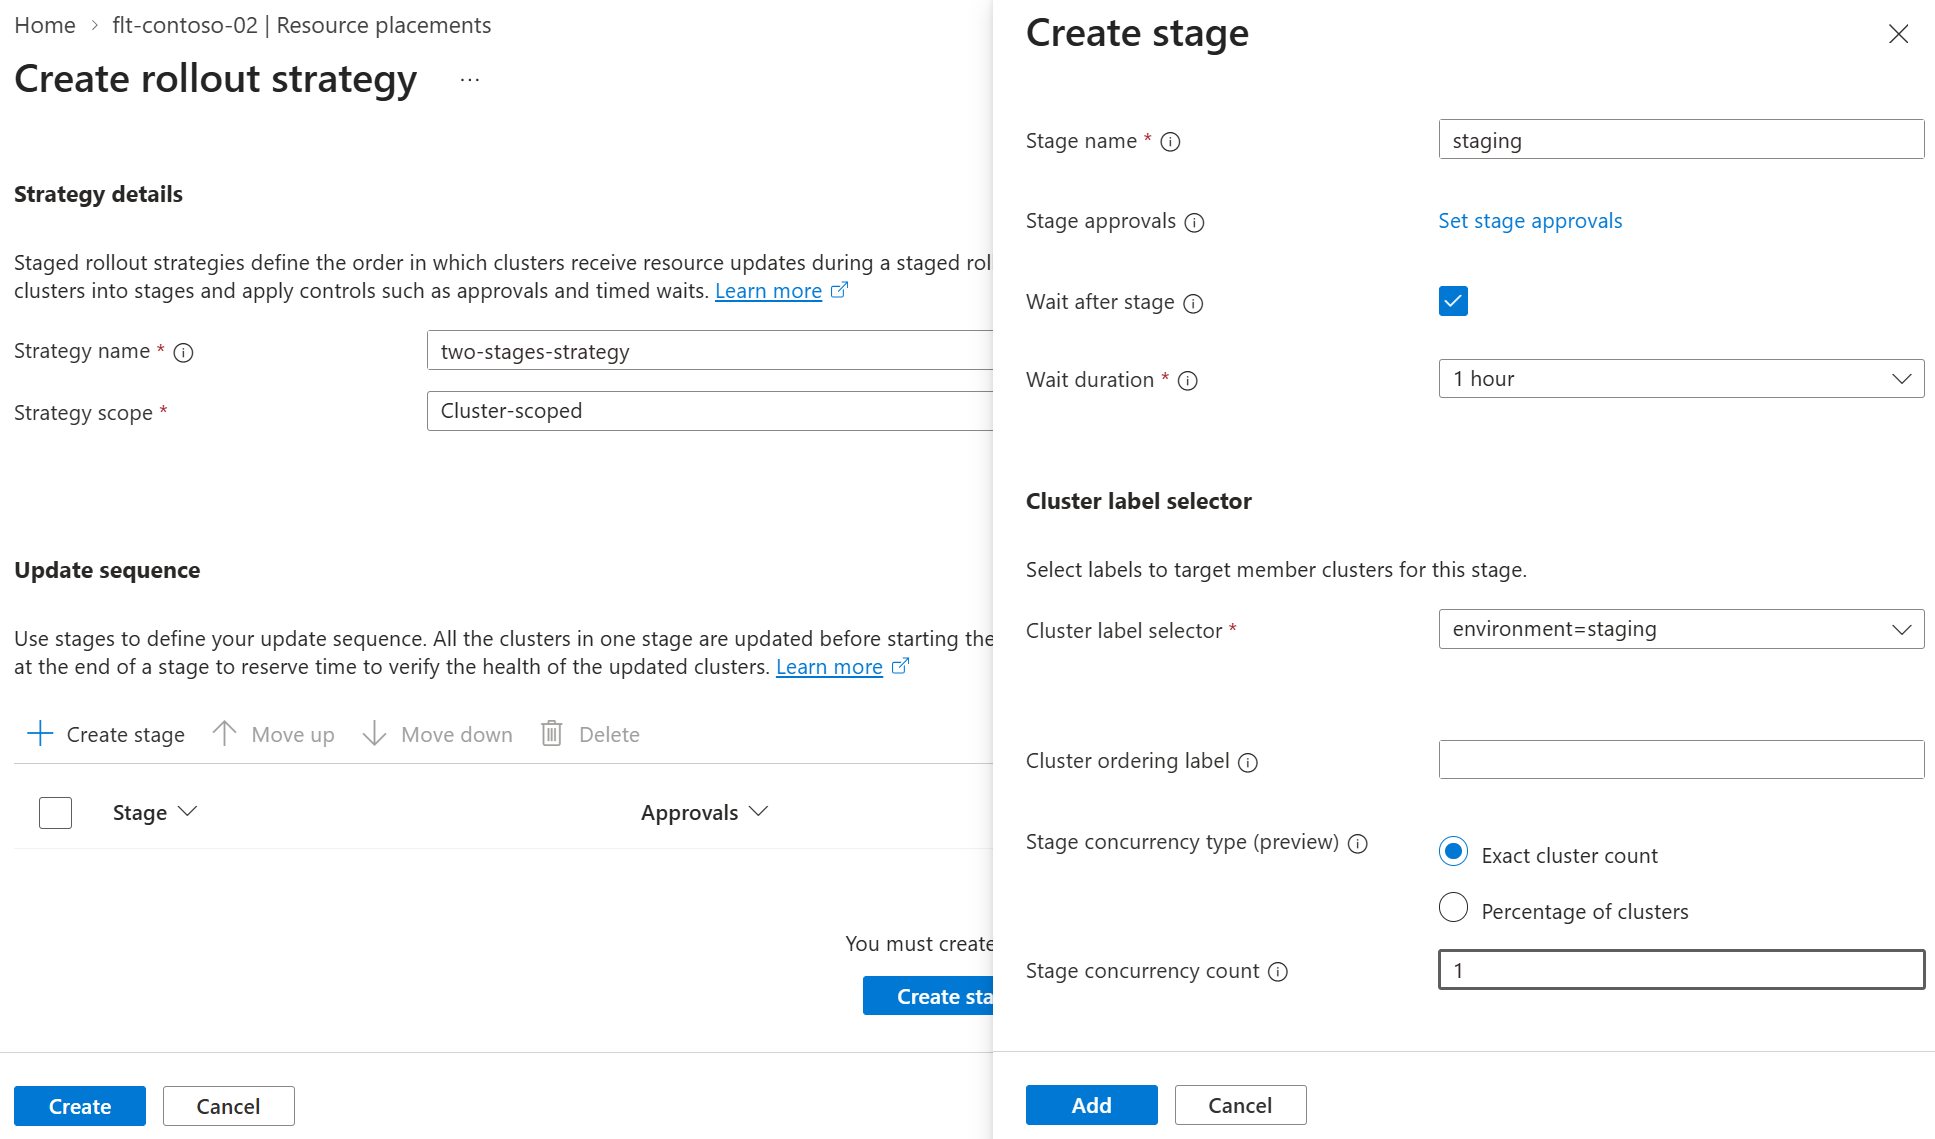
In the Azure portal, go to your Fleet Manager.
On the service menu, under Fleet Resources, select Resource placements > Staged rollout strategies, then Create.
Enter a name for the strategy.
Select the Strategy scope, choosing either Cluster-scoped or Namespace-scoped.
- For Namespace-scoped, select the existing Namespace on the Fleet Manager hub cluster where the Kubernetes resources to be distributed are staged.
Select Create Stage and enter:
- Stage name - name the stage - it must be unique across all stage names in the strategy.
- (Optional) Stage approvals - select this option if you would like to wait for an approval before this stage starts or after it completes.
- (Optional) Wait after stage - select this option if you would like to define a pause before moving to the next stage.
- (Optional) Wait duration - select a predefined duration, or enter a custom value in seconds.
- Cluster label selector - choose an existing member cluster label to use to select clusters for this stage.
- (Optional) Cluster ordering label - choose an existing member cluster label to use to order the clusters within the stage.
- (Optional) Stage concurrency - set how many clusters should be updated concurrently in the current stage.
Note
The maximum number of stages in each strategy is 31.
Repeat until all stages are added to the strategy. Select Create to create the strategy.
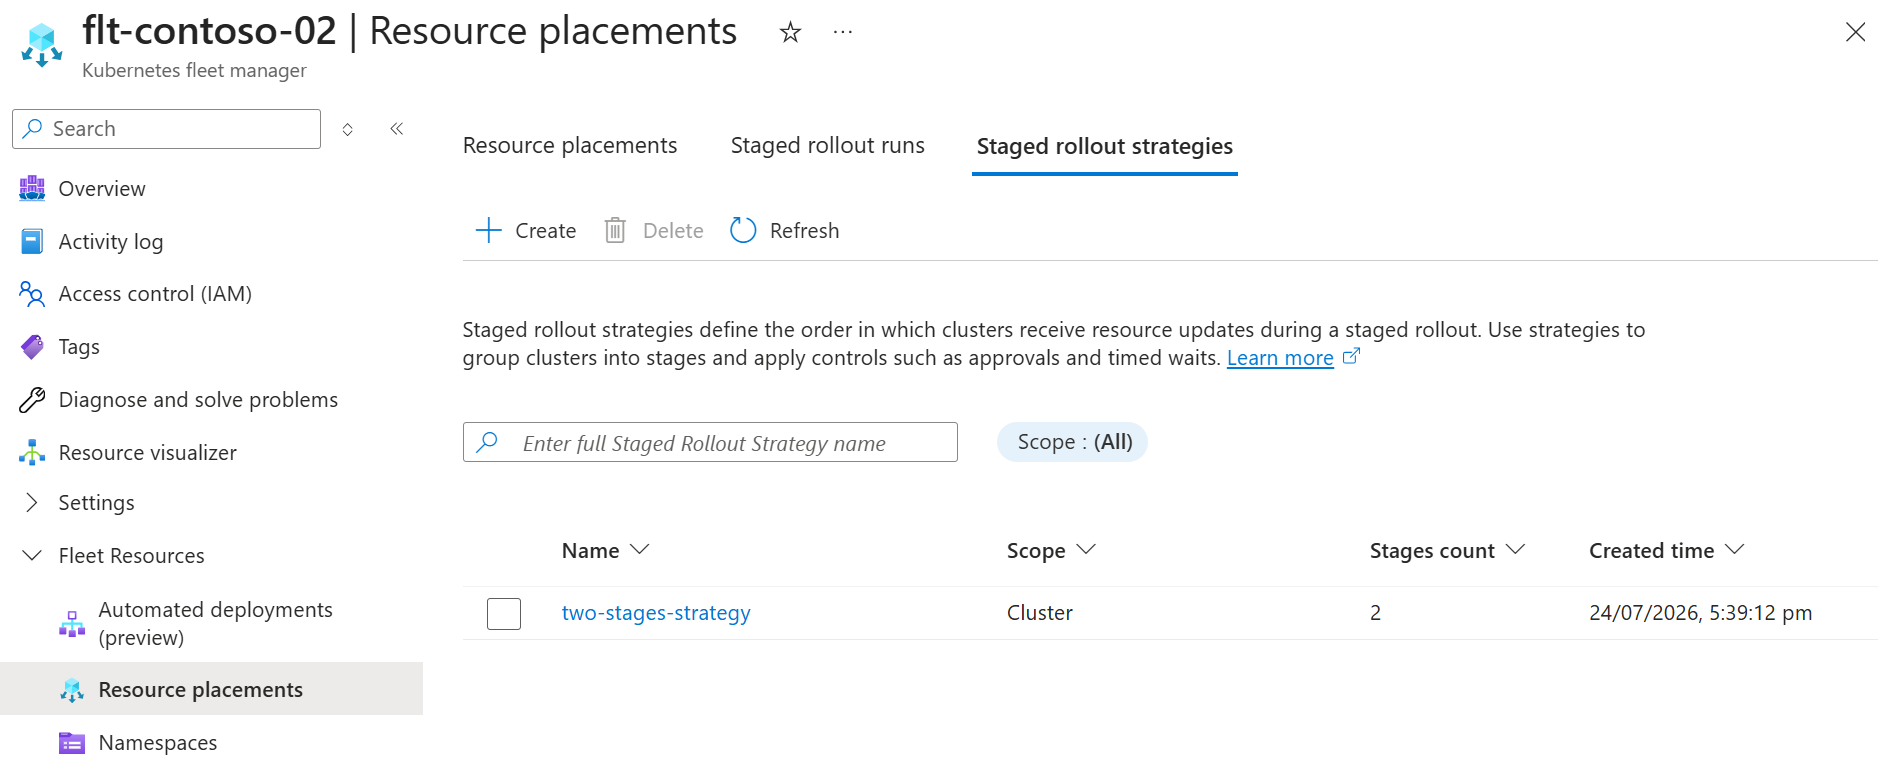
The page refreshes and the list displays the newly created strategy.
Pick clusters by using a resource placement
Use a resource placement to select the resources to distribute and define the policy to pick which clusters receive the resources.
To use a staged rollout, set the rollout strategy type to External so you can control the resource distribution by a staged rollout that you define later.
Save the following YAML as
crp-distribute-workload-ext.yaml.apiVersion: placement.kubernetes-fleet.io/v1 kind: ClusterResourcePlacement metadata: name: distribute-test-app spec: resourceSelectors: - group: "" kind: Namespace version: v1 name: test-app policy: placementType: PickAll strategy: type: ExternalImportant
If you don't set the
strategytype toExternal, the resource rollout starts as soon as you apply the manifest by using aRollingUpdatestrategy.Apply the placement manifest to the Fleet Manager hub cluster.
kubectl apply -f crp-distribute-workload-ext.yamlCheck the status of the resource placement.
kubectl get clusterresourceplacement distribute-test-appYour output should look similar to the following.
NAME                  GEN   SCHEDULED   SCHEDULED-GEN   AVAILABLE   AVAILABLE-GEN   AGE
distribute-test-app   1     True        1                                           60s
In the Azure portal, go to your Fleet Manager.
On the service menu, under Fleet Resources, select Resource placements > + Create.
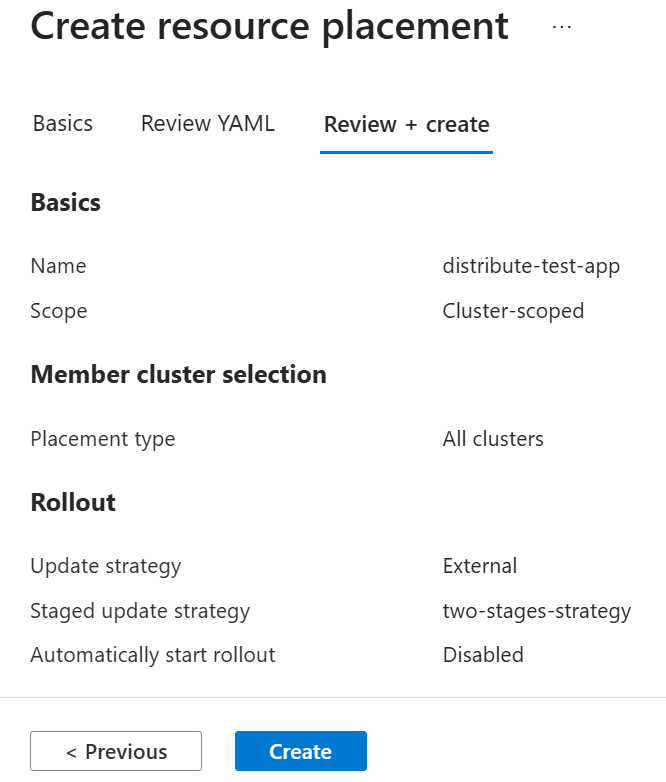
On the Basics tab, configure the following options:
In Placement details, enter a name for the placement.
Under Resource details, leave Scope as Cluster-scoped and enter the Group Version Kind (GVK) and name of the resource to distribute. In this sample, use the following values.
group: ""
kind: Namespace
version: v1
name: test-app
In Member cluster selection, for Placement type choose All clusters.
For Rollout, select External. Use Staged update strategy to select the rollout strategy you created earlier.
Leave the Automatically start rollout box unchecked.
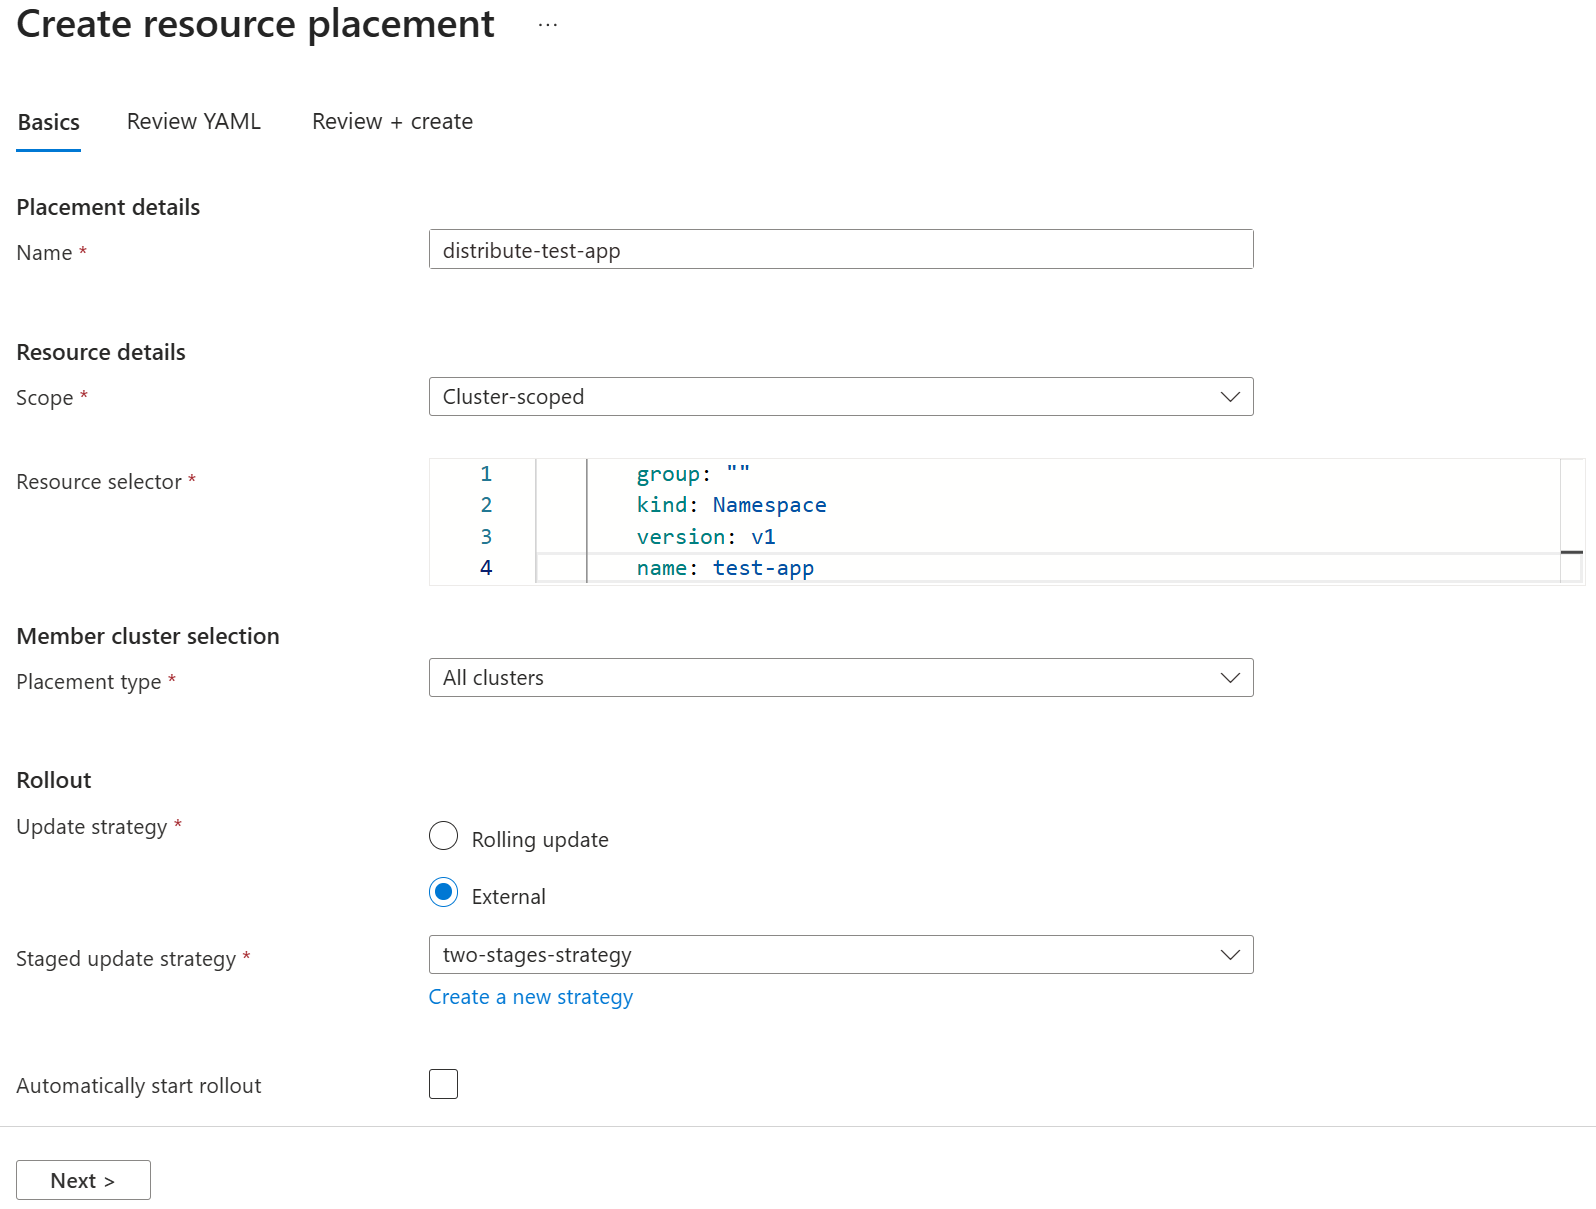
Select Next to review the resulting
ClusterResourcePlacementmanifest. You can modify the manifest if required, validate by using the Validate (dry run) option, or select Review + create to proceed to final confirmation.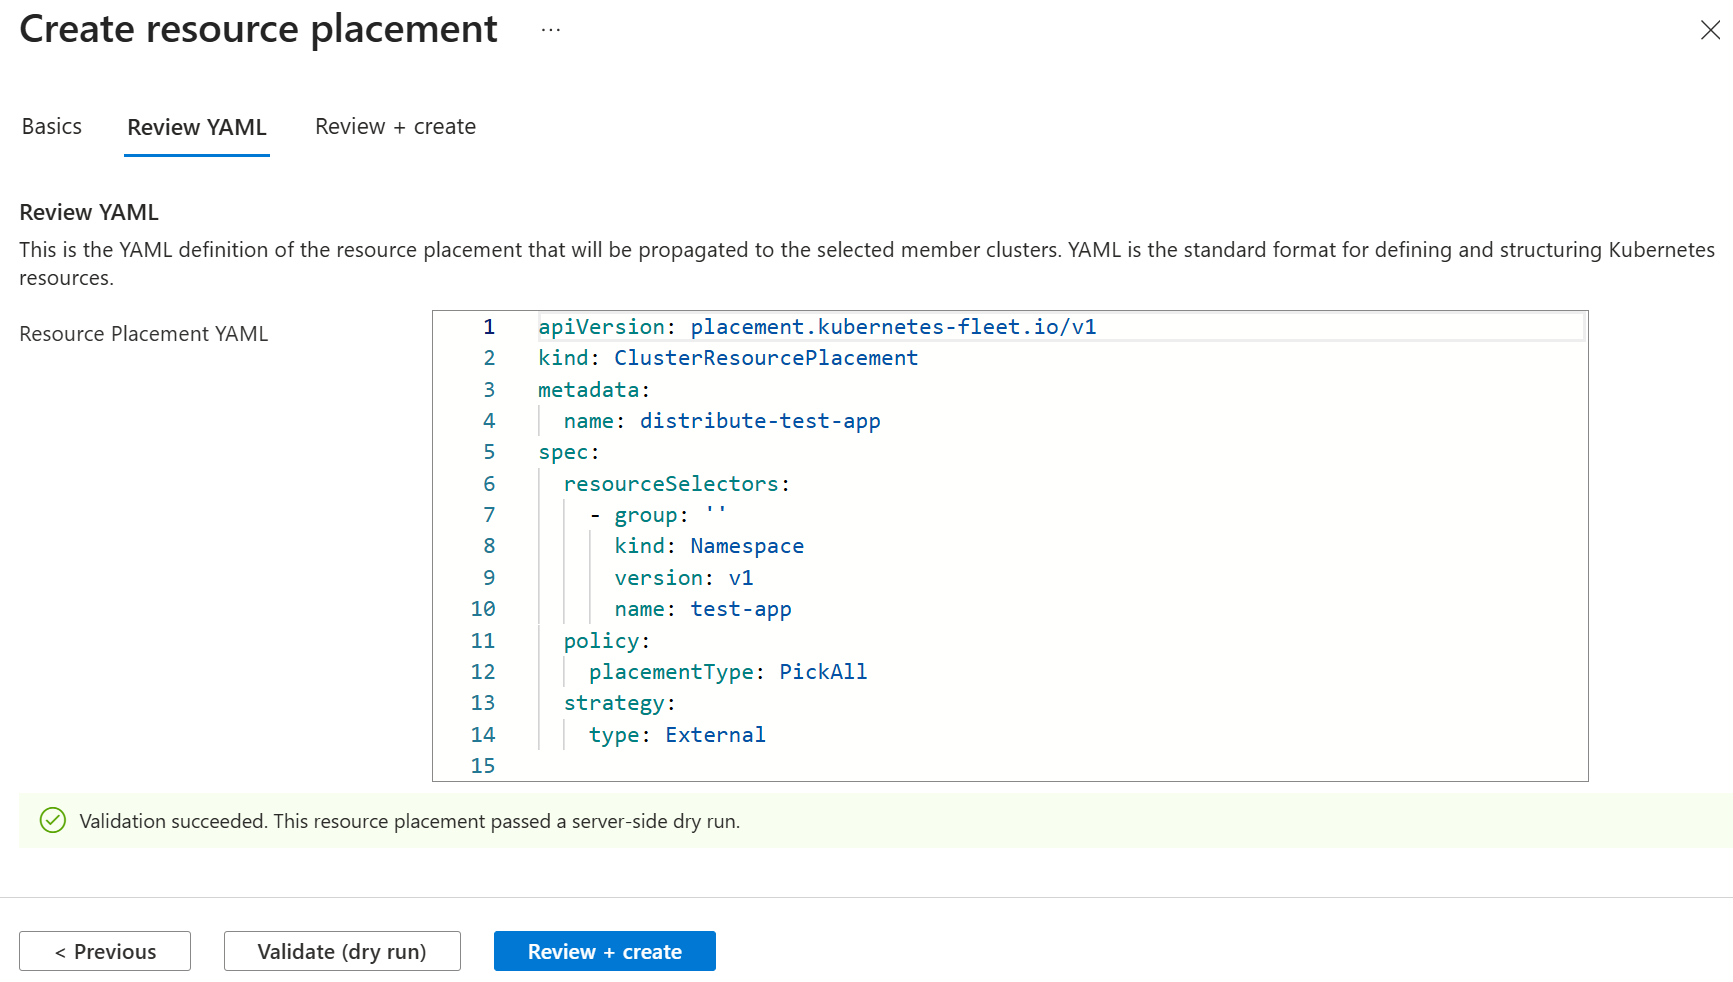
Select Create to create the rollout run, but not start it.
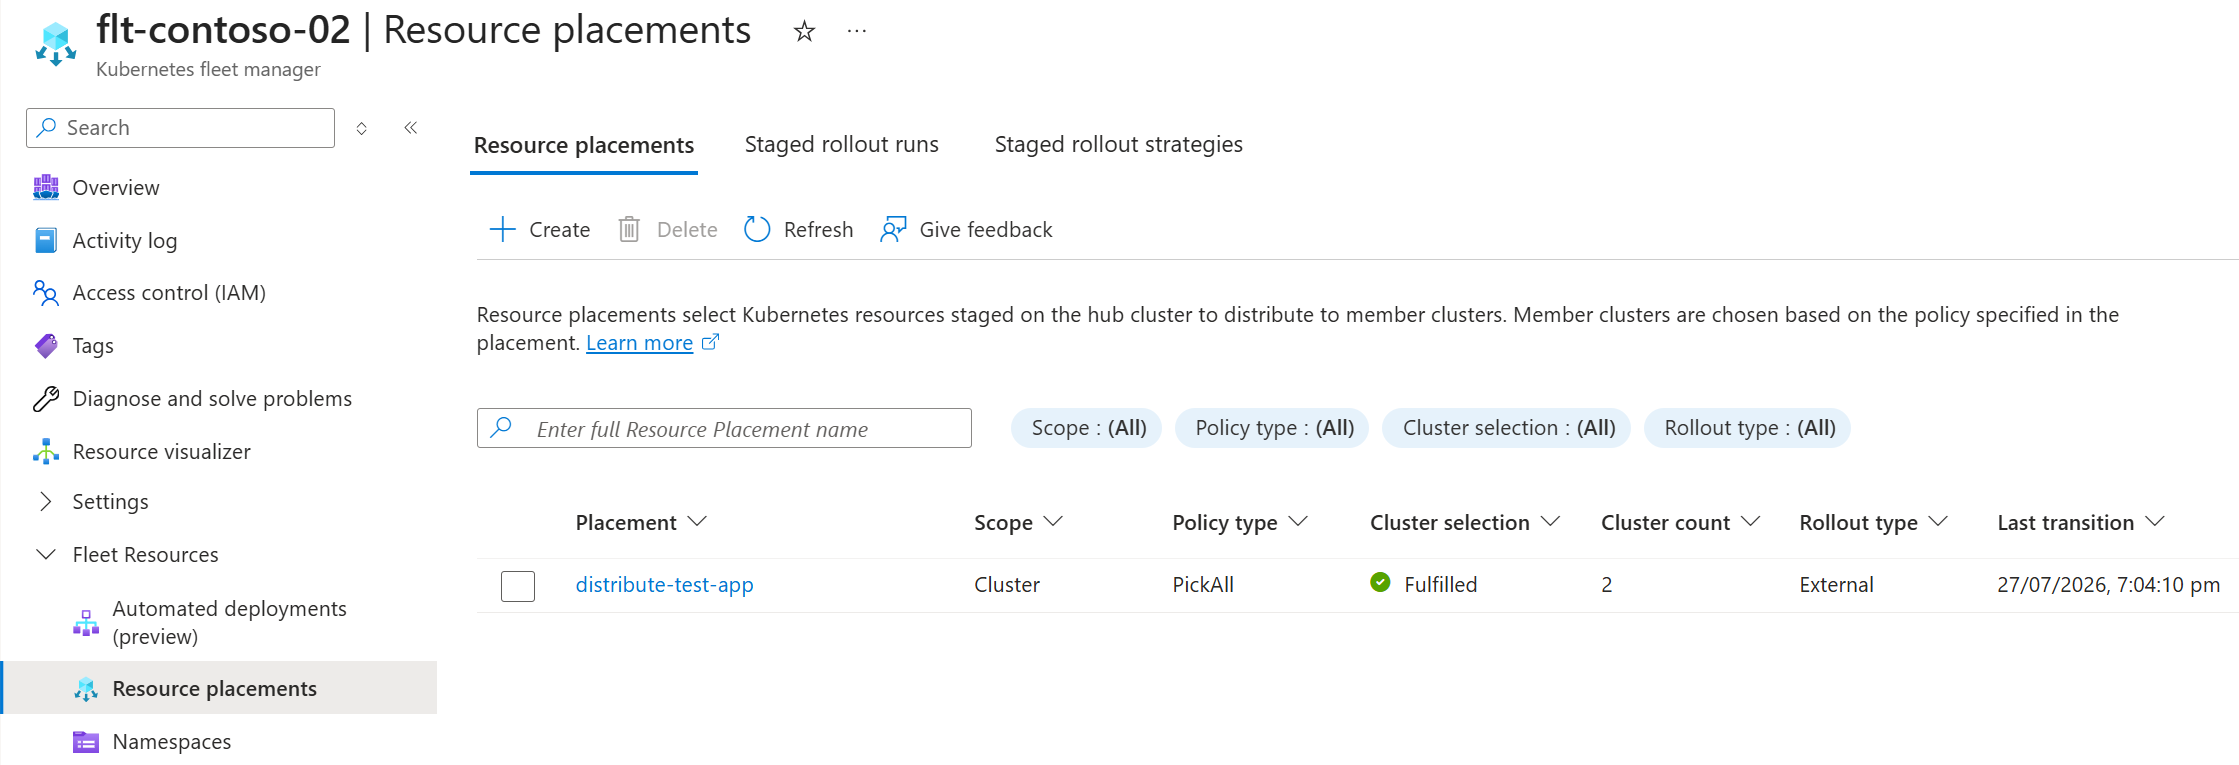
The page refreshes and the Resource placements list displays the newly created placement. It shows the number of clusters selected and whether the fleet scheduler can fulfill the placement policy. Notice the Rollout type is set to External.
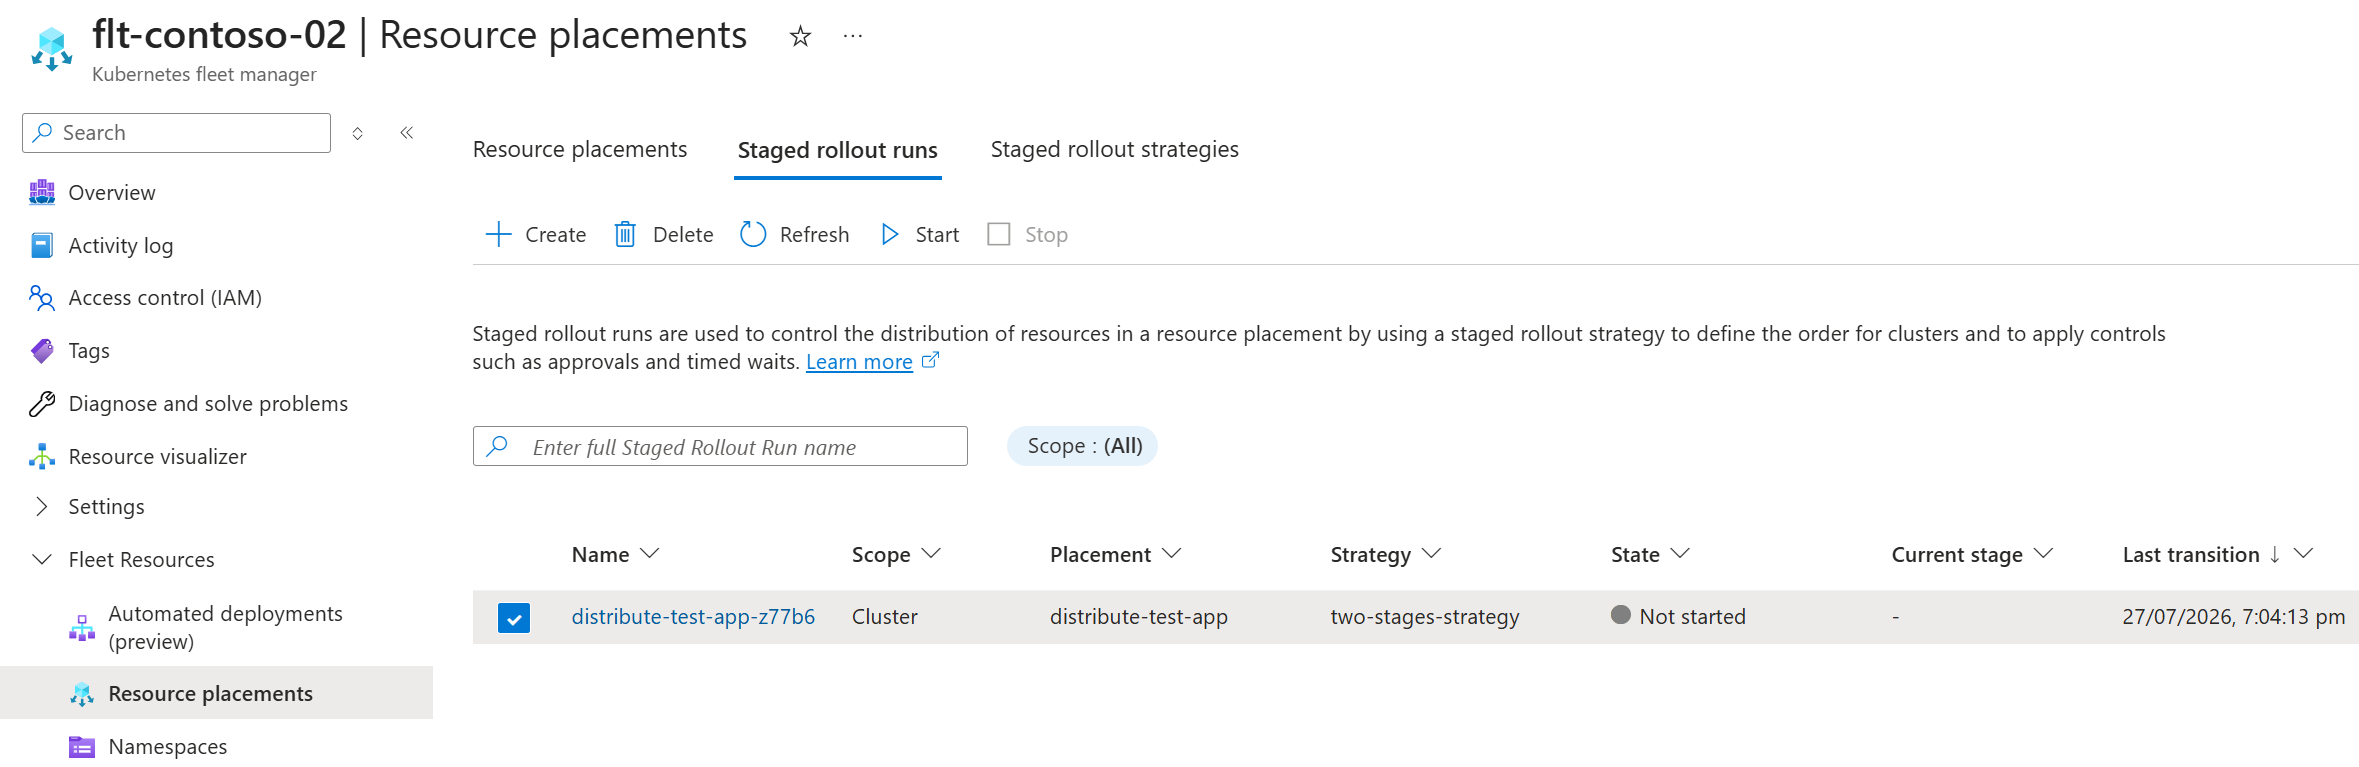
When you use the Azure portal to create a placement with a rollout strategy, it automatically creates a staged rollout run for you.
Use staged rollout to control distribution
In this article, you create the staged rollout with a state of Initialize so that you can start the rollout when you want, rather than the run starting immediately when the manifest is applied. Set the state to Run to start immediately instead.
Save the following YAML as
staged-rollout-test-app.yaml.apiVersion: placement.kubernetes-fleet.io/v1 kind: ClusterStagedUpdateRun metadata: name: staged-rollout-test-app spec: placementName: distribute-test-app stagedRolloutStrategyName: two-stages-strategy state: InitializeNote
If you don't set the
strategytype toExternal, the resource rollout starts as soon as you apply the manifest by using aRollingUpdatestrategy.Apply the staged rollout manifest to the Fleet Manager hub cluster.
kubectl apply -f staged-rollout-test-app.yamlCheck the status of the rollout run resource. It's initialized but not progressing.
kubectl get clusterstagedupdaterun staged-rollout-test-appYour output should look similar to the following.
NAME                      PLACEMENT             RESOURCE-SNAPSHOT-INDEX   POLICY-SNAPSHOT-INDEX   INITIALIZED   PROGRESSING   SUCCEEDED   AGE
staged-rollout-test-app   distribute-test-app                             0                       True                                    101s
Managing staged rollout progress
Once you have all the resources ready, you can now control the rollout of resources across member clusters.
Start a staged rollout
To start a staged rollout, patch the state field in the spec to Run.
kubectl patch clusterstagedupdaterun staged-rollout-test-app --type merge -p '{"spec":{"state":"Run"}}'
Check the status of the rollout run resource. It's initialized but not progressing.
kubectl get clusterstagedupdaterun staged-rollout-test-app
Your output should look similar to the following, noting that progressing is now True.
NAME                      PLACEMENT             RESOURCE-SNAPSHOT-INDEX   POLICY-SNAPSHOT-INDEX   INITIALIZED   PROGRESSING   SUCCEEDED   AGE
staged-rollout-test-app   distribute-test-app                             0                       True          True                      36m
Note
When the rollout reaches a TimedWait or Approval task, the progress status changes to False. Use describe to determine the reason for the pause.
View the detailed status of the rollout by describing the ClusterStagedUpdateRun.
kubectl describe clusterstagedupdaterun staged-rollout-test-app
In the response, review the Status, looking at the Conditions and Stages Status to understand which stage and cluster is currently being processed, or if a TimedWait or Approval task is currently active.
Name:         staged-rollout-test-app
Namespace:
Labels:       <none>
Annotations:  <none>
API Version:  placement.kubernetes-fleet.io/v1
Kind:         ClusterStagedUpdateRun
Metadata:
  Creation Timestamp:  2026-07-27T04:25:14Z
  Finalizers:
    kubernetes-fleet.io/stagedupdaterun-finalizer
  Generation:        3
  Resource Version:  2684410
  UID:               5e20d0a1-515a-4f1c-b566-89676100a968
Spec:
  Placement Name:                distribute-test-app
  Resource Snapshot Index:
  Staged Rollout Strategy Name:  two-stages-strategy
  State:                         Run
Status:
  Applied Strategy:
    Comparison Option:  PartialComparison
    Type:               ClientSideApply
    When To Apply:      Always
    When To Take Over:  Always
  Conditions:
    Last Transition Time:  2026-07-27T04:25:14Z
    Message:               The UpdateRun initialized successfully
    Observed Generation:   3
    Reason:                UpdateRunInitializedSuccessfully
    Status:                True
    Type:                  Initialized
    Last Transition Time:  2026-07-27T05:01:56Z
    Message:               The update run is making progress
    Observed Generation:   3
    Reason:                UpdateRunProgressing
    Status:                True
    Type:                  Progressing
  Deletion Stage Status:
    Clusters:
    Stage Name:                   kubernetes-fleet.io/deleteStage
  Policy Observed Cluster Count:  2
  Policy Snapshot Index Used:     0
  Resource Snapshot Index Used:   0
  Staged Update Strategy Snapshot:
    Stages:
      After Stage Tasks:
        Type:       TimedWait
        Wait Time:  1h0m0s
      Label Selector:
        Match Labels:
          Environment:  staging
      Max Concurrency:  1
      Name:             staging
      Before Stage Tasks:
        Type:  Approval
      Label Selector:
        Match Labels:
          Environment:  canary
      Max Concurrency:  1
      Name:             canary
  Stages Status:
    After Stage Task Status:
      Type:  TimedWait
    Clusters:
      Cluster Name:  aks-place-member-02-fm
      Conditions:
        Last Transition Time:  2026-07-27T05:01:56Z
        Message:               Cluster update started
        Observed Generation:   3
        Reason:                ClusterUpdatingStarted
        Status:                True
        Type:                  Started
    Conditions:
      Last Transition Time:  2026-07-27T05:01:56Z
      Message:               Clusters in the stage started updating
      Observed Generation:   3
      Reason:                StageUpdatingStarted
      Status:                True
      Type:                  Progressing
    Stage Name:              staging
    Start Time:              2026-07-27T05:01:56Z
    Before Stage Task Status:
      Approval Request Name:  staged-rollout-test-app-before-canary
      Type:                   Approval
    Clusters:
      Cluster Name:  aks-place-member-01-fm
    Stage Name:      canary
Events:              <none>
In the Azure portal, go to your Fleet Manager.
On the service menu, under Fleet Resources, select Staged rollout runs.
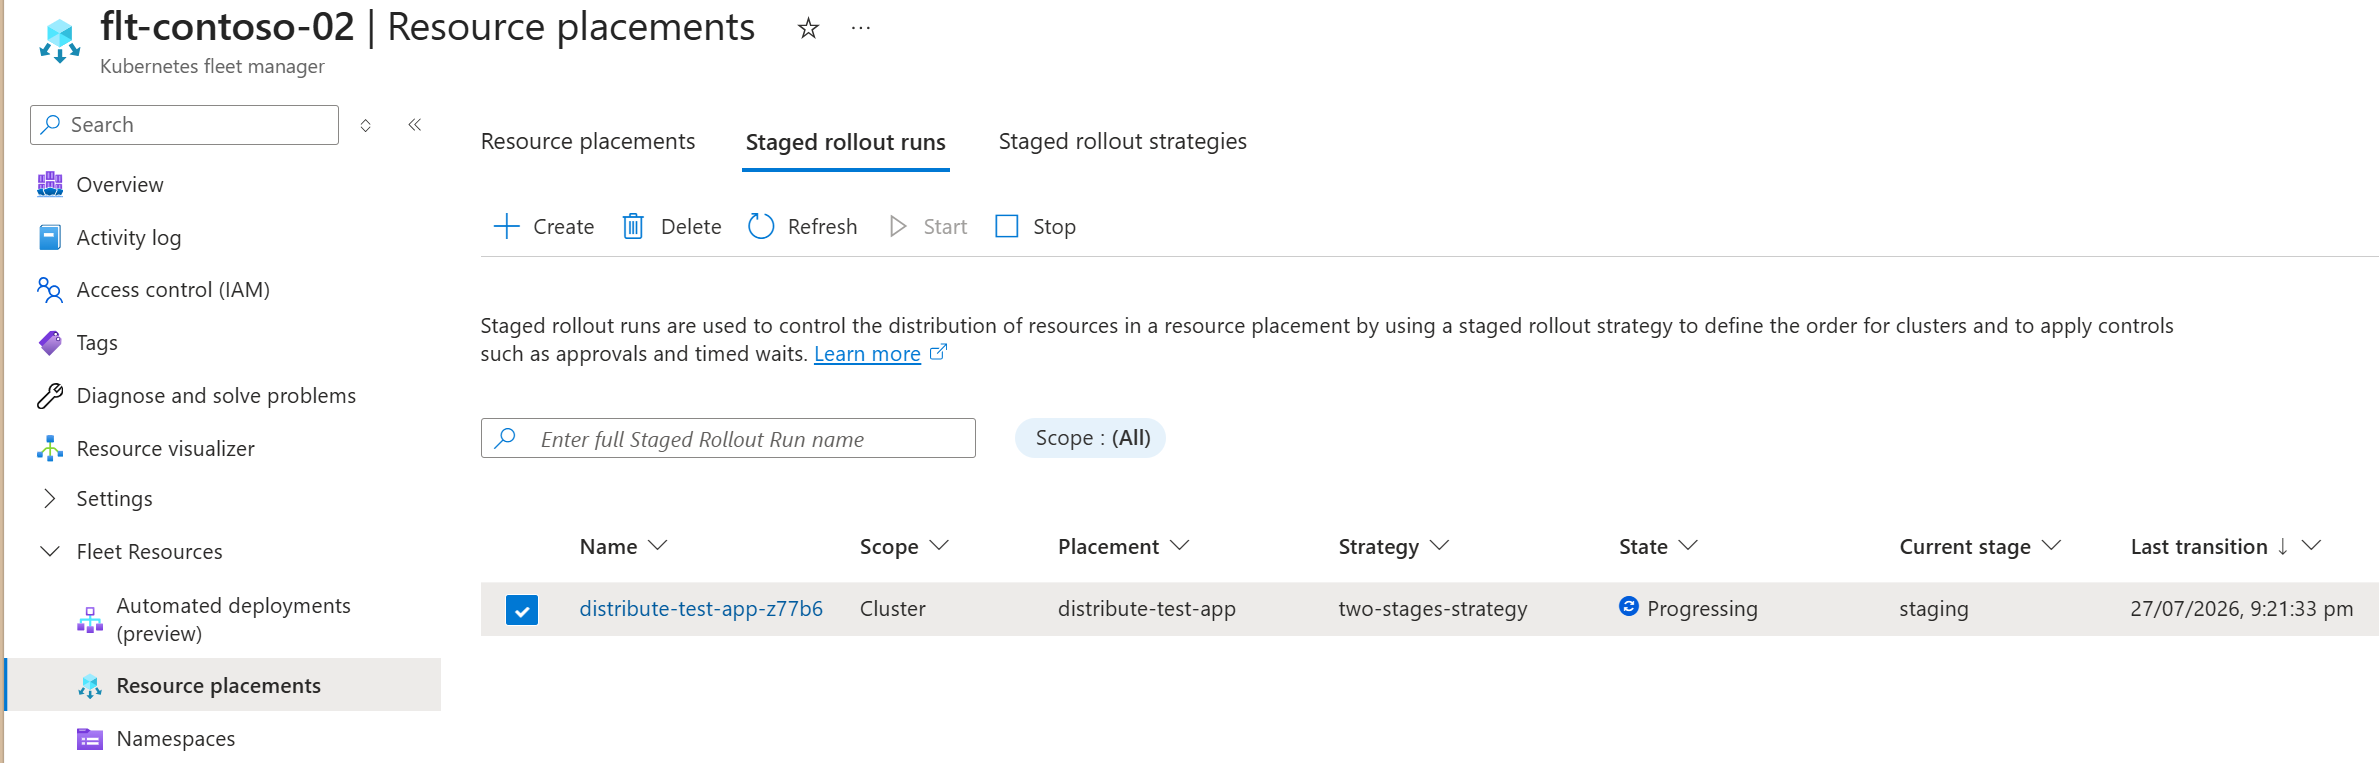
In the list, select the staged rollout run that was created automatically in the previous step, and then select Start in the action menu.
The page refreshes and the Staged rollout runs list displays the staged rollout run with the state of Progressing, with the currently running stage shown.
When the rollout reaches a
TimedWait, the state changes to Waiting. You can hover over the information icon to confirm this state is due to aTimedWait.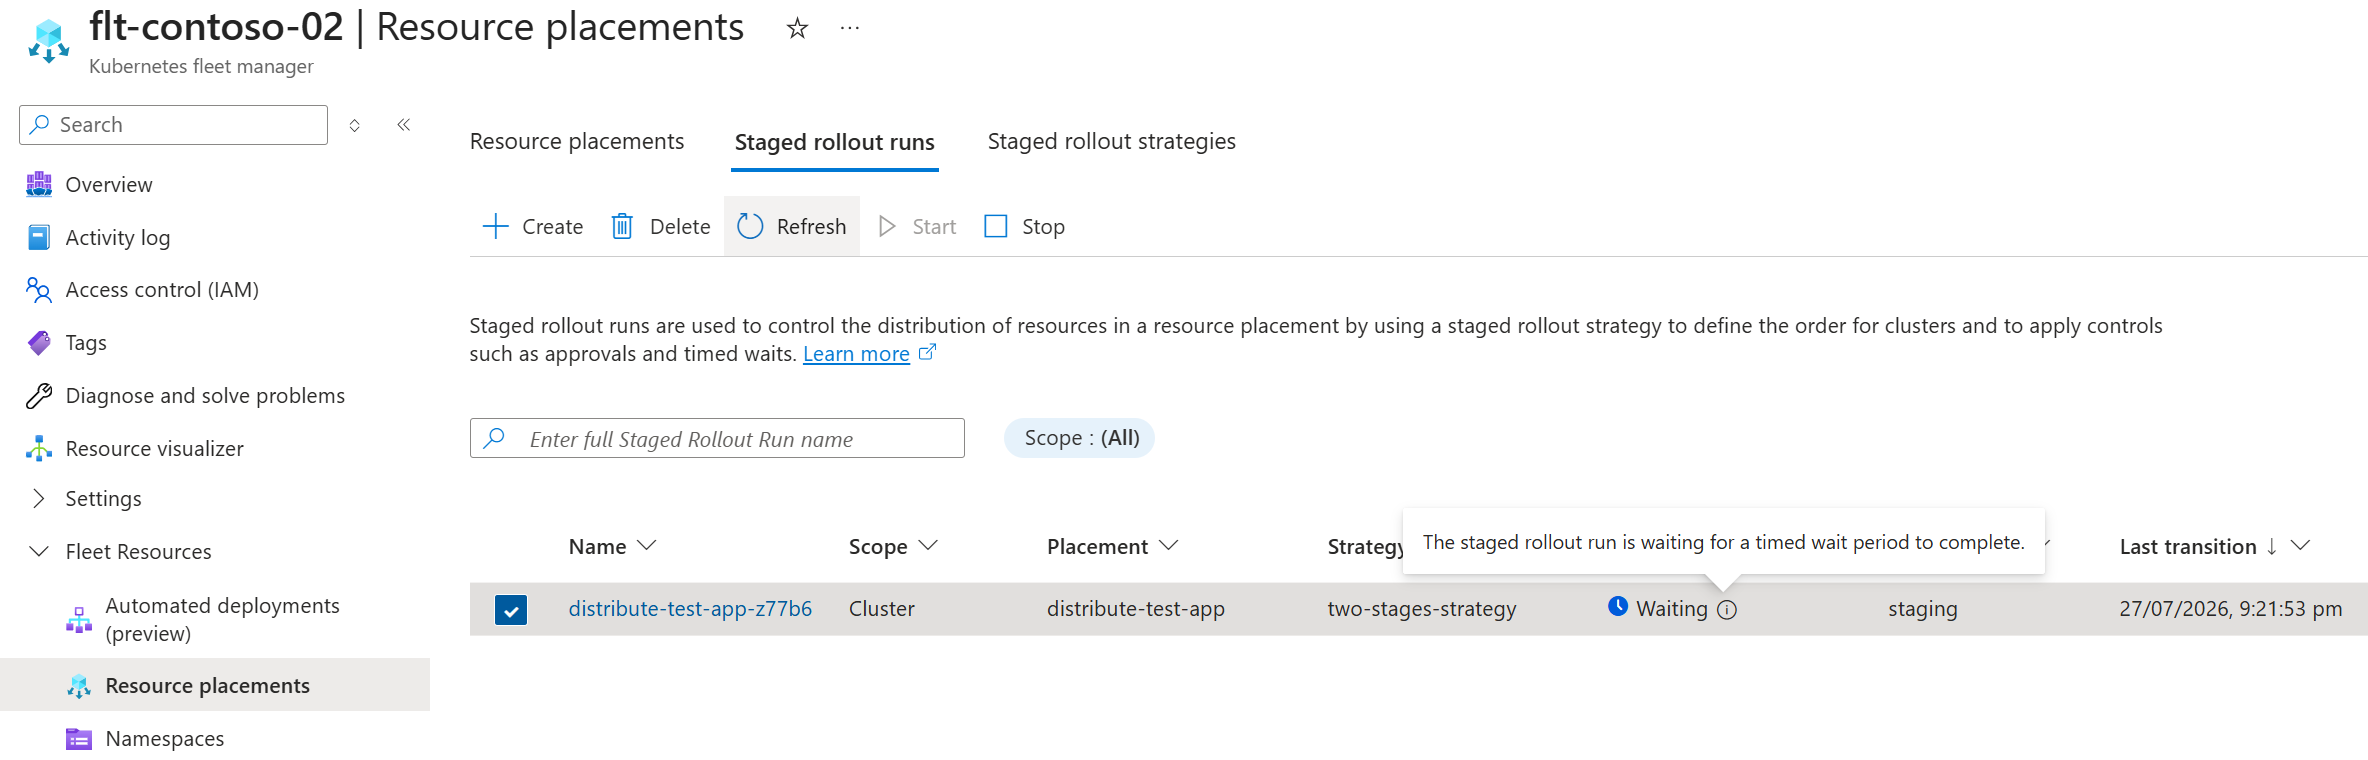
Stop a staged rollout
To stop a running staged rollout, patch the state field in the spec to Stop. This action gracefully halts the staged rollout run, so in-progress clusters finish their updates before the process stops.
kubectl patch clusterstagedupdaterun staged-rollout-test-app --type merge -p '{"spec":{"state":"Stop"}}'
The staged update run is initialized, but no longer running.
kubectl get clusterstagedupdaterun staged-rollout-test-app
Your output should look similar to the following, noting that progressing is now False.
NAME                      PLACEMENT             RESOURCE-SNAPSHOT-INDEX   POLICY-SNAPSHOT-INDEX   INITIALIZED   PROGRESSING   SUCCEEDED   AGE
staged-rollout-test-app   distribute-test-app                             0                       True          False                     46m
To stop a running staged rollout, use the following steps. This action gracefully halts the staged rollout, so in-progress clusters finish their updates before the process stops.
In the Azure portal, go to your Fleet Manager.
On the service menu, under Fleet Resources, select Staged rollout runs.
In the list, select the staged rollout run that you want to stop. Then, choose Stop from the action menu.
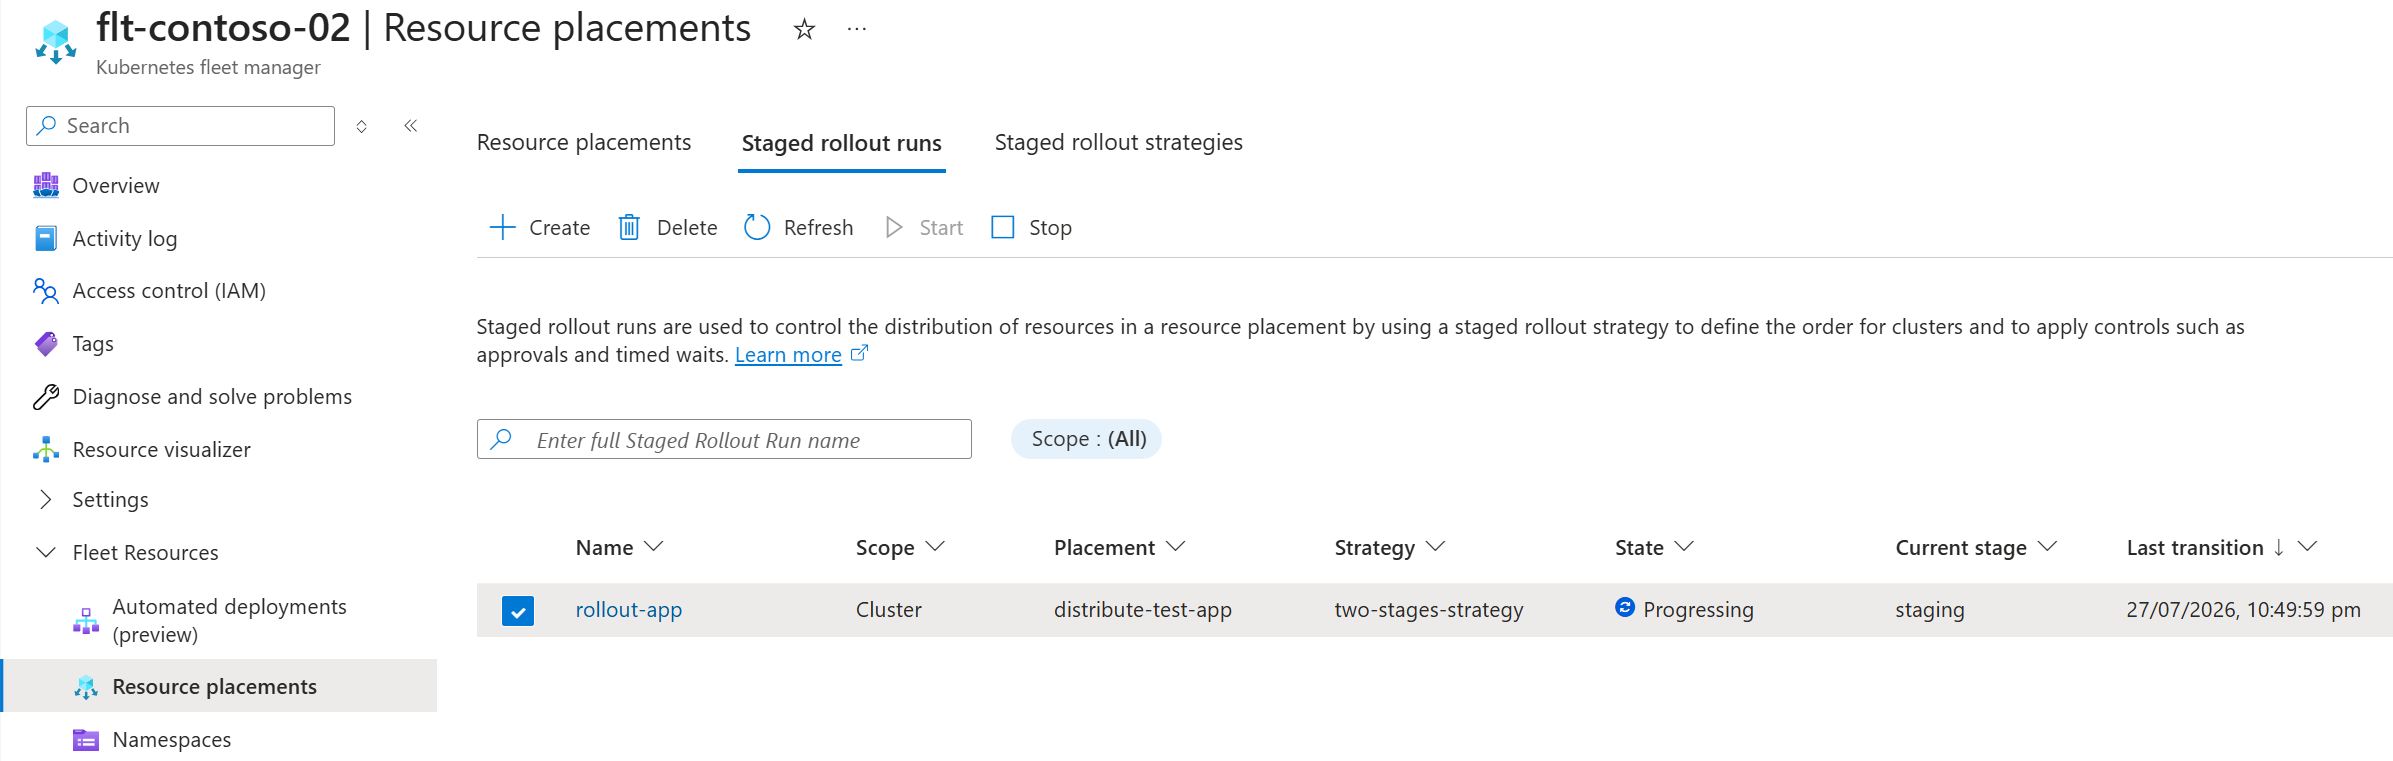
The page refreshes and the Staged rollout runs list displays the staged rollout run with the state of Stopped.
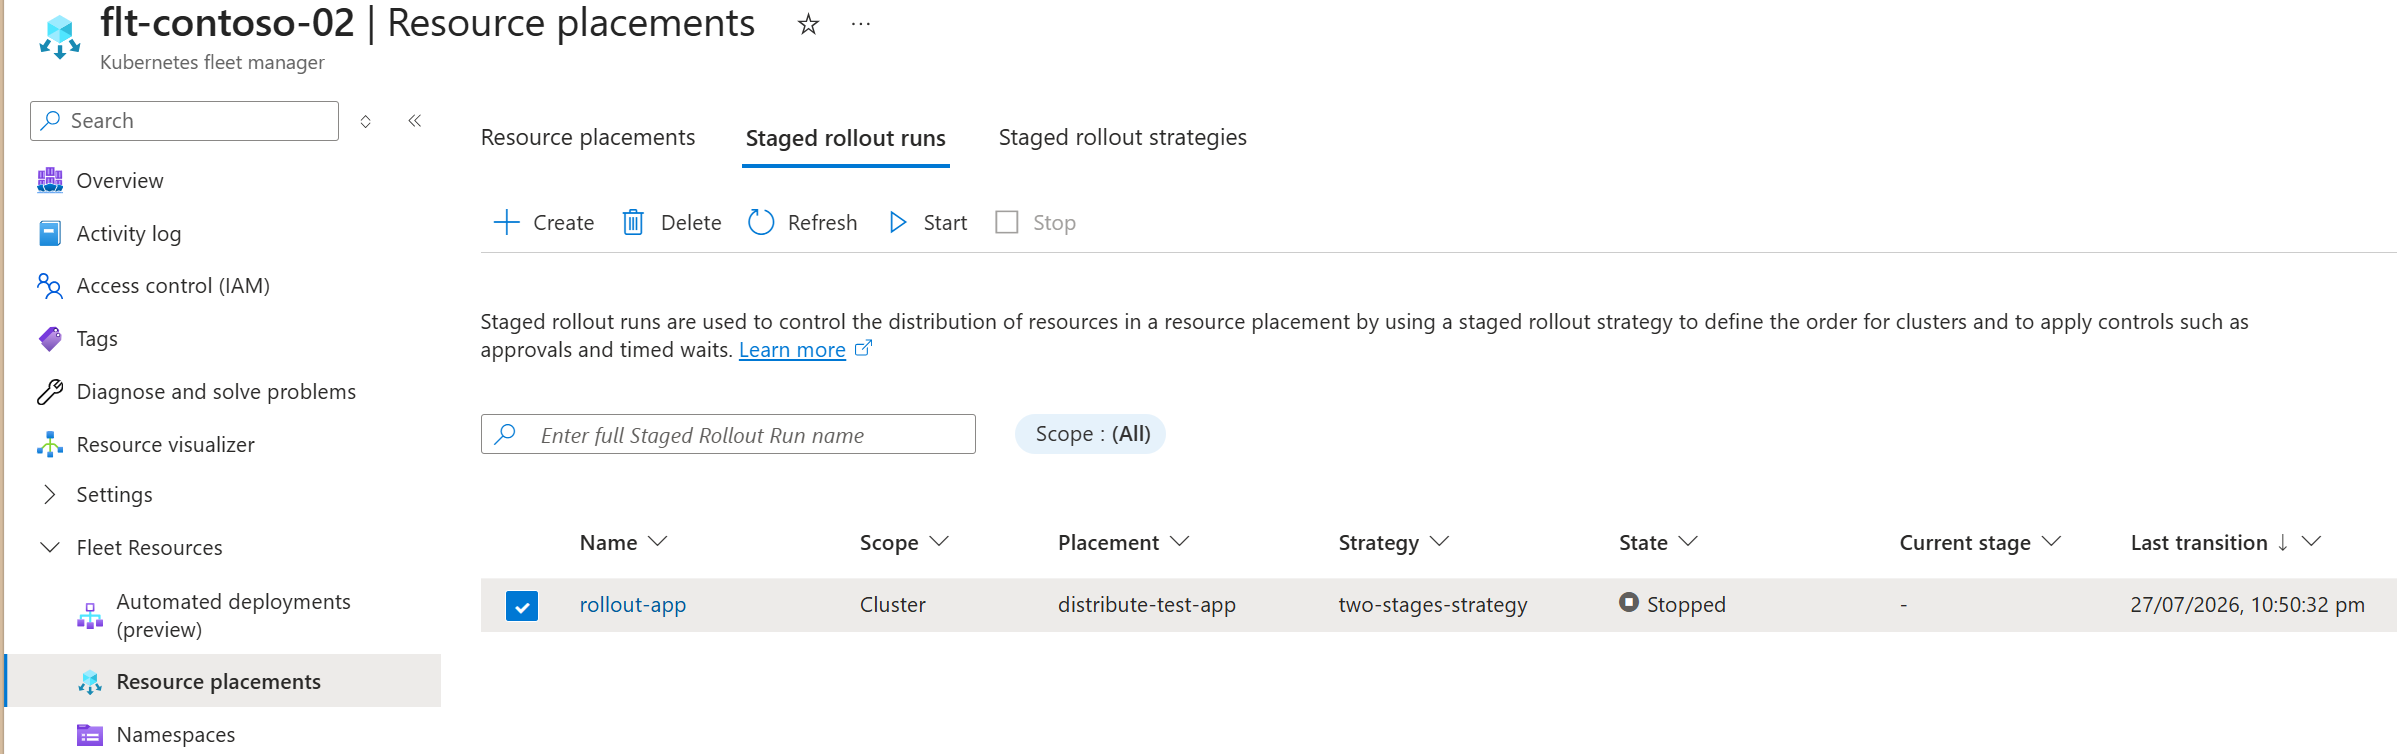
You can restart the rollout by following the instructions in Start a staged rollout.
Note
You can stop a rollout at any time. In-progress clusters continue to completion. Pending approvals stay unaffected.
Clear a pending stage approval
Add approval tasks before or after a stage. These tasks require an explicit action to clear.
When a staged rollout run reaches an approval, it creates an approval request (ClusterApprovalRequest or ApprovalRequest). You must patch this request. After you patch it, the rollout run continues.
Check for any pending approvals by using the following commands.
kubectl get clusterapprovalrequest
When checking for pending ApprovalRequest resources, make sure to provide the namespace in which the resources reside.
kubectl get clusterapprovalrequest -n test-app
If you receive a response of No resources found, then there are currently no cluster scoped approvals pending.
If there are pending approvals, the response should look similar to the following example.
NAME                                    UPDATE-RUN                STAGE    APPROVED   AGE
staged-rollout-test-app-before-canary   staged-rollout-test-app   canary              4m13s
Note
The system generates approval request resource names by using the format {update-run-name}-{before|after}-{stage-name}.
You can approve the ClusterApprovalRequest by creating a JSON patch file and applying it.
cat << EOF > approval.json
"status": {
    "conditions": [
        {
            "lastTransitionTime": "$(date -u +%Y-%m-%dT%H:%M:%SZ)",
            "message": "lgtm",
            "observedGeneration": 1,
            "reason": "testPassed",
            "status": "True",
            "type": "Approved"
        }
    ]
}
EOF
Note
Be sure the observedGeneration matches the generation of the approval object. This value is typically 1.
Submit a patch request to approve the request by using the JSON file you created.
kubectl patch clusterapprovalrequests staged-rollout-test-app-before-canary --type='merge' --subresource=status --patch-file approval.json
Verify the approval was applied to the request.
kubectl get clusterapprovalrequest staged-rollout-test-app-before-canary
Your output should look similar to the following. Note that APPROVED is set to True.
NAME                                    UPDATE-RUN                STAGE    APPROVED   AGE
staged-rollout-test-app-before-canary   staged-rollout-test-app   canary   True       6m
The rollout run continues.
kubectl get clusterstagedupdaterun staged-rollout-test-app
Your output should look similar to the following, which shows a completed run with SUCCEEDED set to True.
NAME                      PLACEMENT             RESOURCE-SNAPSHOT-INDEX   POLICY-SNAPSHOT-INDEX   INITIALIZED   PROGRESSING   SUCCEEDED   AGE
staged-rollout-test-app   distribute-test-app                             0                       True          False         True        9m
When a staged rollout run reaches an approval, use the following process to clear the approval so the run continues.
In the Azure portal, go to your Fleet Manager.
On the service menu, under Fleet Resources, select Staged rollout runs.
In the list, find the staged rollout run that has a state of Pending approval.
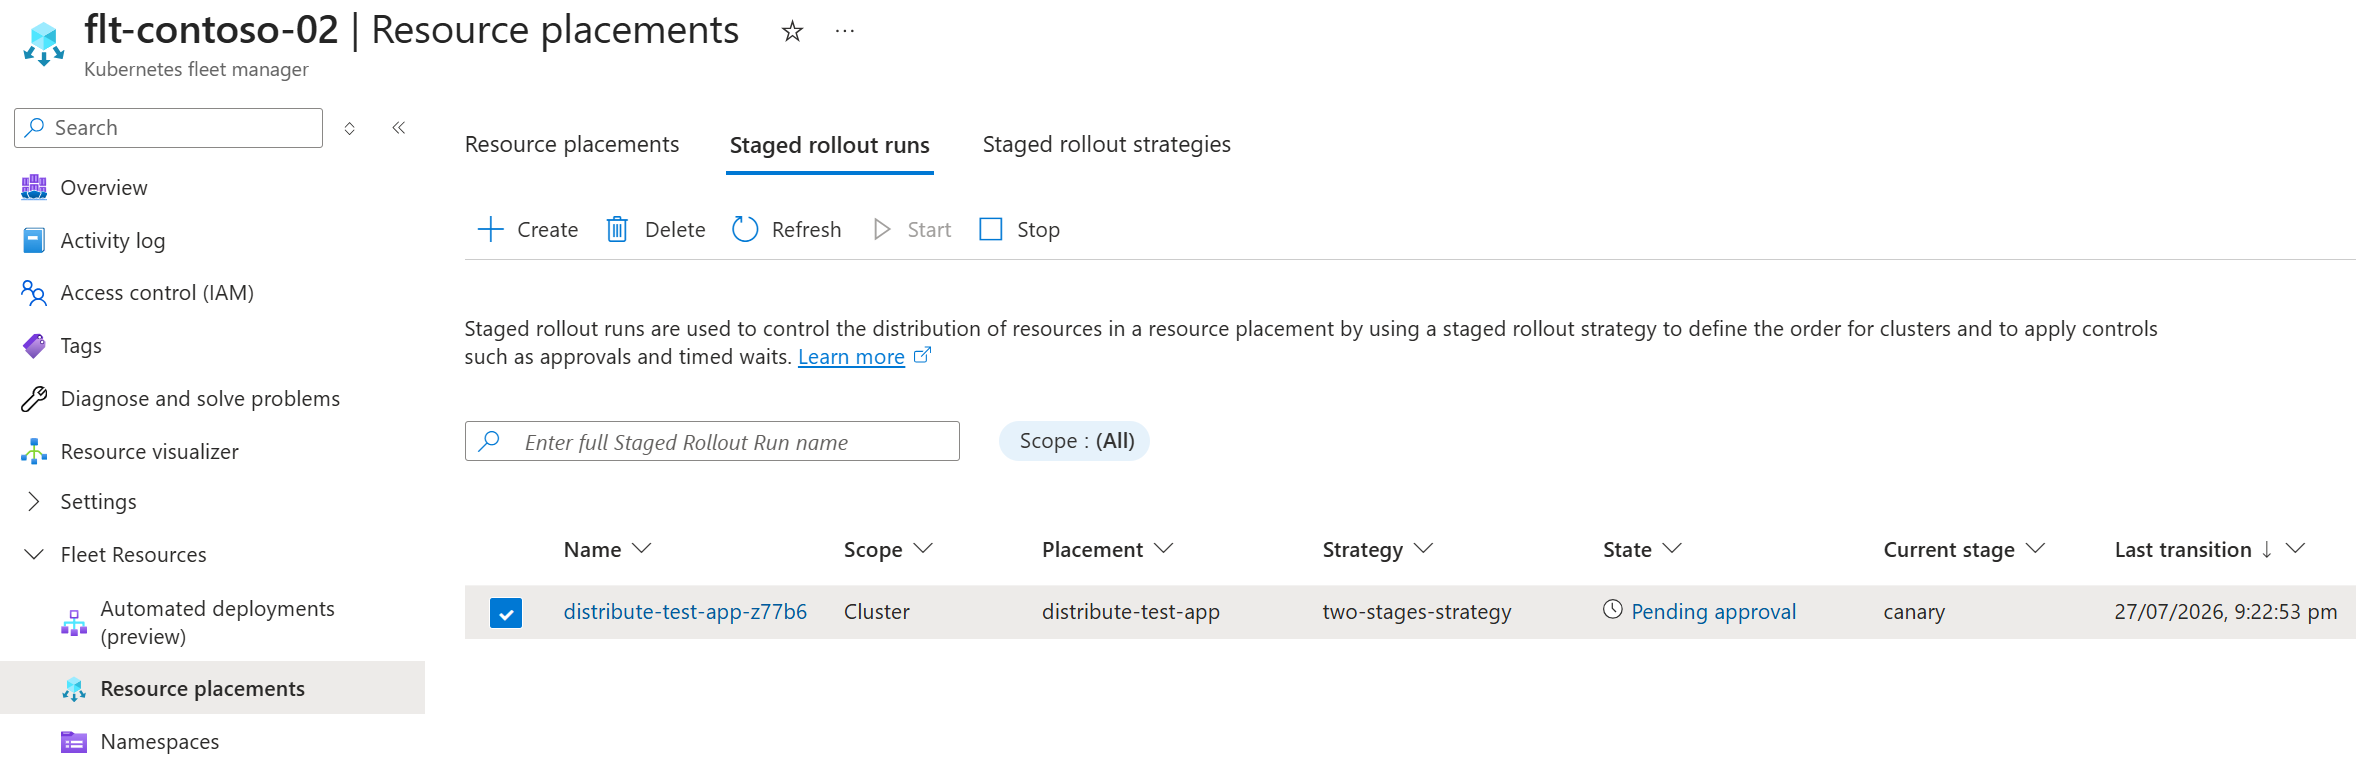
You can open the approval dialog from any of three locations:
- Inline in the staged rollout run list view (shown earlier).
- From the details view for the staged rollout run:
- From the State field in the Essentials section.
- Inline in the Stage view.
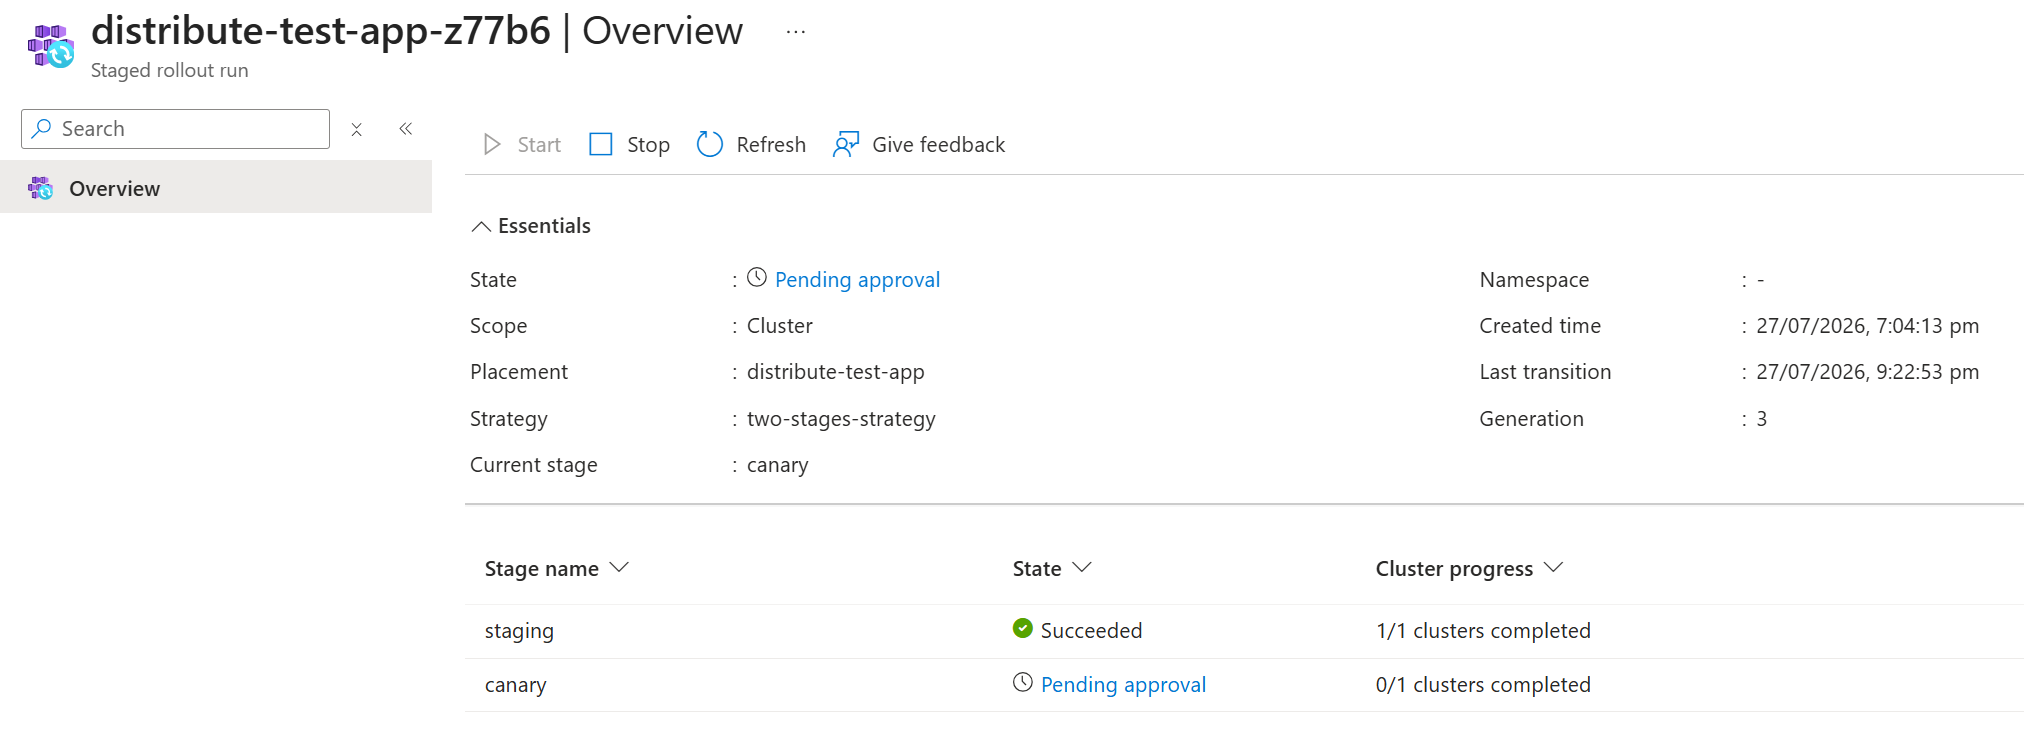
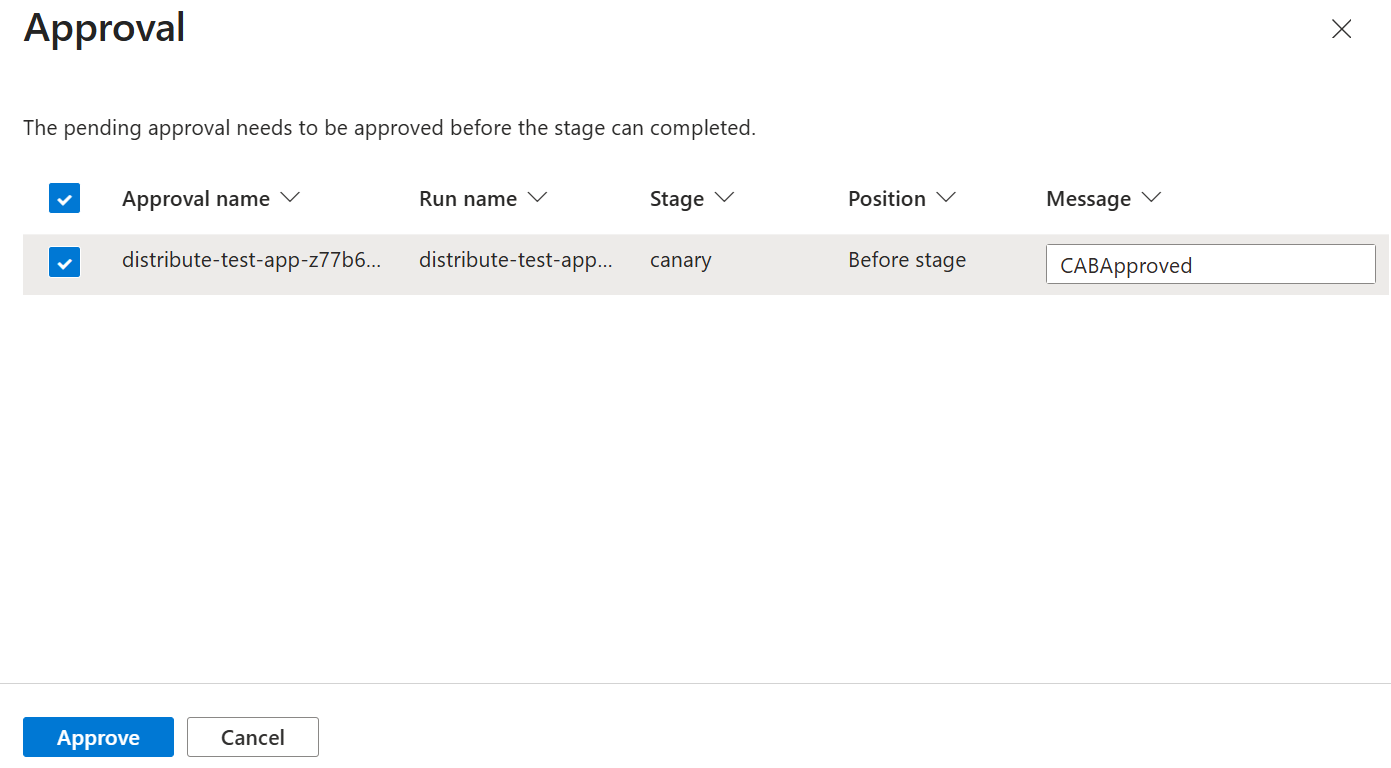
Select an option to open the Approval dialog. Enter an optional Message and choose Approve.
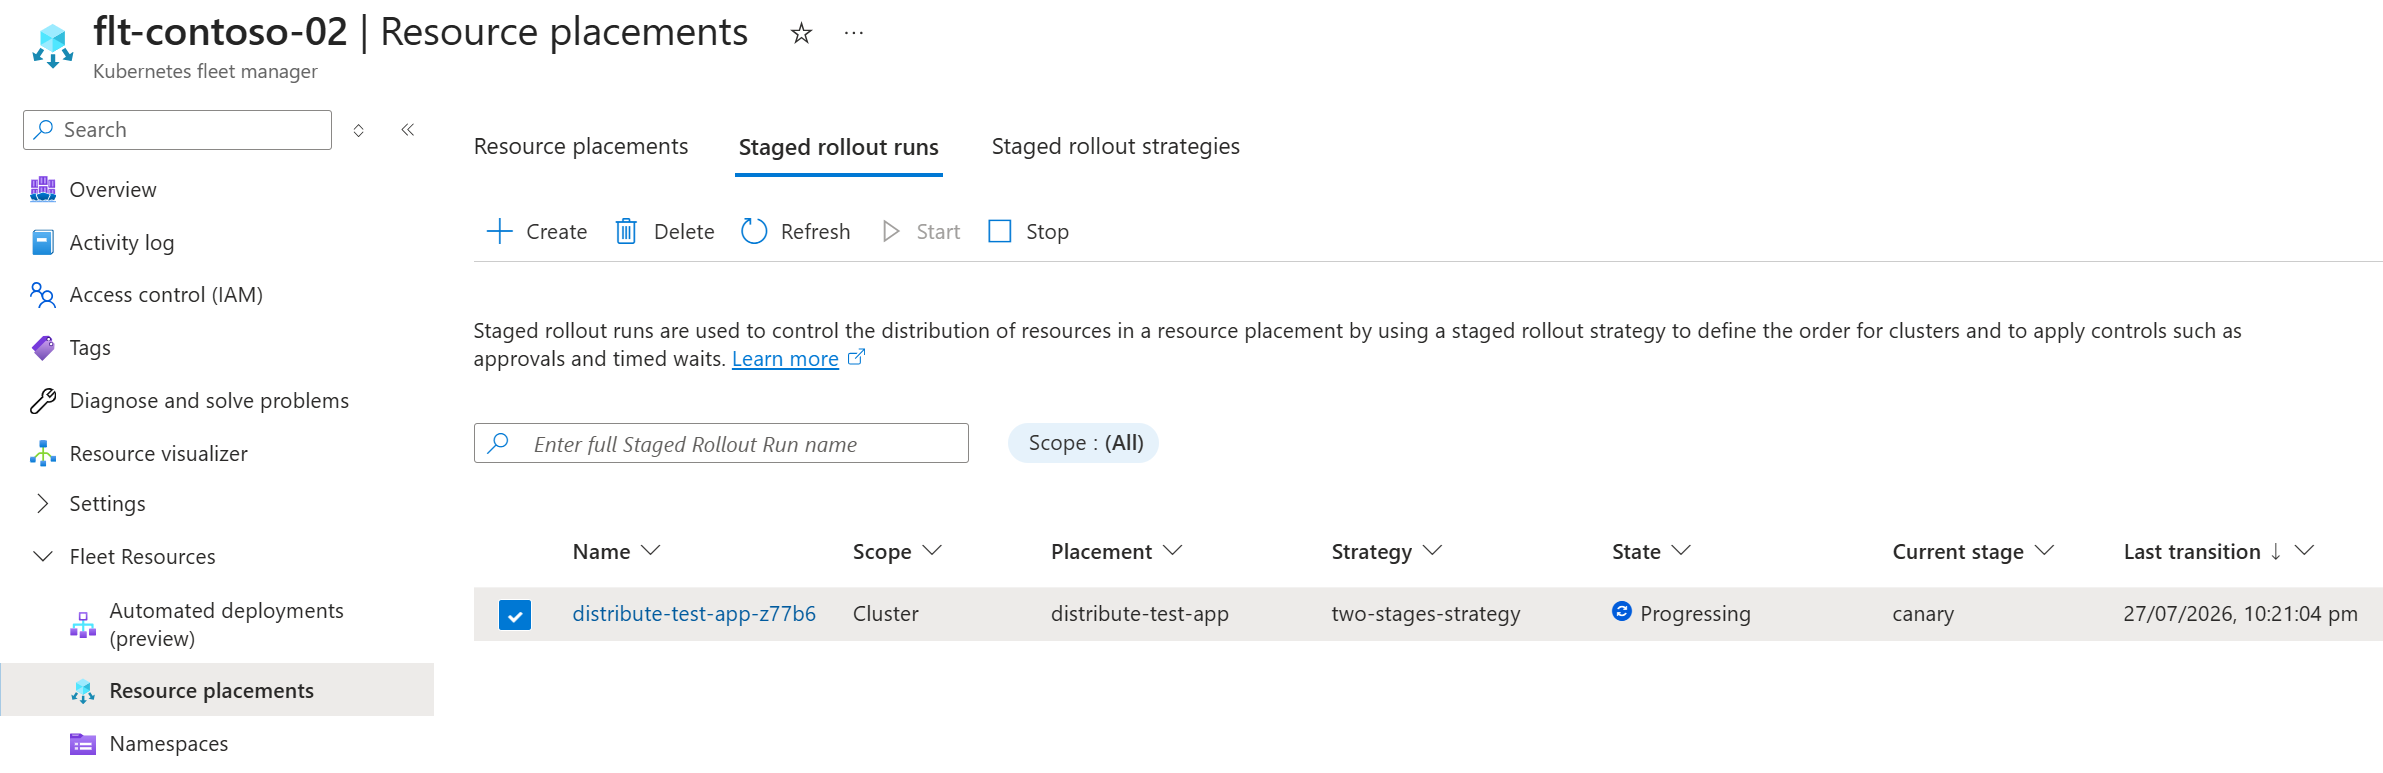
The page refreshes and the Staged rollout runs list displays the staged rollout run with the state of Progressing.
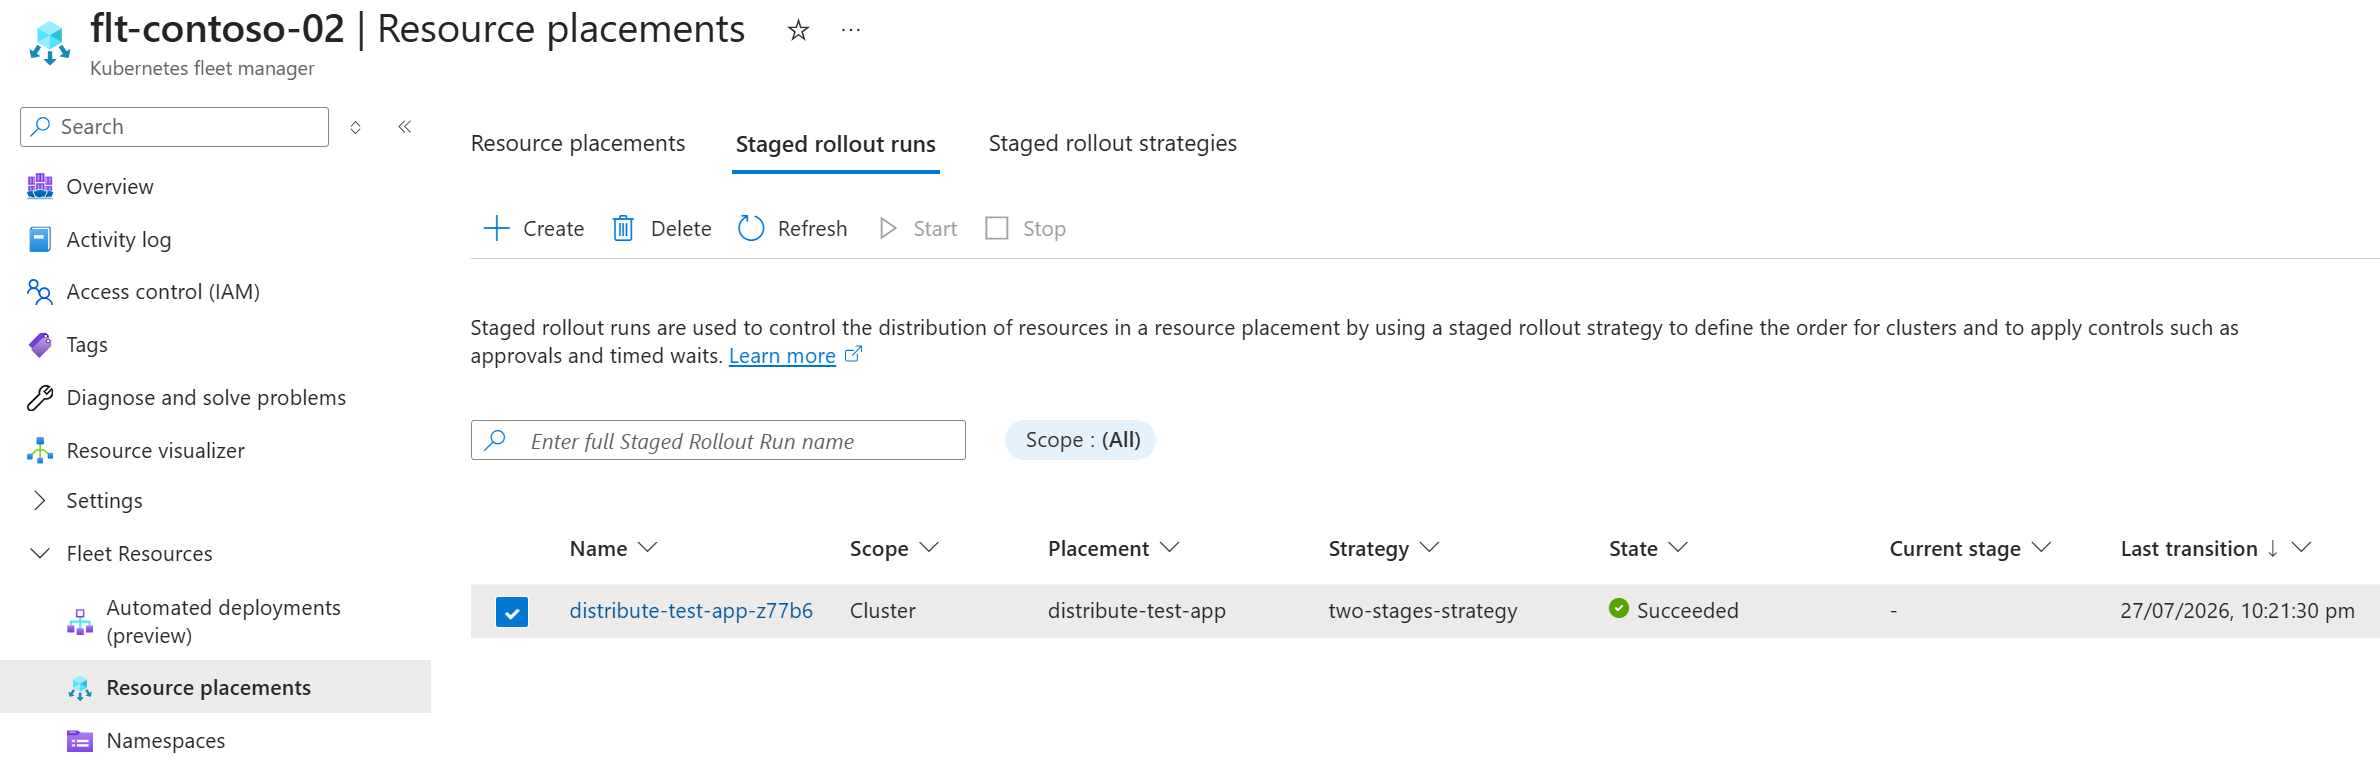
The staged rollout run continues until it finishes, with the Staged rollout runs list displaying the staged rollout run with the state of Succeeded.
Delete a rollout run
Remove a staged rollout run by deleting the Kubernetes resource on the Fleet Manager hub cluster.
kubectl delete clusterstagedupdaterun staged-rollout-test-app
In the Azure portal, go to your Fleet Manager.
On the service menu, under Fleet Resources, select Staged rollout runs.
In the list, select the staged rollout run to delete, and then choose Delete from the action menu.
In the Delete dialog, confirm the resource is correct, and then select Confirm delete. Finally, choose Delete.
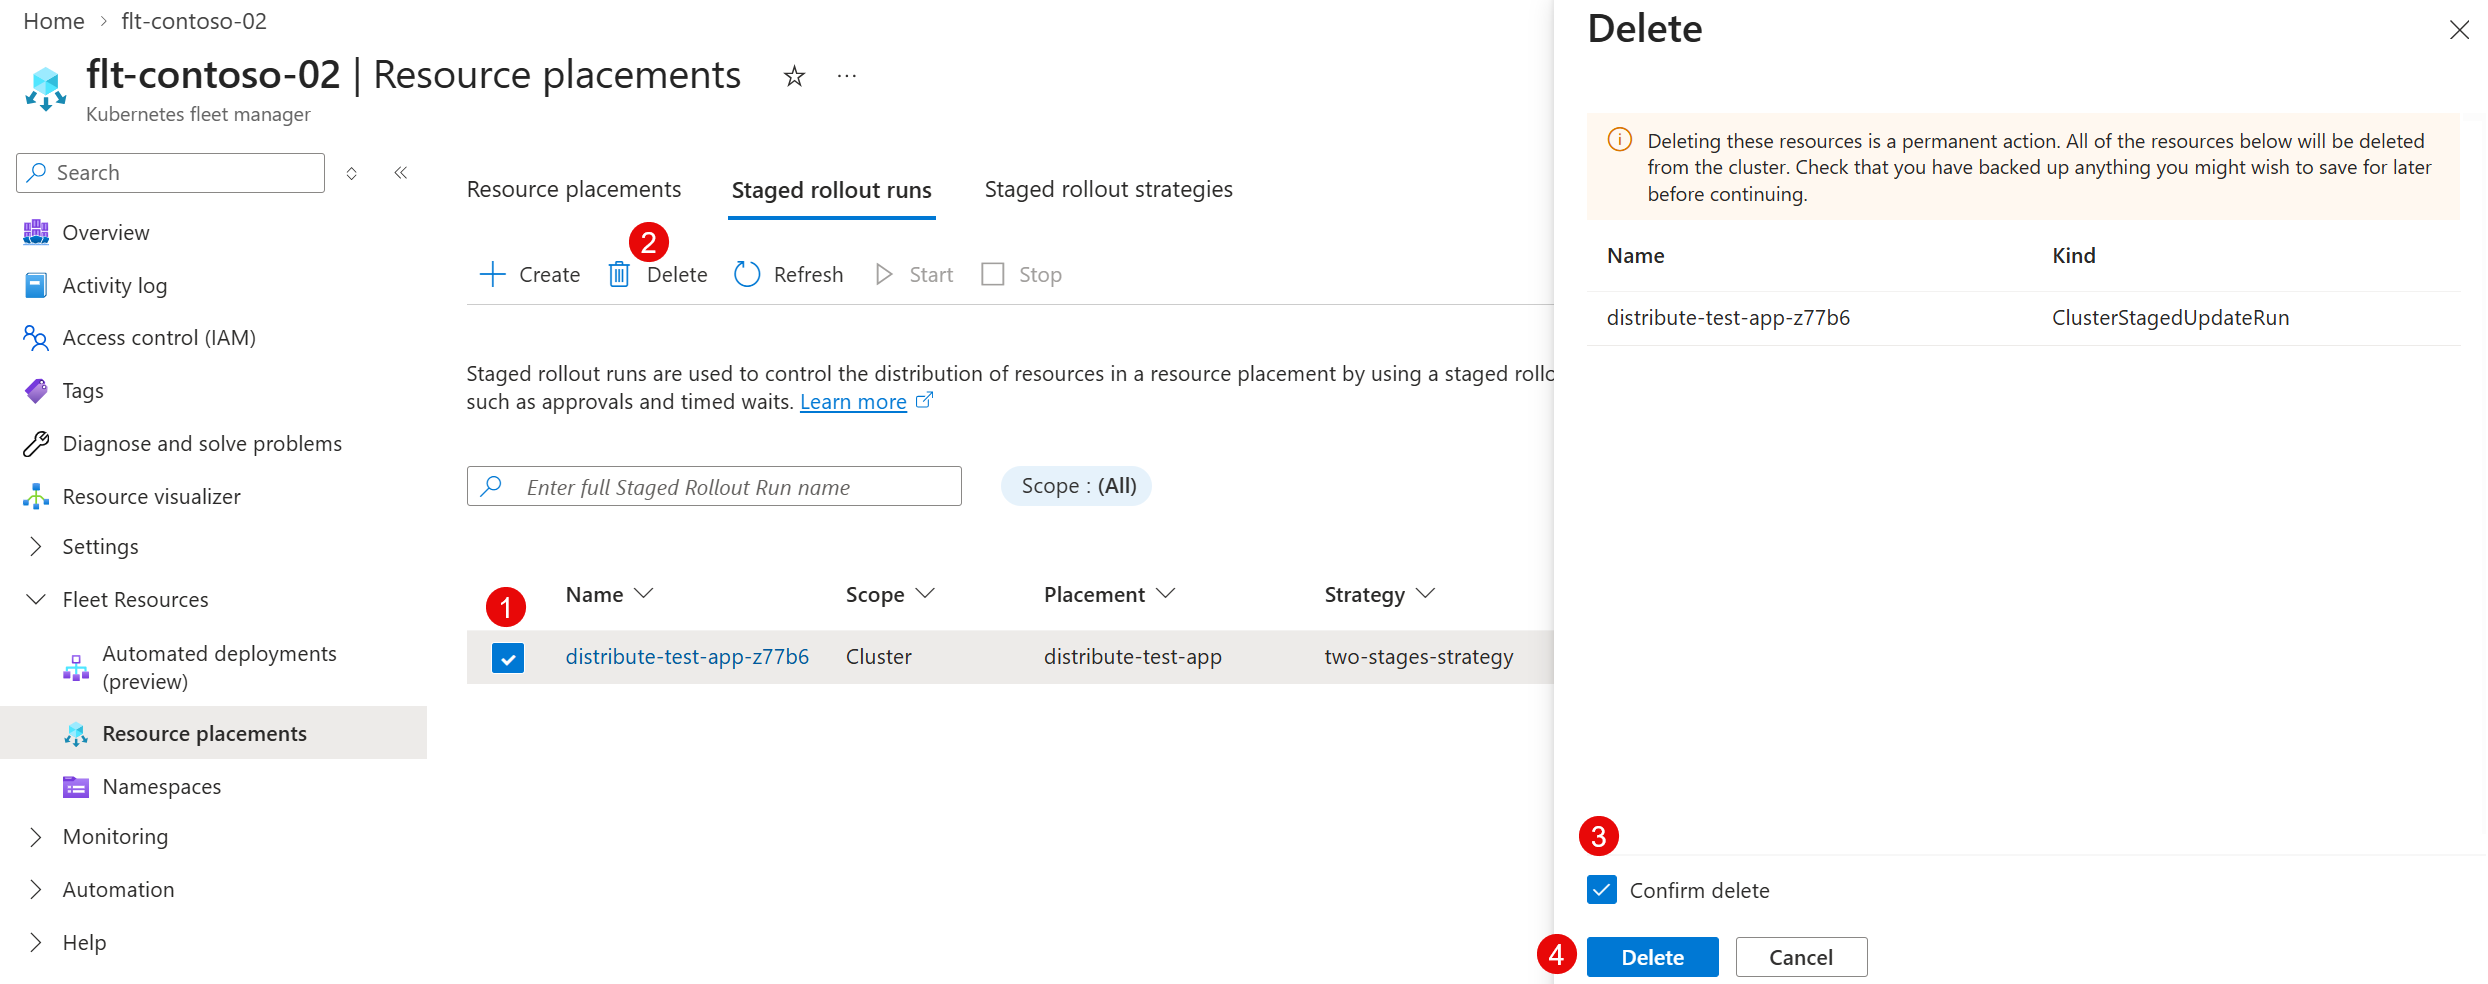
The page refreshes and the deleted staged rollout run is no longer present.
Note
Deleting a completed staged rollout run doesn't remove placed resources. To remove the placed resources, you must delete the resource placement.
Next steps
In this article, you learned how to use staged rollout runs to control the distribution of resources across member clusters by using resource placement.
To learn more about staged rollout runs and related concepts, see the following resources: