Note
Access to this page requires authorization. You can try signing in or changing directories.
Access to this page requires authorization. You can try changing directories.
Applies to: Azure Logic Apps (Consumption + Standard)
If your organization doesn't permit connecting to restricted or unapproved resources using their managed connectors in Azure Logic Apps, you can block the capability to create and use those connections in logic app workflows. With Azure Policy, you can define and enforce policies that prevent creating or using connections for connectors that you want to block. For example, for security reasons, you might want to block connections to specific social media platforms or other services and systems.
This guide shows you how to set up a policy that blocks specific connections by using the Azure portal. You can also create policy definitions in other ways. For example, you can use the Azure REST API, Azure PowerShell, Azure CLI, or Azure Resource Manager templates. For more information, see Create and manage policies to enforce compliance.
Prerequisites
An Azure account and subscription. If you don't have a subscription, create a trial Azure subscription.
The reference ID for the connector that you want to block. This guide shows how to find this reference ID.
Find connector reference ID
If you already have a logic app workflow with the connection that you want to block, skip this section. Otherwise, follow these steps to find the connector reference ID:
Find the ID using the connector reference doc
Review the list of all Azure Logic Apps managed connectors.
Find the reference page for the connector that you want to block.
For example, if you want to block the
Office 365 Outlookconnector, go to this page:https://learn.microsoft.com/connectors/office365/From the page's URL, copy and save the connector reference ID at the end without the forward slash (
/), for example,office365.Later, when you create your policy definition, you use this ID in the definition's condition statement, for example:
"like": "*managedApis/office365"
Find the ID using the Azure portal
In the Azure portal, open your logic app resource.
On the resource sidebar, select one of the following options:
Consumption logic app: Under Development Tools, select API connections.
Standard logic app: Under Workflows, select Connections. On the Connections pane, select API Connections if not already selected.
On the API connections page, select the connection. After the connection page opens, in the upper right corner, select JSON View.
Find the
apiobject, which contains anidproperty and value that has the following format:"id": "/subscriptions/{Azure-subscription-ID}/providers/Microsoft.Web/locations/{Azure-region}/managedApis/{connection-name}"The following example shows the
idproperty and value for anOffice 365 Outlookconnection:"id": "/subscriptions/aaaa0a0a-bb1b-cc2c-dd3d-eeeeee4e4e4e/providers/Microsoft.Web/locations/chinaeast2/managedApis/office365"- From the
idproperty value, copy and save the connector reference ID, which appears at the end, for example,office365.
Later, when you create your policy definition, you use this ID in the definition's condition statement, for example:
"like": "*managedApis/office365"- From the
Block creating connections
To block creating a connection in a workflow, follow these steps:
In the Azure portal search box, enter policy, and select Policy.
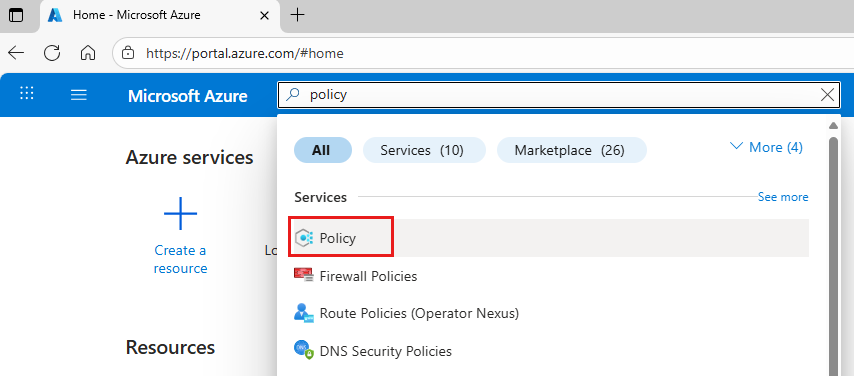
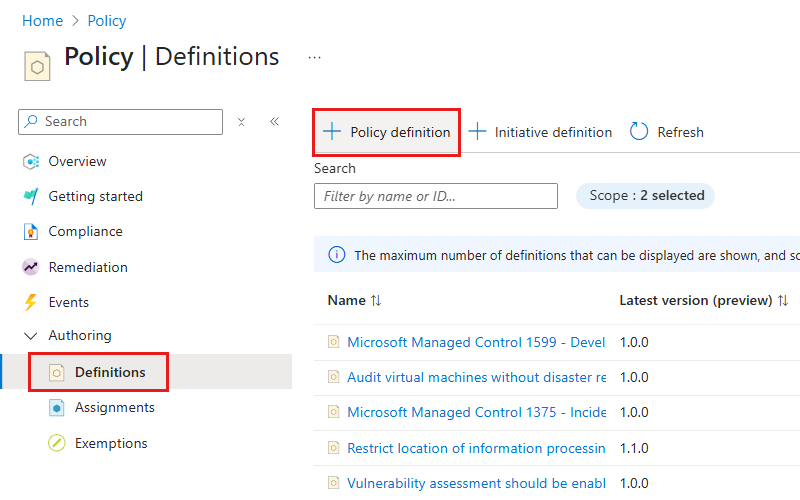
On the Policy menu, under Authoring, select Definitions. On the Definitions toolbar, select Policy definition.
On the Policy definition page, provide the information for your policy definition, based on the properties in the table that follow the image:
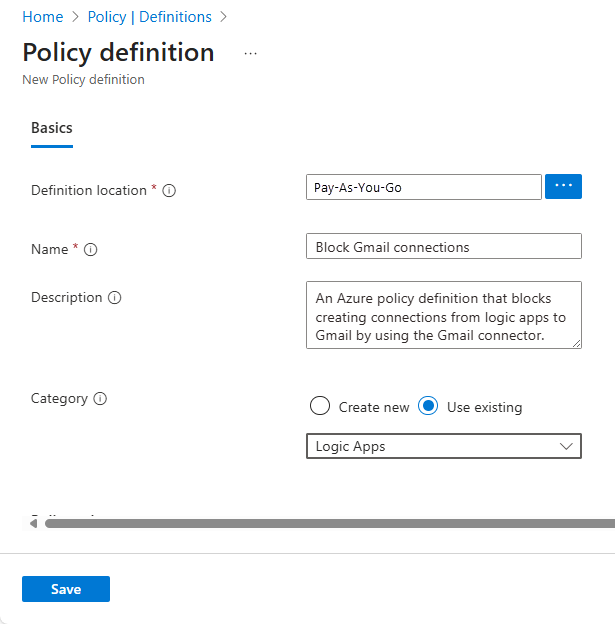
Parameter Required Value Description Definition location Yes <Azure-subscription-name> The Azure subscription to use for the policy definition
1. To find your subscription, select the ellipses (...).
2. From the Subscription list, find and select your subscription.
3. When you're done, select Select.Name Yes <policy-definition-name> The name to use for the policy definition. Description No <policy-definition-name> A description for the policy definition. Category Yes Logic apps The name for an existing category or new category for the policy definition. Under Policy rule, the JSON edit box is prepopulated with a policy definition template. Replace this template with your policy definition based on the properties described in the following table and using this syntax:
{
   "mode": "All",
   "policyRule": {
      "if": {
         "field": "Microsoft.Web/connections/api.id",
         "like": "*managedApis/{connector-name}"
      },
      "then": {
         "effect": "deny"
      }
   },
   "parameters": {}
 }
Keyword Value Description modeAllThe mode that determines the resource types that the policy evaluates.
This scenario setsmodetoAll, which applies the policy to Azure resource groups, subscriptions, and all resource types.
For more information, see Policy definition structure - mode.if{condition-to-evaluate}The condition that determines when to enforce the policy rule
In this scenario, the{condition-to-evaluate}determines whether theapi.idvalue inMicrosoft.Web/connections/api.idmatches on*managedApis/{connector-name}, which specifies a wildcard (*) value.
For more information, see Policy definition structure - Policy rule.fieldMicrosoft.Web/connections/api.idThe fieldvalue to compare against the condition
In this scenario, thefielduses the alias,Microsoft.Web/connections/api.id, to access the value in the connector property,api.id.like*managedApis/{connector-name}The logical operator and value to use for comparing the fieldvalue
In this scenario, thelikeoperator and the wildcard (*) character both make sure that the rule works regardless of region, and the string,*managedApis/{connector-name}, is the value to match where{connector-name}is the ID for the connector that you want to block.
For example, suppose that you want to block creating connections to databases:
- SQL Server or Azure SQL:sql
To find these connector IDs, see Find connector reference ID earlier in this article.then{effect-to-apply}The effect to apply when the ifcondition is met
In this scenario, the{effect-to-apply}is to block and fail a request or operation that doesn't comply with the policy.
For more information, see Policy definition structure - Policy rule.effectdenyThe effectis to block the request, which is to create the specified connection
For more information, see Understand Azure Policy effects - Deny.For example, suppose that you want to block creating connections with the
Office 365 Outlookconnector. Here's the policy definition that you can use:{ "mode": "All", "policyRule": { "if": { "field": "Microsoft.Web/connections/api.id", "like": "*managedApis/office365" }, "then": { "effect": "deny" } }, "parameters": {} }Here's the way that the Policy rule box appears:

For multiple connectors, you can add more than one condition, for example:
{
   "mode": "All",
   "policyRule": {
      "if": {
         "anyOf": [
            {
               "field": "Microsoft.Web/connections/api.id",
               "like": "*managedApis/office365"
            },
            {
               "field": "Microsoft.Web/connections/api.id",
               "like": "*managedApis/office365users"
            },
            {
               "field": "Microsoft.Web/connections/api.id",
               "like": "*managedApis/office365video"
            },
            {
               "field": "Microsoft.Web/connections/api.id",
               "like": "*managedApis/pinterest"
            }
         ]
      },
      "then": {
         "effect": "deny"
      }
   },
   "parameters": {}
 }
When you're done, select Save.
After you save the policy definition, Azure Policy generates and adds more property values to the policy definition.
To assign the policy definition where you want to enforce the policy, create a policy assignment, as described later in this article.
For more information about Azure Policy definitions, see:
- Azure Policy definition structure
- Create and manage policies to enforce compliance
- Azure Policy built-in policy definitions for Azure Logic Apps
Block associating connections with logic apps
When you create a connection in a workflow, this connection exists as separate Azure resource. If you delete only the workflow or logic app resource, the connection resource isn't automatically deleted and continues to exist until deleted. You might have a scenario where the connection resource already exists or where you have to create the connection resource for use outside the logic app resource.
You can still block the capability to associate the connection with a different logic app resource by creating a policy that prevents saving workflows that try to use the restricted or unapproved connection. This policy affects only workflows that don't already use the connection.
In the Azure portal search box, enter policy, and select Policy.
On the Policy menu, under Authoring, select Definitions. On the Definitions page toolbar, select Policy definition.
Under Policy definition, provide the information for your policy definition, based on the properties in the table that follows the image.
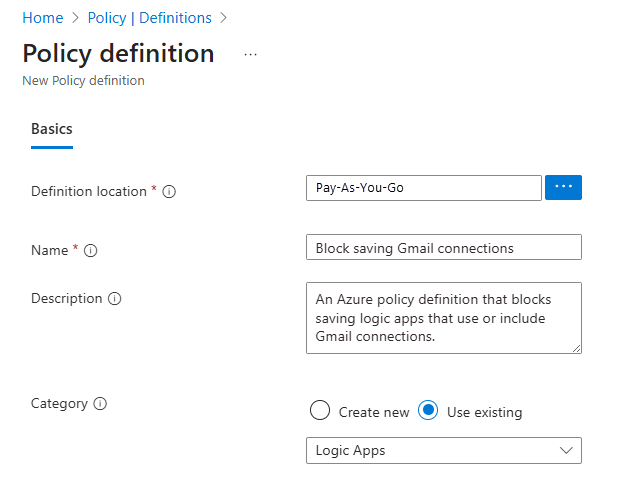
Parameter Required Value Description Definition location Yes <Azure-subscription-name> The Azure subscription to use for the policy definition
1. To find your subscription, select the ellipses (...) button.
2. From the Subscription list, find and select your subscription.
3. When you're done, select Select.Name Yes <policy-definition-name> The name to use for the policy definition Description No <policy-definition-name> A description for the policy definition Category Yes Logic apps The name for an existing category or new category for the policy definition Under Policy Rule, the JSON edit box is prepopulated with a policy definition template. Replace this template with your policy definition based on the properties described in the following table and using this syntax:
{
   "mode": "All",
   "policyRule": {
      "if": {
         "value": "[string(field('Microsoft.Logic/workflows/parameters'))]",
         "contains": "{connector-name}"
      },
      "then": {
         "effect": "deny"
      }
   },
   "parameters": {}
 }
Keyword Value Description modeAllThe mode that determines the resource types that the policy evaluates.
This scenario setsmodetoAll, which applies the policy to Azure resource groups, subscriptions, and all resource types.
For more information, see Policy definition structure - mode.if{condition-to-evaluate}The condition that determines when to enforce the policy rule
In this scenario, the{condition-to-evaluate}determines whether the string output from[string(field('Microsoft.Logic/workflows/parameters'))], contains the string,{connector-name}.
For more information, see Policy definition structure - Policy rule.value[string(field('Microsoft.Logic/workflows/parameters'))]The value to compare against the condition
In this scenario, thevalueis the string output from[string(field('Microsoft.Logic/workflows/parameters'))], which converts the$connectorsobject inside theMicrosoft.Logic/workflows/parametersobject to a string.contains{connector-name}The logical operator and value to use for comparing with the valueproperty
In this scenario, thecontainsoperator makes sure that the rule works regardless where{connector-name}appears, where the string,{connector-name}, is the ID for the connector that you want to restrict or block.
For example, suppose that you want to block using connections to databases:
- SQL Server or Azure SQL:sql
To find these connector IDs, see Find connector reference ID earlier in this article.then{effect-to-apply}The effect to apply when the ifcondition is met
In this scenario, the{effect-to-apply}is to block and fail a request or operation that doesn't comply with the policy.
For more information, see Policy definition structure - Policy rule.effectdenyThe effectis todenyor block the request to save a logic app that uses the specified connection
For more information, see Understand Azure Policy effects - Deny.For example, suppose that you want to block saving logic apps that use
Office 365 Outlookconnections. Here is the policy definition that you can use:{ "mode": "All", "policyRule": { "if": { "value": "[string(field('Microsoft.Logic/workflows/parameters'))]", "contains": "office365" }, "then": { "effect": "deny" } }, "parameters": {} }Here's the way that the policy definition rule appears:

When you're done, select Save.
After you save the policy definition, Azure Policy generates and adds more property values to the policy definition.
To assign the policy definition where you want to enforce the policy, create a policy assignment, as described later in this guide.
For more information about Azure Policy definitions, see:
- Azure Policy definition structure
- Create and manage policies to enforce compliance
- Azure Policy built-in policy definitions for Azure Logic Apps
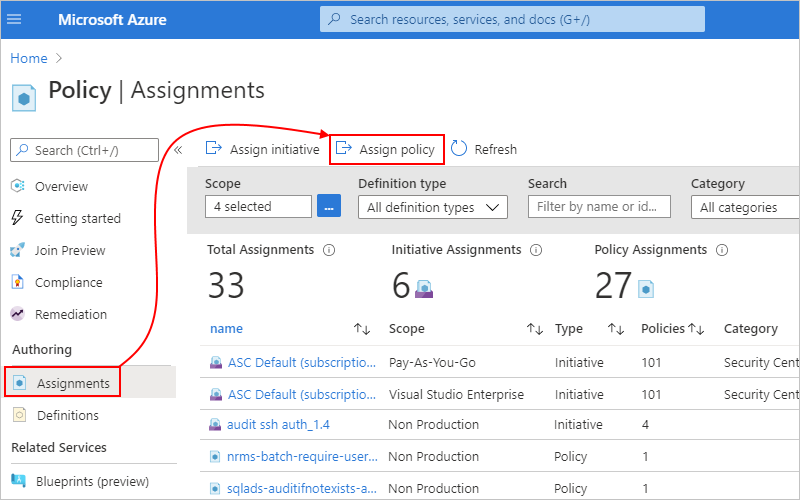
Create policy assignment
You need to assign the policy definition where you want to enforce the policy. For example, you might assign the policy definition to a single resource group, multiple resource groups, a Microsoft Entra tenant, or an Azure subscription. For this task, follow these steps to create a policy assignment:
In the Azure portal search box, enter policy, and select Policy.
On the Policy menu, under Authoring, select Assignments. On the Assignments toolbar, select Assign policy.
On the Assign policy page, under Basics, provide this information for the policy assignment:
Parameter Required Description Scope Yes The resources where you want to enforce the policy assignment.
1. Next to the Scope box, select the ellipses (...) button.
2. From the Subscription list, select the Azure subscription.
3. Optionally, from the Resource Group list, select the resource group.
4. When you're done, select Select.Exclusions No Any Azure resources to exclude from the policy assignment.
1. Next to the Exclusions box, select the ellipses (...) button.
2. From the Resource list, select the resource > Add to Selected Scope.
3. When you're done, select Save.Resource selectors No Policy definition Yes The name for the policy definition that you want to assign and enforce. This example continues with the example Office 365 Outlookpolicy, "BlockOffice 365 Outlookconnections".
1. Next to the Policy definition box, select the ellipses (...) button.
2. Find and select the policy definition by using the Type filter or Search box.
3. When you're done, select Select.Overrides No Assignment name Yes The name to use for the policy assignment, if different from the policy definition. Description No A description for the policy assignment. Policy enforcement Yes The setting that enables or disables the policy assignment. For example, to assign the policy to an Azure resource group by using the
Office 365 Outlookexample: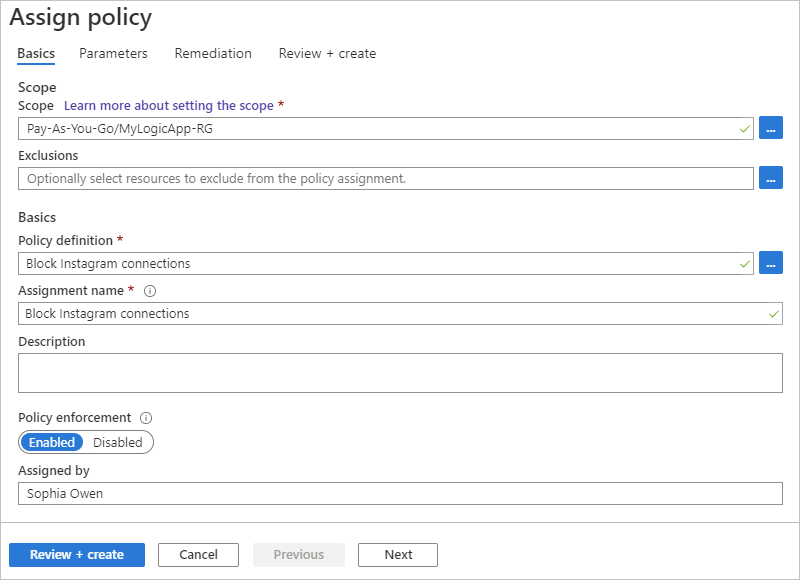
When you're done, select Review + create.
After you create a policy, you might have to wait up to 15 minutes before the policy takes effect. Changes might also have similar delayed effects.

After the policy takes effect, test your policy in the next section.
For more information, see Quickstart: Create a policy assignment to identify noncompliant resources.
Test the policy
To try your policy, start creating a connection by using the now restricted connector in the workflow designer. Continuing with the Office 365 Outlook example, when you sign in to Office 365 Outlook, you get this error that your workflow failed to create the connection.
The error message includes this information:
| Description | Content |
|---|---|
| Reason for the failure | "Resource Office 365 Outlook was disallowed by policy." |
| Assignment name | "Block Office 365 Outlook connections" |
| Assignment ID | "/subscriptions/aaaa0a0a-bb1b-cc2c-dd3d-eeeeee4e4e4e/resourceGroups/MyLogicApp-RG/providers/Microsoft.Authorization/policyAssignments/4231890fc3bd4352acb0b673" |
| Policy definition ID | "/subscriptions/aaaa0a0a-bb1b-cc2c-dd3d-eeeeee4e4e4e/providers/Microsoft.Authorization/policyDefinitions/aaaa0a0a-bb1b-cc2c-dd3d-eeeeee4e4e4e" |
Related content
- Learn more about Azure Policy