Note
Access to this page requires authorization. You can try signing in or changing directories.
Access to this page requires authorization. You can try changing directories.
Applies to: Azure Logic Apps (Consumption + Standard)
This how-to guide shows how to create an example logic app workflow that generates schemas for SAP artifacts. The workflow starts with a Request trigger that can receive HTTP POST requests from your SAP server. The workflow then generates schemas for the specified IDoc and BAPI by using the SAP action named Generate schemas that sends a request to your SAP server. To send this request, you can use either the generic SAP managed connector action named Send message to SAP, or you can use the specific SAP managed or built-in action named [BAPI] Call method in SAP. This SAP action returns an XML schema without the contents or data in the XML document itself. The workflow then uploads the schemas returned by the response to an integration account by using an Azure Resource Manager connector operation.
Schemas contain the following parts:
| Component | Description |
|---|---|
| Request message structure | Use this information to form your BAPI get list. |
| Response message structure | Use this information to parse the response. |
Both Standard and Consumption logic app workflows offer the SAP managed connector, which is hosted and run in multitenant Azure. Standard workflows also offer the SAP built-in connector, which is hosted and run in single-tenant Azure Logic Apps. For more information, see Connector technical reference.
Prerequisites
Before you start, make sure to review and meet the SAP connector requirements for your specific scenario.
If you want to upload your generated schemas to a repository, such as an integration account, make sure that the repository exists.
Generate schemas for an SAP artifact
The following example logic app workflow triggers when the workflow's SAP trigger receives a request from an SAP server. The workflow then runs an SAP action that generates schemas for the specified SAP artifact.
Add the Request trigger
To have your workflow receive requests from your SAP server over HTTP, you can use the Request built-in trigger. This trigger creates an endpoint with a URL where your SAP server can send HTTP POST requests to your workflow. When your workflow receives these requests, the trigger fires and runs the next step in your workflow.
Based on whether you have a Consumption or Standard workflow, follow the corresponding steps.
In the Azure portal, open your Consumption logic app resource and blank workflow in the designer.
In the designer, follow these general steps to find and add the Request built-in trigger named When a HTTP request is received.
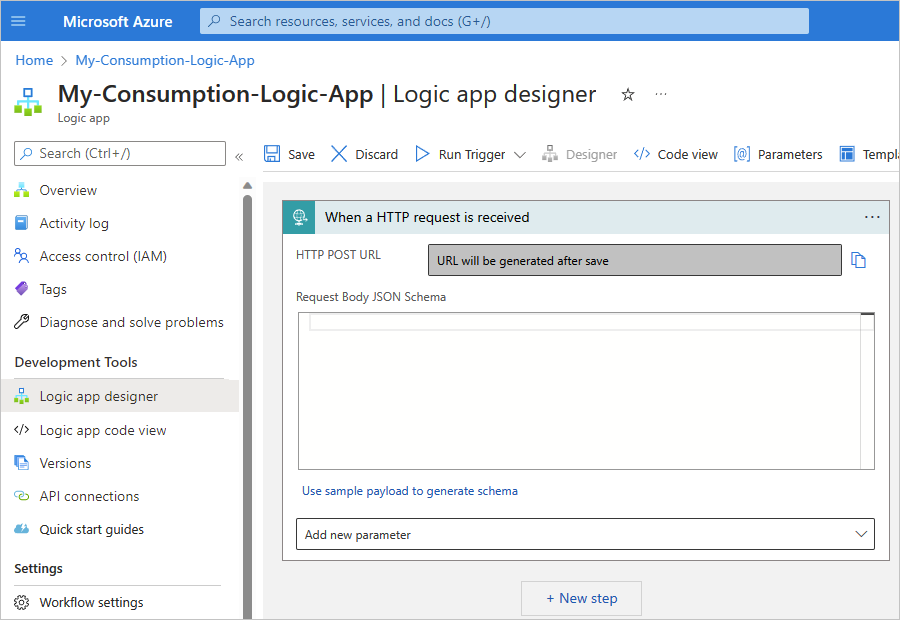
Save your workflow. On the designer toolbar, select Save.
This step generates an endpoint URL where your trigger can receive requests from your SAP server, for example:


Add an SAP action to generate schemas
Based on whether you have a Consumption or Standard workflow, follow the corresponding steps.
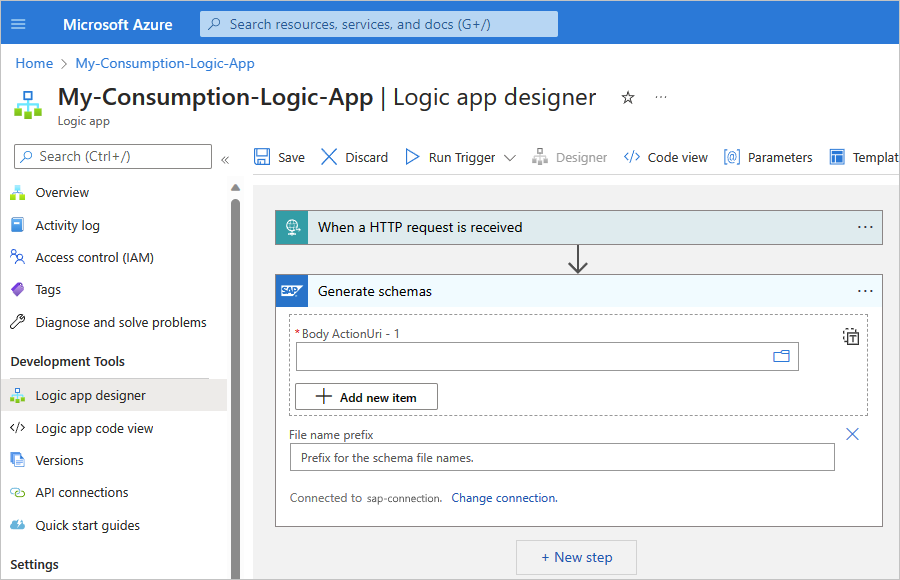
In the workflow designer, under the Request trigger, follow these general steps to find and add the SAP managed action named Generate schemas.
For more information about this SAP managed action, see Generate schemas.
If prompted, provide the connection information for your on-premises SAP server. When you're done, select Create new. Otherwise, continue to the next step to set up the SAP action.
By default, when you create a connection for an SAP managed operation, strong typing is used to check for invalid values by performing XML validation against the schema. This behavior can help you detect issues earlier. For more information about strong typing, see Safe Typing setting. For other available connection parameters, see Default connection information.
After Azure Logic Apps sets up and tests your connection, the action information pane appears.
Note
If you get a Bad Gateway (500) error or Bad request (400) error, see 500 Bad Gateway or 400 Bad Request error. For more information about any connection problems that might happen, see Troubleshoot connections.
In the Generate schemas action, provide a path to the SAP action for which you want to generate a schema.
This example uses the following sample path for the SAP action named Send:
http://Microsoft.LobServices.Sap/2007/03/Idoc/3/ORDERS05//720/Send
Tip
In the sapActionsUris section, you can use the expression editor to provide parameter values. This approach lets you use the same SAP action for different message types.
For more information about the Send SAP action, see Message schemas for IDoc operations.
If you have the option to browse and select the folders along this path, follow these steps:
From the sapActionUris Item - 1 dropdown list, select BAPI, IDOC, RFC, or TRFC.
This example selects IDOC. If you select a different operation type, the available parameters change based on your selection.
Browse the SAP folders by using the arrows to find and select the SAP action to use.
This example selects ORDERS > ORDERS05 > 720 > Send.
To generate schemas for more than one action, in the sapActionUris section, select Add new item.
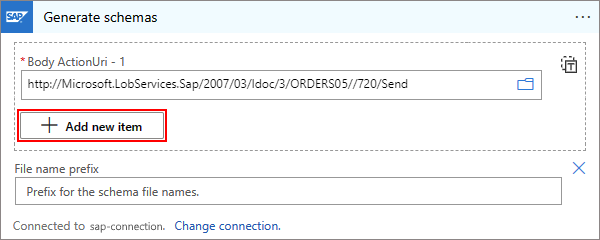
For each SAP action that you want to generate a schema, provide the path to that action, for example:

Save your workflow. On the designer toolbar, select Save.


Test your workflow for schema generation
Based on whether you have a Consumption or Standard workflow, follow the corresponding steps.
If your Consumption logic app resource isn't already enabled, on your logic app menu, select Overview. On the toolbar, select Enable.
On the designer toolbar, select Run > Run to manually start your workflow.
To simulate a webhook trigger payload and trigger the workflow, send an HTTP request to the endpoint URL created by your workflow's Request trigger, including the method that the Request trigger expects, by using your HTTP request tool and its instructions. Make sure to include your message content with your request.
This example uses the POST method and the endpoint URL to send an IDoc file, which must be in XML format and include the namespace for the SAP action that you selected, for example:
<?xml version="1.0" encoding="UTF-8" ?>
<Send xmlns="http://Microsoft.LobServices.Sap/2007/03/Idoc/2/ORDERS05//720/Send">
  <idocData>
    <...>
  </idocData>
</Send>
After you send your HTTP request, wait for the response from your workflow.
Note
Your workflow might time out if all the steps required for the response don't finish within the request time-out limit. If this condition happens, requests might get blocked. To help you diagnose problems, learn how you can check workflow status and view run history in Azure Logic Apps.
On the logic app menu, select Overview. On the Run history tab, select the workflow run.
Select the Generate schemas action to review the action's outputs.
The outputs show the generated schemas for the specified messages.
For more information about reviewing workflow run history, see Check workflow status, view run history, and set up alerts in Azure Logic Apps.
Upload schemas to an integration account
Optionally, you can download or store the generated schemas in repositories, such as an integration account or Azure storage account like a blob container. Integration accounts provide a first-class experience with XML actions for workflows in Azure Logic Apps. You can optionally upload generated schemas to an existing integration account within the same workflow that generates those schemas by using the Azure Resource Manager action named Create or update a resource.
Note
Schemas use base64-encoded format. To upload schemas to an integration account, you must decode them first
by using the base64ToString() function. The following example shows the code for the properties element:
"properties": {
   "Content": "@base64ToString(items('For_each')?['Content'])",
   "ContentType": "application/xml",
   "SchemaType": "Xml"
}
For this task, you need an integration account, if you don't already have one. Follow the corresponding steps based on whether you have a Consumption or Standard workflow. The procedure uploads schemas to an integration account from your workflow after schema generation.
In the workflow designer, under the Generate schemas action, follow these general steps to add the Azure Resource Manager managed action named Create or update a resource.
If you're prompted to sign in, do that now and continue.
After Azure Logic Apps sets up and tests your connection, the action information pane appears:

In the Create or update a resource action, provide the required information.
You can include any outputs from previous steps in the workflow. Select inside the parameter where you want to include the output. Select the lightning icon to open the dynamic content list, and select the output to include.
If the Location and Properties parameters don't appear on the Parameters tab, open the Advanced parameters list, and add those parameters.
Provide values for the added parameters, for example:

The Generate schemas action generates schemas as a collection, so the designer automatically adds a For each loop around the Azure Resource Manager action, for example:

Save your workflow. On the designer toolbar, select Save.


Test your workflow
Follow theses general steps to manually test and run your workflow. Use the procedure that corresponds to your Consumption workflow in multitenant Azure Logic Apps or Standard workflow in single-tenant Azure Logic Apps.
After a successful run, go to the integration account, and confirm the generated schemas exist.
Sample XML schemas
If you're learning how to generate an XML schema for use in creating a sample document, review the following samples. These examples show how you can work with many types of payloads, including:
- RFC requests
- BAPI requests
- IDoc requests
- Simple or complex XML schema data types
- Table parameters
- Optional XML behaviors
You can begin your XML schema with an optional XML prolog. The SAP connector works with or without the XML prolog.
<?xml version="1.0" encoding="utf-8">
XML samples for RFC requests
The following example shows a basic RFC call where the RFC name is STFC_CONNECTION. This request uses the default namespace named xmlns=. However, you can assign and use namespace aliases such as xmlns:exampleAlias=. The namespace value is the namespace for all the RFCs in SAP for Microsoft services. The request has a simple input parameter named <REQUTEXT>.
<STFC_CONNECTION xmlns="http://Microsoft.LobServices.Sap/2007/03/Rfc/">
   <REQUTEXT>exampleInput</REQUTEXT>
</STFC_CONNECTION>
The following example shows an RFC call with a table parameter. This example call and group of test RFCs are available in all SAP systems. The table parameter is named TCPICDAT. The table line type is ABAPTEXT, and this element repeats for each row in the table. This example contains a single line named LINE. Requests with a table parameter can contain any number of fields, where the number is a positive integer (n).
<STFC_WRITE_TO_TCPIC xmlns="http://Microsoft.LobServices.Sap/2007/03/Rfc/">
   <RESTART_QNAME>exampleQName</RESTART_QNAME>
   <TCPICDAT>
      <ABAPTEXT xmlns="http://Microsoft.LobServices.Sap/2007/03/Types/Rfc/">
         <LINE>exampleFieldInput1</LINE>
      </ABAPTEXT>
      <ABAPTEXT xmlns="http://Microsoft.LobServices.Sap/2007/03/Types/Rfc/">
         <LINE>exampleFieldInput2</LINE>
      </ABAPTEXT>
      <ABAPTEXT xmlns="http://Microsoft.LobServices.Sap/2007/03/Types/Rfc/">
         <LINE>exampleFieldInput3</LINE>
      </ABAPTEXT>
   </TCPICDAT>
</STFC_WRITE_TO_TCPIC>
Tip
To review the result from RFC STFC_WRITE_TO_TCPIC, use the SAP Logon's Data Browser (T-Code SE16) and the table named TCPIC.
The following example shows an RFC call with a table parameter that has an anonymous field, which is a field without an assigned name. Complex types are declared under a separate namespace where the declaration sets a new default for the current node and all its child elements. The example uses the hex code x002F as an escape character for the forward slash symbol / because this symbol is reserved in the SAP field name.
<RFC_XML_TEST_1 xmlns="http://Microsoft.LobServices.Sap/2007/03/Rfc/">
   <IM_XML_TABLE>
      <RFC_XMLCNT xmlns="http://Microsoft.LobServices.Sap/2007/03/Rfc/">
         <_x002F_AnonymousField>AQIDBAU=</_x002F_AnonymousField>
      </RFC_XMLCNT>
   </IM_XML_TABLE>
</RFC_XML_TEST_1>
The previous example also shows how to encode binary arrays for the SAP data types byte and XString. The binary arrays are base64 encoded in XML (XSD binary data type xs:base64Binary). In the example, the sample base64 string value AQIDBAU= decodes as the binary array [01][02][03][04]. This encoding differs and is more space-efficient than the hex encoding of the underlying SAP .NET Connector. With hex encoding, the same value is encoded as the string 01020304.
Caution
Exercise caution when you use binary array encoding because hex encoding uses a subset of the base64 range and
appears as valid base64 values. For example, the string value 01020304 also decodes as a valid base64
encoded value, but results in a different binary array [d3][5d][36][d3][7d][38], and not the binary array [01][02][03][04].
The following example includes prefixes for the namespaces. You can declare all the prefixes at one time, or you can declare any number of prefixes as attributes of a node. The RFC namespace alias named ns0 is used as the root and parameters for the basic type.
Note
Complex types are declared under a different namespace for RFC types with
the alias ns3 instead of the regular RFC namespace with the alias ns0.
<ns0:BBP_RFC_READ_TABLE xmlns:ns0="http://Microsoft.LobServices.Sap/2007/03/Rfc/" xmlns:ns3="http://Microsoft.LobServices.Sap/2007/03/Types/Rfc/">
   <ns0:DELIMITER>0</ns0:DELIMITER>
   <ns0:QUERY_TABLE>KNA1</ns0:QUERY_TABLE>
   <ns0:ROWCOUNT>250</ns0:ROWCOUNT>
   <ns0:ROWSKIPS>0</ns0:ROWSKIPS>
   <ns0:FIELDS>
      <ns3:RFC_DB_FLD>
         <ns3:FIELDNAME>KUNNR</ns3:FIELDNAME>
      </ns3:RFC_DB_FLD>
   </ns0:FIELDS>
</ns0:BBP_RFC_READ_TABLE>
XML samples for BAPI requests
The following XML samples are example requests to call the BAPI method.
Note
SAP makes business objects available to external systems by describing them in response to RFC RPY_BOR_TREE_INIT,
which Azure Logic Apps issues without an input filter. Azure Logic Apps inspects the output table BOR_TREE.
The SHORT_TEXT field is used for names of business objects. Business objects not returned by SAP in the output
table aren't accessible to Azure Logic Apps.
If you use custom business objects, make sure to publish and release these business objects in SAP. Otherwise,
SAP doesn't list your custom business objects in the output table BOR_TREE. You can't access your custom
business objects in Azure Logic Apps until you expose the business objects from SAP.
The following example gets a list of banks by using the BAPI method GETLIST. This sample contains the business object for a bank named BUS1011.
<GETLIST xmlns="http://Microsoft.LobServices.Sap/2007/03/Bapi/BUS1011">
   <BANK_CTRY>US</BANK_CTRY>
   <MAX_ROWS>10</MAX_ROWS>
</GETLIST>
The following example creates a bank object by using the CREATE method. This example uses the same business object named BUS1011, as the previous example. When you use the CREATE method to create a bank, make sure to commit your changes because this method isn't committed by default.
Tip
Make sure that your XML document follows any validation rules configured in your SAP system. For example, for this
sample document, in the USA, the bank key (<BANK_KEY>) must be a bank routing number, also known as an ABA number.
<CREATE xmlns="http://Microsoft.LobServices.Sap/2007/03/Bapi/BUS1011">
   <BANK_ADDRESS>
      <BANK_NAME xmlns="http://Microsoft.LobServices.Sap/2007/03/Types/Rfc">ExampleBankName</BANK_NAME>
      <REGION xmlns="http://Microsoft.LobServices.Sap/2007/03/Types/Rfc">ExampleRegionName</REGION>
      <STREET xmlns="http://Microsoft.LobServices.Sap/2007/03/Types/Rfc">ExampleStreetAddress</STREET>
      <CITY xmlns="http://Microsoft.LobServices.Sap/2007/03/Types/Rfc">Redmond</CITY>
   </BANK_ADDRESS>
   <BANK_CTRY>US</BANK_CTRY>
   <BANK_KEY>123456789</BANK_KEY>
</CREATE>
The following example gets details for a bank by using the bank routing number, which is the value for <BANK_KEY>.
<GETDETAIL xmlns="http://Microsoft.LobServices.Sap/2007/03/Bapi/BUS1011">
   <BANKCOUNTRY>US</BANKCOUNTRY>
   <BANKKEY>123456789</BANKKEY>
</GETDETAIL>
XML samples for IDoc requests
To generate a plain SAP IDoc XML schema, use the SAP Logon application and the WE60 T-Code. Access the SAP documentation through the user interface, and generate XML schemas in XSD format for your IDoc types and extensions. For more information about generic SAP formats and payloads, and their built-in dialogs, review the SAP documentation.
This example declares the root node and namespaces. The URI in the sample code, http://Microsoft.LobServices.Sap/2007/03/Idoc/3/ORDERS05//700/Send, declares the following configuration:
/IDocis the root node for all IDocs./3is the record types version for common segment definitions./ORDERS05is the IDoc type.//is an empty segment because there's no IDoc extension./700is the SAP version./Sendis the action to send the information to SAP.
<ns0:Send xmlns:ns0="http://Microsoft.LobServices.Sap/2007/03/Idoc/3/ORDERS05//700/Send" xmlns:ns3="http://schemas.microsoft.com/2003/10/Serialization" xmlns:ns1="http://Microsoft.LobServices.Sap/2007/03/Types/Idoc/Common/" xmlns:ns2="http://Microsoft.LobServices.Sap/2007/03/Idoc/3/ORDERS05//700">
   <ns0:idocData>
You can repeat the idocData node to send a batch of IDocs in a single call. In the following example, there's one control record named EDI_DC40, and multiple data records.
<...>
   <ns0:idocData>
      <ns2:EDI_DC40>
         <ns1:TABNAM>EDI_DC40</ns1:TABNAM>
         <...>
         <ns1:ARCKEY>Cor1908207-5</ns1:ARCKEY>
      </ns2:EDI_DC40>
      <ns2:E2EDK01005>
         <ns2:DATAHEADERCOLUMN_SEGNAM>E23DK01005</ns2:DATAHEADERCOLUMN_SEGNAM>
         <ns2:CURCY>USD</ns2:CURCY>
      </ns2:E2EDK01005>
      <ns2:E2EDK03>
      <...>
   </ns0:idocData>
The following example shows a sample IDoc control record, which uses a prefix named EDI_DC. You must update the values to match your SAP installation and IDoc type. For example, your IDoc client code might not be 800. Contact your SAP team to make sure you're using the correct values for your SAP installation.
<ns2:EDI_DC40>
   <ns:TABNAM>EDI_DC40</ns1:TABNAM>
   <ns:MANDT>800</ns1:MANDT>
   <ns:DIRECT>2</ns1:DIRECT>
   <ns:IDOCTYP>ORDERS05</ns1:IDOCTYP>
   <ns:CIMTYP></ns1:CIMTYP>
   <ns:MESTYP>ORDERS</ns1:MESTYP>
   <ns:STD>X</ns1:STD>
   <ns:STDVRS>004010</ns1:STDVRS>
   <ns:STDMES></ns1:STDMES>
   <ns:SNDPOR>SAPENI</ns1:SNDPOR>
   <ns:SNDPRT>LS</ns1:SNDPRT>
   <ns:SNDPFC>AG</ns1:SNDPFC>
   <ns:SNDPRN>ABAP1PXP1</ns1:SNDPRN>
   <ns:SNDLAD></ns1:SNDLAD>
   <ns:RCVPOR>BTSFILE</ns1:RCVPOR>
   <ns:RCVPRT>LI</ns1:RCVPRT>
The following example shows a sample data record with plain segments. This example uses the SAP date format. Strong-typed documents can use native XML date formats, such as 2020-12-31 23:59:59.
<ns2:E2EDK01005>
   <ns2:DATAHEADERCOLUMN_SEGNAM>E2EDK01005</ns2:DATAHEADERCOLUMN_SEGNAM>
      <ns2:CURCY>USD</ns2:CURCY>
      <ns2:BSART>OR</ns2:BSART>
      <ns2:BELNR>1908207-5</ns2:BELNR>
      <ns2:ABLAD>CC</ns2:ABLAD>
   </ns2>
   <ns2:E2EDK03>
      <ns2:DATAHEADERCOLUMN_SEGNAM>E2EDK03</ns2:DATAHEADERCOLUMN_SEGNAM>
      <ns2:IDDAT>002</ns2:IDDAT>
      <ns2:DATUM>20160611</ns2:DATUM>
   </ns2:E2EDK03>
The following example shows a data record with grouped segments. The record includes a group parent node named E2EDKT1002GRP, and multiple child nodes, including E2EDKT1002 and E2EDKT2001.
<ns2:E2EDKT1002GRP>
   <ns2:E2EDKT1002>
      <ns2:DATAHEADERCOLUMN_SEGNAM>E2EDKT1002</ns2:DATAHEADERCOLUMN_SEGNAM>
         <ns2:TDID>ZONE</ns2:TDID>
   </ns2:E2EDKT1002>
   <ns2:E2EDKT2001>
      <ns2:DATAHEADERCOLUMN_SEGNAM>E2EDKT2001</ns2:DATAHEADERCOLUMN_SEGNAM>
         <ns2:TDLINE>CRSD</ns2:TDLINE>
   </ns2:E2EDKT2001>
</ns2:E2EDKT1002GRP>
The recommended method is to create an IDoc identifier for use with tRFC. You can set this transaction identifier named tid by using the Send IDoc operation in the SAP managed connector.
The following example shows an alternate method to set the transaction identifier, or tid. In this example, the last data record segment node and the IDoc data node are closed. Then, the GUID, guid, is used as the tRFC identifier to detect duplicates.
     </E2STZUM002GRP>
  </idocData>
  <guid>8820ea40-5825-4b2f-ac3c-b83adc34321c</guid>
</Send>