Note
Access to this page requires authorization. You can try signing in or changing directories.
Access to this page requires authorization. You can try changing directories.
Applies to: Azure Logic Apps (Standard)
To streamline deployment automation for Standard logic apps, you can directly integrate your source code repository with your logic app resources by using Deployment Center. This capability helps you set up continuous deployment (CD) directly within your logic app, so you can make sure that every change committed to your repository gets automatically deployed to your logic app. Your team can then ship new features, fix bugs, and respond to changes faster, yet maintain control and visibility over the deployment process.
Deployment Center supports multiple source control providers, seamlessly fits into modern DevOps workloads and scenarios, and makes sure that your logic apps stay current and production ready.
Prerequisites
An Azure account and subscription. If you don't have an Azure subscription, sign up for a Azure account.
Visual Studio Code with the Azure Logic Apps (Standard) extension installed and their prerequisites.
An Azure Key Vault resource for you to store connection strings and secrets.
For more information, see Quickstart: Create a key vault using the Azure portal.
Your Standard logic app resource with the following requirements:
Requirement Description Enable the SCM Basic Auth Publishing Credentials setting. To enable this setting, see Turn on SCM Basic Auth Publishing Credentials. Create a user-assigned managed identity on your logic app. This identity needs to have role assignments on the following resources:
- Logic Apps Standard Contributor role on your logic app's resource group.
- Key Vault Secrets User role on your key vault resource.
For more information, see Create the user-assigned managed identity and assign roles.Create a workspace and project in Visual Studio Code for your logic app. This workspace also needs a connection to your source control repository. To create the workspace and project, you can export your Standard logic app to Visual Studio Code.
Turn on SCM Basic Auth publishing credentials
In the Azure portal, open your Standard logic app resource.
On the resource sidebar, under Settings, select Configuration.
On the General settings tab, under Platform settings, select SCM Basic Auth Publishing Credentials so that the setting is turned on.
When you're done, select Apply.
The following example shows where to find the SCM Basic Auth Publishing Credentials setting:

Create user-assigned managed identity and assign roles
In the Azure portal, open your Standard logic app resource.
Follow the general steps to create the user-assigned managed identity.
Follow the general steps to add the user-assigned managed identity to your logic app.
Follow the general steps to give the identity access to the resources in the Prerequisites section.
When you're done, continue on to create scripts for Deployment Center.
Generate scripts for Deployment Center
In Visual Studio Code, open the workspace and project for your Standard logic app.
On the Visual Studio Code Activity Bar, select Explorer (files icon) to open the Explorer window, which shows your logic app project and files.
In the Explorer window, find the project root level. Open the project context menu, and select Generate deployment scripts.
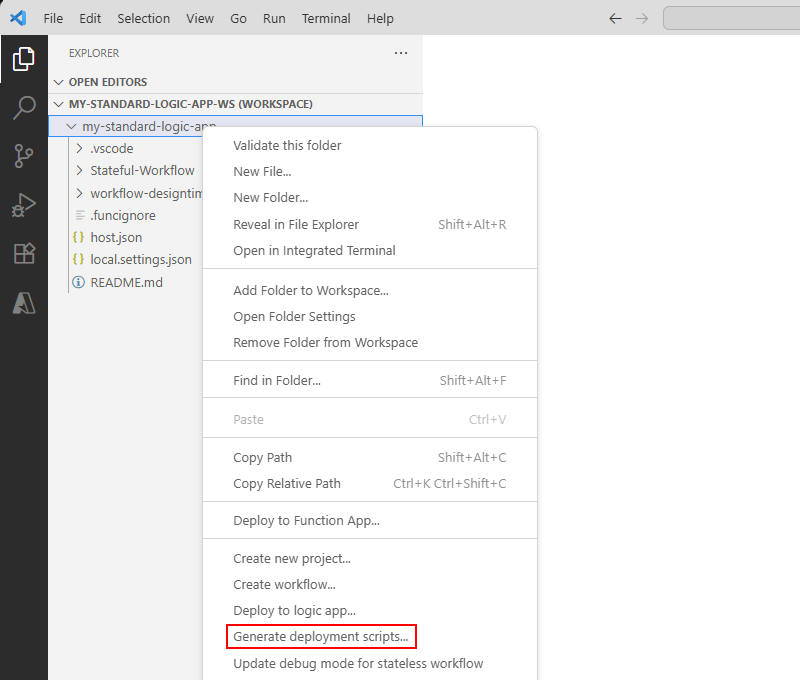
Follow the prompts to complete the following steps:
Select the Azure subscription for your deployed Standard logic app.
Select the Azure resource group for your logic app, and then select your logic app.
Select the associated user-assigned managed identity that has Logic Apps Standard Contributor role-based access.
When you're done, Visual Studio Code creates the following folders and files:
Folder name File name Description <logic-app-project-folder-name> cloud.settings.json This file contains the following content:
- Keys copied from the local.settings.json file and required for logic app deployment.
- Placeholders to specify the key vault references for any secrets.
- Any associated nonsecret values.deployment deploy.ps1 This deployment script parameterizes the items that you selected during deployment script generation. The script also performs the following tasks:
- Deploys the logic app code.
- Updates the authentication required for any Azure-hosted managed connection definition in the connections.json file.
- Configures the settings defined in the cloud.settings.json file created in your logic app project.<logic-app-project-folder-name> README.md This file contains instructions about how to update the cloud.settings.json so you can safely deploy application secrets, for example:
- Connection strings required for built-in, service provider-based connections in your project.
- Keys for Azure API Management, Azure Functions, and so on.
- Keys for any other customer-defined secrets.Review the created files, and update the cloud.settings.json with your key vault references.
When you're done, push your changes to your source control repository.

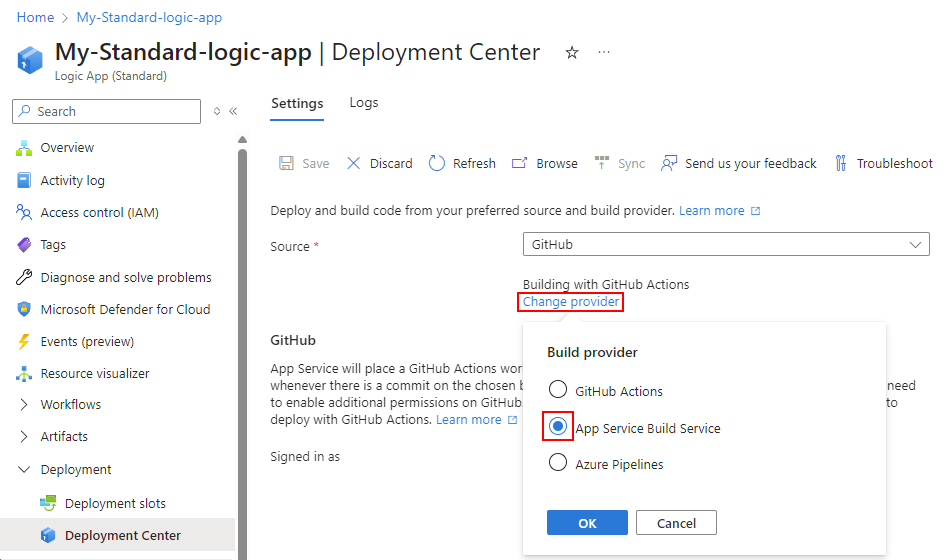
Set up Deployment Center with your source repository
To set up Deployment Center with a repository in GitHub for your Standard logic app, follow these steps:
In the Azure portal, open your Standard logic app resource.
On the resource sidebar, under Deployment, select Deployment Center.
From the Source list, select GitHub as your source repository.
Under the Source list, select Change provider, and select App Service Build Service as the build provider.
In GitHub, sign in, if necessary, and select your organization.
Select your repository, and then select your branch.
When you're done, at the top of the page, select Save.


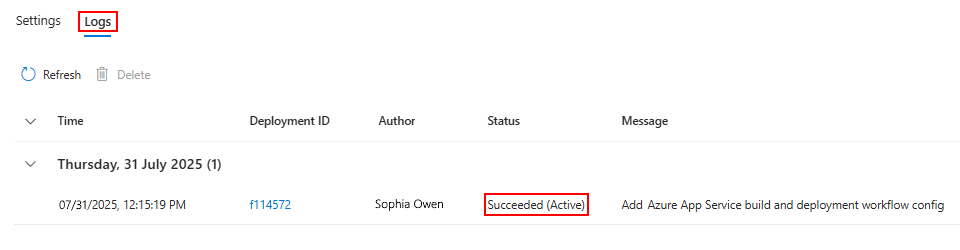
Confirm successful deployment
To make sure that your deployment works correctly, follow these steps:
Return to your logic app's Deployment Center page, and select the Logs tab.
If necessary, refresh the Logs tab. Review the status message to check that the deployment successfully finished, for example: