Note
Access to this page requires authorization. You can try signing in or changing directories.
Access to this page requires authorization. You can try changing directories.
APPLIES TO:
 Azure CLI ml extension v2 (current)
 Python SDK azure-ai-ml v2 (current)
In Azure Machine Learning, you can use a custom container to deploy a model to an online endpoint. Custom container deployments can use web servers other than the default Python Flask server that Azure Machine Learning uses.
When you use a custom deployment, you can:
- Use various tools and technologies, such as TensorFlow Serving (TF Serving), TorchServe, Triton Inference Server, the Plumber R package, and the Azure Machine Learning inference minimal image.
- Still take advantage of the built-in monitoring, scaling, alerting, and authentication that Azure Machine Learning offers.
This article shows you how to use a TF Serving image to serve a TensorFlow model.
Prerequisites
An Azure Machine Learning workspace. For instructions for creating a workspace, see Create the workspace.
The Azure CLI and the
mlextension or the Azure Machine Learning Python SDK v2:To install the Azure CLI and the
mlextension, see Install and set up the CLI (v2).The examples in this article assume that you use a Bash shell or a compatible shell. For example, you can use a shell on a Linux system or Windows Subsystem for Linux.
An Azure resource group that contains your workspace and that you or your service principal have Contributor access to. If you use the steps in Create the workspace to configure your workspace, you meet this requirement.
Docker Engine, installed and running locally. This prerequisite is highly recommended. You need it to deploy a model locally, and it's helpful for debugging.
Deployment examples
The following table lists deployment examples that use custom containers and take advantage of various tools and technologies.
| Example | Azure CLI script | Description |
|---|---|---|
| minimal/multimodel | deploy-custom-container-minimal-multimodel | Deploys multiple models to a single deployment by extending the Azure Machine Learning inference minimal image. |
| minimal/single-model | deploy-custom-container-minimal-single-model | Deploys a single model by extending the Azure Machine Learning inference minimal image. |
| mlflow/multideployment-scikit | deploy-custom-container-mlflow-multideployment-scikit | Deploys two MLFlow models with different Python requirements to two separate deployments behind a single endpoint. Uses the Azure Machine Learning inference minimal image. |
| r/multimodel-plumber | deploy-custom-container-r-multimodel-plumber | Deploys three regression models to one endpoint. Uses the Plumber R package. |
| tfserving/half-plus-two | deploy-custom-container-tfserving-half-plus-two | Deploys a Half Plus Two model by using a TF Serving custom container. Uses the standard model registration process. |
| tfserving/half-plus-two-integrated | deploy-custom-container-tfserving-half-plus-two-integrated | Deploys a Half Plus Two model by using a TF Serving custom container with the model integrated into the image. |
| torchserve/densenet | deploy-custom-container-torchserve-densenet | Deploys a single model by using a TorchServe custom container. |
| triton/single-model | deploy-custom-container-triton-single-model | Deploys a Triton model by using a custom container. |
This article shows you how to use the tfserving/half-plus-two example.
Warning
Microsoft support teams might not be able to help troubleshoot problems caused by a custom image. If you encounter problems, you might be asked to use the default image or one of the images that Microsoft provides to see whether the problem is specific to your image.
Download the source code
The steps in this article use code samples from the azureml-examples repository. Use the following commands to clone the repository:
git clone https://github.com/Azure/azureml-examples --depth 1
cd azureml-examples/cli
Initialize environment variables
To use a TensorFlow model, you need several environment variables. Run the following commands to define those variables:
#/bin/bash

set -e

# <initialize_variables>
BASE_PATH=endpoints/online/custom-container/tfserving/half-plus-two
AML_MODEL_NAME=tfserving-mounted
MODEL_NAME=half_plus_two
MODEL_BASE_PATH=/var/azureml-app/azureml-models/$AML_MODEL_NAME/1
Download a TensorFlow model
Download and unzip a model that divides an input value by two and adds two to the result:
wget https://aka.ms/half_plus_two-model -O $BASE_PATH/half_plus_two.tar.gz
tar -xvf $BASE_PATH/half_plus_two.tar.gz -C $BASE_PATH
Test a TF Serving image locally
Use Docker to run your image locally for testing:
docker run --rm -d -v $PWD/$BASE_PATH:$MODEL_BASE_PATH -p 8501:8501 \
 -e MODEL_BASE_PATH=$MODEL_BASE_PATH -e MODEL_NAME=$MODEL_NAME \
 --name="tfserving-test" docker.io/tensorflow/serving:latest
sleep 10
Send liveness and scoring requests to the image
Send a liveness request to check that the process inside the container is running. You should get a response status code of 200 OK.
curl -v http://localhost:8501/v1/models/$MODEL_NAME
Send a scoring request to check that you can get predictions about unlabeled data:
curl --header "Content-Type: application/json" \
  --request POST \
  --data @$BASE_PATH/sample_request.json \
  http://localhost:8501/v1/models/$MODEL_NAME:predict
Stop the image
When you finish testing locally, stop the image:
docker stop tfserving-test
Deploy your online endpoint to Azure
To deploy your online endpoint to Azure, take the steps in the following sections.
Create YAML files for your endpoint and deployment
You can configure your cloud deployment by using YAML. For instance, to configure your endpoint, you can create a YAML file named tfserving-endpoint.yml that contains the following lines:
tfserving-endpoint.yml
$schema: https://azuremlsdk2.blob.core.chinacloudapi.cn/latest/managedOnlineEndpoint.schema.json
name: tfserving-endpoint
auth_mode: aml_token
tfserving-deployment.yml
To configure your deployment, you can create a YAML file named tfserving-deployment.yml that contains the following lines:

```yml
$schema: https://azuremlschemas.azureedge.net/latest/managedOnlineDeployment.schema.json
name: tfserving-deployment
endpoint_name: tfserving-endpoint
model:
  name: tfserving-mounted
  version: <model-version>
  path: ./half_plus_two
environment_variables:
  MODEL_BASE_PATH: /var/azureml-app/azureml-models/tfserving-mounted/<model-version>
  MODEL_NAME: half_plus_two
environment:
  #name: tfserving
  #version: 1
  image: docker.io/tensorflow/serving:latest
  inference_config:
    liveness_route:
      port: 8501
      path: /v1/models/half_plus_two
    readiness_route:
      port: 8501
      path: /v1/models/half_plus_two
    scoring_route:
      port: 8501
      path: /v1/models/half_plus_two:predict
instance_type: Standard_DS3_v2
instance_count: 1
The following sections discuss important concepts about the YAML and Python parameters.
Base image
In the environment section in YAML, or the Environment constructor in Python, you specify the base image as a parameter. This example uses docker.io/tensorflow/serving:latest as the image value.
If you inspect your container, you can see that this server uses ENTRYPOINT commands to start an entry point script. That script takes environment variables such as MODEL_BASE_PATH and MODEL_NAME, and it exposes ports such as 8501. These details all pertain to this server, and you can use this information to determine how to define your deployment. For example, if you set the MODEL_BASE_PATH and MODEL_NAME environment variables in your deployment definition, TF Serving uses those values to initiate the server. Likewise, if you set the port for each route to 8501 in the deployment definition, user requests to those routes are correctly routed to the TF Serving server.
This example is based on the TF Serving case. But you can use any container that stays up and responds to requests that go to liveness, readiness, and scoring routes. To see how to form a Dockerfile to create a container, you can refer to other examples. Some servers use CMD instructions instead of ENTRYPOINT instructions.
The inference_config parameter
In the environment section or the Environment class, inference_config is a parameter. It specifies the port and path for three types of routes: liveness, readiness, and scoring routes. The inference_config parameter is required if you want to run your own container with a managed online endpoint.
Readiness routes vs. liveness routes
Some API servers provide a way to check the status of the server. There are two types of routes that you can specify for checking the status:
- Liveness routes: To check whether a server is running, you use a liveness route.
- Readiness routes: To check whether a server is ready to do work, you use a readiness route.
In the context of machine learning inferencing, a server might respond with a status code of 200 OK to a liveness request before loading a model. The server might respond with a status code of 200 OK to a readiness request only after it loads the model into memory.
For more information about liveness and readiness probes, see Configure Liveness, Readiness and Startup Probes.
The API server that you choose determines the liveness and readiness routes. You identify that server in an earlier step when you test the container locally. In this article, the example deployment uses the same path for the liveness and readiness routes, because TF Serving only defines a liveness route. For other ways of defining the routes, see other examples.
Scoring routes
The API server that you use provides a way to receive the payload to work on. In the context of machine learning inferencing, a server receives the input data via a specific route. Identify that route for your API server when you test the container locally in an earlier step. Specify that route as the scoring route when you define the deployment to create.
The successful creation of the deployment also updates the scoring_uri parameter of the endpoint. You can verify this fact by running the following command: az ml online-endpoint show -n <endpoint-name> --query scoring_uri.
Locate the mounted model
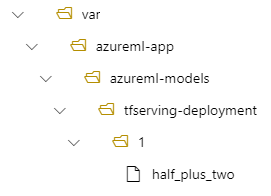
When you deploy a model as an online endpoint, Azure Machine Learning mounts your model to your endpoint. When the model is mounted, you can deploy new versions of the model without having to create a new Docker image. By default, a model registered with the name my-model and version 1 is located on the following path inside your deployed container: /var/azureml-app/azureml-models/my-model/1.
For example, consider the following setup:
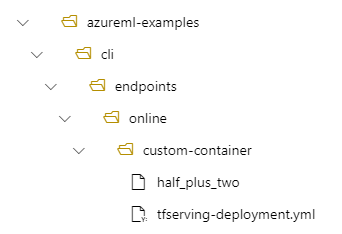
- A directory structure on your local machine of /azureml-examples/cli/endpoints/online/custom-container
- A model name of
half_plus_two

Suppose your tfserving-deployment.yml file contains the following lines in its model section. In this section, the name value refers to the name that you use to register the model in Azure Machine Learning.
model:
    name: tfserving-mounted
    version: 1
    path: ./half_plus_two
In this case, when you create a deployment, your model is located under the following folder: /var/azureml-app/azureml-models/tfserving-mounted/1.

You can optionally configure your model_mount_path value. By adjusting this setting, you can change the path where the model is mounted.
Important
The model_mount_path value must be a valid absolute path in Linux (in the guest OS of the container image).
Important
model_mount_path is usable only in BYOC (Bring your own container) scenario. In BYOC scenario, the environment that the online deployment uses must have inference_config parameter configured. You can use Azure ML CLI or Python SDK to specify inference_config parameter when creating the environment. Studio UI currently doesn't support specifying this parameter.
When you change the value of model_mount_path, you also need to update the MODEL_BASE_PATH environment variable. Set MODEL_BASE_PATH to the same value as model_mount_path to avoid a failed deployment due to an error about the base path not being found.
For example, you can add the model_mount_path parameter to your tfserving-deployment.yml file. You can also update the MODEL_BASE_PATH value in that file:
name: tfserving-deployment
endpoint_name: tfserving-endpoint
model:
  name: tfserving-mounted
  version: 1
  path: ./half_plus_two
model_mount_path: /var/tfserving-model-mount
environment_variables:
  MODEL_BASE_PATH: /var/tfserving-model-mount
...
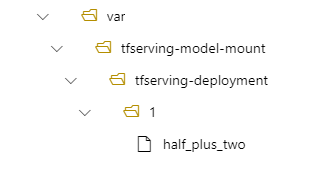
In your deployment, your model is then located at /var/tfserving-model-mount/tfserving-mounted/1. It's no longer under azureml-app/azureml-models, but under the mount path that you specify:

Create your endpoint and deployment
After you construct your YAML file, use the following command to create your endpoint:
az ml online-endpoint create --name tfserving-endpoint -f endpoints/online/custom-container/tfserving/half-plus-two/tfserving-endpoint.yml
Use the following command to create your deployment. This step might run for a few minutes.
az ml online-deployment create --name tfserving-deployment -f endpoints/online/custom-container/tfserving/half-plus-two/tfserving-deployment.yml --all-traffic
Invoke the endpoint
When your deployment is complete, make a scoring request to the deployed endpoint.
RESPONSE=$(az ml endpoint invoke -n $ENDPOINT_NAME --request-file $BASE_PATH/sample_request.json)
Delete the endpoint
If you no longer need your endpoint, run the following command to delete it:
az ml online-endpoint delete --name tfserving-endpoint