Note
Access to this page requires authorization. You can try signing in or changing directories.
Access to this page requires authorization. You can try changing directories.
APPLIES TO:
 Azure CLI ml extension v2 (current)
Python SDK azure-ai-ml v2 (current)
Azure CLI ml extension v2 (current)
Python SDK azure-ai-ml v2 (current)
Get started with GitHub Actions to train a model on Azure Machine Learning.
This article teaches you how to create a GitHub Actions workflow that builds and deploys a machine learning model to Azure Machine Learning. You train a scikit-learn linear regression model on the NYC Taxi dataset.
GitHub Actions use a workflow YAML (.yml) file in the /.github/workflows/ path in your repository. This definition contains the various steps and parameters that make up the workflow.
Prerequisites
An Azure Machine Learning workspace. For steps for creating a workspace, see Create the workspace.
The Azure Machine Learning SDK for Python v2. To install the SDK, use the following command:
pip install azure-ai-ml azure-identityTo update an existing installation of the SDK to the latest version, use the following command:
pip install --upgrade azure-ai-ml azure-identityFor more information, see Azure Machine Learning Package client library for Python.
- A GitHub account. If you don't have one, sign up for free.
Step 1: Get the code
Fork the following repo at GitHub:
https://github.com/azure/azureml-examples
Clone your forked repo locally.
git clone https://github.com/YOUR-USERNAME/azureml-examples
Step 2: Authenticate with Azure
First, define how to authenticate with Azure. The recommended, more secure option is to sign in by using OpenID Connect with a Microsoft Entra application or a user-assigned managed identity. If necessary, you can also use sign in by using a service principal and secret. This approach is less secure and not recommended.
Generate deployment credentials
Create a service principal with the az ad sp create-for-rbac command in the Azure CLI.
az ad sp create-for-rbac --name "myML" --role contributor \
                            --scopes /subscriptions/<subscription-id>/resourceGroups/<group-name> \
                            --sdk-auth
In the example above, replace the placeholders with your subscription ID, resource group name, and app name. The output is a JSON object with the role assignment credentials that provide access to your App Service app similar to below. Copy this JSON object for later.
  {
    "clientId": "<GUID>",
    "clientSecret": "<GUID>",
    "subscriptionId": "<GUID>",
    "tenantId": "<GUID>",
    (...)
  }
Create secrets
In GitHub, browse your repository, select Settings > Secrets > Actions. Select New repository secret.
Paste the entire JSON output from the Azure CLI command into the secret's value field. Give the secret the name
AZ_CREDS.
Step 3: Update setup.sh to connect to your Azure Machine Learning workspace
Update the CLI setup file variables to match your workspace.
In your forked repository, go to
azureml-examples/cli/.Edit
setup.shand update these variables in the file.Variable Description GROUPName of resource group LOCATIONLocation of your workspace (example: chinanorth2)WORKSPACEName of Azure Machine Learning workspace
Step 4: Update pipeline.yml with your compute cluster name
Use a pipeline.yml file to deploy your Azure Machine Learning pipeline. The pipeline is a machine learning pipeline and not a DevOps pipeline. You only need to make this update if you're using a name other than cpu-cluster for your compute cluster name.
- In your forked repository, go to
azureml-examples/cli/jobs/pipelines/nyc-taxi/pipeline.yml. - Each time you see
compute: azureml:cpu-cluster, update the value ofcpu-clusterwith your compute cluster name. For example, if your cluster is namedmy-cluster, your new value would beazureml:my-cluster. There are five updates.
Step 5: Run your GitHub Actions workflow
Your workflow authenticates with Azure, sets up the Azure Machine Learning CLI, and uses the CLI to train a model in Azure Machine Learning.
Your workflow file is made up of a trigger section and jobs:
- A trigger starts the workflow in the
onsection. The workflow runs by default on a cron schedule and when a pull request is made from matching branches and paths. Learn more about events that trigger workflows. - In the jobs section of the workflow, you check out code and sign in to Azure with your service principal secret.
- The jobs section also includes a setup action that installs and sets up the Machine Learning CLI (v2). Once the CLI is installed, the run job action runs your Azure Machine Learning
pipeline.ymlfile to train a model with NYC taxi data.
Enable your workflow
In your forked repository, open
.github/workflows/cli-jobs-pipelines-nyc-taxi-pipeline.ymland verify that your workflow looks similar to this.Note
The workflow file in the repo may include additional steps not shown here. The following example shows the core steps.
name: cli-jobs-pipelines-nyc-taxi-pipeline
on:
  workflow_dispatch:
  schedule:
    - cron: "0 0/4 * * *"
  pull_request:
    branches:
      - main
    paths:
      - cli/jobs/pipelines/nyc-taxi/**
      - .github/workflows/cli-jobs-pipelines-nyc-taxi-pipeline.yml
      - cli/run-pipeline-jobs.sh
      - cli/setup.sh
jobs:
  build:
    runs-on: ubuntu-latest
    steps:
    - name: check out repo
      uses: actions/checkout@v4
    - name: azure login
      uses: azure/login@v2
      with:
        creds: ${{secrets.AZURE_CREDENTIALS}}
    - name: setup
      run: bash setup.sh
      working-directory: cli
      continue-on-error: true
    - name: run job
      run: bash -x ../../../run-job.sh pipeline.yml
      working-directory: cli/jobs/pipelines/nyc-taxi
Select View runs.
Enable workflows by selecting I understand my workflows, go ahead and enable them.
Select the cli-jobs-pipelines-nyc-taxi-pipeline workflow and choose to Enable workflow.

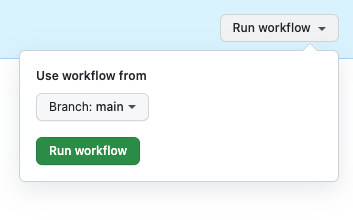
Select Run workflow and choose the option to Run workflow now.
Step 6: Verify your workflow run
Open your completed workflow run and verify that the build job ran successfully. You see a green checkmark next to the job.
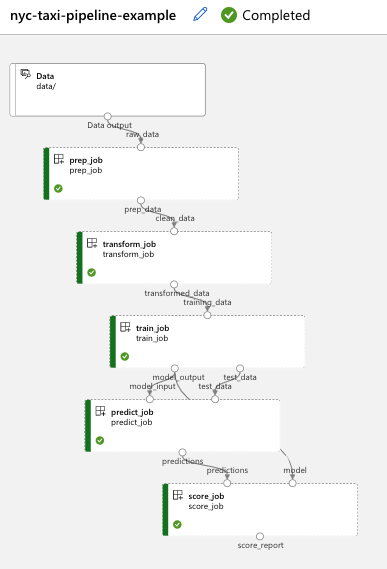
Open Azure Machine Learning studio and go to nyc-taxi-pipeline-example. Verify that each part of your job (prep, transform, train, predict, score) completed and that you see a green checkmark.
Clean up resources
When you no longer need your resource group and repository, clean up the resources you deployed by deleting the resource group and your GitHub repository.