Note
Access to this page requires authorization. You can try signing in or changing directories.
Access to this page requires authorization. You can try changing directories.
Get started with Azure Machine Learning by using Jupyter notebooks to learn more about the Python SDK.
In this quickstart, you'll learn how to run notebooks on a compute instance in Azure Machine Learning studio. A compute instance is an online compute resource that has a development environment already installed and ready to go.
You'll also learn where to find sample notebooks to help jump-start your path to training and deploying models with Azure Machine Learning.
Prerequisites
- An Azure account with an active subscription. Create an account.
- Run the Quickstart: Create workspace resources you need to get started with Azure Machine Learning to create a workspace and a compute instance.
Create a new notebook
Create a new notebook in studio.
Sign into Azure Machine Learning studio.
Select your workspace, if it isn't already open.
On the left, select Notebooks.
Select Create new file.
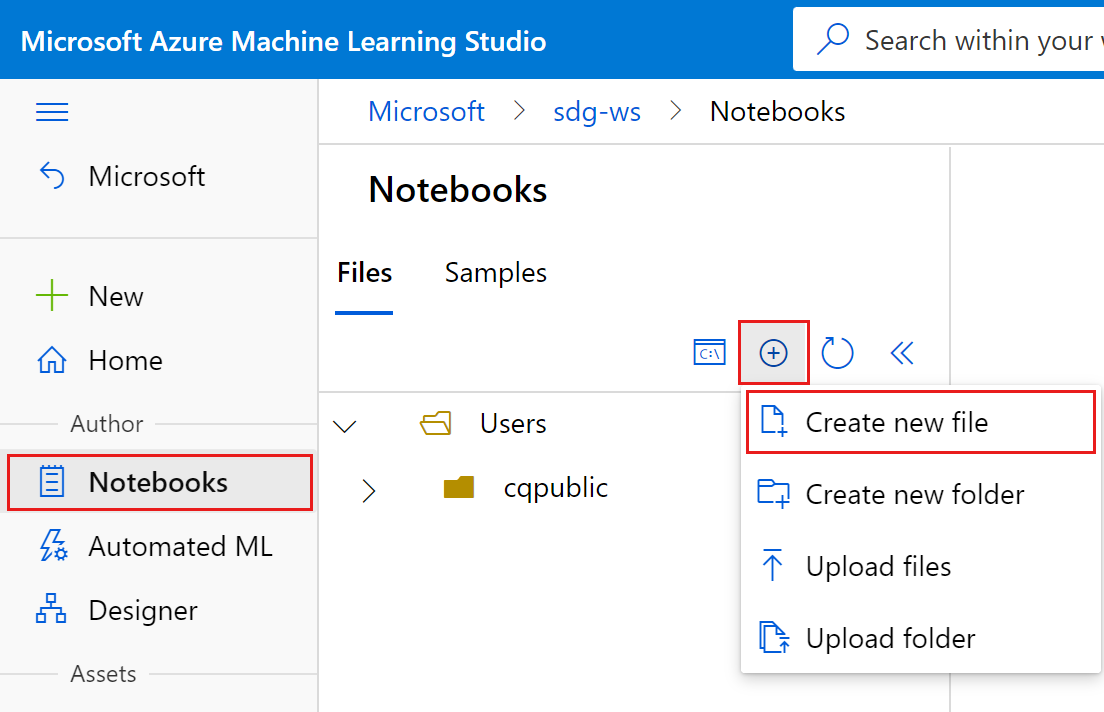
Name your new notebook my-new-notebook.ipynb.
Create a markdown cell
On the upper right of each notebook cell is a toolbar of actions you can use for that cell. Select the Convert to markdown cell tool to change the cell to markdown.

Double-click on the cell to open it.
Inside the cell, type:
# Testing a new notebook
Use markdown cells to add nicely formatted content to the notebook.
Create a code cell
Just below the cell, select + Code to create a new code cell.
Inside this cell, add:
print("Hello, world!")
Run the code
If you stopped your compute instance at the end of the Quickstart: Create workspace resources you need to get started with Azure Machine Learning, start it again now:

Wait until the compute instance is "Running". When it is running, the Compute instance dot is green. You can also see the status after the compute instance name. You may have to select the arrow to see the full name.

You can run code cells either by using Shift + Enter, or by selecting the Run cell tool to the right of the cell. Use one of these methods to run the cell now.
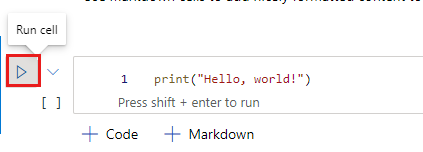
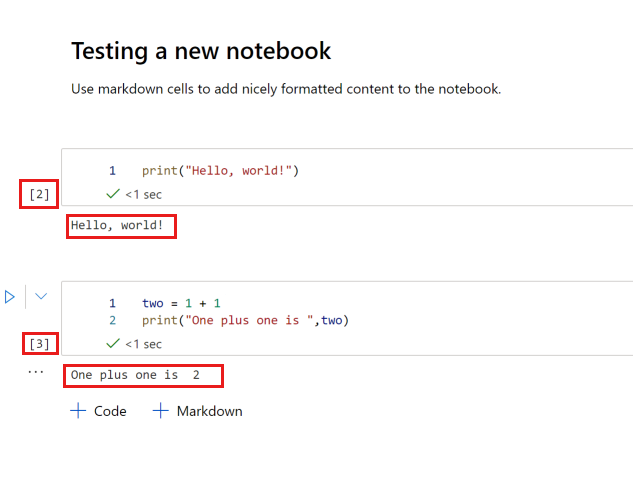
The brackets to the left of the cell now have a number inside. The number represents the order in which cells were run. Since this is the first cell you've run, you'll see
[1]next to the cell. You also see the output of the cell,Hello, world!.Run the cell again. You'll see the same output (since you didn't change the code), but now the brackets contain
[2]. As your notebook gets larger, these numbers help you understand what code was run, and in what order.
Run a second code cell
Add a second code cell:
two = 1 + 1
print("One plus one is ",two)
Run the new cell.
Your notebook now looks like:
See your variables
Use the Variable explorer to see the variables that are defined in your session.
Select the "..." in the notebook toolbar.
Select Variable explorer.
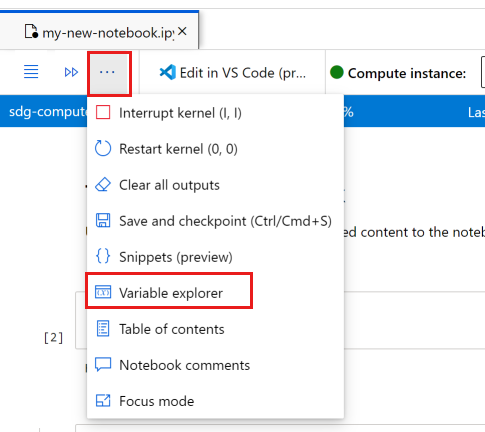 ":::
":::The explorer appears at the bottom. You currently have one variable,
two, assigned.Add another code cell:
three = 1+twoRun this cell to see the variable
threeappear in the variable explorer.
Learn from sample notebooks
There are sample notebooks available in studio to help you learn more about Azure Machine Learning. To find these samples:
Still in the Notebooks section, select Samples at the top.
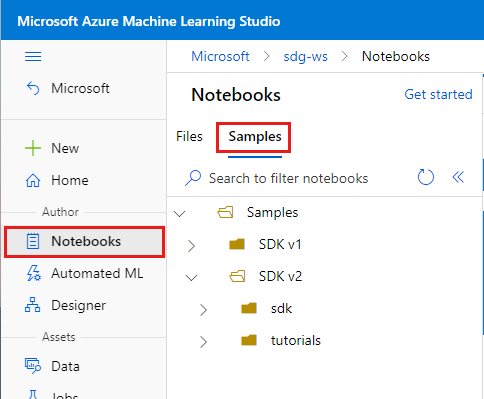
The SDK v1 folder can be used with the previous, v1 version of the SDK. If you're just starting, you won't need these samples.
Use notebooks in the SDK v2 folder for examples that show the current version of the SDK, v2.
Select the notebook SDK v2/tutorials/azureml-in-a-day/azureml-in-a-day.ipynb. You'll see a read-only version of the notebook.
To get your own copy, you can select Clone this notebook. This action will also copy the rest of the folder's content for that notebook. No need to do that now, though, as you're going to instead clone the whole folder.
Clone tutorials folder
You can also clone an entire folder. The tutorials folder is a good place to start learning more about how Azure Machine Learning works.
Open the SDK v2 folder.
Select the "..." at the right of tutorials folder to get the menu, then select Clone.
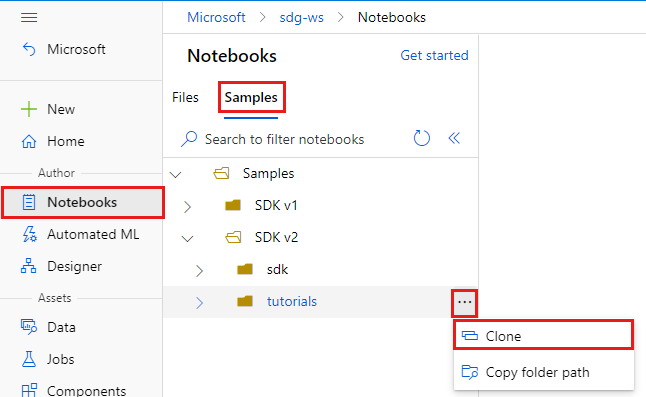
Your new folder is now displayed in the Files section.
Run the notebooks in this folder to learn more about using the Python SDK v2 to train and deploy models.
Clean up resources
If you plan to continue now to the next tutorial, skip to Next steps.
Delete all resources
Important
The resources that you created can be used as prerequisites to other Azure Machine Learning tutorials and how-to articles.
If you don't plan to use any of the resources that you created, delete them so you don't incur any charges:
In the Azure portal, select Resource groups on the far left.
From the list, select the resource group that you created.
Select Delete resource group.
Enter the resource group name. Then select Delete.