Note
Access to this page requires authorization. You can try signing in or changing directories.
Access to this page requires authorization. You can try changing directories.
Tags in Azure Migrate help you add business and operational context to discovered workloads. By creating and managing tags, you can classify, group, and filter workloads based on attributes such as environment, migration intent, department, or ownership. Tagging enables more accurate scoping of assessments, business cases, and reports, and supports effective migration planning across your inventory.
In this article, you learn how to:
- Understand reserved and custom tags in Azure Migrate
- After tags are created, you can modify or delete them later to keep discovered workloads up to date in Azure Migrate.
- Using Azure Migrate tags to scope assessments, business cases, and reports.
Prerequisites
Before you begin
- Ensure that you have an Azure Migrate project with discovery completed using one of the following methods:
- Microsoft Azure Migrate: Server Migration center
- Azure Migrate appliance
- CSV import
- RVTools import
- Verify that at least one workload has been successfully discovered and is visible in the Azure Migrate inventory.
Reserved
Use reserved attributes to define the environment and migration intent for workloads so Azure Migrate can apply the correct sizing logic, pricing model, and prioritization during analysis.
Environment
Use the environment value to classify workloads as Prod, Dev, Test, or UAT. Setting this value allows Azure Migrate to apply appropriate pricing, recommend suitable target SKUs, and prioritize workloads during migration planning.
| Value | Effect on downstream analysis |
|---|---|
| Prod | The workload is right‑sized to General Purpose and Memory Optimized VM series using standard pricing. It's prioritized first during wave planning and is the default when no value is specified. |
| Dev | The workload is assessed for burstable targets (B‑series), in addition to General Purpose and Memory Optimized VM series. Azure costs are estimated using Dev/Test discount pricing. Software license costs are excluded from the ROI calculation in the business case. |
| Test | Same assessment and pricing behavior as Dev. |
| UAT | Same assessment and pricing behavior as Dev. |
Migration intent
The Migration intent attribute indicates the planned outcome for a workload. It classifies workloads into one of the following categories: Migrate, Retain, or Retire.
| Value | Effect on downstream analysis |
|---|---|
| Migrate | The workload is assessed for migration to Azure and included in Azure target sizing, cost estimates, and migration wave plans. This is a default behavior when no value is specified. |
| Retain | The workload remains on-premises and isn't assessed for migration to Azure. It's excluded from Azure target sizing, cost estimates, and migration wave plans. |
| Retire | The workload is decommissioned. Not assessed for migration to Azure. It's excluded from Azure target sizing, cost estimates, and migration wave plans. However, on-premises ESU costs are still modeled, so retiring the workload contributes to on-premises cost reduction in ROI analysis. |
Custom tags
Custom tags are user-defined key-value pairs used to represent organizational attributes. You can define any tag names and values that meet your organization's requirements.
Custom tags appear in the Tags column of the exported All inventory CSV file, with values shown in JSON format.
The following table provides example custom tags for reference only. You can define tags based on your organization's needs.
| Tag name | Example values | Example use case |
|---|---|---|
| Dept | Finance, HR, Engineering | Use tags for chargeback and departmental scoping |
| CostCenter | CC100, CC200 | Support financial reporting and cost |
| AppTier | Web, Database, Middleware | Categorize workloads within an application |
| Owner | John Doe, Team-Infra | Track ownership and accountability |
| Compliance | PCI, HIPAA, SOC2 | Scope resources for compliance |
Custom tags don't affect cost modeling or SKU recommendations. You can use custom tags to:
- Filter and scope assessments or reports using organizational dimensions such as department, cost center, or compliance requirements.
- Analyze ROI for stakeholder-specific proposals.
- Group workloads into applications based on shared tags.
Add tags to workloads
You can add both reserved tags and custom tags to workloads by using one of the following methods:
- The Azure portal
- CSV export and import
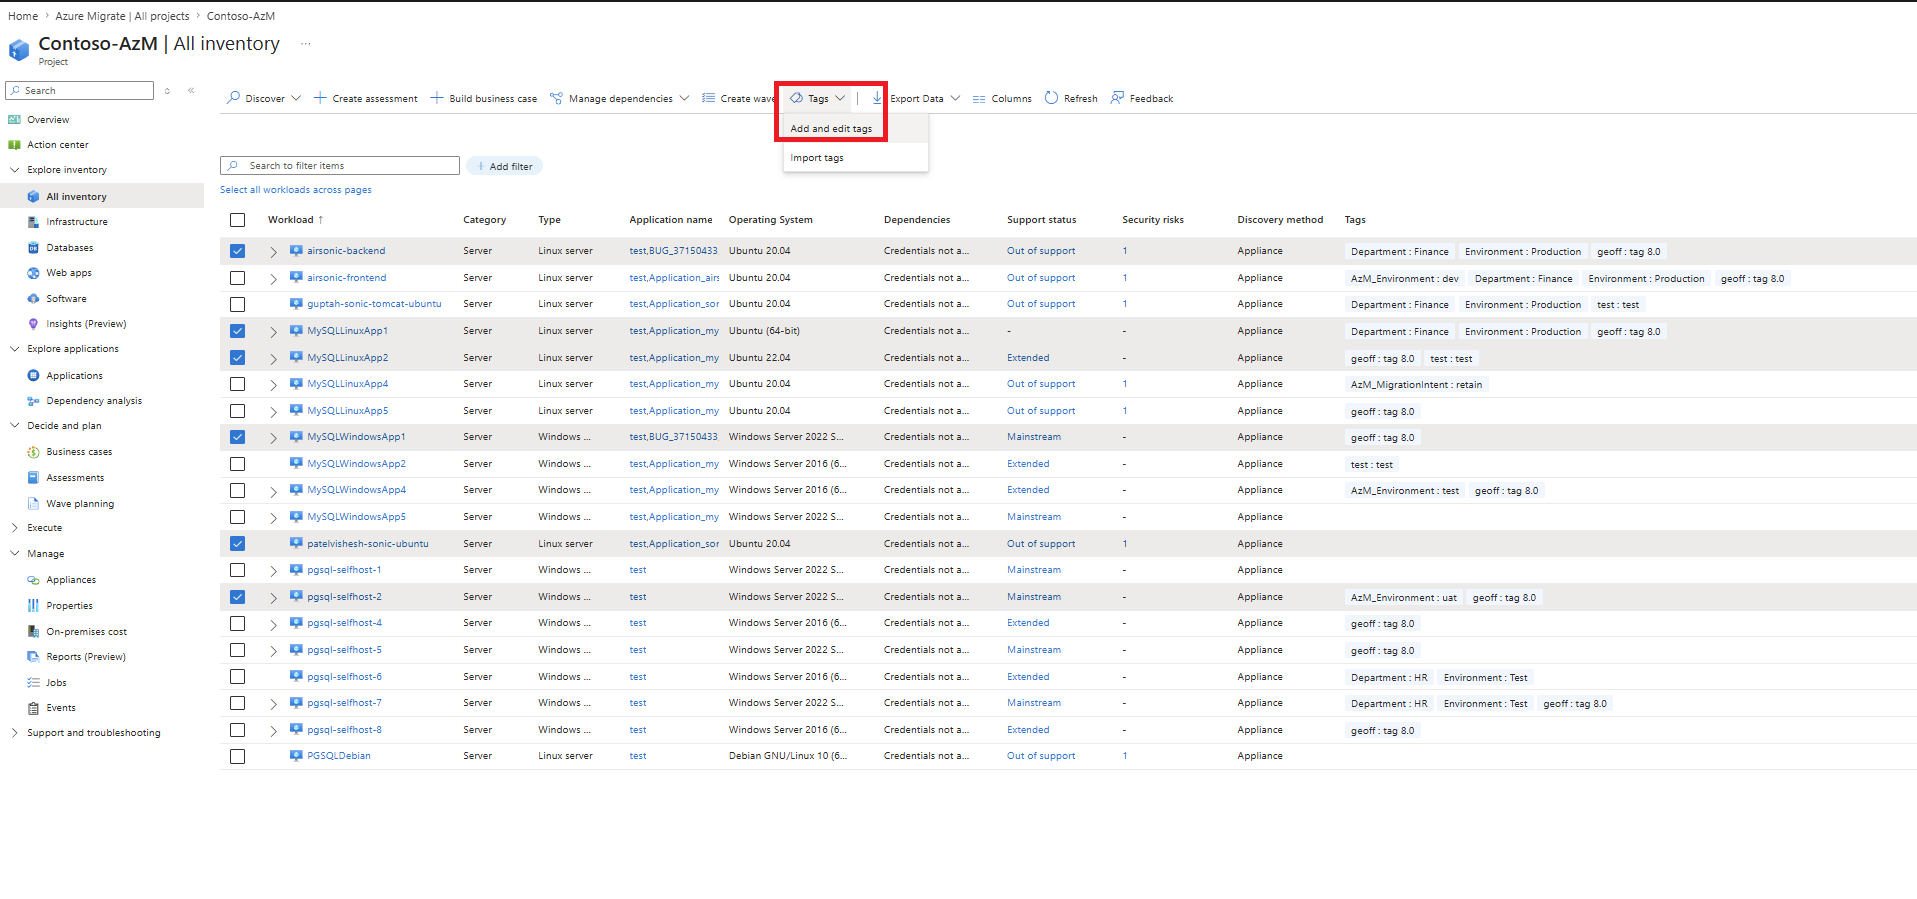
Add tags in the Azure portal
You can use the Azure portal to add reserved and custom tags to discovered workloads directly from the Azure Migrate inventory.
To add tags, follow these steps:
Sign in to the Azure portal.
In the Azure portal, search for Azure Migrate, and then go to Migrate dashboard.
Go to Inventory pane.

Select the workloads that you want to tag.
- Use filters to narrow the list by name, OS type, location, or other attributes.
- Select individual workloads, or select Select all to choose all workloads in the filtered view.
Select Tags and then select Add and Edit tags.
To add an Environment tag, enter:
- Name:
AzM_Environment. - Value:
Prod, Dev, Test, or UAT.

- Name:
To add a Migration intent tag, enter:
-
- Name:
AzM_MigrationIntent. - Value:
Migrate, Retain, or Retire.
- Name:
To add a Custom tag, enter a name and value that match your organizational requirements, for example: Name: Dept, Value: Finance.


Add tags by using CSV export and import
You can use CSV export and import to add or update tags in bulk, which is useful when managing tags for multiple resources at scale.
To add tags, follow these steps:
In the Azure Migrate project, go to the Inventory pane.
Select Export and then select All inventory.
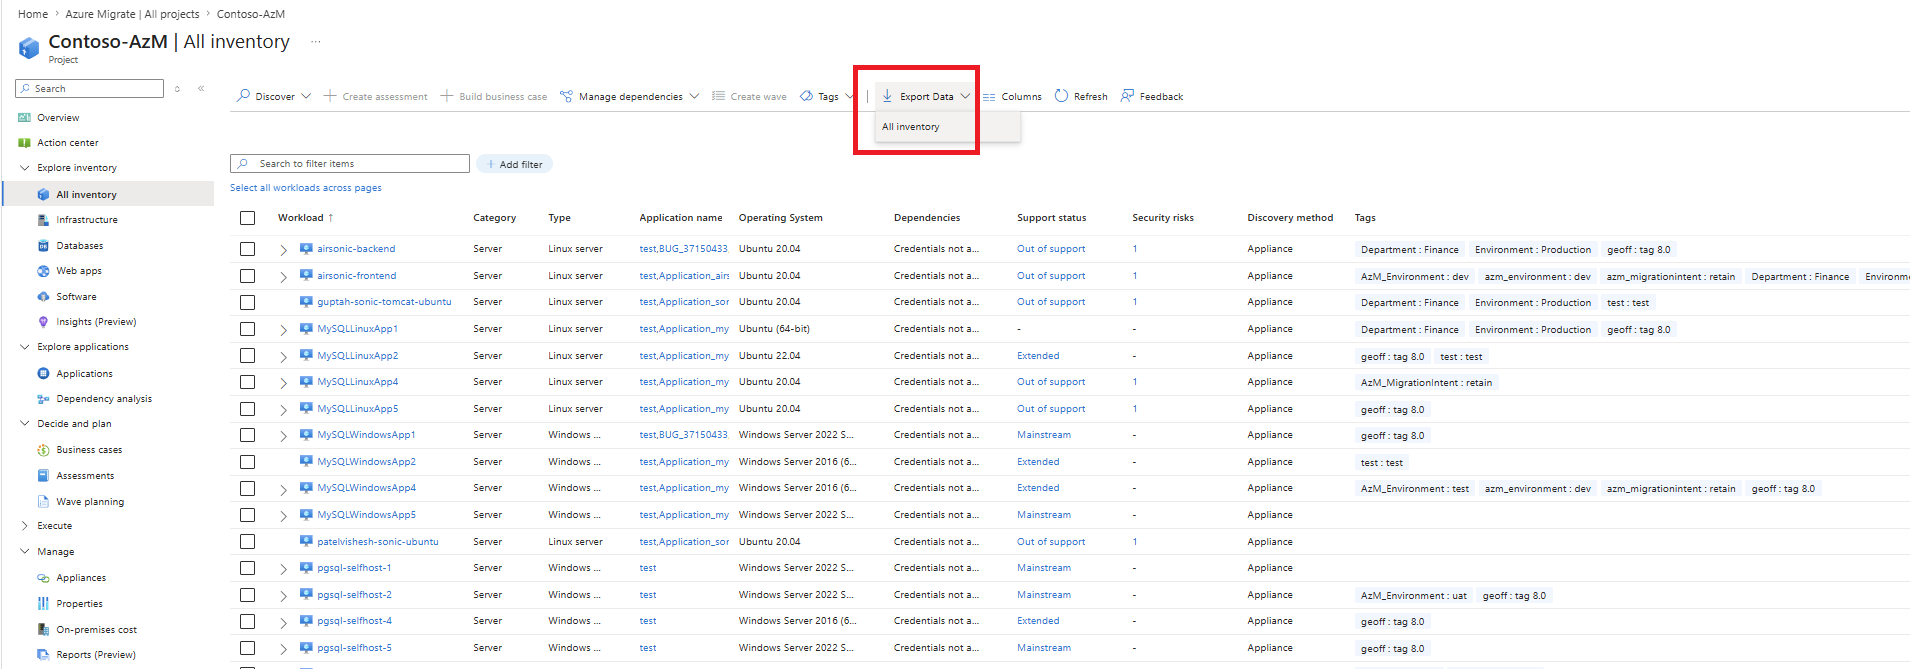
Open the exported CSV file. Each row represents a workload, including servers, SQL instances, and web apps.
Update the required columns in the CSV file:
- Reserved tags: Use the dedicated columns provided in the CSV:
- Environment: Enter Prod, Dev, Test, or UAT.
- Migration Intent: Enter Migrate, Retain, or Retire.
- Custom tags: Use the Tags column and add tags in JSON format.
- Single tag example:
{"Dept":"Finance"} - Multiple tags example:
{"Dept":"Finance","CostCenter":"CC100","Owner":"JohnDoe"} - Adding to existing tags: if the cell already contains
{"Dept":"Finance"}, add the new key-value pair inside the JSON, for example:{"Dept":"Finance","AppTier":"Web"}. You can use any tag names and values.
- Single tag example:
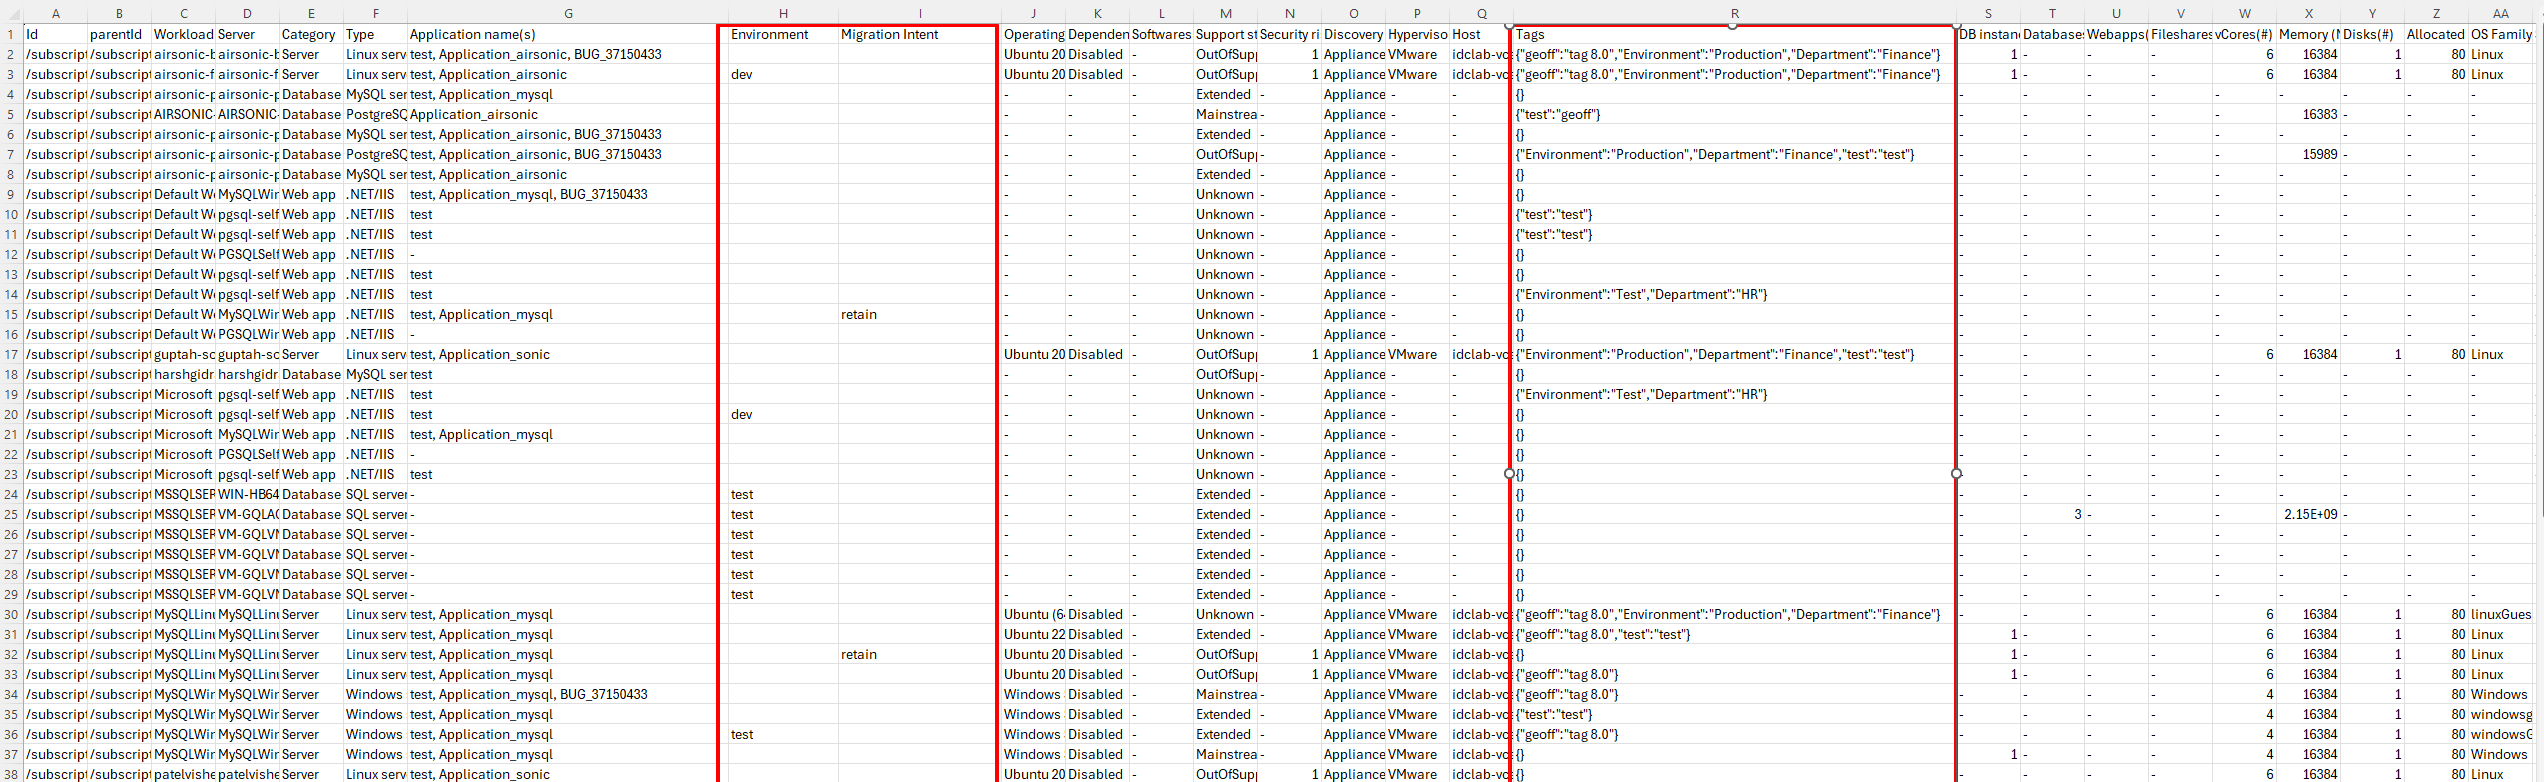
- Reserved tags: Use the dedicated columns provided in the CSV:
Save the file.
In the Azure portal, go to Inventory, select Tags. Select Import tags, and then upload the updated CSV file.
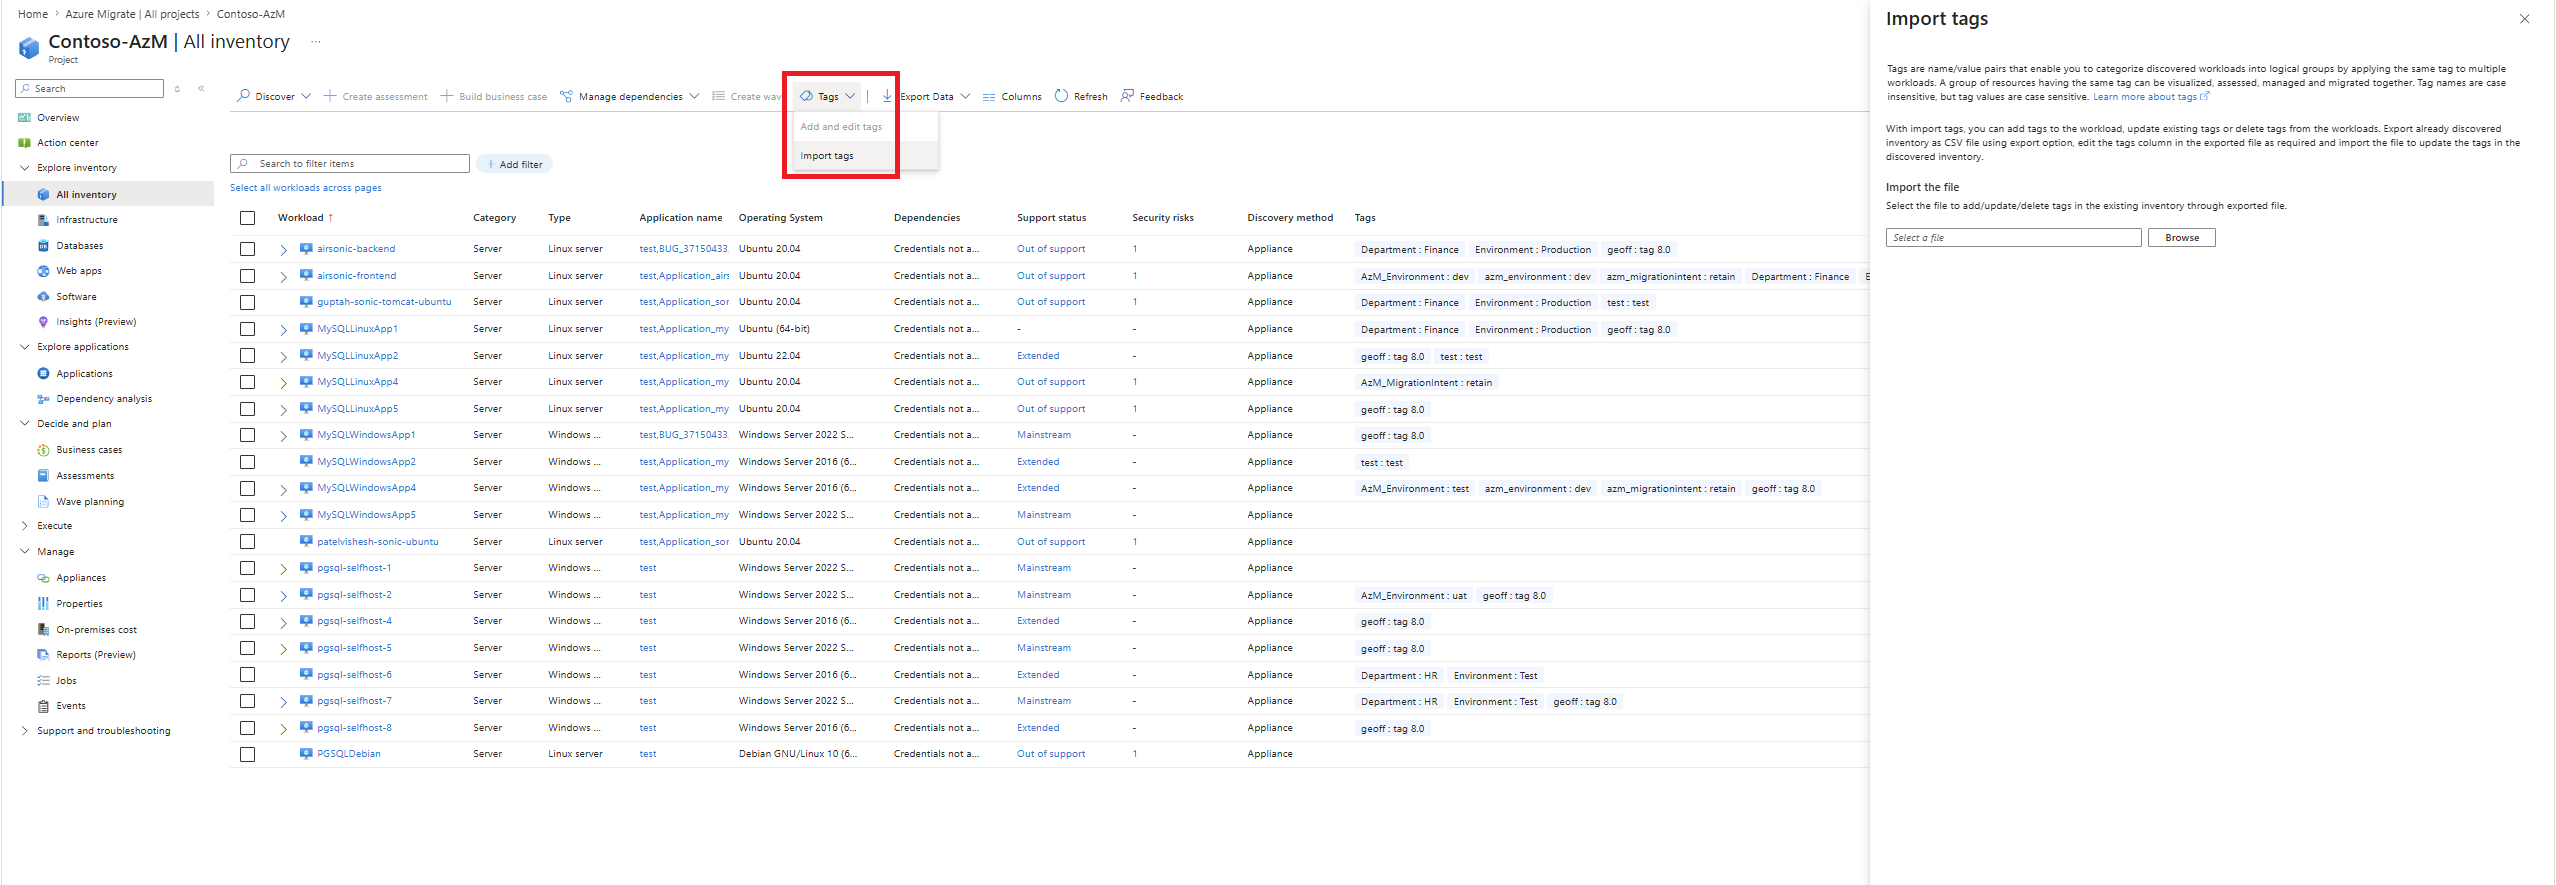


Note
Tag names and values can include alphanumeric and special characters. Use consistent naming across your estate to ensure reliable filtering, for example, always use Dept instead of Department.