Note
Access to this page requires authorization. You can try signing in or changing directories.
Access to this page requires authorization. You can try changing directories.
This quickstart demonstrates how to connect to an Azure Database for MySQL Flexible Server instance using the MySQL Workbench application.
Prerequisites
This quickstart uses the resources created in either of these guides as a starting point:
- Quickstart: Create an instance of Azure Database for MySQL with the Azure portal
- Quickstart: Create an instance of Azure Database for MySQL - Flexible Server by using the Azure CLI
Prepare your client workstation
- If you created your flexible server with Private access (virtual network integration), you need to connect to your server from a resource within the same virtual network as your server. You can create a virtual machine and add it to the virtual network created with your flexible server. Refer to Create and manage virtual networks for Azure Database for MySQL - Flexible Server using the Azure CLI.
- If you created your flexible server with Public access (allowed IP addresses), you can add your local IP address to the list of firewall rules on your server. Refer to Manage firewall rules for Azure Database for MySQL - Flexible Server using Azure CLI.
- Download and install MySQL Workbench on your computer from the MySQL website.
Get connection information
Get the connection information needed to connect to the flexible server. You need the fully qualified server name and sign in credentials.
- Sign in to the Azure portal.
- From the left-hand menu in Azure portal, select All resources, and then search for the server you created (such as mydemoserver).
- Select the server name.
- From the server's Overview panel, make a note of the Server name and Server admin login name. If you forget your password, you can also reset the password from this panel.
Connect to the server using MySQL Workbench
To connect to Azure Database for MySQL Flexible Server using MySQL Workbench:
Launch the MySQL Workbench application on your computer.
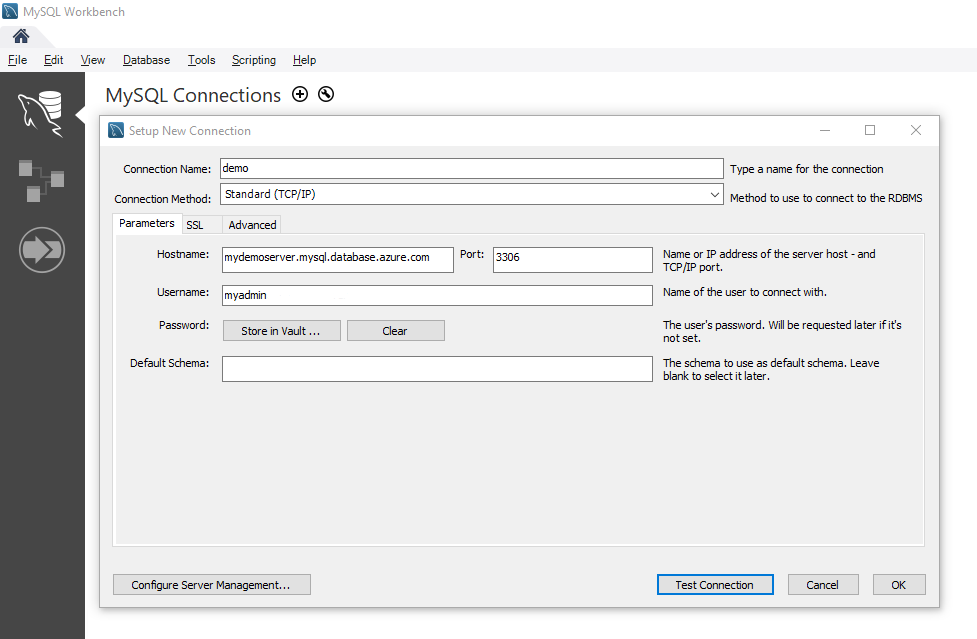
In Setup New Connection dialog box, enter the following information on the Parameters tab:
Parameters Suggested value Field description Connection Name Demo Connection Specify a label for this connection. Connection Method Standard (TCP/IP) Standard (TCP/IP) is sufficient. Hostname server name Specify the server name value that was used when you created the Azure Database for MySQL earlier. Our example server shown is mydemoserver.mysql.database.chinacloudapi.cn. Use the fully qualified domain name (*.mysql.database.chinacloudapi.cn) as shown in the example. Follow the steps in the previous section to get the connection information if you don't remember your server name. Port 3306 Always use port 3306 when connecting to Azure Database for MySQL. Username server admin login name Type in the server admin login username supplied when you created the Azure Database for MySQL earlier. Our example username is myadmin. Follow the steps in the previous section to get the connection information if you don't remember the username. Password your password Select Store in Vault... button to save the password. Select Test Connection to test if all parameters are correctly configured.
Select OK to save the connection.
In the listing of MySQL Connections, select the tile corresponding to your server, and then wait for the connection to be established.
A new SQL tab opens with a blank editor where you can type your queries.
Note
Encrypted connection using TLS 1.2 is required and enforced on your Azure Database for MySQL Flexible Server instance. Although typically no extra configuration with TLS/SSL certificates is required for MySQL Workbench to connect to your server, we recommend binding the TLS/SSL CA certification with MySQL Workbench. For more information, see connect using TLS/SSL
Create a table, insert data, read data, update data, delete data
Copy and paste the sample SQL code into a blank SQL tab to illustrate some sample data.
This code creates an empty database named
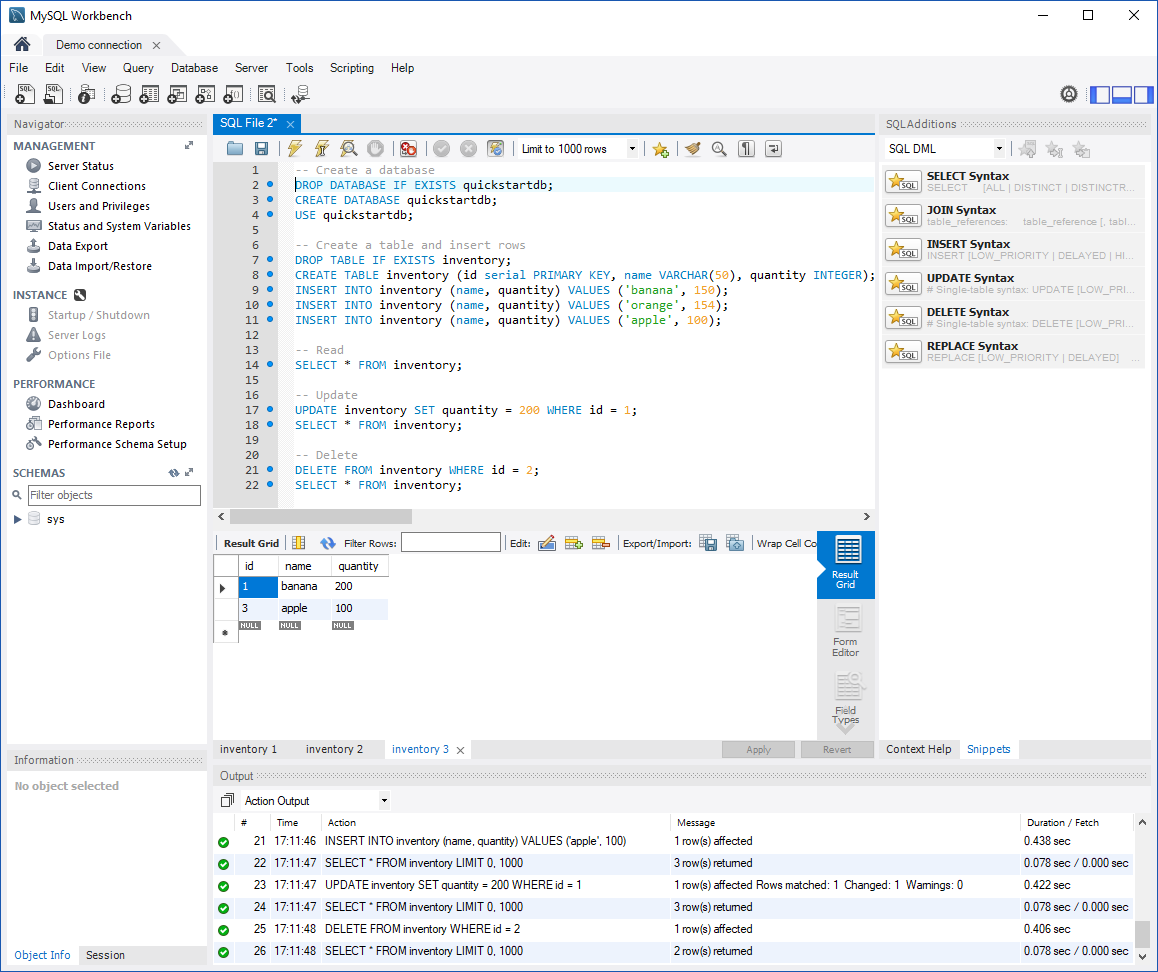
quickstartdb, and then creates a sample table named inventory. It inserts some rows, then reads the rows. It changes the data with an update statement, and reads the rows again. Finally it deletes a row, and then reads the rows again.-- Create a database -- DROP DATABASE IF EXISTS quickstartdb; CREATE DATABASE quickstartdb; USE quickstartdb; GO -- Create a table and insert rows DROP TABLE IF EXISTS inventory; CREATE TABLE inventory ( id serial PRIMARY KEY, name VARCHAR (50), quantity INT ); INSERT INTO inventory (name, quantity) VALUES ('banana', 150); INSERT INTO inventory (name, quantity) VALUES ('orange', 154); INSERT INTO inventory (name, quantity) VALUES ('apple', 100); -- Read SELECT * FROM inventory; -- Update UPDATE inventory SET quantity = 200 WHERE id = 1; SELECT * FROM inventory; -- Delete DELETE FROM inventory WHERE id = 2; SELECT * FROM inventory;The screenshot shows an example of the SQL code in SQL Workbench and the output.
To run the sample SQL Code, select the lightning bolt icon in the toolbar of the SQL File tab.
Notice the three tabbed results in the Result Grid section in the middle of the page.
Notice the Output list at the bottom of the page. The status of each command is shown.
Related content
- Connect to Azure Database for MySQL - Flexible Server with encrypted connections
- Connectivity and networking concepts for Azure Database for MySQL - Flexible Server
- Manage firewall rules for Azure Database for MySQL - Flexible Server using the Azure portal
- Create and manage virtual networks for Azure Database for MySQL - Flexible Server using the Azure portal

