Note
Access to this page requires authorization. You can try signing in or changing directories.
Access to this page requires authorization. You can try changing directories.
In this quickstart, you connect to an Azure Database for PostgreSQL flexible server instance by using Python. You then use SQL statements to query, insert, update, and delete data in the database from macOS, Ubuntu Linux, and Windows platforms.
The steps in this article include two authentication methods: Microsoft Entra authentication and PostgreSQL authentication. The Passwordless tab shows the Microsoft Entra authentication and the Password tab shows the PostgreSQL authentication.
Microsoft Entra authentication is a mechanism for connecting to Azure Database for PostgreSQL using identities defined in Microsoft Entra ID. With Microsoft Entra authentication, you can manage database user identities and other Microsoft services in a central location, which simplifies permission management. To learn more, see Microsoft Entra authentication with Azure Database for PostgreSQL.
PostgreSQL authentication uses accounts stored in PostgreSQL. If you choose to use passwords as credentials for the accounts, these credentials are stored in the user table. Because these passwords are stored in PostgreSQL, you need to manage the rotation of the passwords by yourself.
This article assumes that you're familiar with developing using Python, but you're new to working with Azure Database for PostgreSQL.
Prerequisites
- An Azure account with an active subscription. Create an account for trial.
- An Azure Database for PostgreSQL flexible server instance. To create Azure Database for PostgreSQL flexible server instance, refer to Create an Azure Database for PostgreSQL.
- Python 3.8+.
- Latest pip package installer.
Add firewall rules for your client workstation
- If you created your Azure Database for PostgreSQL flexible server instance with Private access (virtual network Integration), you need to connect to your server from a resource within the same virtual network as your server. You can create a virtual machine and add it to the virtual network created with your Azure Database for PostgreSQL flexible server instance. Refer to Networking.
- If you created your Azure Database for PostgreSQL flexible server instance with Public access (allowed IP addresses), you can add your local IP address to the list of firewall rules on your server. Refer to Networking.
Configure Microsoft Entra integration on the server (passwordless only)
If you're following the steps for passwordless authentication, Microsoft Entra authentication must be configured for your server instance, and you must be assigned as a Microsoft Entra administrator on the server instance. Follow the steps in Configure Microsoft Entra integration to ensure that Microsoft Entra authentication is configured and that you're assigned as a Microsoft Entra administrator on your server instance.
Prepare your development environment
Change to a folder where you want to run the code and create and activate a virtual environment. A virtual environment is a self-contained directory for a particular version of Python plus the other packages needed for that application.
Run the following commands to create and activate a virtual environment:
py -3 -m venv .venv
.venv\Scripts\activate
Install the Python libraries
Install the Python libraries needed to run the code examples.
Install the azure-identity library, which provides Microsoft Entra token authentication support across the Azure SDK.
# Use the interpreter-bound pip to ensure installs go into the active venv/interpreter
python -m pip install --upgrade pip
python -m pip install azure-identity azure-keyvault-secrets
Add authentication code
In this section, you add authentication code to your working directory and perform any additional steps required for authentication and authorization with your server instance.
Before you add the authentication code, make sure the required packages for each example are installed.
Required packages (examples in this article):
- Passwordless example:
azure-identity,azure-keyvault-secrets(if you use Key Vault) - Password example:
psycopg(recommended:python -m pip install "psycopg[binary]")
Optional: create a requirements.txt with these entries and install with python -m pip install -r requirements.txt for reproducible installs.
Copy the following code into an editor and save it in a file named get_conn.py.
import urllib.parse
import os

from azure.identity import DefaultAzureCredential

# IMPORTANT! This code is for demonstration purposes only. It's not suitable for use in production.
# For example, tokens issued by Microsoft Entra ID have a limited lifetime (24 hours by default).
# In production code, you need to implement a token refresh policy.

def get_connection_uri():

    # Read URI parameters from the environment
    dbhost = os.environ['DBHOST']
    dbname = os.environ['DBNAME']
    dbuser = urllib.parse.quote(os.environ['DBUSER'])
    sslmode = os.environ['SSLMODE']

    # Use passwordless authentication via DefaultAzureCredential.
    # IMPORTANT! This code is for demonstration purposes only. DefaultAzureCredential() is invoked on every call.
    # In practice, it's better to persist the credential across calls and reuse it so you can take advantage of token
    # caching and minimize round trips to the identity provider. To learn more, see:
    # https://github.com/Azure/azure-sdk-for-python/blob/main/sdk/identity/azure-identity/TOKEN_CACHING.md
    credential = DefaultAzureCredential()

    # Call get_token() to get a token from Microsft Entra ID and add it as the password in the URI.
    # Note the requested scope parameter in the call to get_token, "https://ossrdbms-aad.database.chinacloudapi.cn/.default".
    password = credential.get_token("https://ossrdbms-aad.database.chinacloudapi.cn/.default").token

    db_uri = f"postgresql://{dbuser}:{password}@{dbhost}/{dbname}?sslmode={sslmode}"
    return db_uri
Get database connection information.
- In the Azure portal, search for and select your Azure Database for PostgreSQL flexible server instance name.
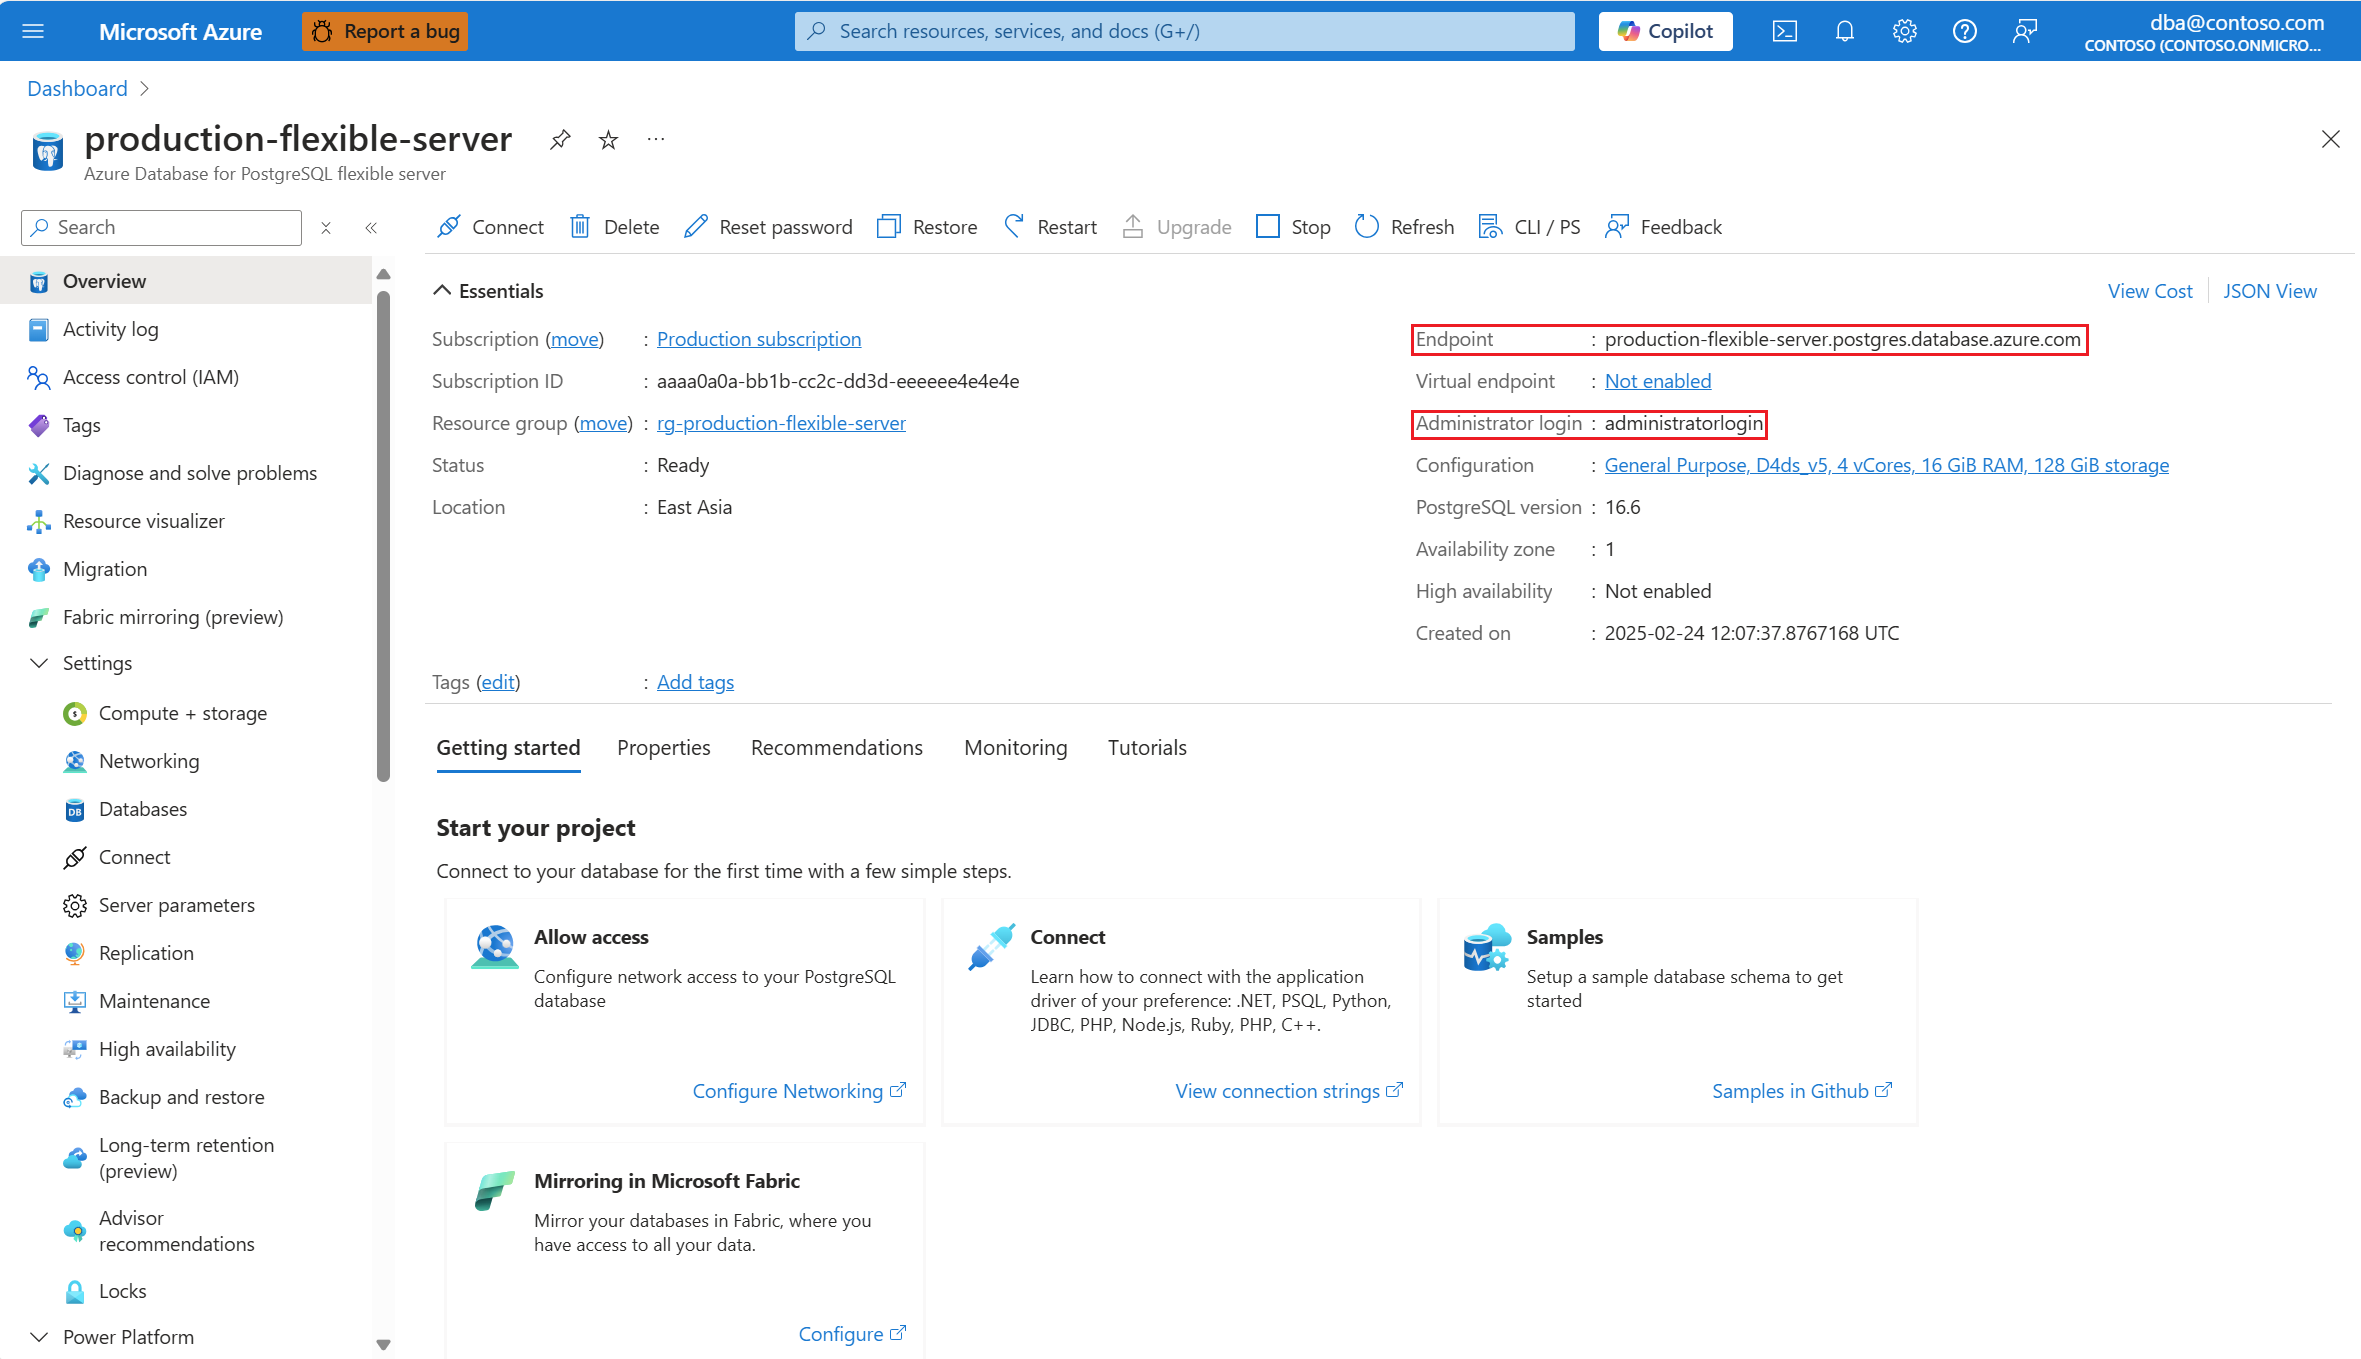
- On the server's Overview page, copy the fully qualified Server name. The fully qualified Server name is always of the form <my-server-name>.postgres.database.chinacloudapi.cn.
- On the left menu, under Security, select Authentication. Make sure your account is listed under Microsoft Entra Admins. If it isn't, complete the steps in Configure Microsoft Entra integration on the server (passwordless only).
Set environment variables for the connection URI elements:
set DBHOST=<server-name> set DBNAME=<database-name> set DBUSER=<username> set SSLMODE=requireSign in to Azure on your workstation. You can sign in using the Azure CLI, or Azure PowerShell.
The authentication code uses
DefaultAzureCredentialto authenticate with Microsoft Entra ID and get a token that authorizes you to perform operations on your server instance.DefaultAzureCredentialsupports a chain of authentication credential types. Among the credentials supported are credentials that you're signed in to developer tools with like the Azure CLI, or Azure PowerShell.
How to run the Python examples
For each code example in this article:
Create a new file in a text editor.
Add the code example to the file.
Save the file in your project folder with a .py extension, such as postgres-insert.py. For Windows, make sure UTF-8 encoding is selected when you save the file.
In your project folder type
pythonfollowed by the filename, for examplepython postgres-insert.py.
Create a table and insert data
The following code example connects to your Azure Database for PostgreSQL flexible server database using the psycopg.connect function, and loads data with a SQL INSERT statement. The cursor.execute function executes the SQL query against the database.
import psycopg
from get_conn import get_connection_uri

conn_string = get_connection_uri()

conn = psycopg.connect(conn_string)
print("Connection established")
cursor = conn.cursor()

# Drop previous table of same name if one exists
cursor.execute("DROP TABLE IF EXISTS inventory;")
print("Finished dropping table (if existed)")

# Create a table
cursor.execute("CREATE TABLE inventory (id serial PRIMARY KEY, name VARCHAR(50), quantity INTEGER);")
print("Finished creating table")

# Insert some data into the table
cursor.execute("INSERT INTO inventory (name, quantity) VALUES (%s, %s);", ("banana", 150))
cursor.execute("INSERT INTO inventory (name, quantity) VALUES (%s, %s);", ("orange", 154))
cursor.execute("INSERT INTO inventory (name, quantity) VALUES (%s, %s);", ("apple", 100))
print("Inserted 3 rows of data")

# Clean up
conn.commit()
cursor.close()
conn.close()
When the code runs successfully, it produces the following output:
Connection established
Finished dropping table (if existed)
Finished creating table
Inserted 3 rows of data
Read data
The following code example connects to your Azure Database for PostgreSQL flexible server database and uses cursor.execute with the SQL SELECT statement to read data. This function accepts a query and returns a result set to iterate over by using cursor.fetchall().
import psycopg
from get_conn import get_connection_uri

conn_string = get_connection_uri()

conn = psycopg.connect(conn_string)
print("Connection established")
cursor = conn.cursor()

# Fetch all rows from table
cursor.execute("SELECT * FROM inventory;")
rows = cursor.fetchall()

# Print all rows
for row in rows:
    print("Data row = (%s, %s, %s)" %(str(row[0]), str(row[1]), str(row[2])))

# Cleanup
conn.commit()
cursor.close()
conn.close()
When the code runs successfully, it produces the following output:
Connection established
Data row = (1, banana, 150)
Data row = (2, orange, 154)
Data row = (3, apple, 100)
Update data
The following code example connects to your Azure Database for PostgreSQL flexible server database and uses cursor.execute with the SQL UPDATE statement to update data.
import psycopg
from get_conn import get_connection_uri

conn_string = get_connection_uri()

conn = psycopg.connect(conn_string)
print("Connection established")
cursor = conn.cursor()

# Update a data row in the table
cursor.execute("UPDATE inventory SET quantity = %s WHERE name = %s;", (200, "banana"))
print("Updated 1 row of data")

# Cleanup
conn.commit()
cursor.close()
conn.close()
Delete data
The following code example connects to your Azure Database for PostgreSQL flexible server database and uses cursor.execute with the SQL DELETE statement to delete an inventory item that you previously inserted.
import psycopg
from get_conn import get_connection_uri

conn_string = get_connection_uri()

conn = psycopg.connect(conn_string)
print("Connection established")
cursor = conn.cursor()

# Delete data row from table
cursor.execute("DELETE FROM inventory WHERE name = %s;", ("orange",))
print("Deleted 1 row of data")

# Cleanup
conn.commit()
cursor.close()
conn.close()
Related content
- Quickstart: Use Java and JDBC with Azure Database for PostgreSQL
- Quickstart: Use .NET (C#) to connect and query data in Azure Database for PostgreSQL
- Quickstart: Use Go language to connect and query data in Azure Database for PostgreSQL
- Quickstart: Use PHP to connect and query data in Azure Database for PostgreSQL
- Quickstart: Connect and query with Azure CLI with Azure Database for PostgreSQL
- Quickstart: Import data from Azure Database for PostgreSQL in Power BI


